

Washing Machine Cleaning DIY: Is your washing machine starting to smell a little… funky? Or maybe you’ve noticed some residue clinging to your freshly laundered clothes? Don’t worry, you’re not alone! We often forget that our trusty washing machines, the very things that keep our clothes clean, need a good cleaning themselves.
For generations, keeping clothes clean was a laborious task, often involving harsh chemicals and back-breaking work. While we’ve come a long way with modern appliances, the need to maintain them persists. Think of it this way: even the most advanced technology requires a little TLC to function at its best. And that’s where this Washing Machine Cleaning DIY guide comes in!
Let’s face it, nobody wants to spend their precious free time scrubbing away at a smelly washing machine. But neglecting this essential chore can lead to reduced cleaning performance, unpleasant odors, and even costly repairs down the line. I’m here to show you some simple, effective, and often surprisingly inexpensive DIY tricks to keep your washing machine sparkling clean and running smoothly. Get ready to say goodbye to lingering smells and hello to fresh, clean laundry, all thanks to a little DIY magic!
DIY Deep Clean: Revive Your Washing Machine!
Okay, let’s face it, we all rely on our washing machines to keep our clothes sparkling clean, but how often do we actually think about cleaning the *machine* itself? Over time, detergent residue, fabric softener buildup, and even mold can accumulate, leading to funky smells and less-than-stellar cleaning performance. But don’t worry, I’m here to guide you through a simple, effective DIY deep clean that will have your washing machine running like new!
What You’ll Need:
Before we dive in, let’s gather our supplies. The best part? You probably already have most of these lying around the house!
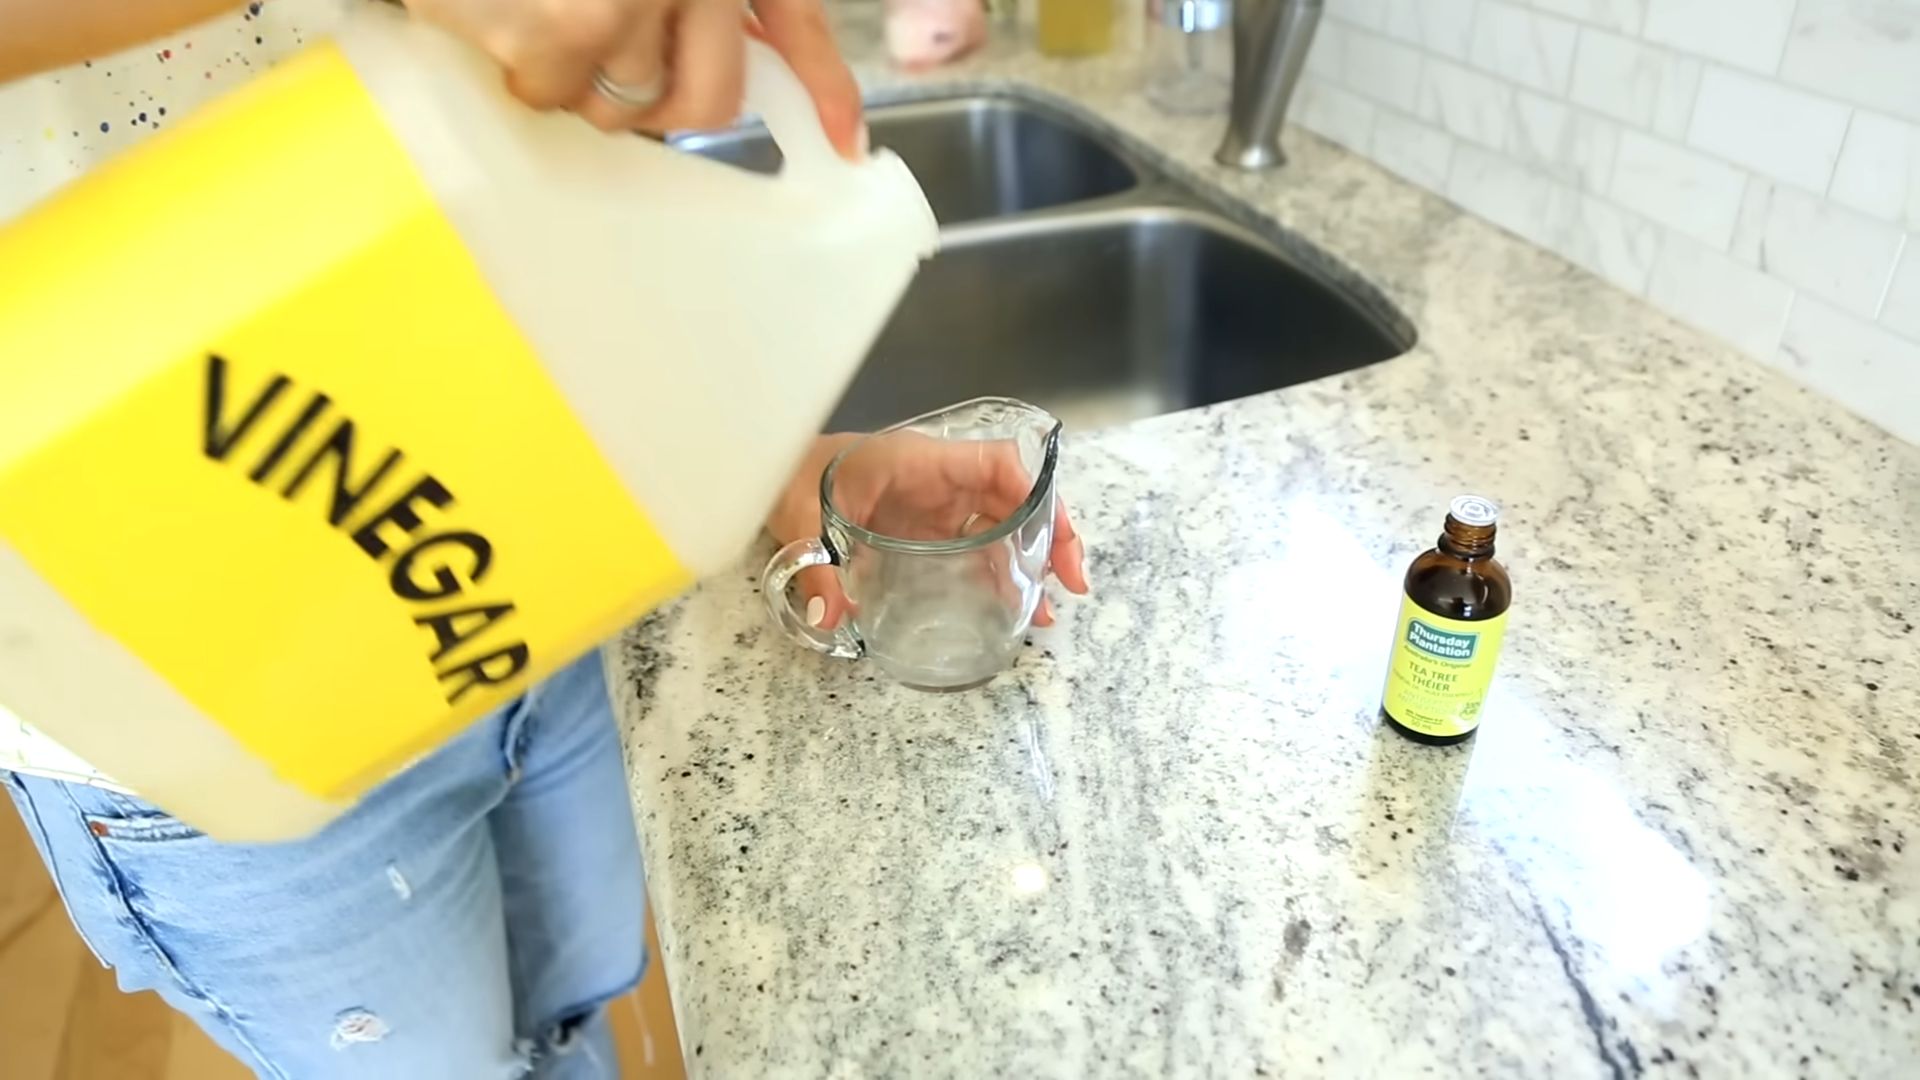
* White Vinegar: This is our star ingredient! Vinegar is a natural disinfectant and deodorizer, perfect for breaking down residue and killing mold.
* Baking Soda: Another cleaning powerhouse! Baking soda helps to scrub away grime and neutralize odors.
* Bleach (Optional): If you’re dealing with stubborn mold or mildew, bleach can be a powerful ally. However, use it sparingly and only if your washing machine manufacturer recommends it. Never mix bleach with vinegar!
* Old Toothbrush or Scrub Brush: For scrubbing those hard-to-reach areas.
* Microfiber Cloths or Sponges: For wiping down surfaces.
* Rubber Gloves: To protect your hands.
* Spray Bottle: For easy application of cleaning solutions.
* Screwdriver (Possibly): Depending on your washing machine model, you might need a screwdriver to access the drain pump filter.
* Small Bowl or Container: To catch any water when cleaning the drain pump filter.
Step-by-Step Cleaning Guide:
Alright, let’s get down to business! I’ve broken down the cleaning process into manageable steps to make it super easy to follow.
1. The Vinegar Wash (First Cycle)
This is where we start to loosen up all the gunk and grime that’s been building up inside your washing machine.
1. Empty the Washing Machine: Make sure there are no clothes or other items inside.
2. Pour in the Vinegar: Add 2-4 cups of white vinegar directly into the washing machine drum. The amount depends on the size of your machine and how dirty it is. If it’s been a while since your last cleaning, go for the full 4 cups.
3. Run a Hot Water Cycle: Set your washing machine to the hottest water setting and the largest load size. Choose a normal or heavy-duty cycle.
4. Let it Run: Allow the entire cycle to complete. The hot water and vinegar will work together to loosen and dissolve residue.
2. The Baking Soda Scrub (Second Cycle)
Now that we’ve loosened everything up, it’s time to give the washing machine a good scrub!
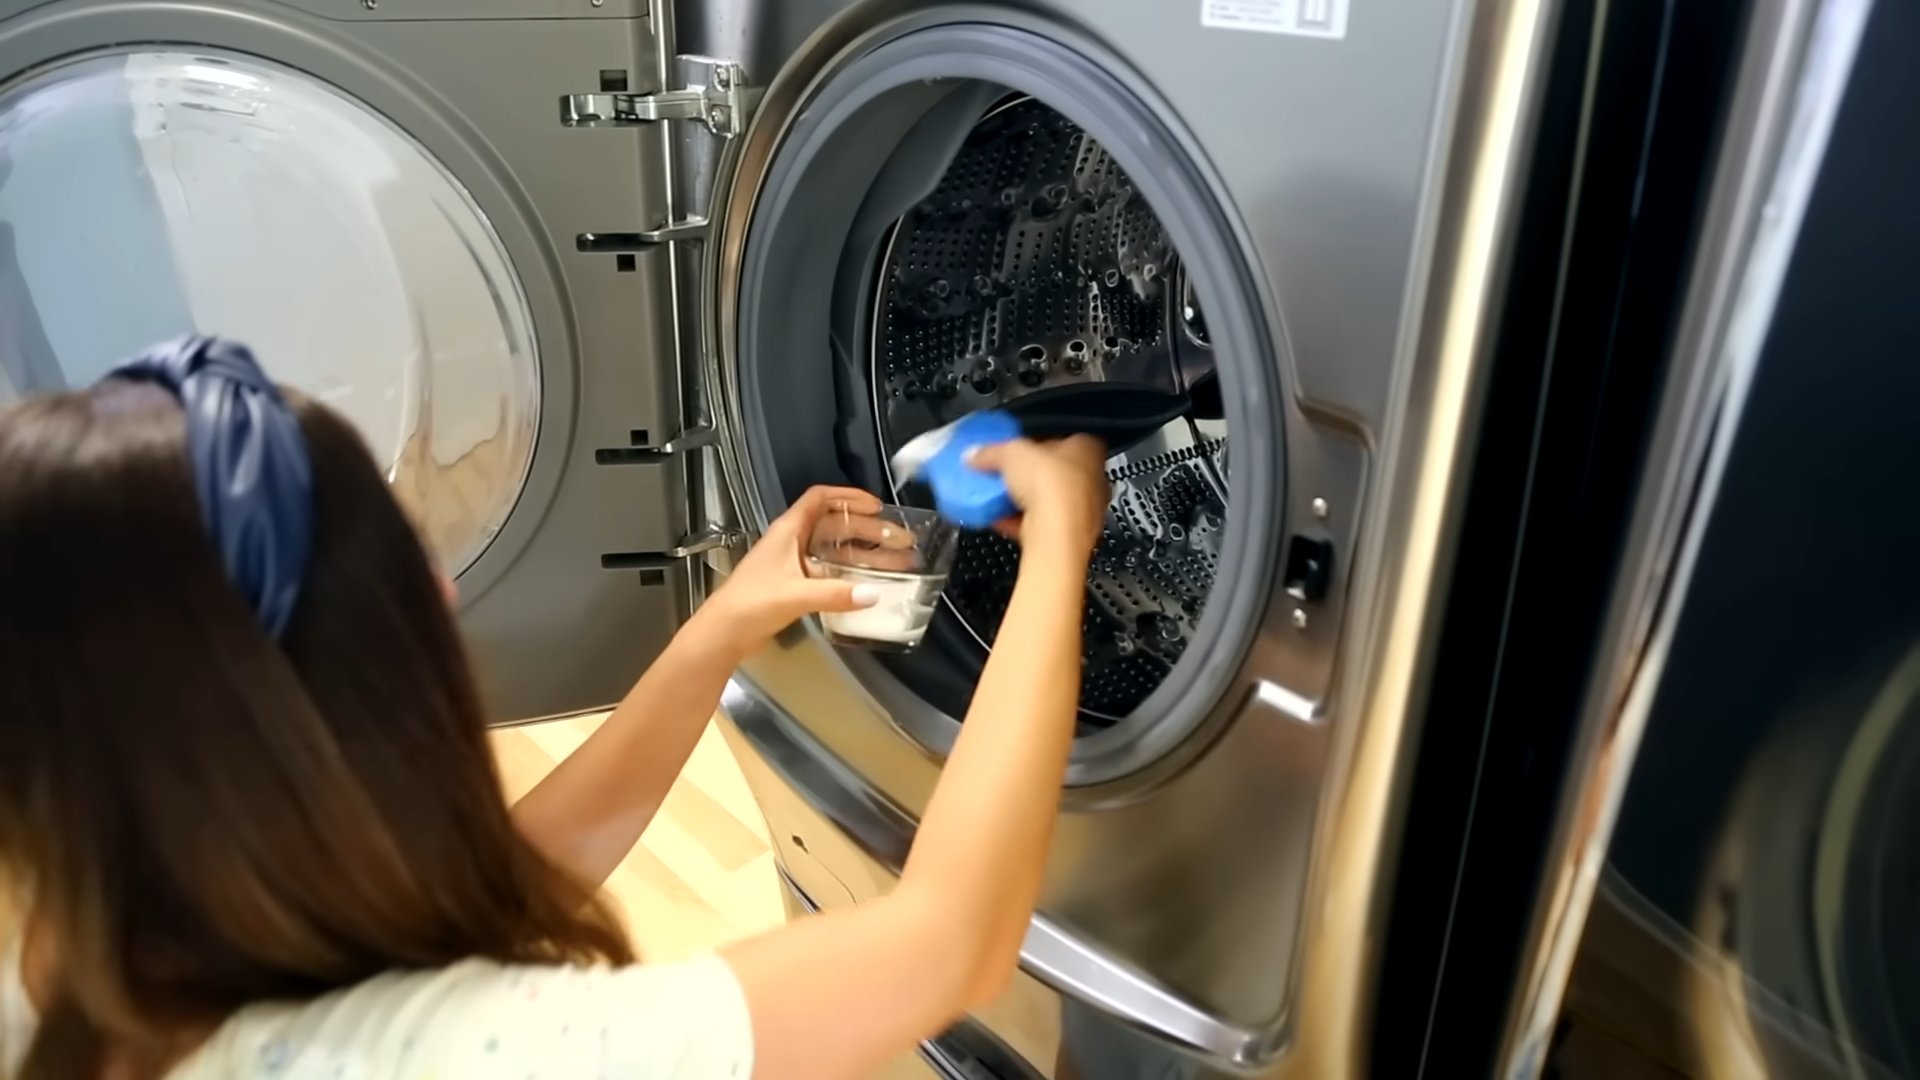
1. Add Baking Soda: After the vinegar cycle is complete, sprinkle about 1/2 cup of baking soda directly into the drum.
2. Run Another Hot Water Cycle: Again, set your washing machine to the hottest water setting and the largest load size. Choose a normal or heavy-duty cycle.
3. Let it Run: Allow the entire cycle to complete. The baking soda will help to scrub away any remaining grime and neutralize odors.
3. Cleaning the Detergent Dispenser
The detergent dispenser is a prime spot for buildup, so let’s give it some attention.
1. Remove the Dispenser: Most detergent dispensers are removable. Check your washing machine’s manual for specific instructions on how to remove yours.
2. Soak in Hot, Soapy Water: Fill a sink or bucket with hot water and add a squirt of dish soap. Submerge the dispenser and let it soak for at least 30 minutes.
3. Scrub Away Residue: Use an old toothbrush or scrub brush to scrub away any remaining detergent residue. Pay close attention to the corners and crevices.
4. Rinse Thoroughly: Rinse the dispenser thoroughly with clean water to remove all traces of soap.
5. Dry and Reinstall: Dry the dispenser completely before reinstalling it in your washing machine.
4. Cleaning the Rubber Gasket (Front Loaders Only)
If you have a front-loading washing machine, the rubber gasket around the door is a notorious spot for mold and mildew. Let’s tackle that!
1. Inspect the Gasket: Carefully inspect the rubber gasket for any signs of mold or mildew.
2. Spray with Vinegar Solution: In a spray bottle, mix equal parts white vinegar and water. Spray the solution liberally onto the gasket, paying close attention to any areas with mold or mildew.
3. Let it Sit: Allow the vinegar solution to sit on the gasket for at least 30 minutes. This will give it time to kill any mold or mildew.
4. Scrub with a Brush: Use an old toothbrush or scrub brush to scrub away any remaining mold or mildew.
5. Wipe Clean: Wipe the gasket clean with a microfiber cloth or sponge.
6. Dry Thoroughly: Dry the gasket thoroughly with a clean cloth. Leaving it damp can encourage mold growth.
7. Leave the Door Ajar: After cleaning, leave the washing machine door ajar to allow air to circulate and prevent moisture buildup.
5. Cleaning the Exterior
Don’t forget about the outside of your washing machine!
1. Wipe Down Surfaces: Use a damp microfiber cloth to wipe down all exterior surfaces of your washing machine.
2. Clean the Control Panel: Pay special attention to the control panel, as it can accumulate dust and grime.
3. Dry Thoroughly: Dry all surfaces with a clean cloth.
6. Cleaning the Drain Pump Filter
This is a crucial step that often gets overlooked! The drain pump filter catches lint, debris, and even small objects that can clog the drain and affect your washing machine’s performance.
1. Locate the Drain Pump Filter: The location of the drain pump filter varies depending on your washing machine model. Consult your owner’s manual for specific instructions. It’s usually located at the bottom front of the machine, behind a small access panel.
2. Prepare for Water: Place a small bowl or container under the access panel to catch any water that may spill out when you remove the filter.
3. Open the Access Panel: Use a screwdriver (if necessary) to open the access panel.
4. Remove the Filter: Carefully unscrew and remove the drain pump filter. Be prepared for some water to come out.
5. Clean the Filter: Remove any lint, debris, or objects from the filter. Rinse it thoroughly with clean water.
6. Inspect the Filter Housing: While the filter is removed, inspect the filter housing for any debris. You can use a small brush or your fingers to remove any blockages.
7. Reinstall the Filter: Reinstall the drain pump filter, making sure it’s securely tightened.
8. Close the Access Panel: Close the access panel and secure it with a screwdriver (if necessary).
7. The Bleach Wash (Optional – Use with Caution!)
If you’re dealing with persistent mold or mildew, you can use bleach for an extra-deep clean. Remember, never mix bleach with vinegar!
1. Ensure Compatibility: Check your washing machine’s manual to ensure that it’s safe to use bleach.
2. Add Bleach: Pour 1/2 to 1 cup of bleach into the bleach dispenser (if your machine has one) or directly into the drum.
3. Run a Hot Water Cycle: Set your washing machine to the hottest water setting and the largest load size. Choose a normal or heavy-duty cycle.
4. Let it Run: Allow the entire cycle to complete.
5. Run a Rinse Cycle: After the bleach cycle is complete, run an extra rinse cycle to remove any remaining bleach residue.
Tips for Maintaining a Clean Washing Machine:
Now that you’ve given your washing machine a thorough cleaning, here are a few tips to help keep it clean and fresh in the future:
* Use the Right Amount of Detergent: Using too much detergent can lead to buildup. Follow the manufacturer’s instructions on the detergent packaging.
* Use HE Detergent (for HE Machines): If you have a high-efficiency (HE) washing machine, be sure to use HE detergent. Regular detergent can create too many suds and cause problems.
* Leave the Door Ajar: After each wash, leave the washing machine door ajar to allow air to circulate and prevent moisture buildup. This is especially important for front-loading machines.
* Wipe Down the Gasket: After each wash, wipe down the rubber gasket (on front-loading machines) to remove any moisture
Conclusion
So, there you have it! A simple, effective, and budget-friendly way to keep your washing machine sparkling clean and running smoothly. This washing machine cleaning DIY isn’t just about aesthetics; it’s about extending the life of your appliance, ensuring your clothes come out truly clean, and saving money on costly repairs down the line. Think of it as preventative maintenance that pays dividends in the long run.
Why is this DIY trick a must-try? Because it tackles the hidden grime and build-up that commercial cleaners often miss. The combination of baking soda, vinegar, and hot water creates a powerful cleaning action that breaks down detergent residue, mildew, and hard water deposits. This not only eliminates unpleasant odors but also improves the efficiency of your washing machine. A cleaner machine means cleaner clothes, and that’s something we all want!
But don’t stop there! Feel free to experiment with variations to suit your specific needs and preferences. For instance, if you have a particularly stubborn mildew problem, you can add a few drops of tea tree oil or eucalyptus oil to the vinegar solution for their natural antifungal properties. Alternatively, if you prefer a more fragrant clean, consider using lemon juice instead of vinegar for a refreshing citrus scent. Just be mindful of the acidity levels and always dilute essential oils properly.
Another variation involves the type of vinegar you use. While white vinegar is the most common and readily available option, apple cider vinegar can also be used, although it may leave a slightly different scent. Some people also swear by using borax in addition to baking soda for extra cleaning power, but always research and use it cautiously, especially if you have sensitive skin or allergies.
Remember to pay special attention to the rubber gasket around the washing machine door. This area is notorious for trapping moisture and harboring mold and mildew. Use a toothbrush or small scrub brush to thoroughly clean the gasket, paying close attention to any crevices or folds. You can also soak a cloth in a vinegar solution and leave it pressed against the gasket for a few minutes to loosen stubborn grime.
Furthermore, don’t forget to clean the detergent dispenser and fabric softener dispenser regularly. These areas can also accumulate residue and become breeding grounds for bacteria. Remove the dispensers and wash them with warm soapy water, ensuring all traces of detergent and softener are removed.
Ultimately, the key to a clean washing machine is consistency. Make this washing machine cleaning DIY a part of your regular cleaning routine, ideally once a month, to prevent build-up and maintain optimal performance. It’s a small investment of time and effort that will yield significant benefits in the long run.
So, what are you waiting for? Give this DIY trick a try and experience the difference a clean washing machine can make. We’re confident you’ll be amazed by the results. And most importantly, we want to hear about your experience! Share your tips, variations, and before-and-after photos in the comments below. Let’s create a community of clean washing machine enthusiasts! Your insights could help others discover the power of this simple yet effective cleaning solution. Let us know if you have any questions, and happy cleaning!
Frequently Asked Questions (FAQ)
1. How often should I clean my washing machine using this DIY method?
The ideal frequency for cleaning your washing machine using this DIY method is once a month. This regular cleaning schedule will help prevent the build-up of detergent residue, mildew, and hard water deposits, ensuring your machine stays clean and efficient. However, if you use your washing machine very frequently or notice a persistent odor, you may want to clean it more often, perhaps every two weeks. Conversely, if you only use your washing machine occasionally, you might be able to stretch the cleaning interval to every six weeks. The key is to monitor your machine and adjust the cleaning schedule based on its usage and condition.
2. Can I use this DIY cleaning method on both top-loading and front-loading washing machines?
Yes, this DIY cleaning method is generally safe and effective for both top-loading and front-loading washing machines. However, there are a few minor adjustments you may need to make depending on the type of machine you have. For top-loading machines, simply pour the baking soda and vinegar directly into the drum before running the cleaning cycle. For front-loading machines, pour the baking soda into the drum and the vinegar into the detergent dispenser. Also, for front-loading machines, pay extra attention to cleaning the rubber gasket around the door, as this area is prone to mold and mildew growth.
3. What type of vinegar is best for cleaning a washing machine?
White vinegar is generally considered the best type of vinegar for cleaning a washing machine due to its high acidity and lack of color. The acidity helps to break down detergent residue, mildew, and hard water deposits, while the lack of color prevents staining. However, apple cider vinegar can also be used as an alternative, although it may leave a slightly different scent. Avoid using other types of vinegar, such as balsamic vinegar or red wine vinegar, as they may contain sugars or pigments that could stain your washing machine.
4. Is it safe to use baking soda and vinegar together in my washing machine?
Yes, it is generally safe to use baking soda and vinegar together in your washing machine for cleaning purposes. While baking soda and vinegar react when mixed, creating carbon dioxide and water, the reaction is not harmful in the context of cleaning a washing machine. The fizzing action can actually help to loosen dirt and grime. However, it’s important to note that the combination of baking soda and vinegar is not a particularly strong cleaning agent on its own. The real cleaning power comes from the individual properties of each ingredient – baking soda’s ability to deodorize and scrub, and vinegar’s ability to disinfect and dissolve mineral deposits.
5. Can I add essential oils to the cleaning solution for a better scent?
Yes, you can add a few drops of essential oils to the vinegar solution for a more pleasant scent. Tea tree oil and eucalyptus oil are particularly good choices due to their natural antifungal and antibacterial properties. Lemon oil and lavender oil are also popular options for their refreshing and calming scents, respectively. However, it’s important to use essential oils sparingly, as too much can leave a residue in your washing machine. A few drops (5-10) should be sufficient. Also, be sure to dilute the essential oils properly in the vinegar before adding them to the washing machine.
6. My washing machine has a self-cleaning cycle. Do I still need to use this DIY method?
Even if your washing machine has a self-cleaning cycle, it’s still a good idea to supplement it with this DIY cleaning method periodically. Self-cleaning cycles are often effective at removing some build-up, but they may not be as thorough as a manual cleaning with baking soda and vinegar. This DIY method allows you to target specific areas of concern, such as the rubber gasket or detergent dispenser, and provides a more comprehensive cleaning experience. Think of the self-cleaning cycle as a maintenance tool and the DIY method as a deep cleaning treatment.
7. What if my washing machine still smells after using this DIY method?
If your washing machine still smells after using this DIY method, there are a few possible reasons. First, make sure you’ve thoroughly cleaned all areas of the machine, including the rubber gasket, detergent dispenser, and fabric softener dispenser. Second, check the drain hose for any clogs or blockages. A clogged drain hose can trap water and lead to mold and mildew growth. Third, consider running another cleaning cycle with a stronger cleaning agent, such as bleach (if your machine is compatible with bleach) or a commercial washing machine cleaner. Finally, if the odor persists, you may need to consult a professional appliance repair technician to inspect the machine for more serious issues.
8. Can this DIY method damage my washing machine?
When used correctly, this DIY method is unlikely to damage your washing machine. Baking soda and vinegar are generally safe for use in washing machines, and the hot water helps to dissolve residue and grime. However, it’s important to follow the instructions carefully and avoid using excessive amounts of baking soda or vinegar. Also, be sure to check your washing machine’s manual for any specific cleaning recommendations or warnings. If you’re unsure about using this DIY method on your particular machine, it’s always best to err on the side of caution and consult a professional.
9. What are some signs that my washing machine needs cleaning?
There are several signs that indicate your washing machine needs cleaning. These include:
* A musty or unpleasant odor emanating from the machine.
* Visible mold or mildew growth on the rubber gasket or in the detergent dispenser.
* Detergent residue or build-up on the drum or other parts of the machine.
* Clothes that don’t smell fresh after washing.
* Reduced washing machine efficiency or performance.
* Water not draining properly.
If you notice any of these signs, it’s time to give your washing machine a good cleaning.
10. Is it necessary to run an empty cycle after using this DIY cleaning method?
While not always strictly necessary, running an empty rinse cycle after using this DIY cleaning method is generally a good idea. This helps to ensure that any remaining baking soda or vinegar is thoroughly flushed out of the machine, preventing any potential residue from affecting your next load of laundry. It also helps to remove any lingering odors from the cleaning process. Simply set your washing machine to a rinse and


Leave a Comment