

Grout cleaning baking soda peroxide – sounds like a science experiment, right? Well, in a way, it is! But trust me, it’s a science experiment that will leave your bathroom sparkling and your grout looking brand new. I know, I know, cleaning grout is probably on everyone’s list of least favorite chores. It’s tedious, back-breaking, and often feels like you’re not even making a dent in that stubborn grime. But what if I told you there’s a simple, effective, and surprisingly satisfying way to tackle this task using ingredients you probably already have in your pantry?
For generations, people have been searching for the perfect grout cleaning solution. From harsh chemicals to elbow grease, the quest for pristine grout has been a long and arduous one. But the beauty of using baking soda and peroxide is that it’s a natural, less toxic alternative to those harsh chemicals. Plus, it’s incredibly budget-friendly!
Let’s face it, nobody wants to live with dingy, stained grout. It can make even the cleanest bathroom or kitchen look neglected. Not only does it affect the overall aesthetic of your home, but dirty grout can also harbor bacteria and mold. That’s why mastering the art of grout cleaning baking soda peroxide is so important. In this DIY guide, I’m going to walk you through the process step-by-step, so you can say goodbye to grimy grout and hello to a sparkling clean home. Get ready to be amazed by the power of these two simple ingredients!
DIY Grout Cleaning with Baking Soda and Peroxide: A Sparkling Solution!
Hey there, fellow DIY enthusiasts! Are you tired of staring at dingy, discolored grout lines in your bathroom or kitchen? I know I was! No matter how much I scrubbed, those stubborn stains just wouldn’t budge. That’s when I discovered the magic of baking soda and hydrogen peroxide. This dynamic duo is a natural, effective, and budget-friendly way to restore your grout to its former glory. Trust me, you’ll be amazed at the results!
What You’ll Need: Your Grout-Cleaning Arsenal
Before we dive in, let’s gather our supplies. This is a pretty simple project, so you probably already have most of these items on hand.
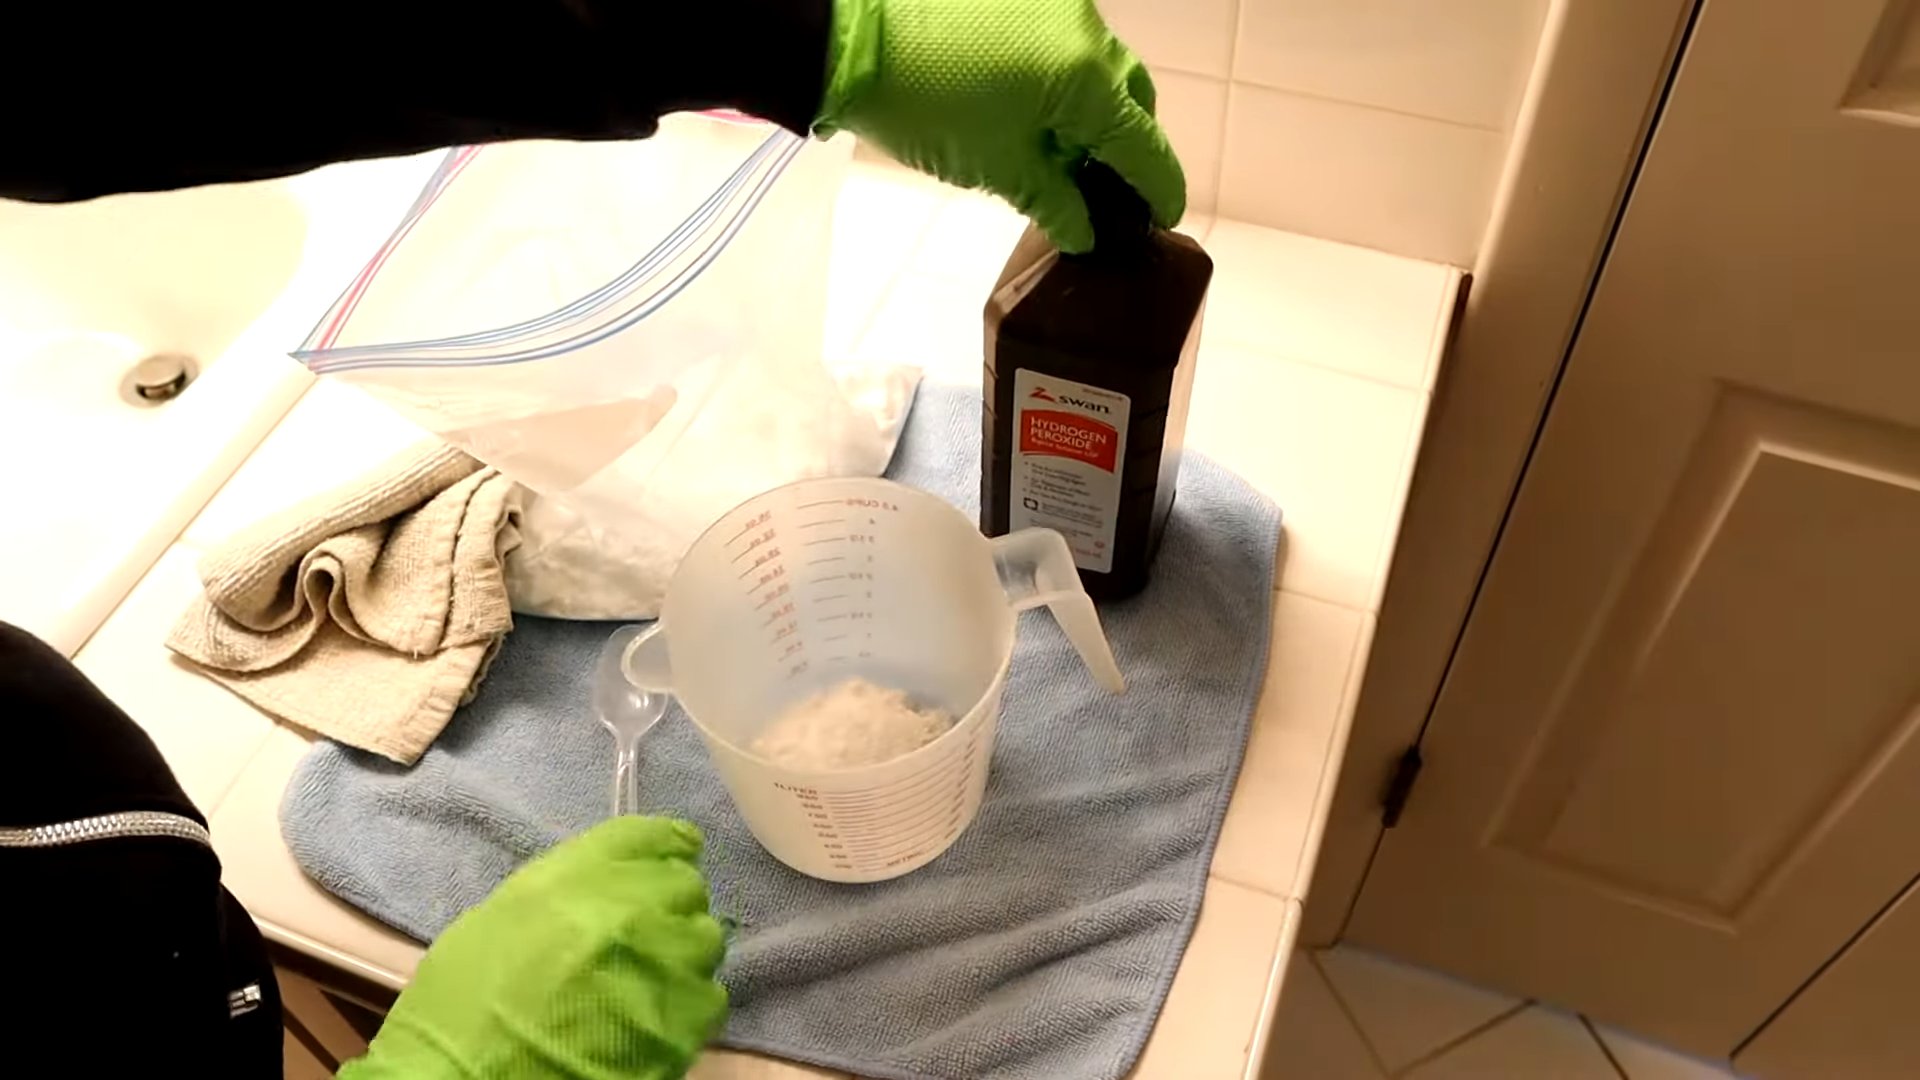
* Baking Soda: The star of the show! Baking soda is a mild abrasive that helps lift dirt and grime.
* Hydrogen Peroxide (3%): This is your bleaching agent. It helps to whiten and disinfect the grout. Make sure you’re using the standard 3% solution you find at the drugstore.
* Spray Bottle: For easy application of the hydrogen peroxide.
* Old Toothbrush or Grout Brush: This is your weapon of choice for scrubbing. An old toothbrush works great for smaller areas, while a grout brush is ideal for larger surfaces.
* Spoon or Small Bowl: For mixing the baking soda and peroxide into a paste.
* Gloves: Protect your hands from the peroxide.
* Eye Protection (Optional): Just to be extra safe, especially if you’re working on vertical surfaces.
* Clean Cloth or Sponge: For wiping away the residue.
* Water: For rinsing.
* Vacuum (Optional): To remove loose debris before you start.
Step-by-Step Guide: Let’s Get Cleaning!
Alright, let’s get down to business! Follow these steps, and you’ll have sparkling grout in no time.
1. Prepare the Area:
* First things first, give the area a quick once-over. If there’s any loose dirt or debris, vacuum it up or sweep it away. This will prevent you from just pushing the dirt around while you’re scrubbing.
* If you’re working in the bathroom, make sure the area is well-ventilated. Open a window or turn on the exhaust fan.
2. Mix the Baking Soda and Peroxide:
* In your small bowl, combine baking soda and hydrogen peroxide to form a paste. I usually start with about 1/2 cup of baking soda and slowly add the peroxide until I get a thick, spreadable consistency. You want it to be thick enough to stick to the grout lines, but not so thick that it’s difficult to work with.
* The mixture will fizz a bit, which is perfectly normal.
3. Apply the Paste to the Grout:
* Using your spoon or fingers (with gloves on, of course!), apply the baking soda paste generously to the grout lines. Make sure you cover all the stained areas.
* Don’t be shy! The more paste you apply, the better the results will be.
4. Let it Sit:
* This is the crucial part where the magic happens. Let the paste sit on the grout for at least 5-10 minutes. For really stubborn stains, you can let it sit for up to 30 minutes. The longer it sits, the more time the baking soda and peroxide have to work their magic.
5. Scrub, Scrub, Scrub!
* Now it’s time to put in a little elbow grease. Using your old toothbrush or grout brush, scrub the grout lines thoroughly. Use a circular motion and apply firm pressure.
* You’ll probably see the dirt and grime starting to lift as you scrub. Keep going until you’ve scrubbed all the grout lines.
* Don’t be afraid to really get in there and scrub! The more you scrub, the cleaner your grout will be.
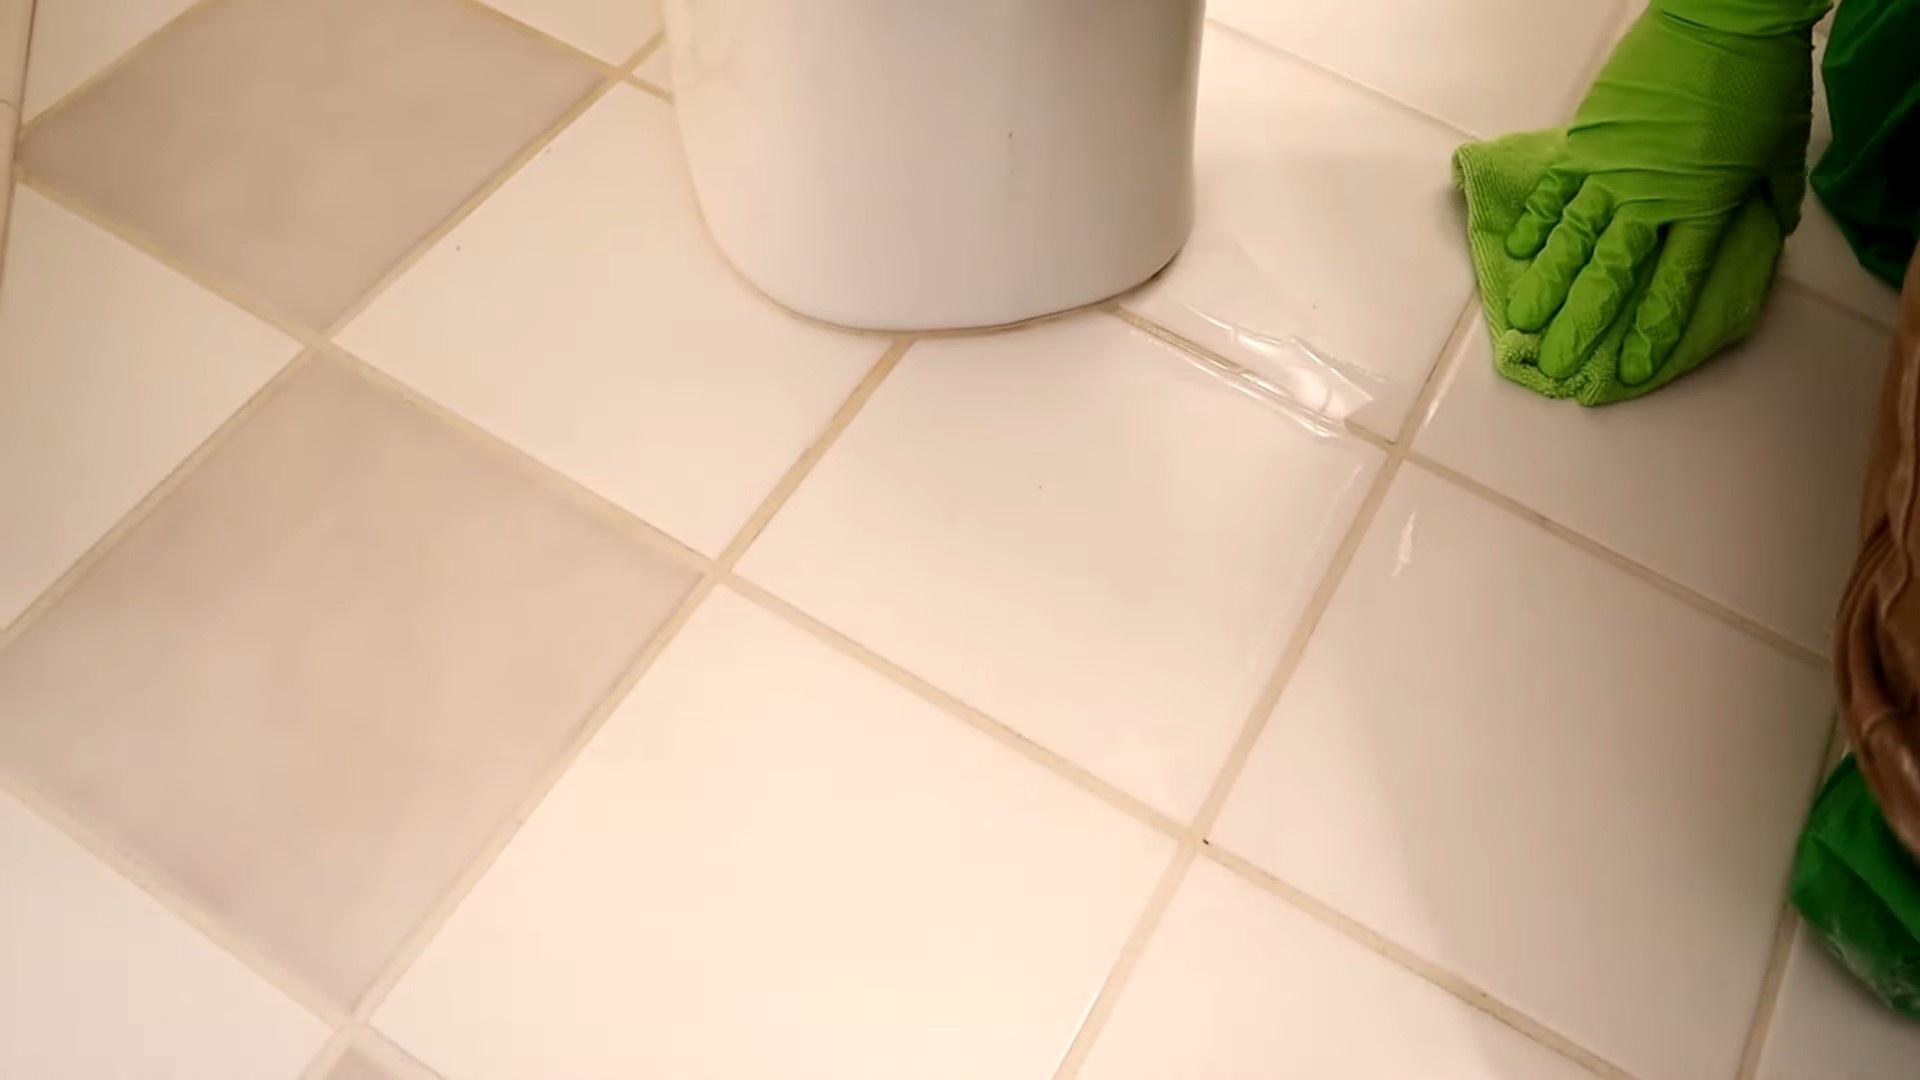
6. Rinse and Wipe:
* Once you’ve finished scrubbing, rinse the area with clean water. You can use a spray bottle or a damp sponge to rinse away the baking soda residue.
* After rinsing, wipe the area with a clean cloth or sponge to remove any remaining residue.
7. Dry and Admire:
* Let the area dry completely. You can speed up the drying process by using a fan or opening a window.
* Once the area is dry, step back and admire your sparkling clean grout! You’ll be amazed at the difference.
Tackling Stubborn Stains: When Extra Help is Needed
Sometimes, even with the baking soda and peroxide, you might encounter some really stubborn stains. Don’t worry, I’ve got a few extra tricks up my sleeve!
* Reapply and Rescrub: If the stain is still visible after the first cleaning, simply repeat the process. Apply another layer of baking soda paste, let it sit, and scrub again. Sometimes, it just takes a few tries to completely remove the stain.
* Increase the Peroxide Concentration (Use with Caution!): If the standard 3% peroxide isn’t cutting it, you can try using a slightly stronger solution. However, be very careful when using stronger peroxide, as it can be corrosive and may damage certain surfaces. Always test it in an inconspicuous area first. I personally haven’t needed to go this route, but it’s an option if you’re desperate.
* Magic Eraser: A magic eraser can be surprisingly effective at removing stubborn stains. Wet the magic eraser and gently rub it over the stained grout lines. Be careful not to scrub too hard, as it can damage the grout.
* Commercial Grout Cleaner: If all else fails, you can try using a commercial grout cleaner. There are many different brands available, so do some research and choose one that’s specifically designed for your type of grout. Always follow the manufacturer’s instructions carefully.
Tips and Tricks for Grout Cleaning Success
Here are a few extra tips and tricks that I’ve learned along the way:
* Test in an Inconspicuous Area: Before you start cleaning your entire grout surface, test the baking soda and peroxide mixture in a small, inconspicuous area to make sure it doesn’t damage the grout or surrounding tiles.
* Work in Sections: If you’re cleaning a large area, work in sections to prevent the baking soda paste from drying out before you have a chance to scrub it.
* Use a Stiff-Bristled Brush: A stiff-bristled brush will help you scrub away the dirt and grime more effectively.
* Don’t Use Abrasive Cleaners: Avoid using abrasive cleaners, as they can damage the grout and make it more susceptible to staining.
* Seal Your Grout: Once you’ve cleaned your grout, consider sealing it to help prevent future stains. There are many different grout sealers available, so do some research and choose one that’s right for you.
* Regular Cleaning: The best way to keep your grout clean is to clean it regularly. Wipe up spills immediately and clean the grout at least once a month.
Preventing Future Grout Stains: A Proactive Approach
Cleaning your grout is great, but preventing stains in the first place is even better! Here are some things you can do to keep your grout looking its best:
* Wipe Up Spills Immediately: The sooner you wipe up spills, the less likely they are to stain the grout.
* Use a Squeegee After Showering: After showering, use a squeegee to remove excess water from the walls and floor. This will help prevent mildew and mold from growing on the grout.
* Improve Ventilation: Make sure your bathroom is well-ventilated to prevent moisture buildup. Open a window or turn on the exhaust fan after showering.
* Seal Your Grout: As mentioned earlier, sealing your grout is a great way to protect it from stains.
* Use Bath Mats and Rugs: Place bath mats and rugs in high-traffic areas to protect the grout from dirt and grime.
Safety First! Important Precautions
While baking soda and peroxide are relatively safe, it’s still important to take a few precautions:
* Wear Gloves: Protect your hands from the peroxide by wearing gloves.
* Avoid Contact with Eyes: Avoid getting the baking soda and peroxide mixture in your eyes. If you do, rinse immediately with plenty of water.
* Ventilation: Work in a well-ventilated area.
* Keep Out of Reach of Children and Pets: Store baking soda and peroxide out of reach of children and pets.
I hope this guide has been helpful! With a little elbow grease and the power of baking soda and peroxide, you can easily restore your grout to its former glory. Happy cleaning!
Conclusion
So, there you have it! This simple yet incredibly effective DIY grout cleaning trick using baking soda and peroxide is a game-changer for anyone battling dingy, stained grout. We’ve all been there, scrubbing tirelessly with commercial cleaners that promise the world but often fall short, leaving you with aching arms and minimal results. This method, however, harnesses the natural cleaning power of baking soda and the gentle bleaching action of hydrogen peroxide to lift stains and grime without harsh chemicals or back-breaking effort.
Why is this a must-try? Because it’s cost-effective, readily accessible, and remarkably efficient. You likely already have baking soda and peroxide in your pantry or medicine cabinet, making this a budget-friendly alternative to expensive store-bought cleaners. More importantly, it’s a safer option for your family and pets, avoiding the harsh fumes and potentially harmful ingredients found in many commercial products. The combination creates a powerful fizzing action that penetrates deep into the porous grout, loosening dirt and discoloration that other cleaners simply can’t reach.
But the beauty of this DIY grout cleaning solution lies in its versatility. While the basic baking soda and peroxide paste is highly effective on its own, you can easily customize it to suit your specific needs. For particularly stubborn stains, consider adding a small amount of dish soap to the mixture. The soap acts as a surfactant, helping to break down grease and grime, further enhancing the cleaning power. Alternatively, for colored grout, test the solution in an inconspicuous area first to ensure the peroxide doesn’t cause any fading. If you’re concerned about color alteration, you can dilute the peroxide with water or use a baking soda and water paste instead, although it may require a bit more elbow grease.
Another variation involves using a toothbrush or grout brush with stiff bristles to really scrub the grout lines after applying the paste. This helps to dislodge any remaining dirt and debris, leaving your grout sparkling clean. For larger areas, consider using an electric grout brush to save time and effort.
We are confident that this DIY grout cleaning method will transform your cleaning routine and leave your tile surfaces looking brand new. It’s a simple, effective, and affordable way to achieve professional-quality results without the harsh chemicals or exorbitant costs.
Now, it’s your turn! We wholeheartedly encourage you to try this DIY grout cleaning trick using baking soda and peroxide. We’re certain you’ll be amazed by the results. Don’t just take our word for it – experience the difference for yourself. And most importantly, we want to hear about your experience! Share your before-and-after photos, tips, and variations in the comments below. Let’s build a community of clean grout enthusiasts and help each other achieve sparkling clean homes! We can’t wait to see your transformations!
Frequently Asked Questions (FAQ)
What exactly makes baking soda and peroxide such an effective grout cleaner?
The magic lies in the chemical reaction between baking soda (sodium bicarbonate) and hydrogen peroxide (H2O2). Baking soda is a mild abrasive and a natural deodorizer, helping to scrub away surface dirt and neutralize odors. Hydrogen peroxide, on the other hand, is a mild bleaching agent and disinfectant. When combined, they create a fizzing action that helps to lift stains and grime from the porous surface of the grout. The fizzing action also helps the mixture penetrate deeper into the grout lines, reaching dirt that other cleaners might miss. This combination is particularly effective at removing mold, mildew, and soap scum, common culprits behind dingy grout.
Is this DIY grout cleaning method safe for all types of grout and tile?
Generally, yes, this method is safe for most types of grout and tile. However, it’s always a good idea to test the solution in an inconspicuous area first, especially if you have colored grout or delicate tile. Hydrogen peroxide can sometimes cause slight fading in colored grout, so testing beforehand will help you avoid any unwanted surprises. If you’re concerned about color alteration, you can dilute the peroxide with water or use a baking soda and water paste instead. For natural stone tiles like marble or granite, it’s best to consult the manufacturer’s recommendations before using any cleaning products, as some acidic or alkaline substances can damage the stone.
How often should I clean my grout using this method?
The frequency of cleaning depends on several factors, including the amount of foot traffic, the humidity levels in your home, and the color of your grout. In high-traffic areas like bathrooms and kitchens, you may need to clean your grout every few weeks to prevent buildup of dirt and grime. In less frequently used areas, you can probably get away with cleaning every few months. Regularly wiping down your tile surfaces after use can also help to prevent stains and extend the time between deep cleanings.
What if the stains are really stubborn and the baking soda and peroxide paste doesn’t seem to be working?
For particularly stubborn stains, there are a few things you can try. First, make sure you’re using a thick enough paste and that you’re allowing it to sit on the grout for at least 10-15 minutes before scrubbing. You can also try adding a small amount of dish soap to the mixture to help break down grease and grime. Another option is to use a stronger concentration of hydrogen peroxide, but be careful not to overdo it, as this could potentially damage the grout or tile. If all else fails, you may need to resort to a commercial grout cleaner specifically designed for tough stains.
Can I use this method on vertical surfaces, like shower walls?
Yes, you can definitely use this method on vertical surfaces. The key is to make the paste thick enough so that it doesn’t drip down the wall. You can also use a sponge or cloth to apply the paste to the grout lines, rather than trying to spread it with your fingers. Once the paste has sat for the recommended time, use a scrub brush or sponge to scrub the grout and then rinse thoroughly with water.
What kind of baking soda and hydrogen peroxide should I use?
Regular baking soda (sodium bicarbonate) that you find in the baking aisle of your grocery store is perfectly fine. For hydrogen peroxide, a 3% solution, which is the standard concentration sold in most drugstores, is sufficient for most grout cleaning tasks. Higher concentrations of hydrogen peroxide can be more effective for stubborn stains, but they can also be more irritating to the skin and eyes, so use caution and wear gloves and eye protection if you choose to use a stronger solution.
How do I prevent grout from getting dirty in the first place?
Prevention is always better than cure! There are several things you can do to prevent grout from getting dirty in the first place. Regularly wiping down your tile surfaces after use can help to remove spills and prevent stains from setting in. Using a squeegee in your shower after each use can help to prevent the buildup of soap scum and mildew. You can also seal your grout with a grout sealer to create a protective barrier that repels water and dirt. Reapply the sealer every year or two, or as recommended by the manufacturer. Finally, ensure proper ventilation in your bathroom and kitchen to reduce humidity levels and prevent the growth of mold and mildew.


Leave a Comment