

Growing bush beans can be incredibly rewarding, offering a delicious and nutritious harvest right from your own backyard! Have you ever dreamed of plucking fresh, crisp beans straight from the vine and adding them to your dinner plate? Well, you’re in the right place! This article is packed with easy-to-follow DIY tricks and hacks that will transform even the most novice gardener into a bush bean-growing pro.
Beans, in general, have a rich history, dating back thousands of years and playing a vital role in the diets of cultures worldwide. From ancient civilizations in the Americas to traditional European cuisines, beans have been a staple food source. Growing bush beans, in particular, offers a compact and manageable way to participate in this agricultural legacy, even if you only have a small space.
Let’s face it, store-bought vegetables often lack the vibrant flavor and freshness of homegrown produce. Plus, with rising grocery costs, wouldn’t it be amazing to supplement your meals with something you’ve nurtured yourself? This DIY guide will empower you to bypass the supermarket and cultivate your own supply of delicious bush beans. I’ll share my favorite tips and tricks for maximizing your yield, combating common pests, and ensuring a bountiful harvest. Get ready to roll up your sleeves and discover the joy of growing your own food!
Growing Bush Beans: A Beginner’s Guide to a Bountiful Harvest
Hey there, fellow garden enthusiasts! I’m so excited to share my experience with growing bush beans. They’re incredibly rewarding, relatively easy to care for, and perfect for small gardens or even containers. Trust me, there’s nothing quite like the taste of fresh, homegrown beans! This guide will walk you through every step, from prepping your soil to harvesting your delicious bounty.
Choosing Your Bush Bean Variety
First things first, let’s talk about varieties. Bush beans come in a rainbow of colors and flavors. Here are a few of my favorites:
* Blue Lake Bush Beans: These are classic, reliable, and produce stringless, dark green beans. They’re great for canning and freezing.
* Contender Bush Beans: As the name suggests, these are tough and productive, even in less-than-ideal conditions. They’re early producers, which is a huge plus!
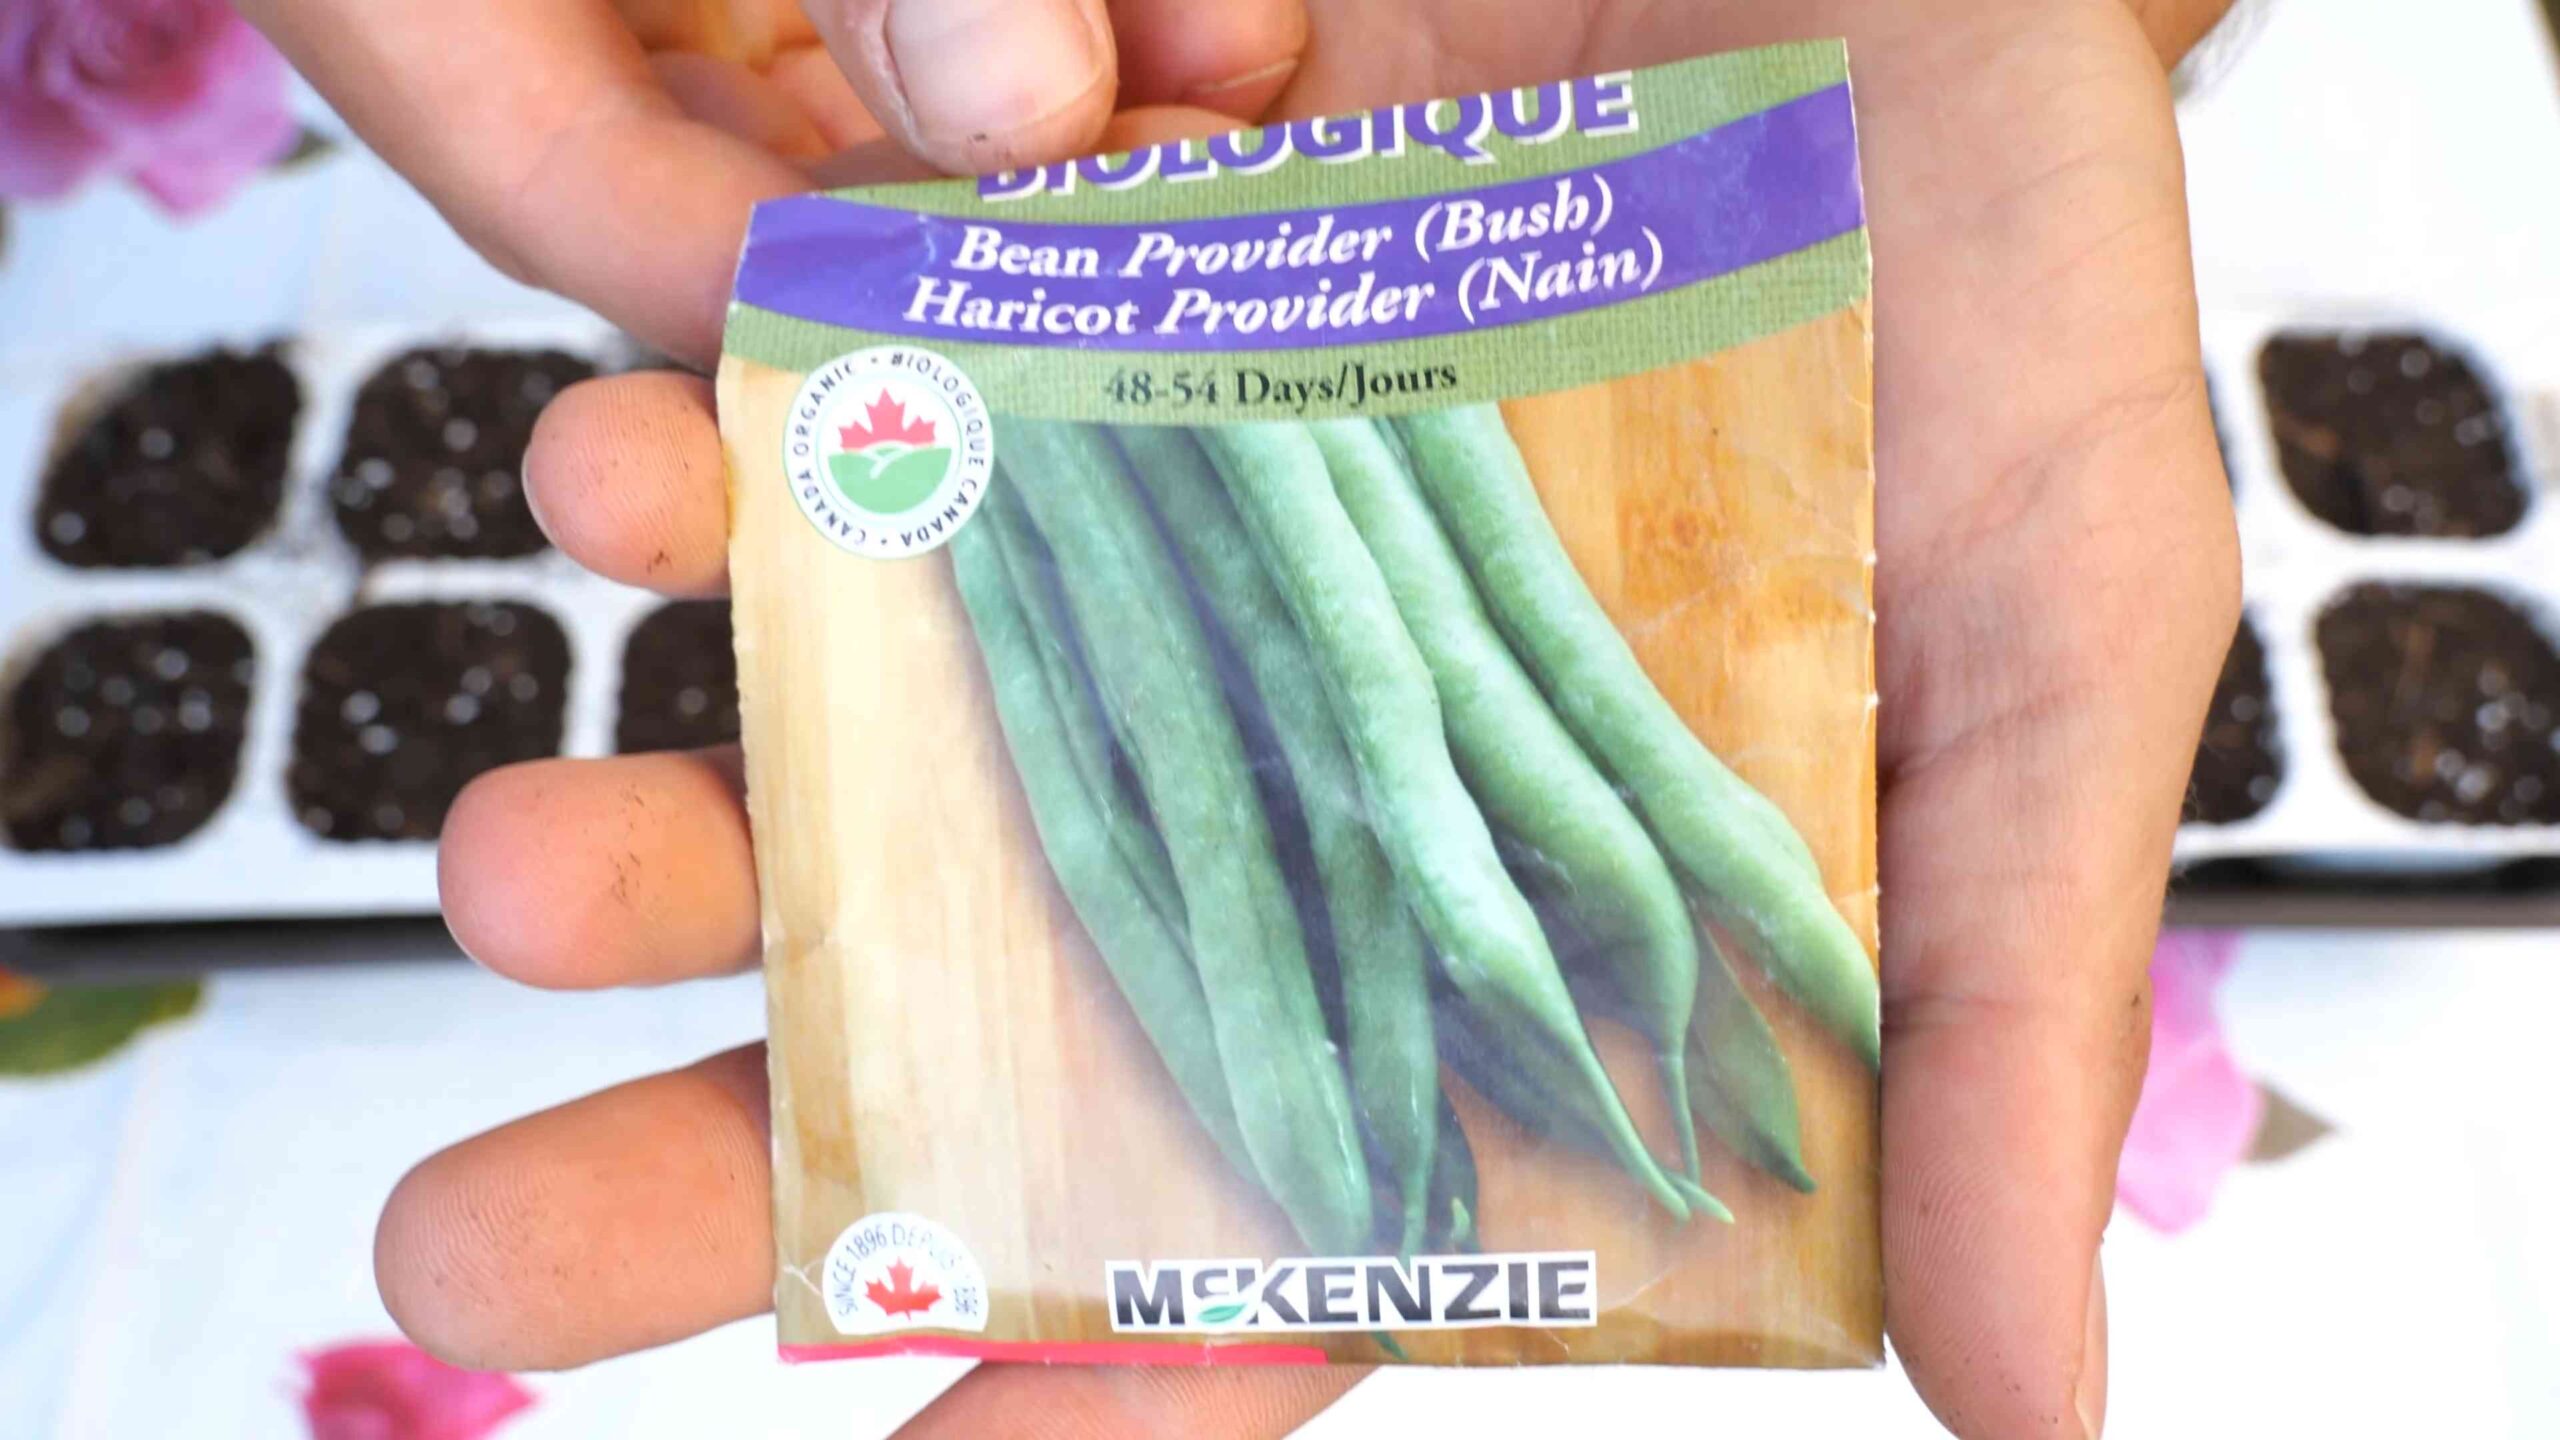
* Provider Bush Beans: Another early variety, Provider beans are known for their excellent flavor and disease resistance.
* Roma II Bush Beans: If you love flat, Italian-style beans, Roma II is your go-to. They’re tender and delicious.
* Royal Burgundy Bush Beans: For a pop of color, try Royal Burgundy. These beans are a beautiful purple color that turns green when cooked.
Preparing Your Garden Bed
Bush beans need a sunny spot with well-drained soil. Here’s how I get my garden bed ready:
1. Choose the Right Location: Select a spot that gets at least 6-8 hours of direct sunlight per day. More sun equals more beans!
2. Clear the Area: Remove any weeds, rocks, and debris from the planting area. I like to use a garden fork to loosen the soil.
3. Amend the Soil: Bush beans prefer soil that’s rich in organic matter. I always amend my soil with compost or well-rotted manure. This improves drainage and provides essential nutrients. Spread a 2-3 inch layer of compost over the soil surface.
4. Test Your Soil (Optional): A soil test can tell you the pH level and nutrient content of your soil. Bush beans prefer a slightly acidic to neutral pH (around 6.0 to 7.0). You can purchase a soil test kit at most garden centers.
5. Work the Soil: Use a garden fork or tiller to work the compost into the soil to a depth of about 6-8 inches. This will create a loose, well-drained bed for your beans.
6. Level the Surface: Rake the soil to create a smooth, even surface. This will make planting easier.
Planting Your Bush Beans
Now for the fun part – planting! Bush beans are warm-season crops, so it’s important to wait until the danger of frost has passed before planting.
1. Check the Soil Temperature: The ideal soil temperature for bean germination is between 60°F and 70°F. You can use a soil thermometer to check the temperature.
2. Direct Sow the Seeds: Bush beans are best direct-sown, meaning you plant the seeds directly into the garden bed. They don’t transplant well.
3. Spacing: Plant the seeds about 1 inch deep and 2-3 inches apart in rows. Space the rows about 18-24 inches apart.
4. Water Gently: After planting, water the soil gently to moisten it. Avoid overwatering, which can cause the seeds to rot.
5. Mark Your Rows: Use plant markers or labels to identify your bean rows. This will help you keep track of what you’ve planted.
Caring for Your Bush Beans
Bush beans are relatively low-maintenance, but they do need some attention to thrive.
1. Watering: Water your bean plants regularly, especially during dry spells. Aim to keep the soil consistently moist, but not waterlogged. Water deeply at the base of the plants to avoid wetting the foliage, which can lead to fungal diseases. I usually water in the morning.
2. Weeding: Keep the garden bed free of weeds, which can compete with your bean plants for nutrients and water. Hand-pull weeds regularly or use a hoe to cultivate the soil. Be careful not to damage the bean plants’ roots.
3. Mulching: Apply a layer of mulch around your bean plants to help retain moisture, suppress weeds, and regulate soil temperature. I like to use straw or shredded leaves.
4. Fertilizing: Bush beans don’t need a lot of fertilizer, but a side-dressing of compost or a balanced fertilizer (like 10-10-10) can help boost growth. Apply the fertilizer according to the package directions. I usually fertilize about 3-4 weeks after planting.
5. Pest Control: Keep an eye out for common bean pests, such as aphids, bean beetles, and spider mites. You can control these pests with insecticidal soap, neem oil, or by hand-picking them off the plants. I prefer organic pest control methods whenever possible.
6. Disease Prevention: To prevent fungal diseases, avoid overhead watering and ensure good air circulation around your bean plants. If you notice any signs of disease, such as yellowing leaves or spots, remove the affected plants immediately.
Supporting Your Bush Beans (Optional)
While bush beans are generally self-supporting, some taller varieties may benefit from a little extra support, especially if they’re grown in windy areas.
* Staking: You can use stakes to support individual plants. Insert a stake near each plant and tie the stem to the stake with soft twine.
* Caging: You can also use tomato cages to support multiple plants. Place the cage over the plants when they’re young.
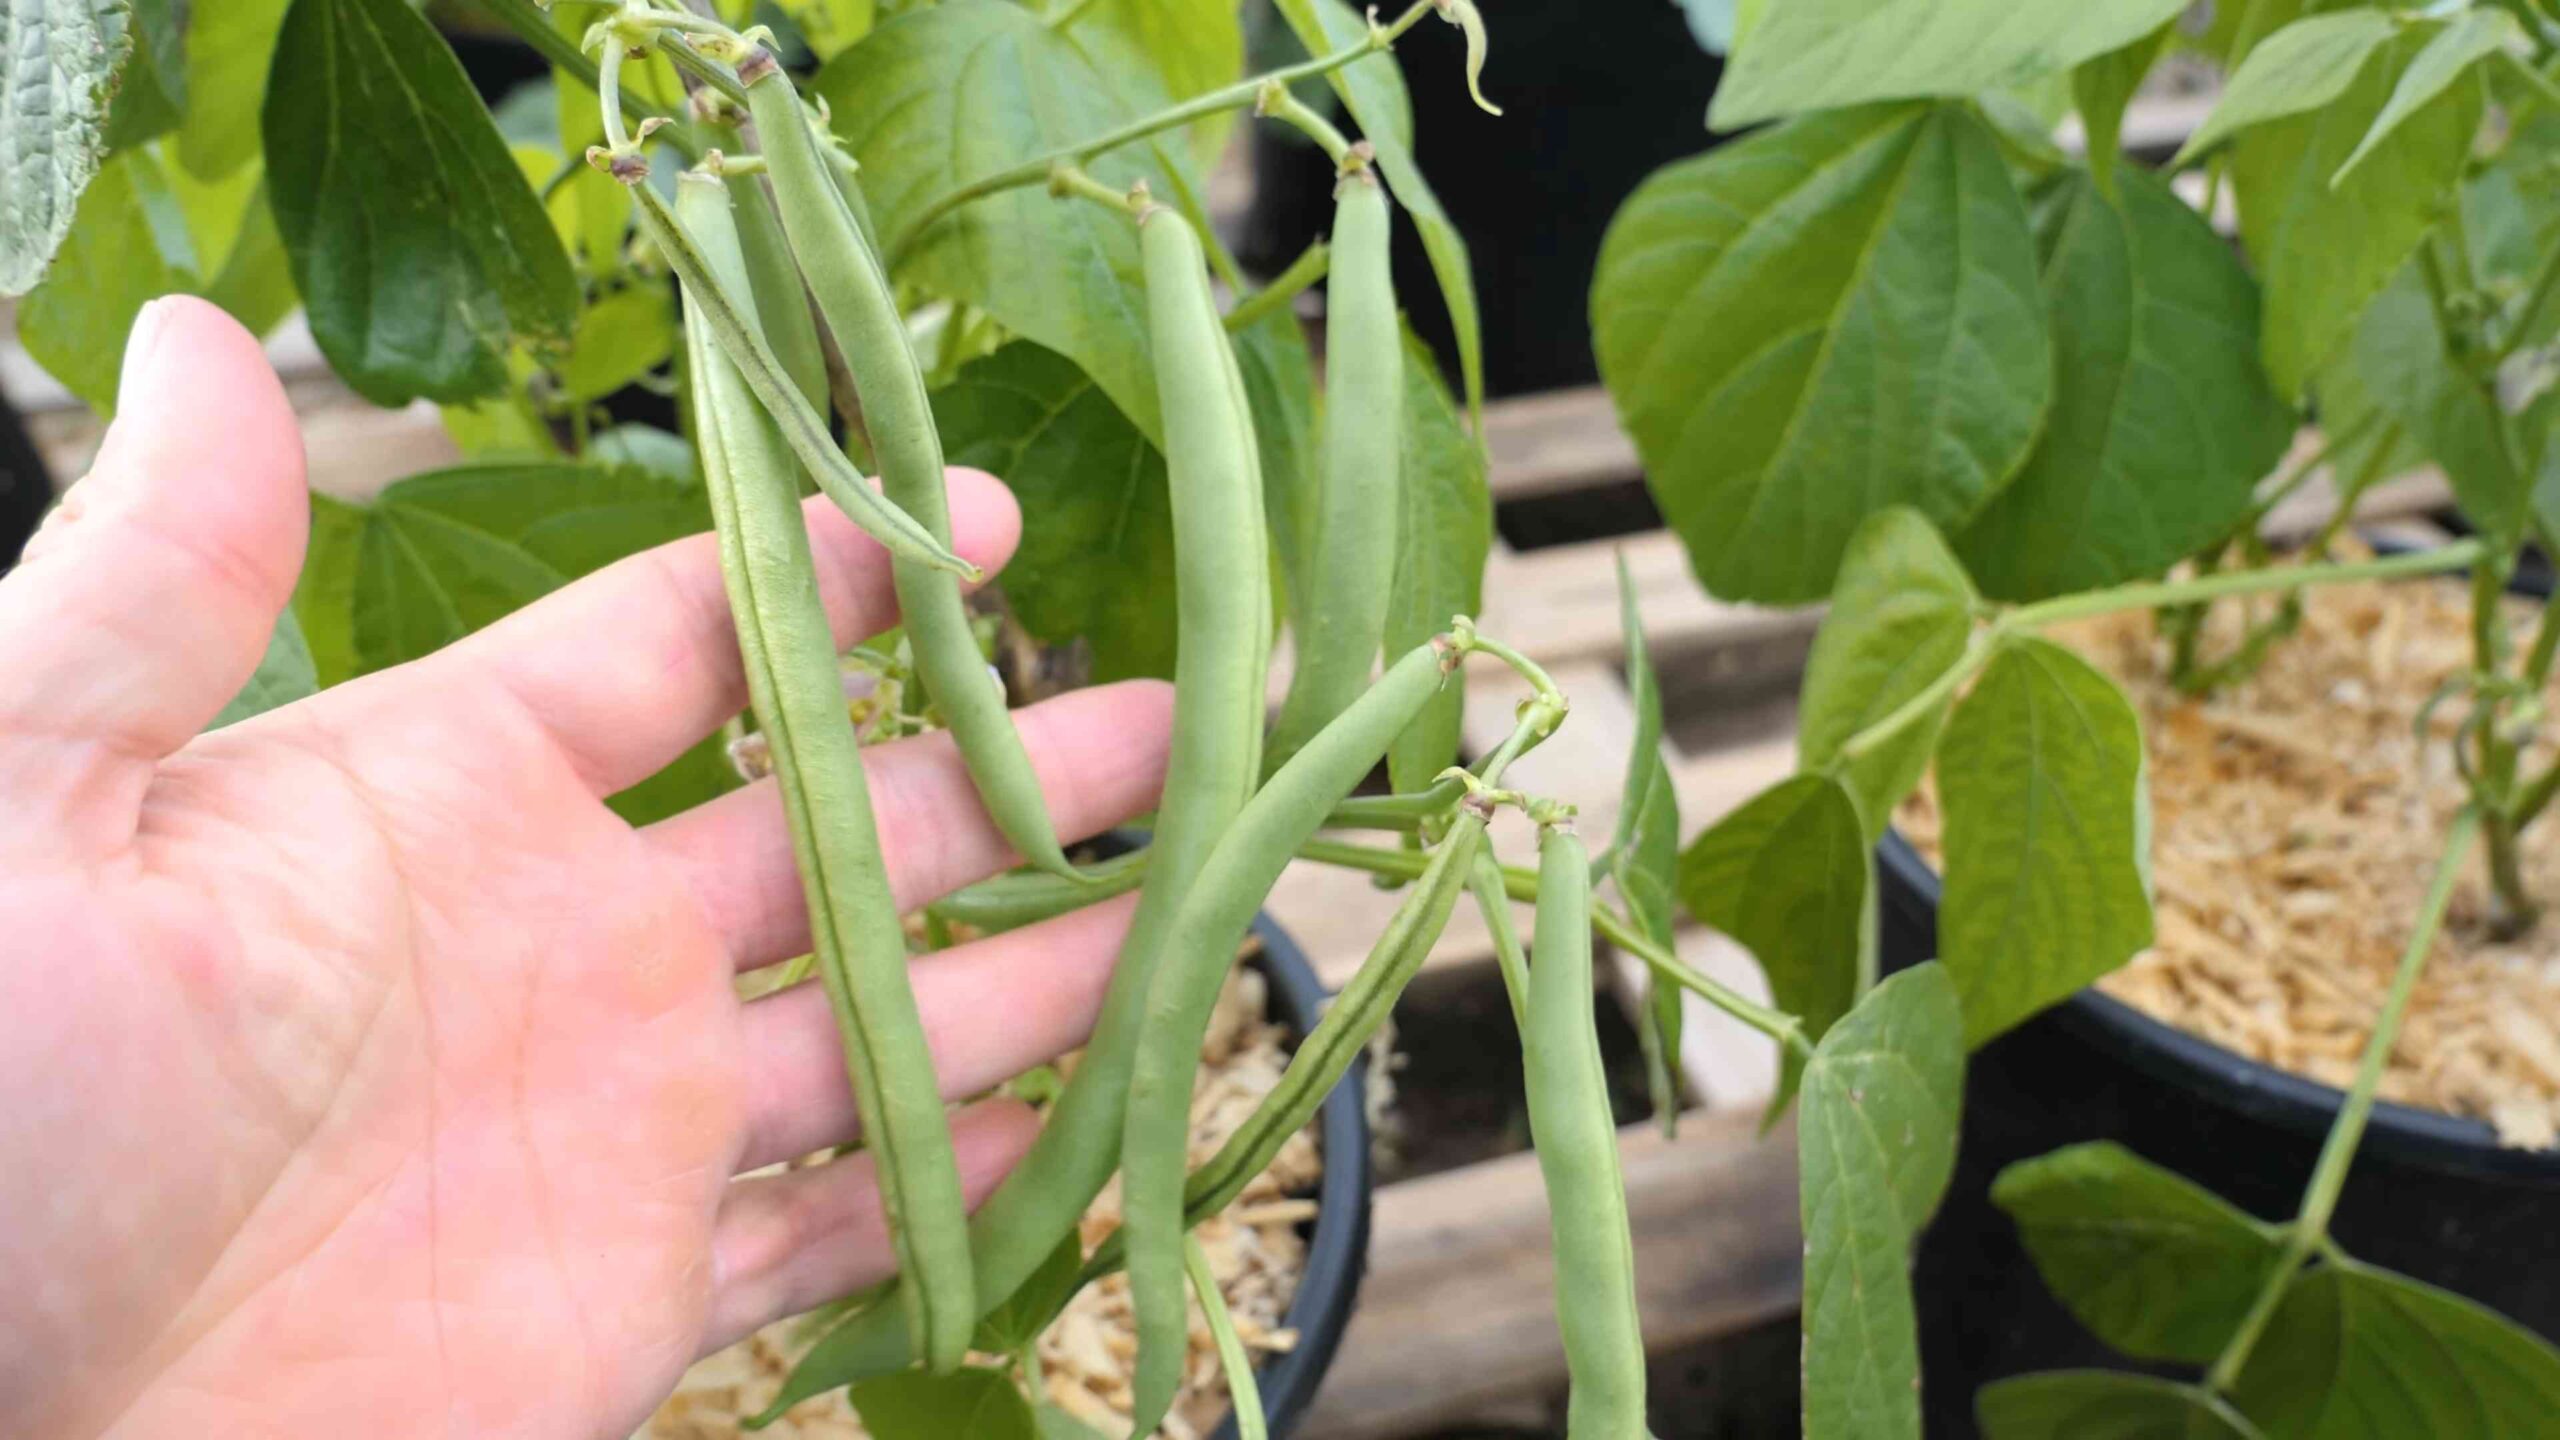
Harvesting Your Bush Beans
Harvesting is the most rewarding part of growing bush beans!
1. Timing: Bush beans are typically ready to harvest about 50-60 days after planting. The beans should be firm, plump, and snap easily when bent.
2. Picking: Harvest the beans regularly, about every 2-3 days. This will encourage the plants to produce more beans.
3. Technique: Gently snap the beans off the plants, being careful not to damage the stems or leaves.
4. Storage: Freshly harvested bush beans are best eaten right away. You can store them in the refrigerator for a few days, but they’ll lose their flavor and texture over time.
5. Preserving: If you have a bumper crop of beans, you can preserve them by canning, freezing, or drying. Canning and freezing are the most common methods.
Troubleshooting Common Problems
Even with the best care, you may encounter some problems when growing bush beans. Here are a few common issues and how to address them:
* Poor Germination: If your bean seeds aren’t germinating, it could be due to cold soil, overwatering, or poor-quality seeds. Make sure the soil temperature is warm enough, avoid overwatering, and use fresh seeds.
* Yellowing Leaves: Yellowing leaves can be a sign of nutrient deficiency, overwatering, or disease. Check the soil drainage, fertilize with a balanced fertilizer, and inspect the plants for signs of disease.
* Pest Infestations: As mentioned earlier, aphids, bean beetles, and spider mites can be a problem. Use insecticidal soap, neem oil, or hand-pick the pests off the plants.
* Disease: Fungal diseases, such as powdery mildew and bean rust, can affect bean plants. Avoid overhead watering, ensure good air circulation, and remove any affected plants.
Succession Planting for a Continuous Harvest
To enjoy a continuous harvest of bush beans throughout the growing season, consider succession planting. This involves planting new seeds every 2-3 weeks. This way, you’ll always have a fresh supply of beans ready to pick.
Enjoying Your Harvest
Now that you’ve harvested your delicious bush beans, it’s time to enjoy them! Here are a few of my favorite ways to prepare them:
* Steamed or Boiled: Simply steam or boil the beans until they’re tender-crisp. Serve them with a little butter, salt, and pepper.
* Sautéed: Sauté the beans in a pan with olive oil, garlic, and herbs.
* Roasted: Roast the beans in the oven with olive oil, salt, and pepper. They’ll become slightly caramelized and delicious.
* In Salads: Add cooked bush beans to salads for a boost of flavor and nutrition.
* In Soups and Stews: Bush beans are a great addition to soups and stews.
Growing bush beans is a rewarding experience that anyone can enjoy. With a little planning and care, you can have a bountiful harvest of fresh, delicious beans right from your own backyard.
Conclusion
So, there you have it! Growing bush beans doesn’t have to be a daunting task. With a little preparation, the right techniques, and a dash of patience, you can enjoy a bountiful harvest of fresh, delicious bush beans right from your own backyard. This DIY approach to growing bush beans is a must-try for several compelling reasons.
First and foremost, the taste. Store-bought beans simply can’t compare to the vibrant flavor and crisp texture of homegrown bush beans. The difference is truly remarkable. Secondly, you have complete control over the growing process. You can choose organic methods, avoid harmful pesticides, and ensure that your beans are grown in healthy, nutrient-rich soil. This is a huge advantage for those concerned about the quality and safety of their food.
Beyond the taste and control, growing your own bush beans is incredibly rewarding. There’s something deeply satisfying about nurturing a plant from seed to harvest and then enjoying the fruits (or, in this case, the beans!) of your labor. It’s a connection to nature that’s both grounding and fulfilling.
But the benefits don’t stop there. Growing bush beans is also a budget-friendly way to add fresh vegetables to your diet. A single packet of seeds can yield a substantial harvest, saving you money at the grocery store. Plus, it’s a great way to reduce your carbon footprint by minimizing the transportation and packaging associated with commercially grown produce.
Ready to take your bush bean growing to the next level? Consider exploring different varieties of bush beans to find your favorites. Some popular options include Blue Lake Bush Beans, Contender Bush Beans, and Provider Bush Beans, each with its unique flavor and texture. You can also experiment with companion planting. Marigolds, for example, are known to deter bean beetles, while nasturtiums can attract aphids away from your beans.
Another variation to consider is succession planting. By planting new seeds every few weeks, you can extend your harvest season and enjoy a continuous supply of fresh bush beans throughout the summer. This is especially useful if you have a small garden and want to maximize your yield.
Don’t be afraid to get creative with your trellising methods, even though bush beans are not climbers. A small, decorative trellis can provide support and add visual interest to your garden. You can also use natural materials like bamboo or branches to create a rustic trellis.
Finally, remember that growing bush beans is a learning process. Don’t be discouraged if you encounter challenges along the way. Every season is an opportunity to learn and improve your techniques. The most important thing is to have fun and enjoy the journey.
So, what are you waiting for? Grab a packet of seeds, prepare your garden bed, and get ready to experience the joy of growing your own bush beans. We’re confident that you’ll be amazed by the results.
We encourage you to try this DIY trick and share your experience with us! Post photos of your garden, share your tips and tricks, and let us know what varieties of bush beans you’re growing. We’re excited to hear your stories and learn from your experiences. Happy gardening!
FAQ
Frequently Asked Questions About Growing Bush Beans
Q: How much sun do bush beans need?
A: Bush beans thrive in full sun, which means they need at least 6-8 hours of direct sunlight per day. Insufficient sunlight can lead to leggy plants and reduced yields. Choose a location in your garden that receives ample sunlight throughout the day. If you live in a particularly hot climate, some afternoon shade can be beneficial to prevent the plants from overheating.
Q: What kind of soil is best for growing bush beans?
A: Bush beans prefer well-drained soil that is rich in organic matter. The ideal soil pH is between 6.0 and 7.0. Before planting, amend your soil with compost or well-rotted manure to improve its fertility and drainage. Avoid heavy clay soils, as they can become waterlogged and inhibit root growth. If you have clay soil, consider adding sand or other amendments to improve its drainage.
Q: How often should I water my bush beans?
A: Bush beans need consistent moisture, especially during flowering and pod development. Water deeply and regularly, aiming to keep the soil consistently moist but not waterlogged. Avoid overhead watering, as this can promote fungal diseases. Instead, water at the base of the plants using a soaker hose or drip irrigation system. Check the soil moisture regularly and adjust your watering schedule accordingly, depending on the weather conditions.
Q: When is the best time to plant bush beans?
A: Bush beans are warm-season crops and should be planted after the last frost when the soil has warmed to at least 60°F (15°C). In most regions, this is typically in late spring or early summer. You can start seeds indoors 2-3 weeks before the last frost, but bush beans transplant poorly, so it’s generally best to direct sow them in the garden. Check your local planting calendar for specific dates based on your region’s climate.
Q: How far apart should I plant bush bean seeds?
A: Bush bean seeds should be planted about 1-2 inches deep and 2-4 inches apart in rows that are 18-24 inches apart. This spacing allows for adequate air circulation and sunlight penetration, which helps to prevent diseases. You can also plant bush beans in hills, with 4-6 seeds per hill, spaced about 12 inches apart.
Q: Do bush beans need fertilizer?
A: Bush beans are relatively light feeders and don’t require heavy fertilization. However, a side dressing of compost or a balanced organic fertilizer can be beneficial, especially during flowering and pod development. Avoid over-fertilizing, as this can lead to excessive foliage growth at the expense of pod production.
Q: What are some common pests and diseases that affect bush beans?
A: Common pests that affect bush beans include bean beetles, aphids, and spider mites. Diseases include powdery mildew, bean rust, and anthracnose. To prevent pests and diseases, practice good garden hygiene, such as removing plant debris and weeds. You can also use organic pest control methods, such as insecticidal soap or neem oil. Choose disease-resistant varieties of bush beans to minimize the risk of disease.
Q: How do I harvest bush beans?
A: Bush beans are typically ready to harvest about 50-60 days after planting. Harvest the pods when they are firm, crisp, and fully developed but before the beans inside become too large and tough. Pick the pods regularly to encourage continued production. Use scissors or pruning shears to avoid damaging the plants.
Q: Can I save seeds from my bush beans?
A: Yes, you can save seeds from your bush beans, but only if you are growing heirloom or open-pollinated varieties. Hybrid varieties will not produce true-to-type seeds. To save seeds, allow some of the pods to dry completely on the plant. Once the pods are dry and brittle, shell the beans and store them in an airtight container in a cool, dry place.
Q: My bush beans are flowering, but not producing pods. What could be the problem?
A: There are several reasons why your bush beans might be flowering but not producing pods. One common reason is insufficient pollination. Ensure that there are plenty of pollinators in your garden by planting flowers that attract bees and other beneficial insects. Another reason could be high temperatures, which can interfere with pollination. Water deeply and regularly to help the plants cope with the heat. Nutrient deficiencies can also affect pod production. Amend your soil with compost or a balanced organic fertilizer to provide the plants with the nutrients they need.


Leave a Comment