

Grow Ginger at Home? Absolutely! Imagine the satisfaction of snipping fresh, fragrant ginger root straight from your own backyard (or even your windowsill!). Forget those sad, shriveled pieces at the grocery store – we’re talking vibrant, juicy ginger, ready to spice up your stir-fries, soothe your tummy, or add a zing to your favorite tea.
Ginger, with its fiery flavor and incredible health benefits, has been cultivated for thousands of years. Originating in South Asia, it quickly spread across the globe, becoming a staple in traditional medicine and cuisines from India to China and beyond. For centuries, it’s been revered not only for its culinary uses but also for its medicinal properties, believed to aid digestion, reduce inflammation, and even boost immunity.
But why should you bother learning to grow ginger at home? Well, for starters, it’s surprisingly easy! Plus, store-bought ginger can sometimes be treated with chemicals to prevent sprouting, which can affect its flavor and nutritional value. By growing your own, you have complete control over the process, ensuring you’re getting the freshest, most potent ginger possible. And let’s be honest, there’s something incredibly rewarding about nurturing a plant from rhizome to harvest. So, ditch the store-bought stuff and let’s embark on this exciting journey together! I’m going to share some simple DIY tricks and hacks that will have you harvesting your own ginger in no time.

Grow Your Own Ginger: A Beginner’s Guide
Hey there, fellow plant enthusiasts! Ever thought about growing your own ginger? It’s surprisingly easy and incredibly rewarding. Imagine having fresh, flavorful ginger right at your fingertips whenever you need it for cooking, teas, or even just a little boost to your immune system. I’m going to walk you through the whole process, step-by-step, so you can enjoy homegrown ginger in no time.
What You’ll Need
Before we dive in, let’s gather our supplies. Here’s what you’ll need to get started:
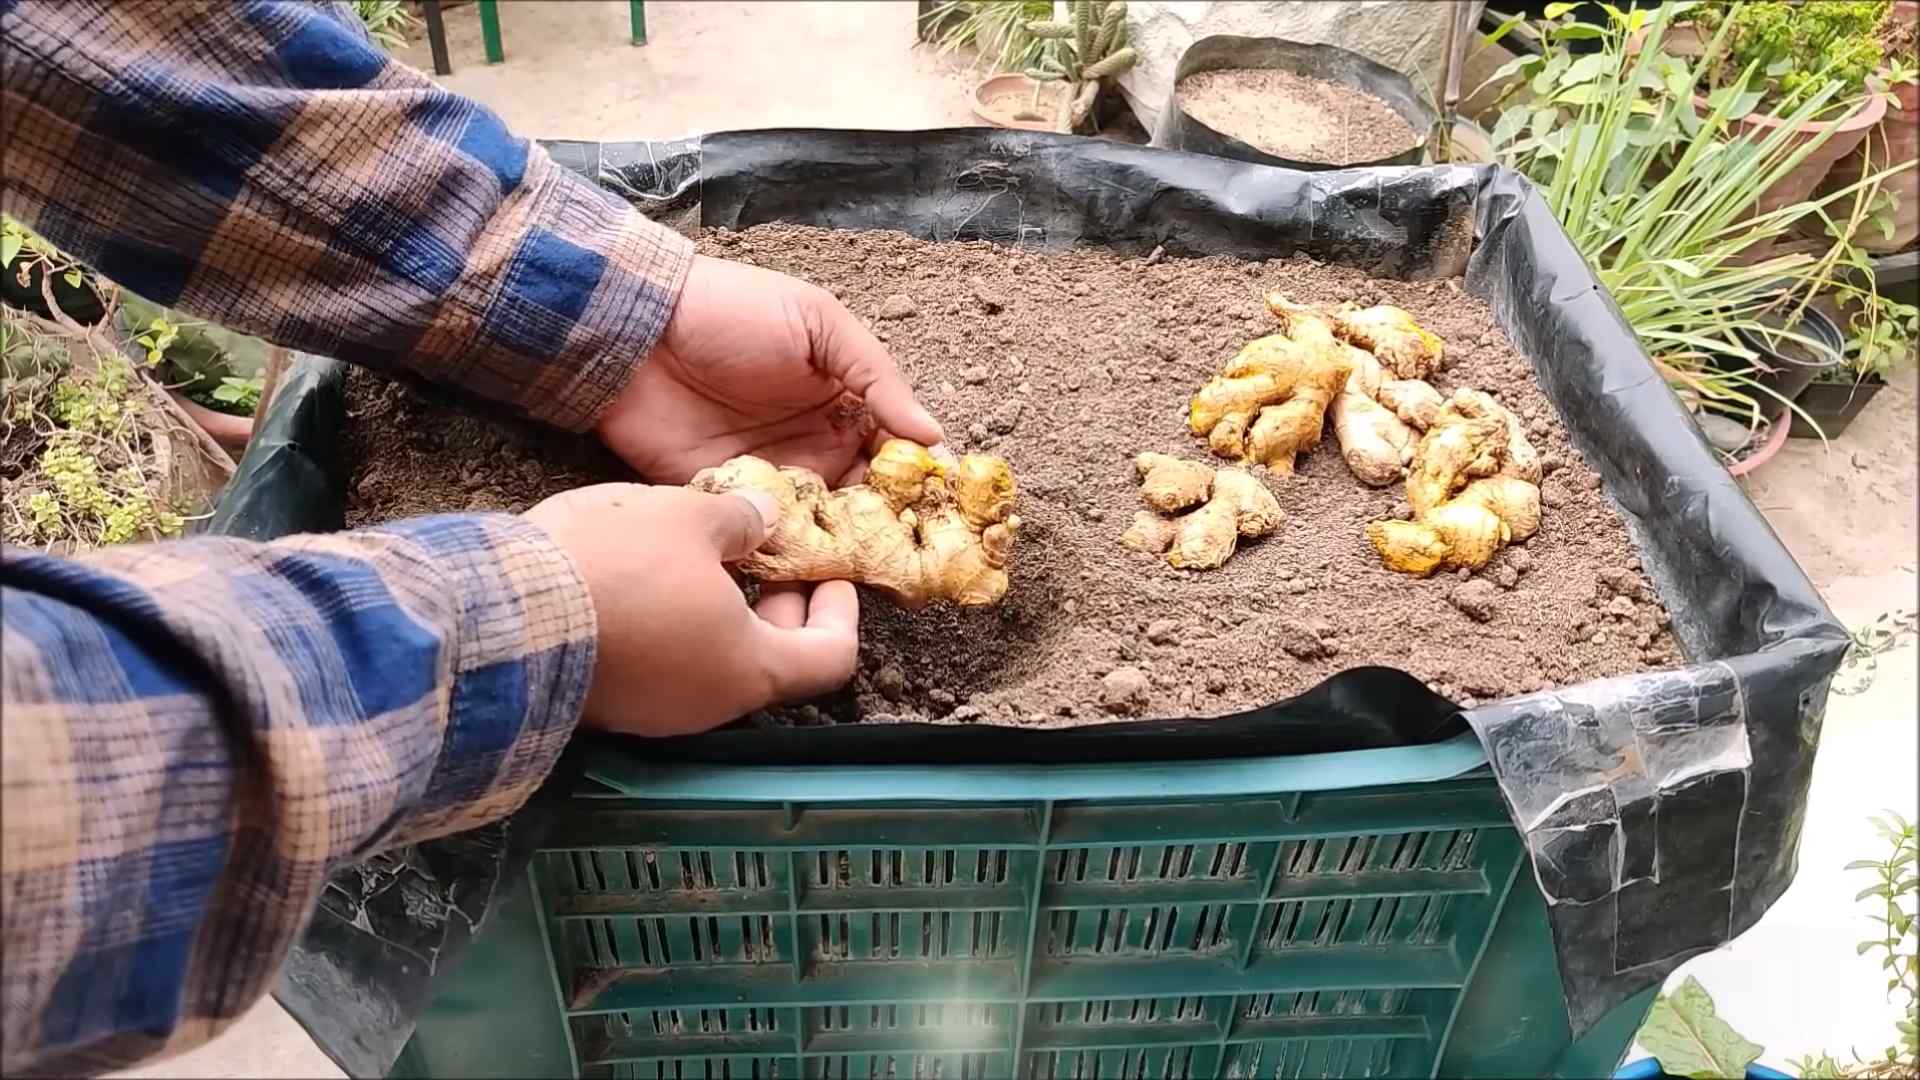
* Ginger Rhizome: Look for a plump, healthy-looking ginger rhizome (that’s the “root” part we eat) at your local grocery store or nursery. Choose one with visible “eyes” or buds – these are where the new shoots will sprout from. Organic ginger is often recommended, as it’s less likely to be treated with growth inhibitors.
* Potting Mix: A well-draining potting mix is crucial. You can use a standard potting mix, but I like to amend it with some compost or perlite to improve drainage. Ginger doesn’t like soggy soil!
* Pot: Choose a pot that’s at least 12 inches in diameter and 12 inches deep. Ginger roots grow horizontally, so a wider pot is better than a tall, narrow one. Make sure the pot has drainage holes.
* Watering Can: A gentle watering can is perfect for keeping the soil moist without overwatering.
* Spray Bottle (Optional): Ginger loves humidity, so a spray bottle can help create a more favorable environment, especially if you live in a dry climate.
* Warm, Shady Location: Ginger thrives in warm temperatures and partial shade. Avoid direct sunlight, which can scorch the leaves.
* Patience: Growing ginger takes time, so be prepared to wait a few months before you can harvest your own.
Preparing the Ginger Rhizome
This is a crucial step to ensure successful sprouting.
1. Soaking the Rhizome (Optional but Recommended): I like to soak the ginger rhizome in lukewarm water for 12-24 hours before planting. This helps to rehydrate it and encourage sprouting. You’ll often see faster growth if you do this.
2. Cutting the Rhizome (If Necessary): If your ginger rhizome is large, you can cut it into smaller pieces, making sure each piece has at least one or two “eyes” or buds. This will allow you to grow multiple ginger plants from a single rhizome. Let the cut pieces air dry for a day or two to prevent rot.
3. Inspecting for Rot: Before planting, carefully inspect the rhizome for any signs of rot or mold. If you see any, discard that piece. You want to start with a healthy rhizome for the best results.
Planting Your Ginger
Now for the fun part!
1. Fill the Pot: Fill your pot with the potting mix, leaving about an inch or two of space at the top.
2. Plant the Rhizome: Place the ginger rhizome on top of the soil, with the “eyes” or buds facing upwards.
3. Cover with Soil: Gently cover the rhizome with about 1-2 inches of soil.
4. Water Thoroughly: Water the soil thoroughly until water drains out of the drainage holes. This helps to settle the soil and provide moisture to the rhizome.
Caring for Your Ginger Plant
Consistent care is key to a thriving ginger plant.
1. Watering: Keep the soil consistently moist, but not soggy. Water when the top inch of soil feels dry to the touch. Overwatering can lead to root rot, so be careful not to overdo it.
2. Humidity: Ginger loves humidity. If you live in a dry climate, you can increase humidity by misting the plant with a spray bottle regularly or placing the pot on a tray filled with pebbles and water. Just make sure the bottom of the pot isn’t sitting directly in the water.
3. Temperature: Ginger thrives in warm temperatures, ideally between 65°F and 85°F (18°C and 29°C). Protect it from frost and cold drafts.
4. Fertilizing: Feed your ginger plant with a balanced liquid fertilizer every 2-3 weeks during the growing season (spring and summer). Follow the instructions on the fertilizer label. I like to use an organic fertilizer for a more natural approach.
5. Light: Provide your ginger plant with bright, indirect light. Avoid direct sunlight, which can scorch the leaves. A spot near an east-facing window is often ideal.
6. Monitoring for Pests and Diseases: Keep an eye out for pests like aphids or spider mites. If you spot any, treat them with an insecticidal soap or neem oil. Root rot can be a problem if the soil is too wet, so make sure your pot has good drainage and avoid overwatering.
Harvesting Your Ginger
The moment we’ve all been waiting for!
1. When to Harvest: You can start harvesting ginger about 8-10 months after planting. The leaves will start to turn yellow and die back, indicating that the rhizome is mature.
2. Partial Harvest: If you only need a small amount of ginger, you can carefully dig around the edges of the pot and harvest a piece of the rhizome. Be sure to leave the rest of the plant undisturbed so it can continue to grow.
3. Full Harvest: If you want to harvest the entire plant, gently dig up the rhizome from the pot.
4. Cleaning and Storing: Wash the harvested ginger rhizome thoroughly to remove any soil. You can store it in the refrigerator for several weeks or freeze it for longer storage. To freeze, wrap the ginger tightly in plastic wrap or place it in a freezer bag.
Troubleshooting
Sometimes things don’t go exactly as planned. Here are a few common issues and how to address them:
* No Sprouting: If your ginger rhizome doesn’t sprout after a few weeks, don’t panic! It can sometimes take a while. Make sure the soil is consistently moist and the temperature is warm enough. You can also try gently uncovering the rhizome to check for any signs of rot. If it’s still firm and healthy, just be patient.
* Yellowing Leaves: Yellowing leaves can be a sign of overwatering, underwatering, or nutrient deficiency. Check the soil moisture and adjust your watering accordingly. If the soil is consistently moist, you may be overwatering. If the soil is dry, you may need to water more frequently. You can also try fertilizing the plant with a balanced liquid fertilizer.
* Root Rot: Root rot is a common problem with ginger plants, especially if the soil is too wet. If you suspect root rot, carefully remove the plant from the pot and inspect the roots. If the roots are mushy and brown, you’ll need to take action quickly. Cut away any affected roots and repot the plant in fresh, well-draining potting mix. Be sure to avoid overwatering in the future.
* Pests: Aphids and spider mites are common pests that can attack ginger plants. If you spot any pests, treat them with an insecticidal soap or neem oil. Be sure to follow the instructions on the product label.
Propagating Ginger
Want to grow even more ginger? It’s easy to propagate!
1. Dividing the Rhizome: When you harvest your ginger, you can divide the rhizome into smaller pieces, making sure each piece has at least one or two “eyes” or buds.
2. Planting the Divisions: Plant the divisions in separate pots, following the same instructions as above.
3. Enjoy Your New Ginger Plants: With a little care, your new ginger plants will thrive and provide you with even more fresh ginger!
Tips for Success
Here are a few extra tips to help you grow the best ginger possible:
* Choose the Right Variety: There are different varieties of ginger, each with its own unique flavor and characteristics. Experiment with different varieties to find your favorite.
* Use a Good Quality Potting Mix: A well-draining potting mix is essential for healthy ginger growth. Avoid using garden soil, which can be too heavy and compact.
* Provide Adequate Drainage: Make sure your pot has drainage holes to prevent water from accumulating in the bottom.
* Water Regularly: Keep the soil consistently moist, but not soggy.
* Fertilize Regularly: Feed your ginger plant with a balanced liquid fertilizer every 2-3 weeks during the growing season.
* Provide Warmth and Humidity: Ginger thrives in warm temperatures and high humidity.
* Be Patient: Growing ginger takes time, so be patient and don’t get discouraged if you don’t see results immediately.
Growing your own ginger is a rewarding experience that allows
Conclusion
So, there you have it! Growing ginger at home isn’t just a fun gardening project; it’s a gateway to fresher, more flavorful ginger than you’ll ever find at the grocery store. Think about it: no more shriveled, dry ginger lurking in the produce aisle. Instead, you’ll have plump, juicy rhizomes ready to be harvested whenever you need them. This DIY trick is a must-try for anyone who loves to cook with ginger, enjoys gardening, or simply wants to add a touch of green to their indoor space.
But the benefits extend beyond just convenience and flavor. Growing your own ginger allows you to control the entire process, ensuring that your ginger is free from harmful pesticides and chemicals. You’ll know exactly where it came from and how it was grown, giving you peace of mind and a healthier product. Plus, the vibrant green shoots of the ginger plant add a beautiful, tropical touch to any room.
Don’t be afraid to experiment with different varieties of ginger. While common ginger is readily available, you might be able to find other types like galangal or turmeric, which are closely related and can be grown using similar methods. Consider planting your ginger in different types of containers to see which works best for you. Some people prefer terracotta pots, while others find success with plastic containers. You can also adjust the amount of sunlight your ginger receives to see how it affects growth.
For a spicier kick, try letting your ginger mature for a longer period before harvesting. The longer it grows, the more intense the flavor will become. Alternatively, harvest young ginger for a milder, more delicate taste. Young ginger is perfect for pickling or adding to salads.
We’re confident that you’ll find growing ginger at home to be a rewarding and enjoyable experience. It’s a simple project that yields delicious results. So, grab a ginger rhizome, follow our instructions, and get ready to enjoy the freshest ginger you’ve ever tasted.
We encourage you to try this DIY trick and share your experiences with us! Let us know how your ginger is growing, what challenges you encountered, and any tips or tricks you discovered along the way. Share your photos and stories on social media using #HomegrownGinger and let’s create a community of home ginger growers! We can’t wait to see your green thumbs in action! This is the best way to ensure you always have fresh ginger on hand.
Frequently Asked Questions (FAQ)
1. What kind of ginger should I use to start growing?
The best type of ginger to use for starting your own plant is fresh, unblemished ginger root from the grocery store. Look for rhizomes that are plump, firm, and have visible “eyes” or buds. Organic ginger is often recommended, as it’s less likely to have been treated with growth inhibitors. Avoid ginger that looks shriveled, dry, or moldy.
2. How long does it take to grow ginger at home?
The time it takes to grow ginger at home can vary depending on factors such as climate, growing conditions, and the specific variety of ginger. Generally, it takes around 8-10 months from planting to harvest mature ginger. However, you can start harvesting young ginger shoots after about 4 months for a milder flavor. Be patient and provide the right conditions, and you’ll be rewarded with fresh ginger in due time.
3. What kind of soil is best for growing ginger?
Ginger thrives in well-draining, nutrient-rich soil. A good potting mix for ginger should be loose and airy, allowing for proper root development. You can create your own mix by combining equal parts of potting soil, compost, and perlite or vermiculite. The compost provides essential nutrients, while the perlite or vermiculite improves drainage and aeration. Avoid heavy clay soils, as they can retain too much moisture and lead to root rot.
4. How much sunlight does ginger need?
Ginger prefers bright, indirect sunlight. Avoid placing your ginger plant in direct sunlight, as it can scorch the leaves. A spot near an east-facing window is ideal, as it provides gentle morning sun. If you’re growing ginger outdoors, choose a location that receives partial shade, especially during the hottest part of the day. If you don’t have access to natural light, you can supplement with grow lights.
5. How often should I water my ginger plant?
Water your ginger plant regularly, keeping the soil consistently moist but not waterlogged. Allow the top inch of soil to dry out slightly between waterings. Overwatering can lead to root rot, so it’s important to ensure proper drainage. During the growing season (spring and summer), you may need to water more frequently than during the dormant season (fall and winter). Check the soil moisture regularly and adjust your watering schedule accordingly.
6. How do I know when my ginger is ready to harvest?
You can harvest ginger at any stage, depending on your desired flavor. For young ginger with a milder taste, harvest after about 4 months. For mature ginger with a stronger, spicier flavor, wait 8-10 months. To harvest, gently dig around the plant and lift the rhizome from the soil. You can harvest the entire plant or just a portion of the rhizome, leaving the rest to continue growing.
7. Can I grow ginger indoors year-round?
Yes, you can grow ginger indoors year-round, especially in colder climates. Provide your ginger plant with adequate light, warmth, and humidity. Maintain consistent watering and fertilizing schedules. During the winter months, growth may slow down, but with proper care, your ginger plant can continue to thrive indoors.
8. What are some common problems when growing ginger and how can I fix them?
Some common problems when growing ginger include root rot, pests, and nutrient deficiencies. Root rot is caused by overwatering and poor drainage. To prevent root rot, ensure your soil is well-draining and avoid overwatering. Pests such as aphids and spider mites can infest ginger plants. Treat infestations with insecticidal soap or neem oil. Nutrient deficiencies can cause yellowing leaves or stunted growth. Fertilize your ginger plant regularly with a balanced fertilizer.
9. Can I grow ginger in a container? What size container should I use?
Yes, ginger grows very well in containers. Choose a container that is at least 12 inches deep and wide to allow for adequate root development. Make sure the container has drainage holes to prevent waterlogging. As the ginger plant grows, you may need to repot it into a larger container.
10. How do I store harvested ginger?
Freshly harvested ginger can be stored in the refrigerator for several weeks. Wrap the ginger rhizome in a paper towel and place it in a plastic bag or container. You can also freeze ginger for longer storage. Peel and chop the ginger into small pieces, then freeze them in a single layer on a baking sheet. Once frozen, transfer the ginger pieces to a freezer bag or container. Frozen ginger can be used directly from the freezer in cooking.


Leave a Comment