

Clean Gas Stove: Is your gas stove looking less like a culinary command center and more like a Jackson Pollock painting gone wrong? Don’t despair! We’ve all been there. That burnt-on food, greasy splatters, and general grime can make even the most enthusiastic cook want to order takeout. But before you resign yourself to a lifetime of scrubbing (or a new stove!), I’m here to share some amazing DIY tricks and hacks that will have your gas stove sparkling in no time.
For generations, the heart of the home has been the kitchen, and the heart of the kitchen? The stove! From wood-burning hearths to the modern gas stove, this appliance has fueled countless meals and family memories. While the technology has evolved, one thing remains constant: the need to keep it clean! A clean cooking surface isn’t just about aesthetics; it’s about hygiene, efficiency, and even safety. A grimy stove can harbor bacteria, affect cooking performance, and even pose a fire hazard.
Let’s face it, nobody enjoys spending hours scrubbing away at stubborn stains. That’s why I’ve compiled these easy-to-follow DIY methods to clean gas stove surfaces effectively and efficiently. These aren’t your grandma’s old-fashioned cleaning methods (unless your grandma was a cleaning genius!). We’re talking about clever hacks using common household ingredients that will save you time, money, and elbow grease. So, ditch the harsh chemicals and get ready to transform your grimy gas stove into a gleaming masterpiece with these simple, yet effective, DIY solutions!
DIY Deep Clean: Revive Your Grimy Gas Stove Like a Pro!
Okay, let’s face it, gas stoves are amazing for cooking, but cleaning them? Not so much fun. But don’t worry, I’m here to guide you through a deep clean that will leave your stove sparkling and working like new. We’re talking removing stubborn grease, burnt-on food, and all that other gunk that accumulates over time. Get ready to roll up your sleeves – it’s cleaning time!
What You’ll Need: Your Cleaning Arsenal
Before we dive in, let’s gather our supplies. Having everything ready will make the process much smoother.
* Dish Soap: A good degreasing dish soap is essential.
* Baking Soda: This is our secret weapon for tackling tough stains.
* White Vinegar: The acidity helps break down grease and grime.
* Spray Bottle: For easy application of cleaning solutions.
* Microfiber Cloths: These are gentle yet effective for wiping surfaces.
* Non-Scratch Scrub Sponge: For scrubbing without damaging the stove.
* Old Toothbrush: Perfect for cleaning those hard-to-reach areas.
* Paper Towels: For soaking up spills and drying surfaces.
* Safety Gloves: Protect your hands from harsh chemicals and grime.
* Small Bowl or Container: For soaking burner caps and grates.
* Optional: Oven cleaner (for extremely stubborn stains), degreaser spray.
* Optional: Safety Glasses (to protect your eyes from splashes).
Safety First!
Before we start, let’s make sure we’re being safe.
* Turn off the gas supply: This is crucial! Locate the gas shut-off valve behind your stove or in the basement and turn it off.
* Unplug the stove: If your stove has electronic ignition, unplug it from the power outlet.
* Ventilation: Open windows or turn on the exhaust fan to ensure proper ventilation.
Disassembling the Stove: Getting Ready to Clean
Now, let’s take the stove apart so we can get to all those nooks and crannies.
1. Remove the Grates: Carefully lift off the grates. These are usually the dirtiest part, so we’ll give them extra attention.
2. Remove the Burner Caps and Heads: Lift off the burner caps and heads. Be sure to remember their placement so you can put them back correctly later. Take a picture with your phone if you’re unsure!
3. Remove the Control Knobs: Most control knobs can be pulled straight off. If they’re stuck, try gently wiggling them while pulling. Don’t force them! Some knobs might have a small screw on the side that needs to be loosened first.
4. Remove Drip Pans (if applicable): Some stoves have drip pans under the burners. Remove these for cleaning as well.
Cleaning the Grates: Tackling the Toughest Grime
The grates usually bear the brunt of spills and splatters, so they need some serious cleaning power.
1. Soak the Grates: Fill a large sink or tub with hot, soapy water. Add a generous amount of dish soap and let the grates soak for at least 30 minutes. For really stubborn grime, you can add 1/2 cup of baking soda to the water.
2. Scrub the Grates: After soaking, use a non-scratch scrub sponge to scrub the grates thoroughly. Pay extra attention to burnt-on food and grease. If the grime is really tough, you can make a paste of baking soda and water and apply it to the affected areas. Let it sit for a few minutes before scrubbing.
3. Rinse the Grates: Rinse the grates thoroughly with clean water to remove all traces of soap and baking soda.
4. Dry the Grates: Dry the grates completely with a clean microfiber cloth or paper towels. Make sure they are completely dry before placing them back on the stove to prevent rust.
Cleaning the Burner Caps and Heads: Restoring the Flame
Clean burner caps and heads are essential for proper gas flow and even cooking.
1. Soak the Burner Caps and Heads: Fill a small bowl or container with hot, soapy water. Add a generous amount of dish soap and let the burner caps and heads soak for at least 30 minutes.
2. Scrub the Burner Caps and Heads: Use an old toothbrush or a small scrub brush to clean the burner caps and heads. Pay close attention to the small holes, as these can become clogged with debris. You can use a needle or a thin wire to carefully clear any clogs.
3. Rinse the Burner Caps and Heads: Rinse the burner caps and heads thoroughly with clean water to remove all traces of soap.
4. Dry the Burner Caps and Heads: Dry the burner caps and heads completely with a clean microfiber cloth or paper towels. Make sure they are completely dry before placing them back on the stove.
Cleaning the Stove Top: From Grimy to Gleaming
Now, let’s tackle the stove top itself.
1. Remove Loose Debris: Use a dry microfiber cloth or paper towels to wipe away any loose crumbs or debris from the stove top.
2. Apply a Baking Soda Paste: Make a paste of baking soda and water. The consistency should be thick enough to spread easily. Apply the paste to the entire stove top, focusing on areas with stubborn stains or grease.
3. Let the Paste Sit: Let the baking soda paste sit for at least 15-20 minutes. This will give it time to break down the grime. For really tough stains, you can let it sit for longer, even overnight.
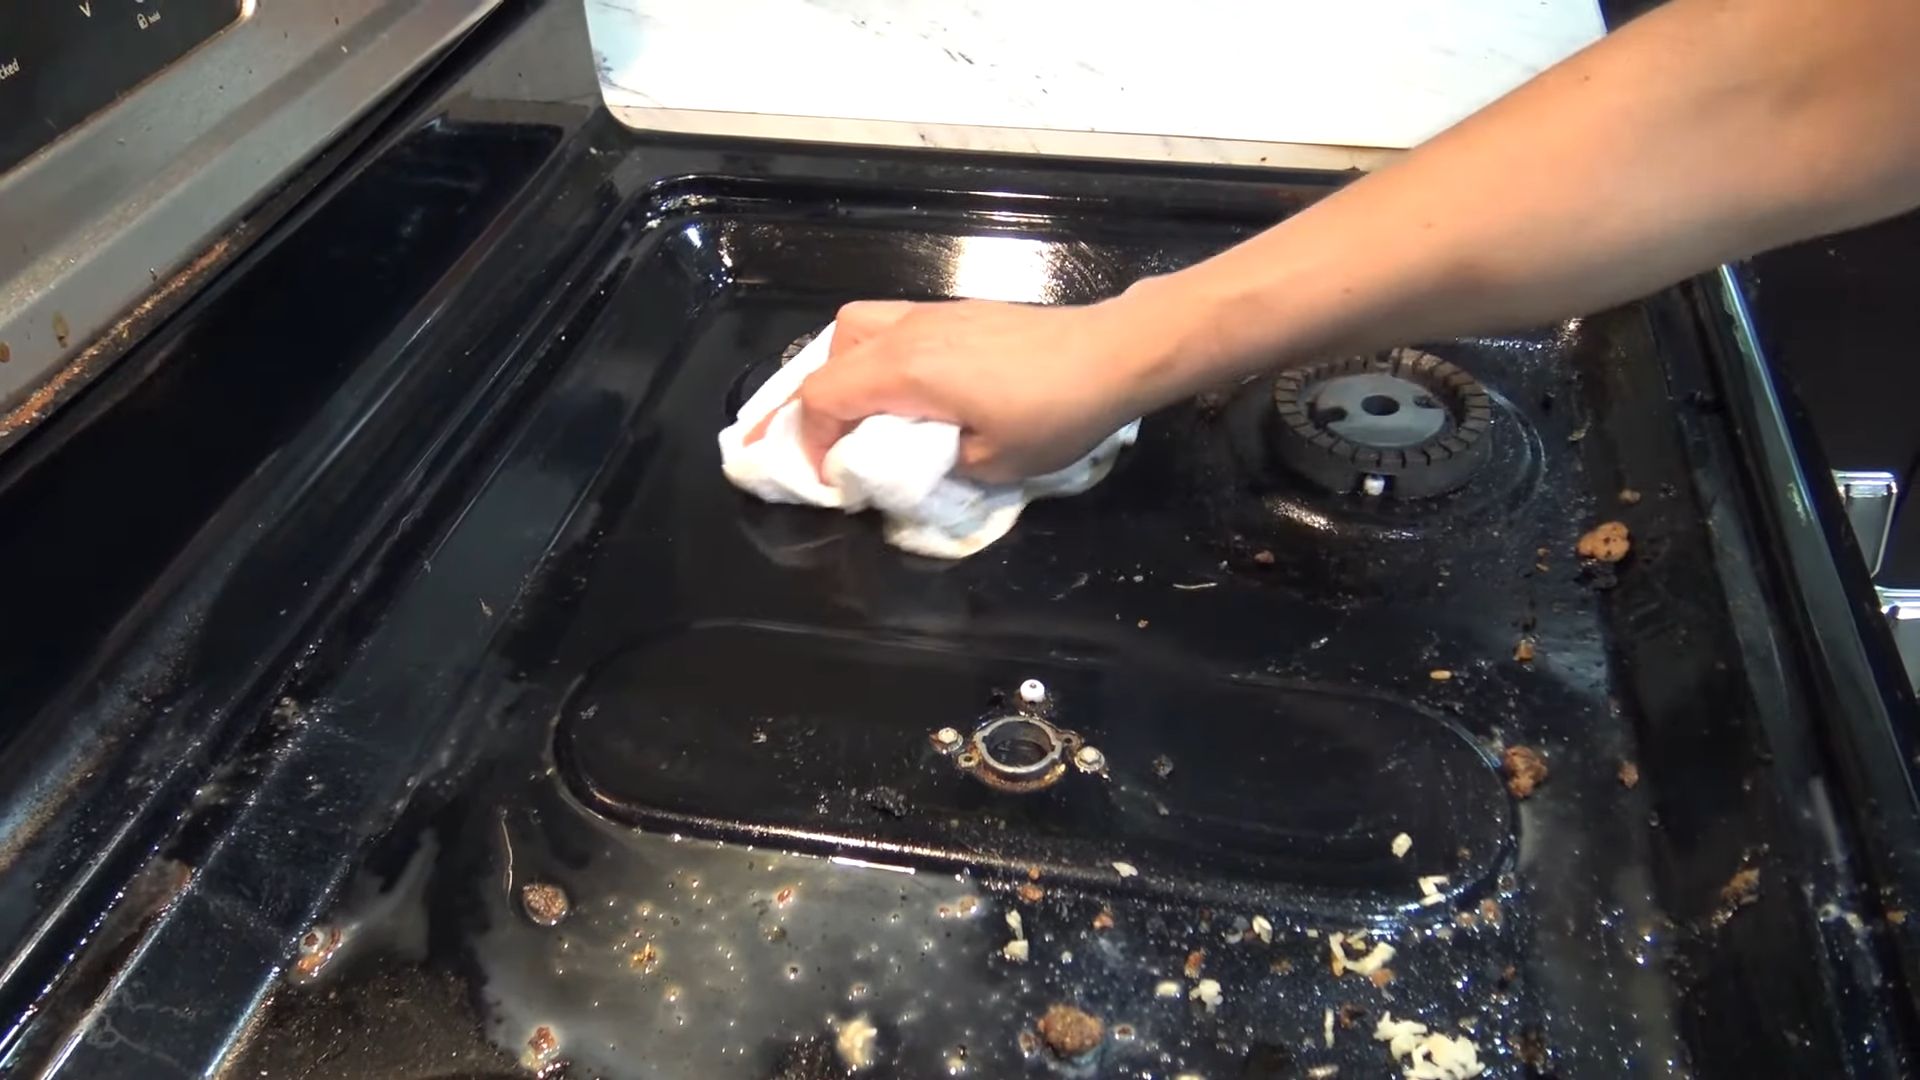
4. Wipe Away the Paste: Use a damp microfiber cloth to wipe away the baking soda paste. You may need to use a bit of elbow grease to remove all the residue.
5. Spray with Vinegar: Fill a spray bottle with white vinegar and spray the entire stove top. The vinegar will react with any remaining baking soda, creating a fizzing action that helps to further loosen grime.
6. Wipe Clean: Use a clean, damp microfiber cloth to wipe away the vinegar and any remaining residue.
7. Dry the Stove Top: Dry the stove top completely with a clean microfiber cloth or paper towels.
Cleaning the Control Knobs: Bringing Back the Shine
Don’t forget the control knobs! These can get pretty grimy from handling.
1. Soak the Control Knobs: Fill a small bowl with warm, soapy water. Add the control knobs and let them soak for about 15 minutes.
2. Scrub the Control Knobs: Use a soft brush or a microfiber cloth to scrub the control knobs. Pay attention to any grooves or crevices where grime may accumulate.
3. Rinse the Control Knobs: Rinse the control knobs thoroughly with clean water.
4. Dry the Control Knobs: Dry the control knobs completely with a clean microfiber cloth.
Reassembling the Stove: Putting It All Back Together
Now that everything is clean and dry, it’s time to put the stove back together.
1. Replace the Drip Pans (if applicable): Place the drip pans back under the burners.
2. Replace the Burner Caps and Heads: Carefully place the burner caps and heads back onto the stove top. Make sure they are properly aligned. Refer to the picture you took earlier if you need help remembering their placement.
3. Replace the Grates: Place the grates back on the stove top.
4. Replace the Control Knobs: Push the control knobs back onto their posts. Make sure they are securely attached.
Final Touches: Making It Sparkle
Now that the stove is reassembled, let’s add some final touches to make it sparkle.
1. Polish the Stove Top: Use a stainless steel cleaner or polish to polish the stove top. This will help to remove any streaks or smudges and give it a beautiful shine. Follow the instructions on the cleaner or polish.
2. Wipe Down the Exterior: Use a damp microfiber cloth to wipe down the exterior of the stove, including the sides and front.
3. Admire Your Work: Step back and admire your sparkling clean gas stove!
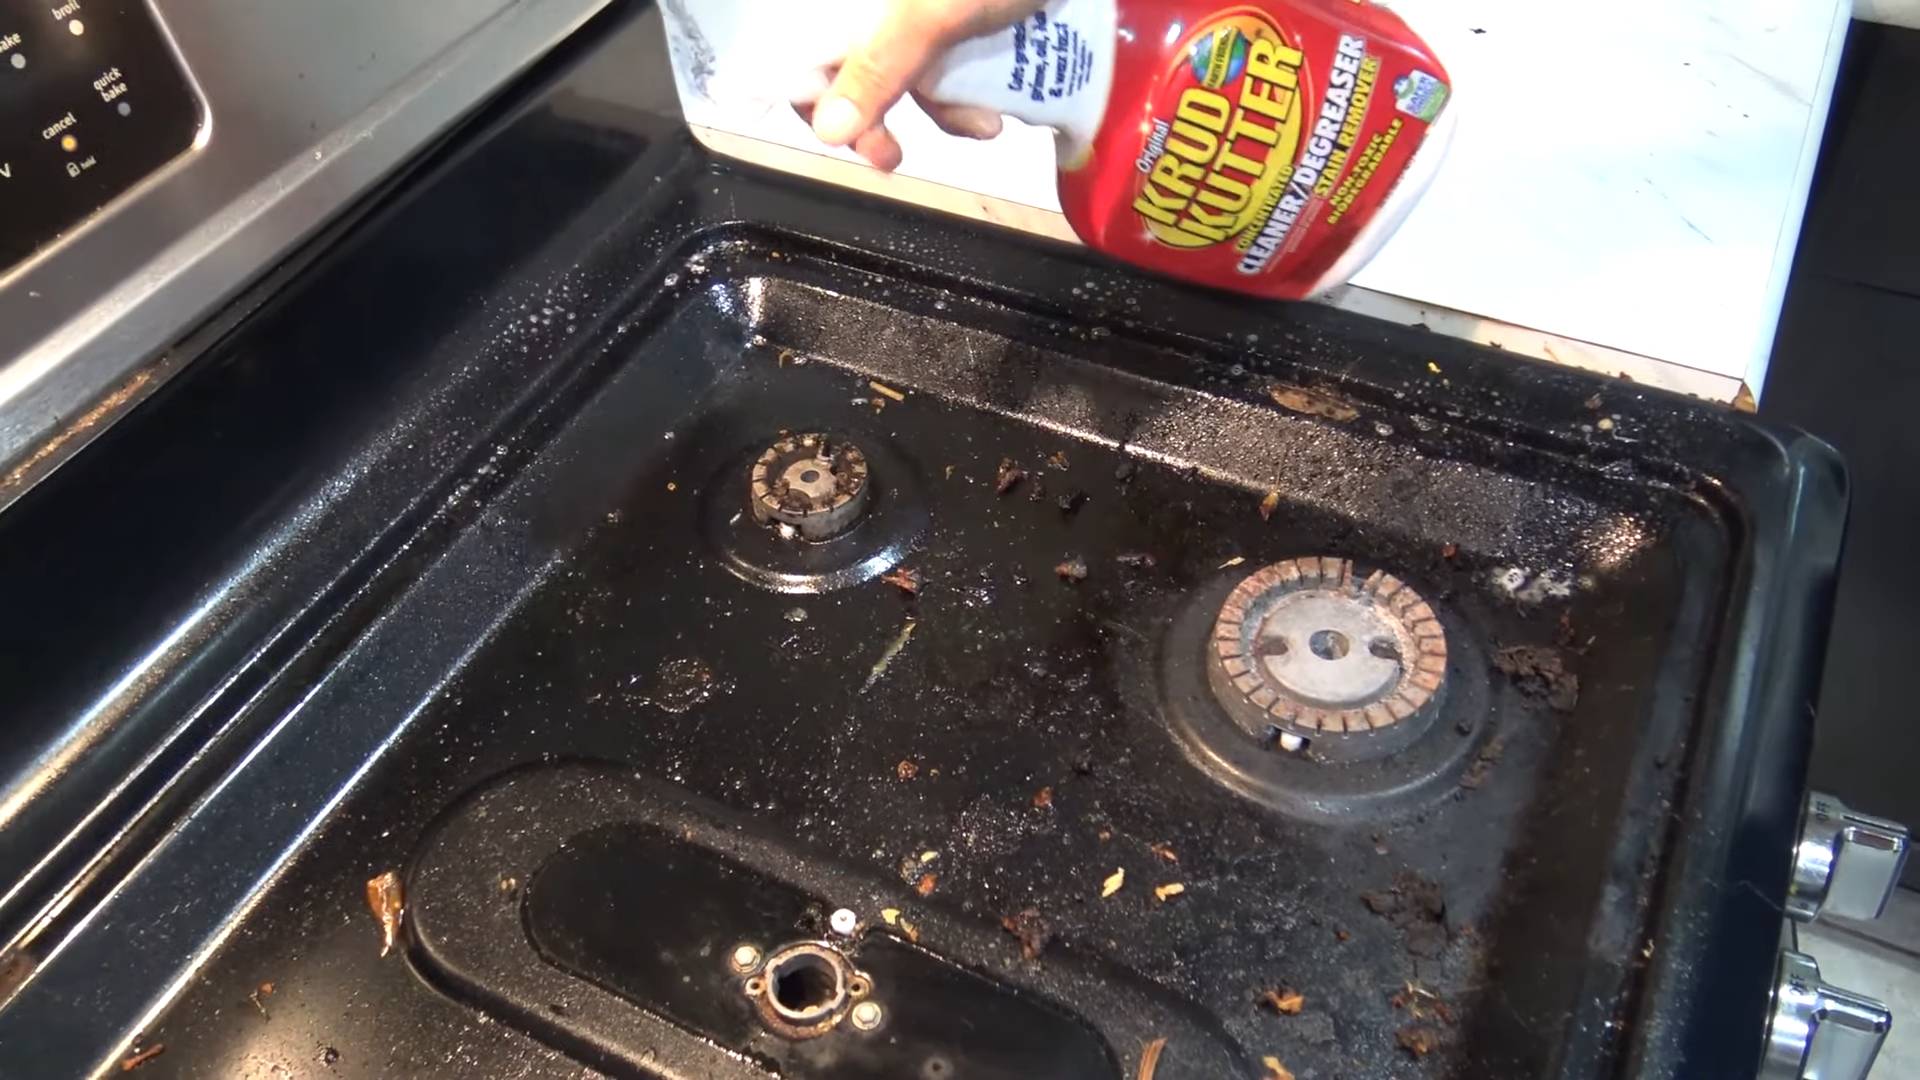
Dealing with Stubborn Stains: When Baking Soda Isn’t Enough
Sometimes, you’ll encounter stains that just won’t budge with baking soda and vinegar. In these cases, you might need to bring in the big guns.
* Oven Cleaner: For extremely stubborn burnt-on food, you can use oven cleaner. Be sure to follow the instructions on the can carefully and wear gloves and eye protection. Spray the oven cleaner on the affected area, let it sit for the recommended time, and then scrub with a non-scratch
Conclusion
So, there you have it! A simple, effective, and surprisingly satisfying way to tackle that grimy gas stove. Forget harsh chemicals and endless scrubbing. This DIY cleaning trick, using readily available household ingredients, offers a powerful yet gentle approach to restoring your gas stove to its former glory. We’ve shown you how to cut through grease, lift stubborn stains, and leave your stovetop sparkling, all without breaking the bank or exposing yourself to potentially harmful fumes.
But why is this DIY method a must-try? Beyond the obvious cost savings and eco-friendliness, it’s about control. You know exactly what’s going onto your stove, and you can adjust the ingredients to suit your specific needs and preferences. Plus, there’s a certain satisfaction that comes from creating your own cleaning solution and seeing it work wonders.
Looking for variations? Absolutely! For particularly stubborn burnt-on food, consider adding a tablespoon of baking soda directly to the affected area before applying the paste. Let it sit for an extra 15-20 minutes to really loosen the grime. Another option is to use a microfiber cloth instead of a sponge for the final wipe-down. Microfiber cloths are excellent at picking up residue and leaving a streak-free shine. If you have a stainless steel gas stove, you can add a few drops of lemon essential oil to your final cleaning water for an extra boost of shine and a pleasant citrus scent. Remember to always test any new cleaning solution on a small, inconspicuous area first to ensure it doesn’t damage the surface.
This method is not just about cleaning; it’s about maintaining your gas stove and extending its lifespan. A clean stove operates more efficiently, distributing heat evenly and preventing potential hazards caused by built-up grease and debris. Regular cleaning also makes future cleanings easier, preventing grime from hardening and becoming more difficult to remove.
We’re confident that this DIY cleaning trick will become a staple in your cleaning routine. It’s simple, effective, and customizable to your specific needs. So, ditch the expensive cleaners and give this method a try. You’ll be amazed at the results!
Now, we want to hear from you! Have you tried this DIY method for cleaning your gas stove? What variations did you use? What were your results? Share your experiences, tips, and photos in the comments below. Let’s build a community of clean stove enthusiasts and help each other keep our kitchens sparkling! Your feedback is invaluable and will help us refine and improve this method for everyone. Don’t be shy – let us know how this DIY gas stove cleaning trick worked for you! We are eager to learn from your experiences and see your sparkling stovetops!
Frequently Asked Questions (FAQ)
1. What ingredients do I need for this DIY gas stove cleaning trick?
The basic ingredients are likely already in your pantry! You’ll need:
* Baking soda: This acts as a gentle abrasive to lift dirt and grime.
* Dish soap: Cuts through grease and helps to dissolve food particles.
* White vinegar: Helps to break down mineral deposits and adds shine.
* Water: To create the cleaning paste or solution.
Optional ingredients for variations include:
* Lemon essential oil: For added shine and a pleasant scent (especially good for stainless steel).
* Microfiber cloths: For a streak-free finish.
2. Is this DIY cleaning method safe for all types of gas stoves?
This method is generally safe for most gas stoves, including those with stainless steel, enamel, or porcelain surfaces. However, it’s always a good idea to test the cleaning solution on a small, inconspicuous area first to ensure it doesn’t damage the surface. Avoid using abrasive scrubbers or steel wool, as these can scratch the stovetop. If you have a particularly delicate or antique stove, consult the manufacturer’s instructions before using any cleaning products.
3. How often should I clean my gas stove using this method?
The frequency of cleaning depends on how often you cook and how messy things get. For light spills and splatters, a quick wipe-down with a damp cloth and a little dish soap after each use is usually sufficient. For a more thorough cleaning, using this DIY method once a week or every other week is generally recommended. If you tend to cook frequently or make particularly messy meals, you may need to clean your stove more often.
4. Can I use this method to clean the gas stove burners and grates?
Yes, this method can be used to clean the gas stove burners and grates. For the burners, remove them from the stove and soak them in a solution of warm water, dish soap, and white vinegar for about 30 minutes. Then, scrub them with a brush to remove any remaining grime. Rinse thoroughly and dry completely before reassembling. For the grates, you can either soak them in the same solution or apply the baking soda paste directly to the grates, let it sit for a while, and then scrub them clean. Make sure to rinse and dry them thoroughly before placing them back on the stove.
5. What if I have really stubborn burnt-on food that won’t come off?
For particularly stubborn burnt-on food, try these tips:
* Apply a thick layer of the baking soda paste directly to the affected area.
* Let it sit for an extended period, such as overnight.
* Add a tablespoon of baking soda directly to the affected area before applying the paste.
* Gently scrub the area with a non-abrasive sponge or brush.
* If the food is still stuck, try using a plastic scraper to gently lift it off.
* Repeat the process if necessary.
6. Can I use other types of vinegar besides white vinegar?
While white vinegar is the most commonly recommended type of vinegar for cleaning, you can also use apple cider vinegar as a substitute. However, avoid using balsamic vinegar or other dark-colored vinegars, as they may stain the stovetop.
7. How do I prevent my gas stove from getting so dirty in the first place?
Prevention is key! Here are a few tips to keep your gas stove cleaner:
* Wipe up spills and splatters immediately after they occur.
* Use splatter screens when frying or cooking foods that tend to splatter.
* Clean your stove regularly, even if it doesn’t look particularly dirty.
* Avoid letting food boil over onto the stovetop.
* Consider using pot lids to prevent splattering.
8. Is this DIY cleaning method environmentally friendly?
Yes, this DIY cleaning method is much more environmentally friendly than using harsh chemical cleaners. The ingredients are natural, biodegradable, and less likely to harm the environment. By making your own cleaning solutions, you can reduce your reliance on commercially produced cleaners that often contain harmful chemicals and contribute to pollution.
9. My gas stove has a stainless steel surface. Are there any special considerations?
Yes, stainless steel can be prone to streaks and water spots. To prevent this, use a microfiber cloth for the final wipe-down and dry the surface thoroughly. You can also add a few drops of lemon essential oil to your final cleaning water for an extra boost of shine and to help prevent streaks. Always wipe in the direction of the grain of the stainless steel to avoid scratching.
10. What should I do if the gas stove cleaning trick doesn’t work for me?
If this DIY cleaning trick doesn’t work for you, it could be due to several factors, such as the severity of the grime, the type of stovetop surface, or the specific ingredients used. Try adjusting the recipe or method to suit your needs. You can also consult the manufacturer’s instructions for your gas stove for specific cleaning recommendations. If all else fails, you may need to consider using a commercially available gas stove cleaner, but be sure to choose one that is safe for your stovetop surface and follow the instructions carefully.


Leave a Comment