

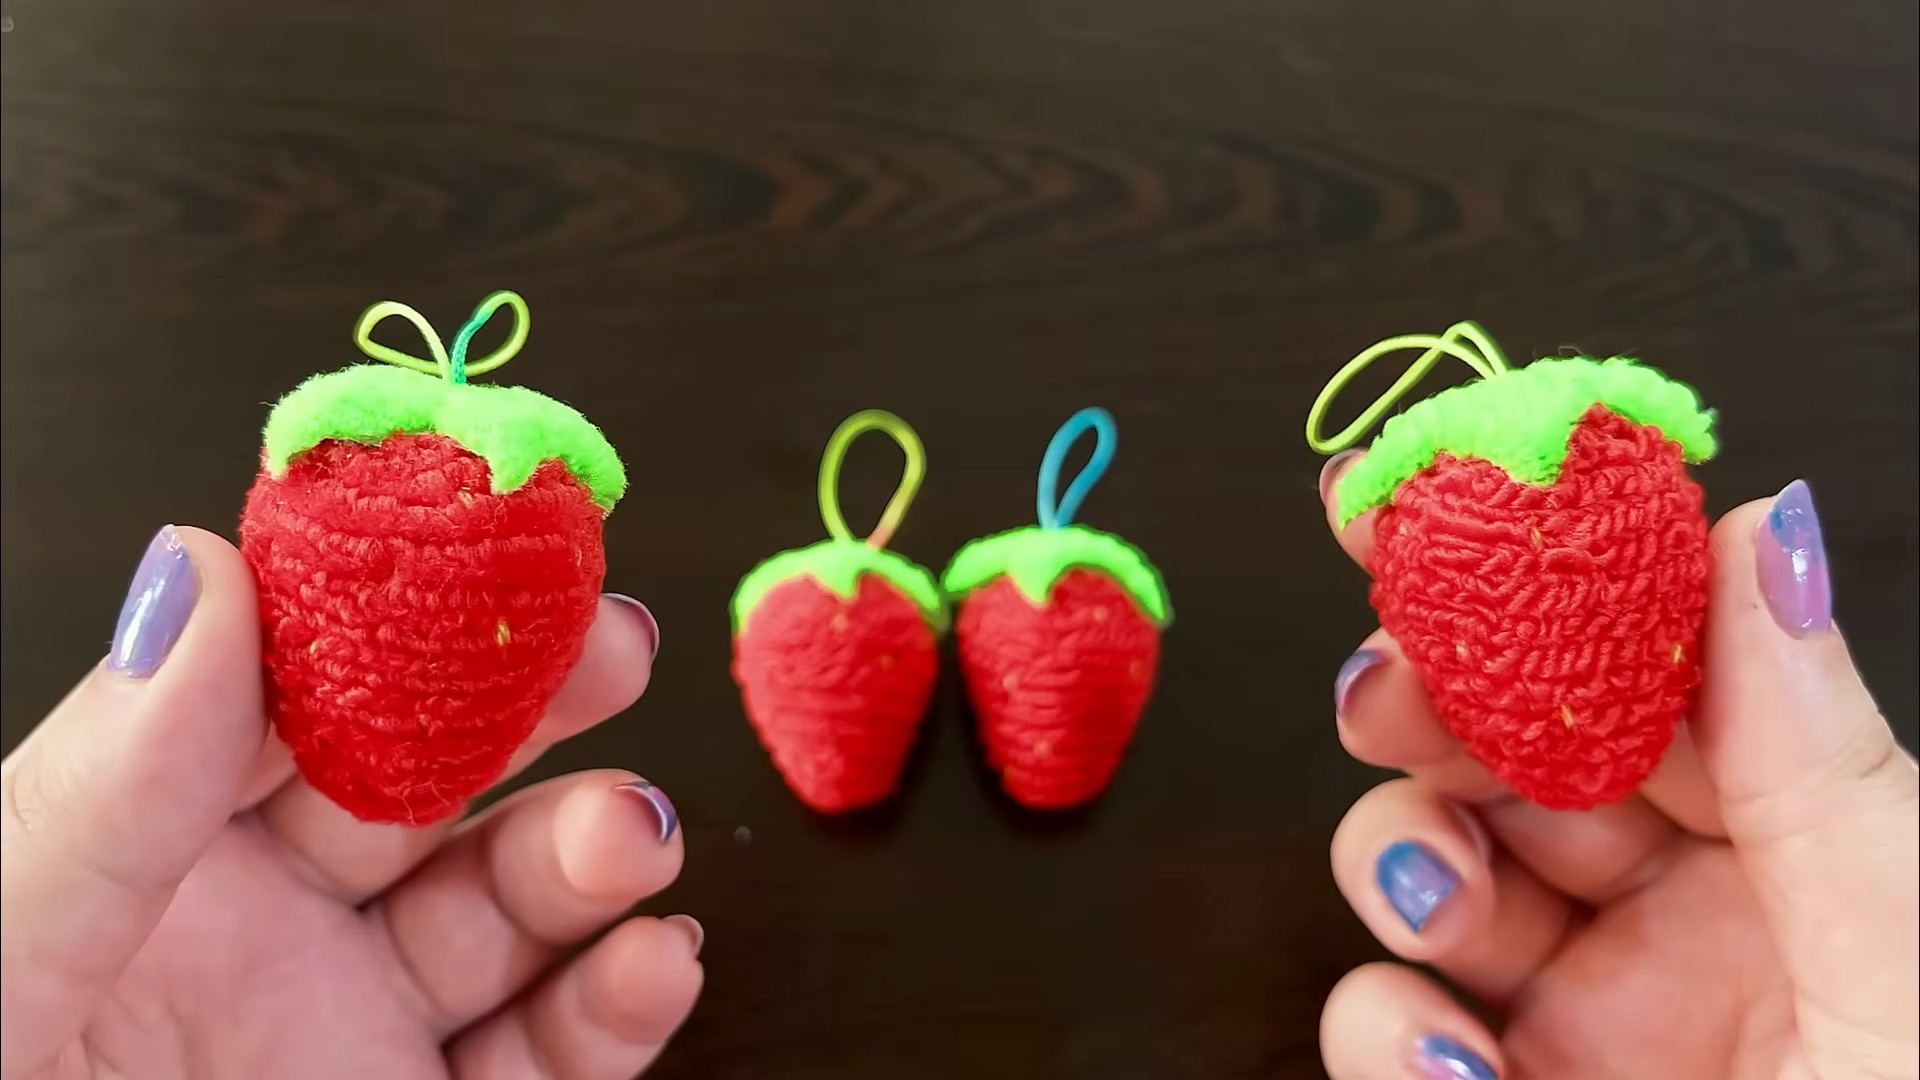
DIY Strawberry Keychain: Who doesn’t love a little burst of summery sweetness dangling from their keys or backpack? I know I do! And what if I told you that you could create your very own adorable strawberry keychain with just a few simple materials and a dash of creativity? This isn’t just another craft project; it’s a chance to personalize your belongings and add a touch of handmade charm to your everyday life.
The tradition of crafting small, decorative items to carry with us dates back centuries. From ancient amulets to Victorian-era lockets, humans have always sought ways to express themselves and keep cherished symbols close. This DIY Strawberry Keychain project taps into that same desire, allowing you to create a miniature work of art that reflects your personality.
Let’s face it, in a world of mass-produced goods, something handmade stands out. This DIY project is perfect for anyone looking to add a unique touch to their accessories or create a thoughtful, personalized gift. Plus, it’s a fantastic way to unwind, get creative, and maybe even discover a new hobby! So, grab your supplies, and let’s get crafting! I’m excited to guide you through the process of creating your very own delightful strawberry keychain.
DIY Adorable Strawberry Keychain: A Sweet Project for Any Skill Level
Hey there, fellow crafters! Today, I’m super excited to share a fun and easy DIY project with you: creating an adorable strawberry keychain! This little charm is perfect for adding a touch of sweetness to your keys, backpack, or even as a cute gift for a friend. Don’t worry if you’re a beginner; I’ll guide you through each step with clear instructions and helpful tips. Let’s get started!
What You’ll Need
Before we dive in, let’s gather all the necessary materials. Having everything organized will make the process much smoother.
* **Felt:** Red, green, and white felt are essential for the strawberry body, leaves, and seeds. I recommend using wool felt for a higher quality finish, but acrylic felt works just fine too!
* **Embroidery Floss:** Matching colors to your felt (red, green, white) are ideal. You’ll also need a contrasting color like black or dark brown for the seed details if you prefer a more defined look.
* **Embroidery Needle:** A sharp needle with a large eye will make threading the floss much easier.
* **Scissors:** A good pair of fabric scissors is crucial for clean cuts.
* **Stuffing:** Polyester fiberfill is perfect for giving your strawberry a plump and cuddly shape.
* **Keychain Ring:** Choose a keychain ring that suits your style. You can find these at most craft stores.
* **Jump Ring:** A small jump ring will connect the strawberry to the keychain ring.
* **Pliers (Optional):** Pliers can be helpful for opening and closing the jump ring.
* **Pencil or Fabric Marker:** For tracing the pattern onto the felt.
* **Paper:** For creating your strawberry pattern.
* **Ruler:** For measuring and ensuring accurate cuts.
* **Glue (Optional):** Fabric glue can be used to secure small details, but sewing is generally more durable.
Creating Your Strawberry Pattern
This is a crucial step, so take your time and be precise!
1. **Draw a Strawberry Shape:** On a piece of paper, draw a simple strawberry shape. It doesn’t have to be perfect; a slightly rounded triangle will do. I usually aim for about 2-3 inches in height.
2. **Add Seam Allowance:** Around your strawberry shape, draw another line about ¼ inch away from the original. This is your seam allowance, which will allow you to sew the pieces together.
3. **Cut Out the Pattern:** Carefully cut out the pattern along the outer line (including the seam allowance).
4. **Create Leaf Pattern:** Draw a small leaf shape on the paper. I like to make mine slightly jagged for a more realistic look. Again, add a ¼ inch seam allowance and cut it out. You’ll need 2-3 leaves.
5. **Optional: Create Seed Pattern:** If you want to pre-mark your seed placement, draw small dots on your strawberry pattern where you want the seeds to be. This will help ensure even spacing.
Cutting the Felt Pieces
Now that we have our patterns, it’s time to cut out the felt pieces.
1. **Pin the Strawberry Pattern:** Pin the strawberry pattern to the red felt. Make sure the felt is flat and wrinkle-free.
2. **Cut Out the Strawberry Body:** Carefully cut out two pieces of the strawberry body using your fabric scissors. Follow the pattern closely, ensuring you cut along the outer line (including the seam allowance).
3. **Pin the Leaf Pattern:** Pin the leaf pattern to the green felt.
4. **Cut Out the Leaves:** Cut out 2-3 leaves.
5. **Cut Out White Felt for Seeds (Optional):** You can either cut out tiny individual seed shapes from white felt, or you can embroider the seeds directly onto the strawberry. If you choose to cut out felt seeds, cut out a small amount of white felt into tiny teardrop shapes.
Embroidering the Seeds (Optional)
If you’re opting for embroidered seeds, this is the time to do it.
1. **Thread Your Needle:** Thread your embroidery needle with white or dark brown embroidery floss. Tie a knot at the end.
2. **Embroider the Seeds:** Using a simple straight stitch or French knot, embroider the seeds onto one of the strawberry body pieces. If you used a seed pattern, follow the dots you marked earlier. If not, space the seeds evenly across the strawberry. I like to use a scattered pattern for a more natural look.
3. **Secure the Thread:** Once you’ve embroidered all the seeds, tie a knot on the back of the felt to secure the thread and trim the excess.
Sewing the Strawberry Body
This is where your strawberry starts to take shape!
1. **Pin the Strawberry Pieces Together:** Place the two strawberry body pieces together, with the embroidered side (if applicable) facing out. Pin them together around the edges, leaving a small opening at the top for stuffing.
2. **Thread Your Needle:** Thread your embroidery needle with red embroidery floss. Tie a knot at the end.
3. **Sew Around the Edges:** Using a blanket stitch or running stitch, sew around the edges of the strawberry, starting at one side of the opening and ending at the other. Make sure your stitches are close together for a neat and secure seam.
* Blanket Stitch: Bring the needle up through the edge of the felt, then loop the thread around the edge before inserting the needle again. This creates a decorative edge.
* Running Stitch: Simply sew in and out along the edge of the felt. This is a quicker option, but less decorative.
4. **Remove the Pins:** Once you’ve sewn almost all the way around, remove the pins.
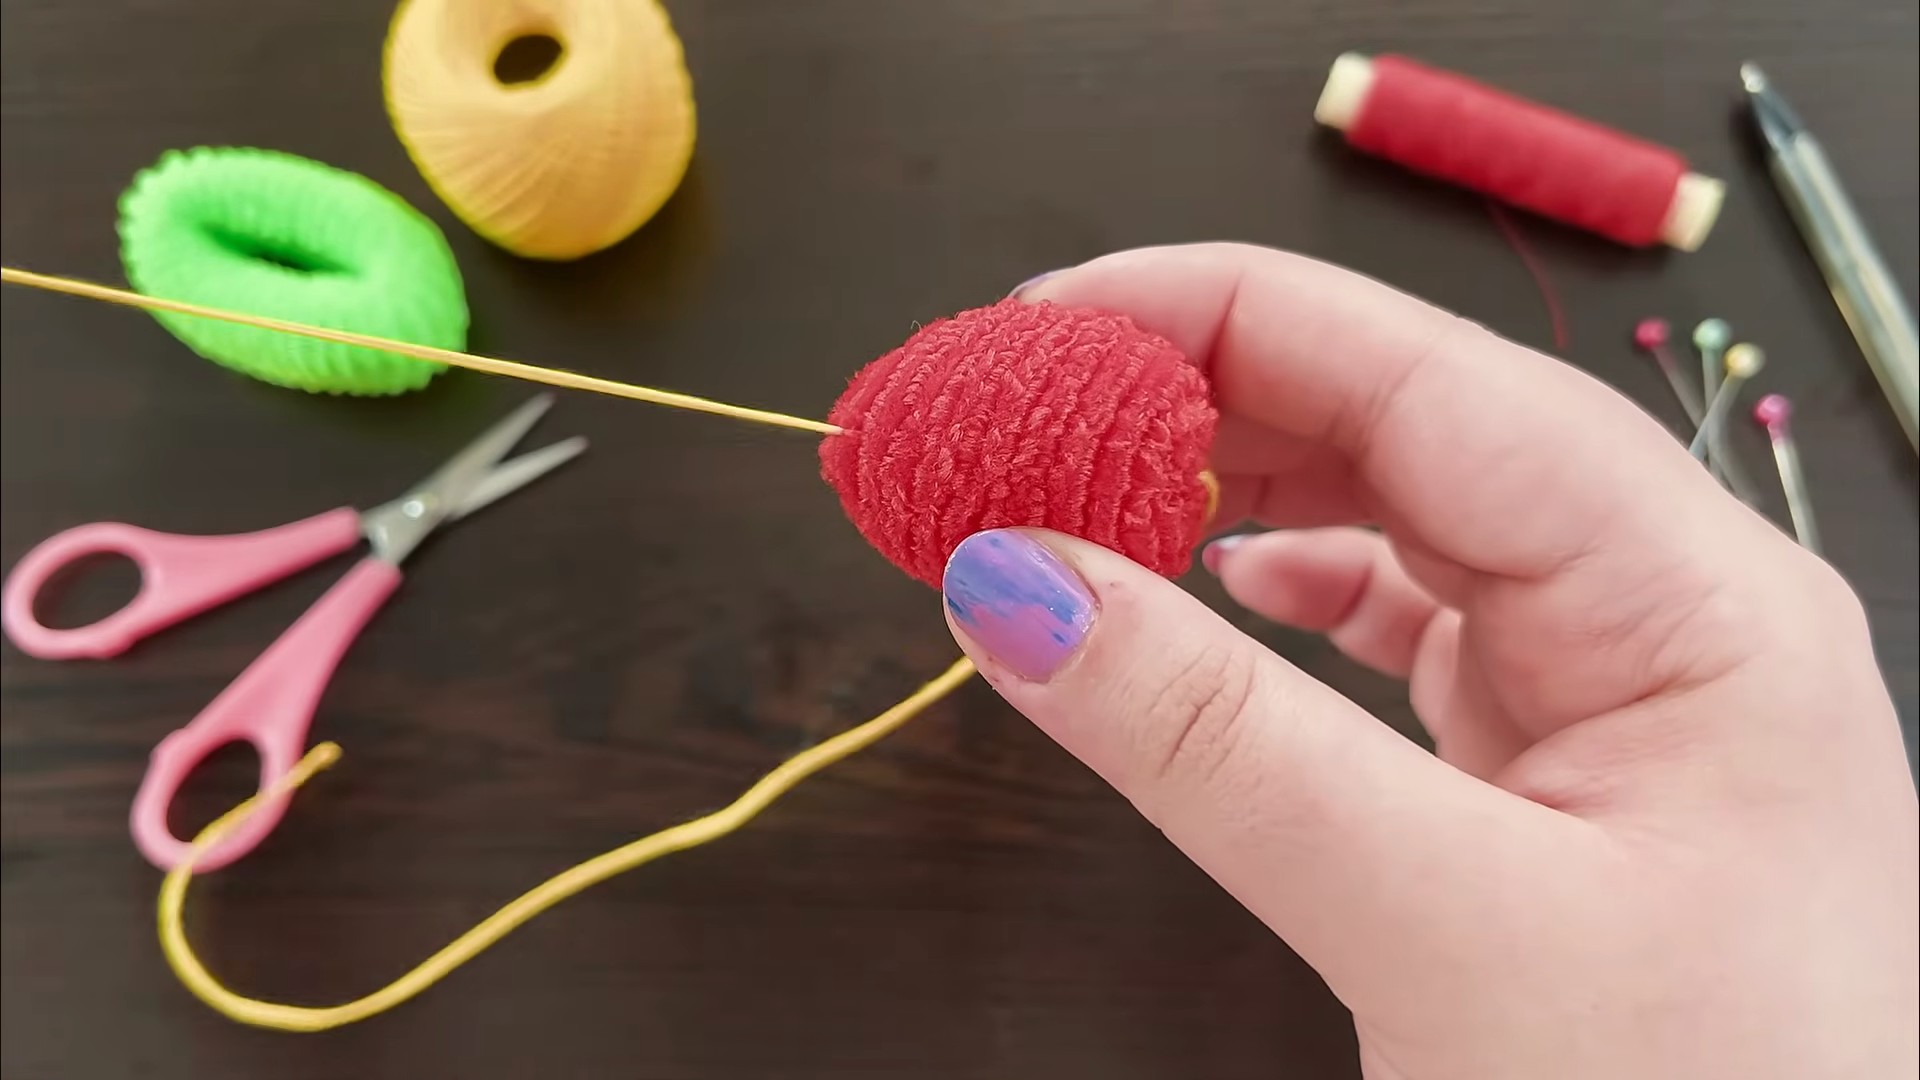
Stuffing the Strawberry
Time to give your strawberry some volume!
1. **Stuff the Strawberry:** Carefully stuff the strawberry with polyester fiberfill through the opening at the top. Use a small amount of stuffing at a time, pushing it into the corners and ensuring the strawberry is evenly filled. Don’t overstuff it, or the seams might stretch.
2. **Close the Opening:** Once the strawberry is stuffed to your liking, sew the opening closed using the same stitch you used earlier.
Attaching the Leaves
Adding the leaves gives your strawberry that final touch of realism.
1. **Arrange the Leaves:** Position the leaves at the top of the strawberry, overlapping them slightly.
2. **Sew the Leaves in Place:** Using green embroidery floss, sew the leaves to the top of the strawberry. You can use a simple running stitch or a more decorative stitch like a whip stitch. Make sure the leaves are securely attached.
Adding the Keychain
Almost there! Now for the final step: attaching the keychain.
1. **Create a Loop:** Using a small piece of red felt, create a loop at the top of the strawberry. This loop will be used to attach the jump ring.
2. **Sew the Loop in Place:** Sew the loop securely to the top of the strawberry, using red embroidery floss.
3. **Open the Jump Ring:** Using pliers (if needed), carefully open the jump ring.
4. **Attach the Jump Ring:** Thread the jump ring through the felt loop at the top of the strawberry.
5. **Attach the Keychain Ring:** Thread the keychain ring onto the jump ring.
6. **Close the Jump Ring:** Using pliers (if needed), carefully close the jump ring, ensuring it is securely closed.
Finishing Touches
Give your strawberry a final inspection and make any necessary adjustments. Trim any loose threads, and make sure all the seams are secure.
And there you have it! Your adorable DIY strawberry keychain is complete! I hope you enjoyed this project as much as I did. Now you can proudly display your handmade creation or give it as a thoughtful gift. Happy crafting!
Conclusion
So, there you have it! This DIY strawberry keychain project isn’t just a craft; it’s a delightful way to add a touch of sweetness and personality to your everyday life. We’ve shown you how to transform simple materials into a charming accessory that’s sure to spark joy every time you reach for your keys. But why is this DIY trick a must-try?
Firstly, it’s incredibly budget-friendly. Forget expensive store-bought keychains that everyone else has. With a few inexpensive supplies, you can create a unique piece that reflects your individual style. Secondly, it’s a fantastic way to unleash your creativity. The possibilities are endless! You can experiment with different shades of felt, add embellishments like tiny beads or sequins, or even personalize it with initials.
Beyond the practical benefits, this DIY strawberry keychain project offers a therapeutic and rewarding experience. The act of crafting something with your own hands is incredibly satisfying, and the finished product is a tangible reminder of your creativity and effort. It’s a perfect activity for a relaxing afternoon, a fun project to do with kids, or a thoughtful handmade gift for a friend or loved one.
Looking for variations? Consider using different types of felt, like wool felt for a more luxurious feel, or adding a small bell inside for a playful jingle. You could also create a whole batch of strawberry keychains in different sizes and colors to give as party favors or sell at a craft fair. Another fun idea is to use embroidery floss to add intricate details to the strawberry, such as tiny seeds or a delicate stem. For a more durable keychain, consider using a stronger adhesive or even sewing the pieces together. You can also experiment with different keychain hardware, such as swivel clasps or split rings, to find the perfect fit for your needs.
We’re confident that you’ll love creating your own DIY strawberry keychain. It’s a simple, fun, and rewarding project that’s sure to bring a smile to your face. So, gather your supplies, follow our easy-to-follow instructions, and let your creativity blossom!
We encourage you to try this DIY trick and share your experience with us! Post photos of your finished strawberry keychains on social media using #DIYStrawberryKeychain and tag us so we can see your amazing creations. We can’t wait to see what you come up with! Let us know in the comments below if you have any questions or suggestions. Happy crafting!
Frequently Asked Questions (FAQ)
What kind of felt should I use for this DIY strawberry keychain?
The best type of felt to use for this project is acrylic felt, as it’s readily available, inexpensive, and comes in a wide variety of colors. However, you can also use wool felt for a more luxurious and durable keychain. Wool felt is a bit more expensive, but it has a richer texture and will hold its shape better over time. Craft felt sheets are also a good option, especially for beginners, as they are easy to cut and work with. Ultimately, the choice of felt depends on your budget, desired aesthetic, and the level of durability you’re looking for.
What kind of glue is best for attaching the felt pieces together?
For attaching the felt pieces, a good quality fabric glue or hot glue gun is recommended. Fabric glue is a great option because it’s specifically designed for bonding fabrics and creates a strong, flexible hold. It’s also less likely to damage the felt than some other types of glue. Hot glue is another popular choice because it dries quickly and creates a strong bond. However, be careful when using hot glue, as it can be hot and may melt some types of felt. If you’re using hot glue, apply it sparingly to avoid making the keychain too bulky. Always test the glue on a scrap piece of felt before applying it to the main project to ensure it doesn’t bleed through or damage the material.
How can I make the keychain more durable?
To make your DIY strawberry keychain more durable, consider sewing the felt pieces together instead of just gluing them. Hand-sewing with a simple running stitch or blanket stitch will create a much stronger bond that will withstand more wear and tear. You can also reinforce the seams with a small amount of fabric glue for added security. Another way to increase durability is to use a thicker felt or to layer multiple pieces of felt together. Finally, choose a high-quality keychain hardware, such as a sturdy split ring or swivel clasp, to ensure that the keychain doesn’t break easily.
Can I personalize the keychain with initials or other embellishments?
Absolutely! Personalizing your DIY strawberry keychain is a great way to make it unique and special. You can add initials using embroidery floss, fabric markers, or even small felt letters. Other embellishments you can use include beads, sequins, buttons, and charms. Get creative and experiment with different materials and techniques to create a keychain that reflects your personal style. Just be sure to attach the embellishments securely so they don’t fall off easily.
How do I clean my DIY strawberry keychain if it gets dirty?
If your DIY strawberry keychain gets dirty, spot clean it with a damp cloth and a mild detergent. Avoid soaking the keychain in water, as this can damage the felt and weaken the glue. Gently blot the stain with the damp cloth, being careful not to rub too hard. Once the stain is removed, allow the keychain to air dry completely before using it again. You can also use a lint roller to remove any dust or debris from the surface of the felt.
What other fruit or vegetable keychains can I make using this technique?
The possibilities are endless! Once you’ve mastered the basic technique for making a strawberry keychain, you can easily adapt it to create other fruit and vegetable keychains. Consider making a lemon, lime, orange, apple, watermelon, pineapple, carrot, or even a tiny avocado keychain. Simply adjust the shape and colors of the felt to match the desired fruit or vegetable. You can also add details like seeds, stems, and leaves to make your keychains even more realistic.
Is this DIY project suitable for children?
This DIY project can be suitable for children with adult supervision. The project involves cutting felt, gluing pieces together, and potentially using a hot glue gun, all of which require careful handling. Younger children may need assistance with the cutting and gluing, while older children can likely complete the project independently with proper guidance. It’s also important to ensure that children use non-toxic materials and work in a well-ventilated area. This project is a great way to encourage creativity and fine motor skills in children, while also creating a fun and personalized accessory.
Where can I find the supplies needed for this project?
The supplies needed for this DIY strawberry keychain project can be found at most craft stores, online retailers, and even some dollar stores. Look for felt sheets in various colors, fabric glue or a hot glue gun, scissors, keychain hardware (such as split rings or swivel clasps), embroidery floss (optional), and any embellishments you’d like to add. You can also repurpose materials you already have at home, such as scraps of felt, old buttons, or beads.


Leave a Comment