

DIY Cup Key Holders: Tired of losing your keys in the abyss of your purse or the black hole that is your entryway table? I know I am! We’ve all been there, frantically searching for those little metal lifelines just as we’re about to walk out the door. But what if I told you there’s a super simple, surprisingly stylish, and incredibly satisfying solution you can create yourself?
Humans have been grappling with key management since, well, keys were invented! From ancient Egyptians entrusting their valuables to lock-and-key systems to medieval chatelaines dangling ornate key sets from their waists, the need to keep keys organized is a timeless one. While we may not be guarding pharaoh’s tombs or castle gates, our keys still represent access to our homes, cars, and personal spaces – making them pretty darn important!
That’s where this genius DIY Cup Key Holders project comes in. Not only is it a fantastic way to repurpose old teacups (giving them a new lease on life!), but it also adds a touch of vintage charm to your décor. Plus, let’s be honest, who doesn’t love a good DIY project that’s both functional and aesthetically pleasing? This simple hack will save you time, reduce stress, and add a unique, personalized touch to your home. So, grab your glue gun and let’s get crafting!
DIY Upcycled Cup Key Holders: A Charming & Functional Project
Hey there, fellow DIY enthusiasts! Are you tired of misplacing your keys? Do you have a collection of adorable teacups or coffee mugs that are just gathering dust? Well, I’ve got the perfect project for you: transforming those cups into charming and functional key holders! This is a super easy and rewarding project that adds a touch of personality to your entryway while keeping your keys organized. Let’s get started!
Materials You’ll Need:
Before we dive in, let’s gather everything we need. This will make the process smoother and more enjoyable.
* Cups/Mugs: Choose your favorite cups or mugs. Teacups, coffee mugs, even small bowls will work! Consider the size and weight of the cups, as you’ll be hanging keys from them.
* Wooden Board: You’ll need a piece of wood to mount the cups onto. The size will depend on how many cups you want to use and how much space you have. Reclaimed wood adds a rustic touch, but any wood will do. I used a piece of pine I had leftover from another project.
* Hooks: These will be attached to the underside of the wooden board to hold your keys. Small, sturdy hooks are ideal. You can find these at any hardware store. I prefer the kind with screw-in backs for extra security.
* Screws: Make sure you have screws that are appropriate for the thickness of your wooden board and the hooks you’re using.
* Strong Adhesive: This is crucial for attaching the cups to the wooden board. I recommend a strong epoxy or construction adhesive. Read the instructions carefully and choose one that’s suitable for bonding ceramic/glass to wood.
* Drill: You’ll need a drill to create pilot holes for the screws that will hold the hooks.
* Screwdriver: For screwing in the hooks.
* Sandpaper: If you’re using reclaimed wood, you might want to sand it down a bit to smooth out any rough edges.
* Paint or Stain (Optional): If you want to customize the look of the wooden board, you can paint or stain it.
* Measuring Tape or Ruler: For accurate placement of the cups and hooks.
* Pencil: For marking where you’ll be drilling and attaching the cups.
* Clamps (Optional): These can be helpful for holding the cups in place while the adhesive dries.
* Safety Glasses: Always protect your eyes when working with power tools.
* Gloves: To protect your hands from the adhesive.
Preparing the Wooden Board
This step is all about getting your wooden board ready to be the base of your key holder.
1. Cut the Wood (If Necessary): If your wooden board isn’t the right size, cut it to the desired length and width. I wanted mine to be about 24 inches long and 6 inches wide, enough for three cups.
2. Sand the Wood: If the wood is rough or has splinters, sand it down with sandpaper. This will create a smoother surface for painting or staining, and it will also make it more comfortable to handle. Start with a coarser grit sandpaper (like 80 or 100) and then move to a finer grit (like 220) for a smooth finish.
3. Paint or Stain (Optional): If you want to customize the look of the wooden board, now’s the time to paint or stain it. I chose a light gray paint to match my entryway decor. Apply the paint or stain according to the manufacturer’s instructions. Let it dry completely before moving on to the next step. You might need to apply multiple coats for full coverage.
4. Seal the Wood (Optional): If you’ve painted or stained the wood, you might want to seal it with a clear coat of varnish or polyurethane. This will protect the finish and make it more durable. Let the sealant dry completely before proceeding.
Attaching the Cups
This is where the magic happens! We’re going to transform those cups into key-holding masterpieces.
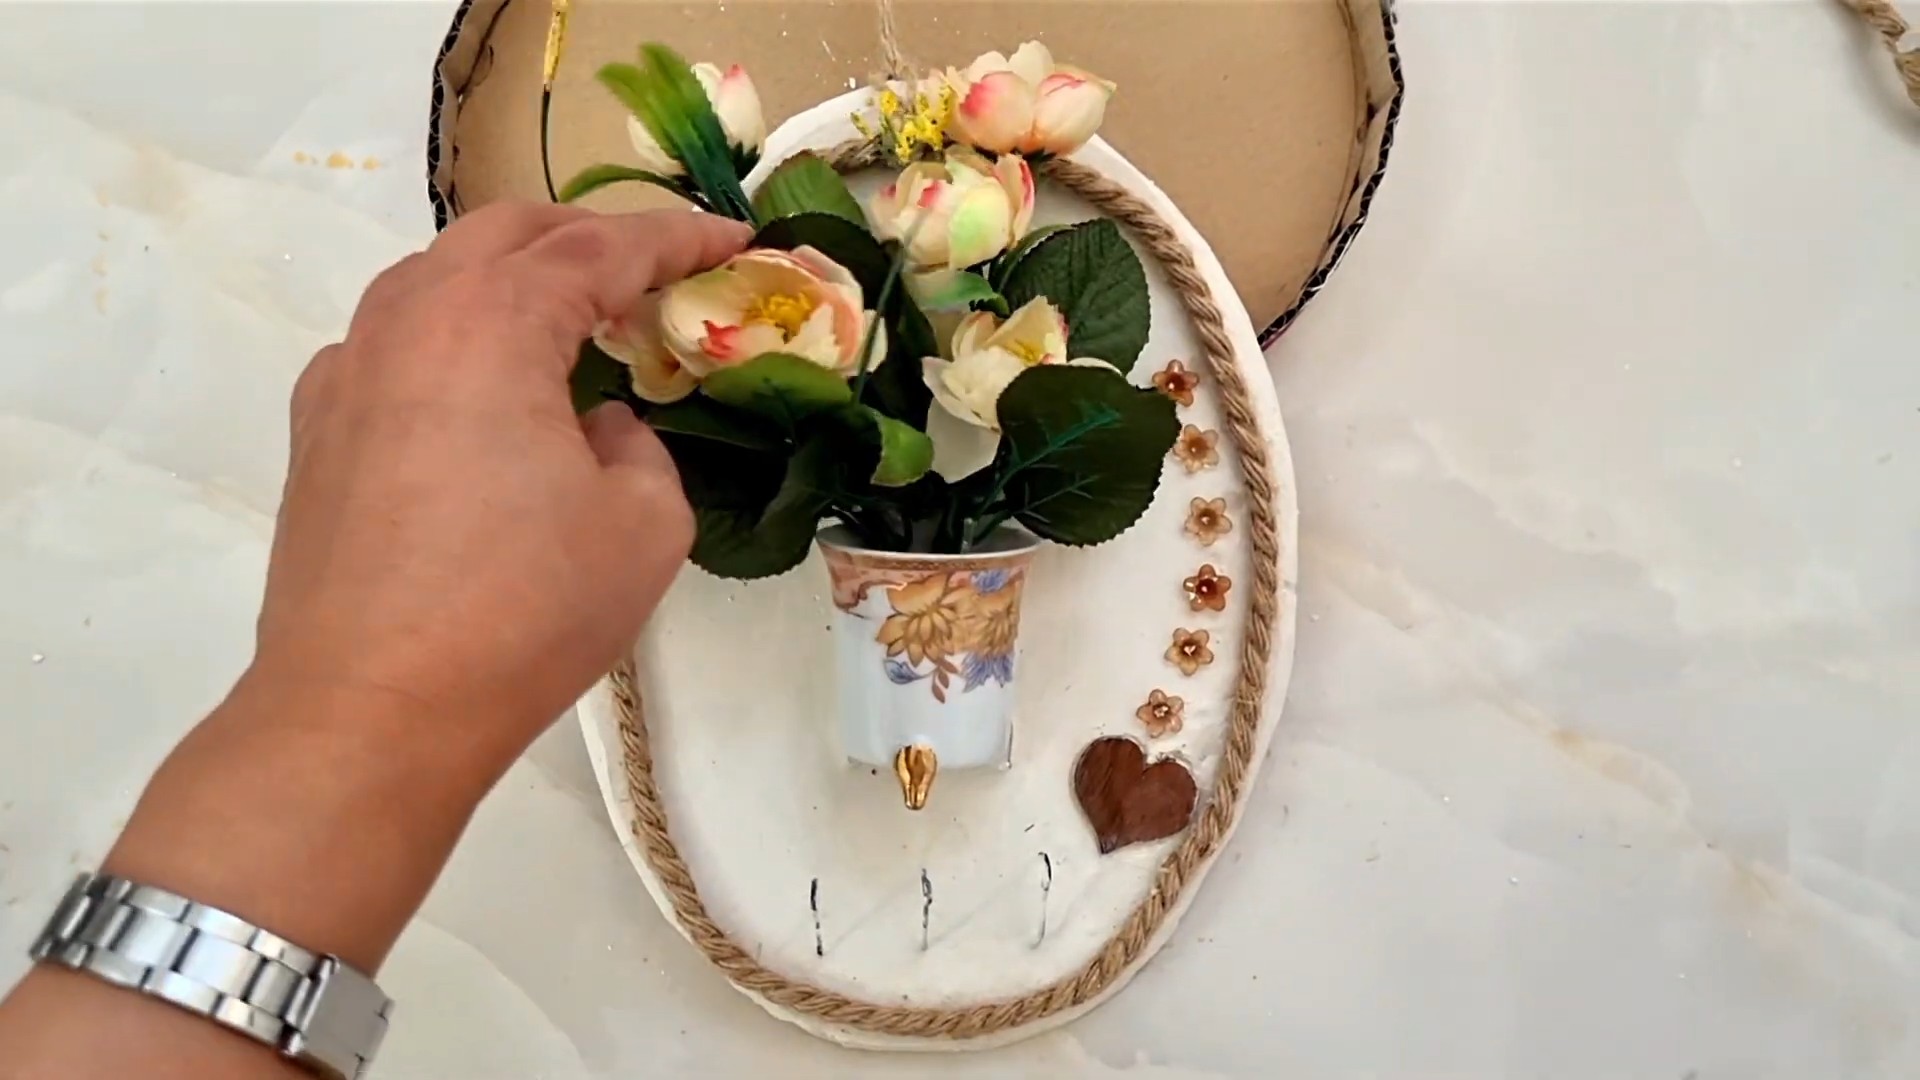
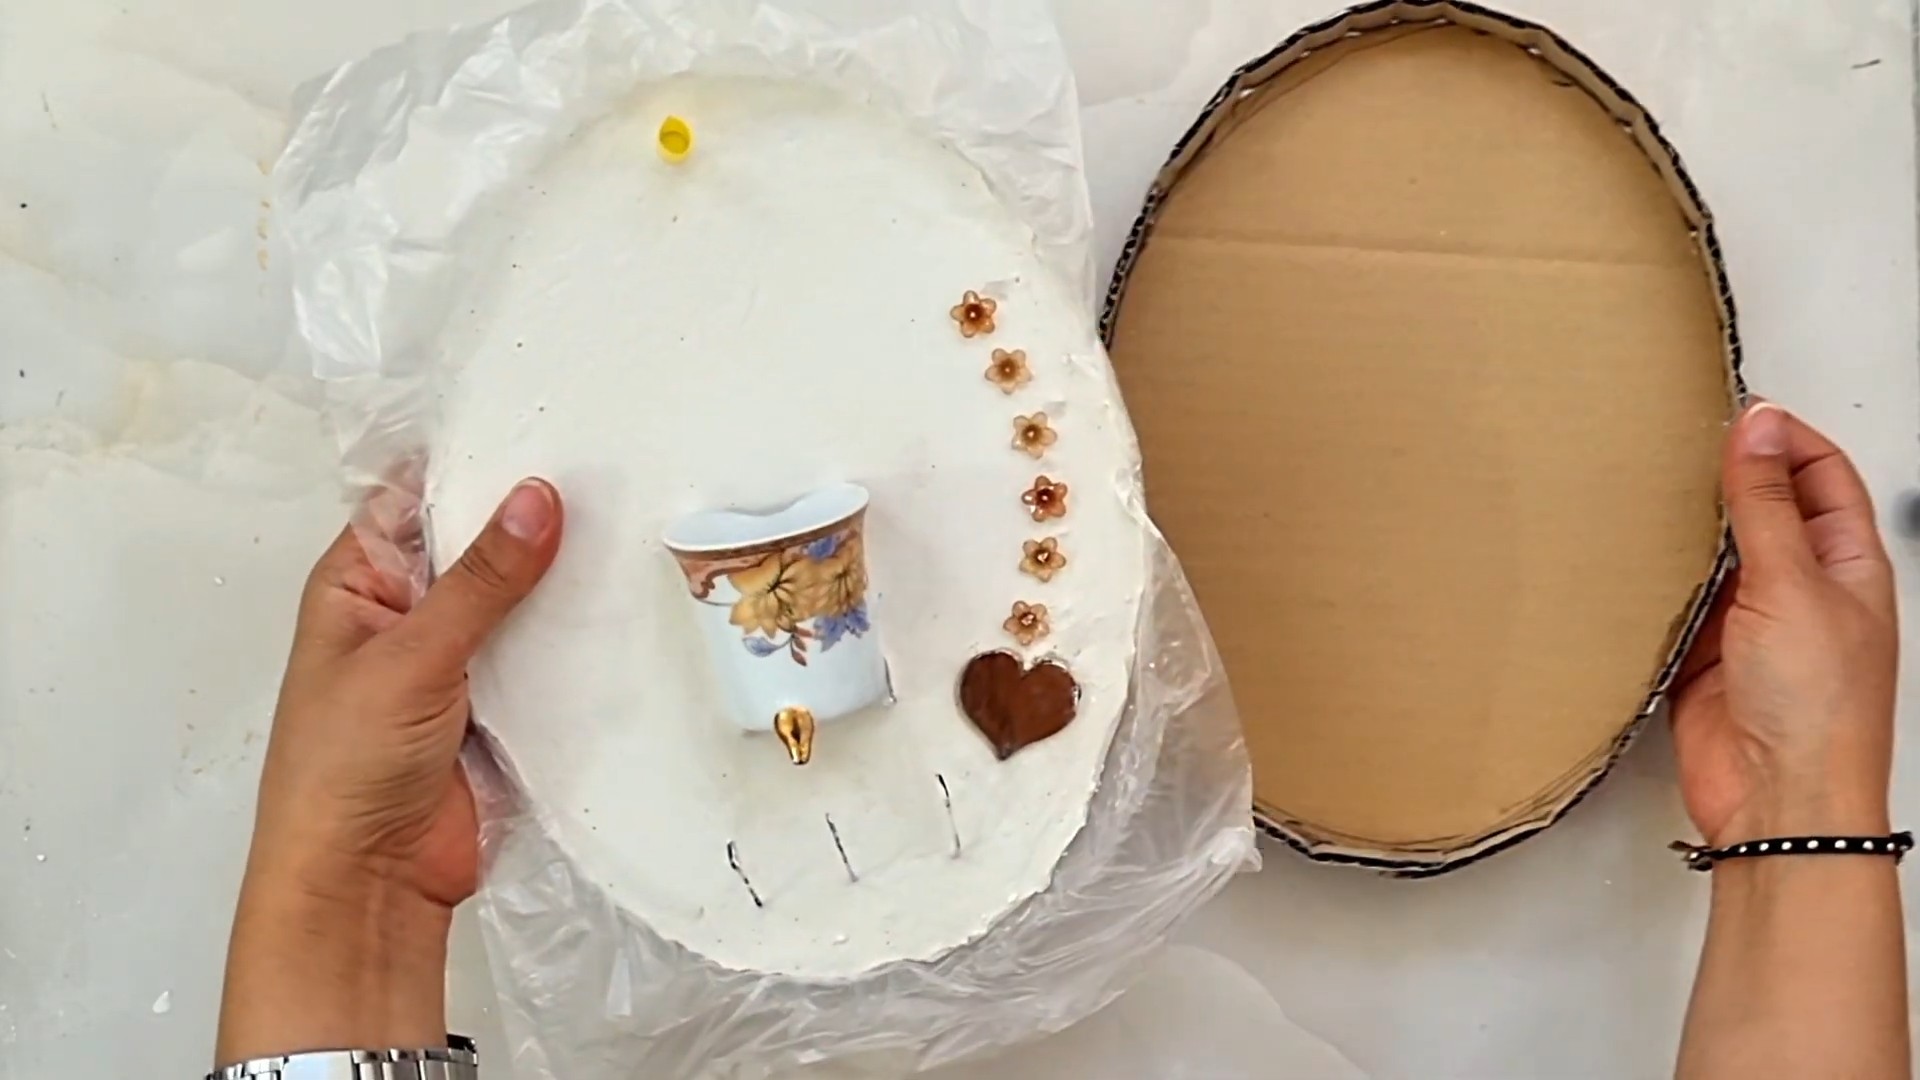
1. Plan the Placement: Before you start gluing, arrange the cups on the wooden board to see how you want them positioned. Consider the spacing between the cups and the overall balance of the design. I like to leave a few inches of space between each cup.
2. Mark the Placement: Once you’re happy with the arrangement, use a pencil to mark the location of each cup on the wooden board. This will help you ensure that they’re evenly spaced and aligned. Trace around the base of each cup with your pencil.
3. Apply Adhesive: Put on your gloves! Now, apply a generous amount of adhesive to the bottom of each cup. Make sure to cover the entire surface that will be in contact with the wooden board. Don’t be shy with the adhesive – you want a strong bond.
4. Attach the Cups: Carefully place each cup onto the wooden board, aligning it with the pencil marks you made earlier. Press down firmly on each cup to ensure good contact with the adhesive.
5. Clamp (Optional): If you have clamps, use them to hold the cups in place while the adhesive dries. This will help ensure a strong and secure bond. If you don’t have clamps, you can use heavy objects to weigh down the cups.
6. Let it Dry: This is the most important part! Let the adhesive dry completely according to the manufacturer’s instructions. This could take several hours or even overnight. Don’t rush this step, or the cups might not be securely attached. I left mine overnight just to be safe.
Adding the Hooks
Now we’ll add the hooks that will actually hold your keys.
1. Determine Hook Placement: Flip the wooden board over so that the underside is facing up. Decide where you want to place the hooks. I recommend placing them directly below each cup, but you can also stagger them if you prefer. Consider the length of your keys when determining the placement.
2. Mark the Placement: Use a pencil to mark the location of each hook on the underside of the wooden board.
3. Drill Pilot Holes: Use a drill to create pilot holes for the screws that will hold the hooks. The pilot holes should be slightly smaller than the diameter of the screws. This will make it easier to screw in the hooks and prevent the wood from splitting.
4. Attach the Hooks: Screw the hooks into the pilot holes. Make sure they’re securely attached and facing the right direction.
Hanging Your Key Holder
Almost there! Now we just need to hang your beautiful new key holder.
1. Choose a Location: Decide where you want to hang your key holder. I recommend placing it near your entryway so you can easily grab your keys when you’re leaving the house.
2. Install Hanging Hardware: There are several ways to hang your key holder. You can use picture-hanging hooks, D-rings, or even keyhole hangers. Choose the method that works best for you and your wall. Make sure to use hardware that’s strong enough to support the weight of the key holder and your keys. I used two D-rings attached to the back of the wooden board and hung it on two sturdy picture-hanging hooks.
3. Hang Your Key Holder: Carefully hang your key holder on the wall. Make sure it’s level and secure.
4. Add Your Keys: Finally, add your keys to the hooks! Admire your handiwork and enjoy your organized entryway.
Tips and Tricks for Success
Here are a few extra tips to help you make the most of this project:
* Choose the Right Cups: Consider the weight and size of the cups. Heavier cups will require stronger adhesive and hanging hardware. Smaller cups might be better for smaller keys.
* Use a Level: When hanging your key holder, use a level to make sure it’s straight.
* Get Creative with Decoration: You can decorate the wooden board with stencils, stamps, or even decoupage. Let your creativity shine!
* Personalize it: Use cups that have special meaning to you, like ones you’ve collected on your travels or that were gifts from loved ones.
* Consider the Adhesive: Choose an adhesive that is specifically designed for bonding ceramic/glass to wood. Read the instructions carefully and follow them closely.
* Don’t Overload the Hooks: Be mindful of the weight capacity of the hooks. Don’t overload them with too many keys.
* Safety First: Always wear safety glasses when working with power tools.
And there you have it! A beautiful and functional key holder made from upcycled cups. This project is a great way to add a personal touch to your home decor while keeping your keys organized. I hope you enjoyed this tutorial! Happy crafting!
Conclusion
So, there you have it! Transforming ordinary teacups into charming and functional key holders is not just a craft project; it’s a statement. It’s a statement about your creativity, your commitment to upcycling, and your desire to infuse a little bit of whimsy into the everyday. Forget those generic, mass-produced key racks – with this simple DIY trick, you can create a personalized piece of art that greets you (and your keys!) every time you walk through the door.
Why is this a must-try? Because it’s incredibly easy, budget-friendly, and endlessly customizable. You probably already have most of the materials lying around your house. And even if you don’t, a quick trip to a thrift store or craft store will provide you with everything you need without breaking the bank. More importantly, it’s a chance to express your unique style. Choose teacups that reflect your personality, your home décor, or even your favorite hobbies.
But the beauty of this project doesn’t stop there. Consider these variations to truly make it your own:
* Add a touch of elegance: Use vintage teacups with intricate floral patterns and gold trim for a sophisticated look.
* Go rustic: Opt for chipped or mismatched teacups for a charming, farmhouse-inspired feel.
* Personalize with paint: Paint the teacups with your favorite colors or add custom designs using stencils or freehand painting.
* Incorporate other elements: Glue small decorative items, such as beads, buttons, or charms, to the teacups for added flair.
* Create a themed key holder: Use teacups with nautical themes for a beach house, or animal-themed teacups for a child’s room.
* Mount on a decorative board: Instead of mounting the teacups directly to the wall, attach them to a painted or stained wooden board for a more polished look. This also makes it easier to move the key holder if needed.
* Use saucers as catch-alls: Glue the saucers beneath the teacups to create a small space for holding mail, sunglasses, or other small items.
The possibilities are truly endless! This DIY cup key holder project is more than just a practical solution for keeping your keys organized; it’s an opportunity to unleash your creativity and add a personal touch to your home.
So, what are you waiting for? Gather your supplies, choose your favorite teacups, and get crafting! We’re confident that you’ll love the results. And once you’ve created your own unique teacup key holder, we’d love to see it! Share your photos and experiences with us in the comments below or on social media using #DIYCupKeyHolder. We can’t wait to see what you create! Let’s turn those forgotten teacups into functional art and add a touch of charm to our homes, one key at a time.
Frequently Asked Questions
What kind of adhesive should I use to attach the teacups to the wall?
Choosing the right adhesive is crucial for ensuring that your teacup key holders stay securely in place. For most surfaces, a strong epoxy adhesive or construction adhesive is recommended. These adhesives are designed to bond to a variety of materials, including ceramic, wood, and drywall. Make sure to choose an adhesive that is specifically labeled for use on the materials you are working with. Before applying the adhesive, clean the back of the teacup and the wall surface with rubbing alcohol to remove any dirt or grease. This will help the adhesive bond properly. Follow the manufacturer’s instructions carefully, and allow the adhesive to cure completely before hanging any keys on the teacups. For heavier teacups or if you are concerned about the adhesive’s strength, you can also use screws in addition to adhesive for extra security.
Can I use vintage or antique teacups for this project?
Absolutely! Vintage and antique teacups can add a unique and charming touch to your DIY cup key holders. However, it’s important to handle these delicate items with care. Before starting the project, inspect the teacups for any cracks or chips. If the teacups are fragile, consider reinforcing them with a thin layer of epoxy resin on the inside to prevent them from breaking. When cleaning vintage teacups, avoid using harsh chemicals or abrasive cleaners, as these can damage the delicate glaze. Instead, use a mild soap and warm water. When attaching the teacups to the wall, be extra gentle and avoid applying too much pressure. If you are concerned about damaging valuable antique teacups, you may want to consider using replicas or less valuable teacups for this project.
How do I ensure that the teacups are level when I attach them to the wall?
Ensuring that your teacups are level is essential for creating a visually appealing and functional key holder. Before attaching the teacups, use a level to mark the desired positions on the wall. You can use a pencil to draw a light line as a guide. If you are attaching multiple teacups, use a measuring tape to ensure that they are evenly spaced. To make the process even easier, consider using a laser level, which projects a straight line onto the wall. This will help you align the teacups perfectly. After attaching each teacup, double-check that it is level before the adhesive dries completely. If necessary, you can make small adjustments to ensure that everything is aligned correctly.
What if I don’t want to drill holes in my wall?
If you prefer not to drill holes in your wall, there are several alternative mounting options for your DIY cup key holders. One option is to use strong adhesive strips or hooks that are specifically designed for hanging items on walls without nails or screws. These strips are available in various sizes and weight capacities, so choose one that is appropriate for the weight of your teacups. Another option is to mount the teacups on a decorative wooden board, which can then be leaned against the wall or hung using a single nail or hook. This is a great way to create a more polished and versatile key holder. You can also use a freestanding coat rack or hall tree to hang your teacup key holders. Simply attach the teacups to the coat rack using adhesive or screws.
Can I use different sizes and shapes of cups for this project?
Absolutely! Using different sizes and shapes of cups can add visual interest and personality to your DIY cup key holders. Experiment with teacups, coffee cups, mugs, and even small bowls to create a unique and eclectic look. Consider arranging the cups in a visually appealing pattern, such as alternating sizes or grouping similar shapes together. You can also use cups with different colors and patterns to create a more vibrant and eye-catching key holder. Just make sure that the cups are all securely attached to the wall or mounting surface.
How do I clean the teacup key holders once they are mounted?
Cleaning your teacup key holders is easy. Simply dust them regularly with a soft cloth or feather duster to remove any accumulated dust or dirt. If the teacups become stained or dirty, you can gently wipe them down with a damp cloth and a mild soap solution. Avoid using harsh chemicals or abrasive cleaners, as these can damage the glaze or finish of the teacups. For stubborn stains, you can try using a paste made from baking soda and water. Apply the paste to the stain, let it sit for a few minutes, and then gently scrub with a soft cloth. Rinse with clean water and dry thoroughly.
Leave a Comment