

DIY tile and grout cleaner – sounds intimidating, right? But trust me, it’s easier than you think, and the results are seriously satisfying! I’m going to show you how to whip up a powerful cleaner using ingredients you probably already have in your pantry. Forget those harsh chemicals and expensive store-bought solutions; we’re going natural and effective!
Tile and grout have been used for centuries, dating back to ancient civilizations like the Egyptians and Romans. They valued the durability and beauty of tiled surfaces. However, one thing hasn’t changed: the struggle to keep them clean! Over time, grout, especially, becomes a breeding ground for dirt, grime, and mildew, making your beautiful tiles look dull and uninviting.
Let’s face it, nobody enjoys scrubbing floors or bathroom tiles. It’s back-breaking work, and those stubborn stains can feel impossible to remove. That’s where this DIY tile and grout cleaner comes in. Not only will it save you money, but it’s also a fantastic way to reduce your environmental impact by avoiding harsh chemicals. Plus, you’ll have the satisfaction of knowing you created a powerful cleaning solution yourself! So, let’s get started and bring back the sparkle to your tiled surfaces!
DIY Tile and Grout Cleaner: Say Goodbye to Grime!
Okay, let’s be honest, cleaning tile and grout is nobody’s favorite chore. But, with this super simple and effective DIY cleaner, you can make the process a whole lot easier (and cheaper!). I’ve tried countless store-bought cleaners, and honestly, this homemade version works just as well, if not better, and it’s made with ingredients you probably already have in your pantry!
What You’ll Need: The Ingredient Rundown
Before we dive in, let’s gather our supplies. This recipe is all about simplicity, so you won’t need anything fancy.
* Baking Soda: This is our gentle abrasive. It helps scrub away dirt and grime without scratching your tile.
* Hydrogen Peroxide (3%): This is a natural disinfectant and bleaching agent. It helps to kill bacteria and lighten stains.
* Dish Soap (Dawn is my go-to!): This helps to cut through grease and grime, making it easier to lift away dirt.
* Spray Bottle: For easy application.
* Old Toothbrush or Grout Brush: For scrubbing those stubborn grout lines.
* Sponge or Cloth: For wiping away the cleaner.
* Gloves: To protect your hands. (Trust me, you’ll want these!)
* Small Bowl: For mixing the ingredients.
* Measuring Spoons: For accurate measurements.
Mixing the Magic Potion: Step-by-Step Instructions
Now for the fun part! Let’s mix up our tile and grout cleaning solution.
1. Protect Yourself: First things first, put on your gloves! Hydrogen peroxide can be a bit drying to the skin, so it’s best to protect your hands.
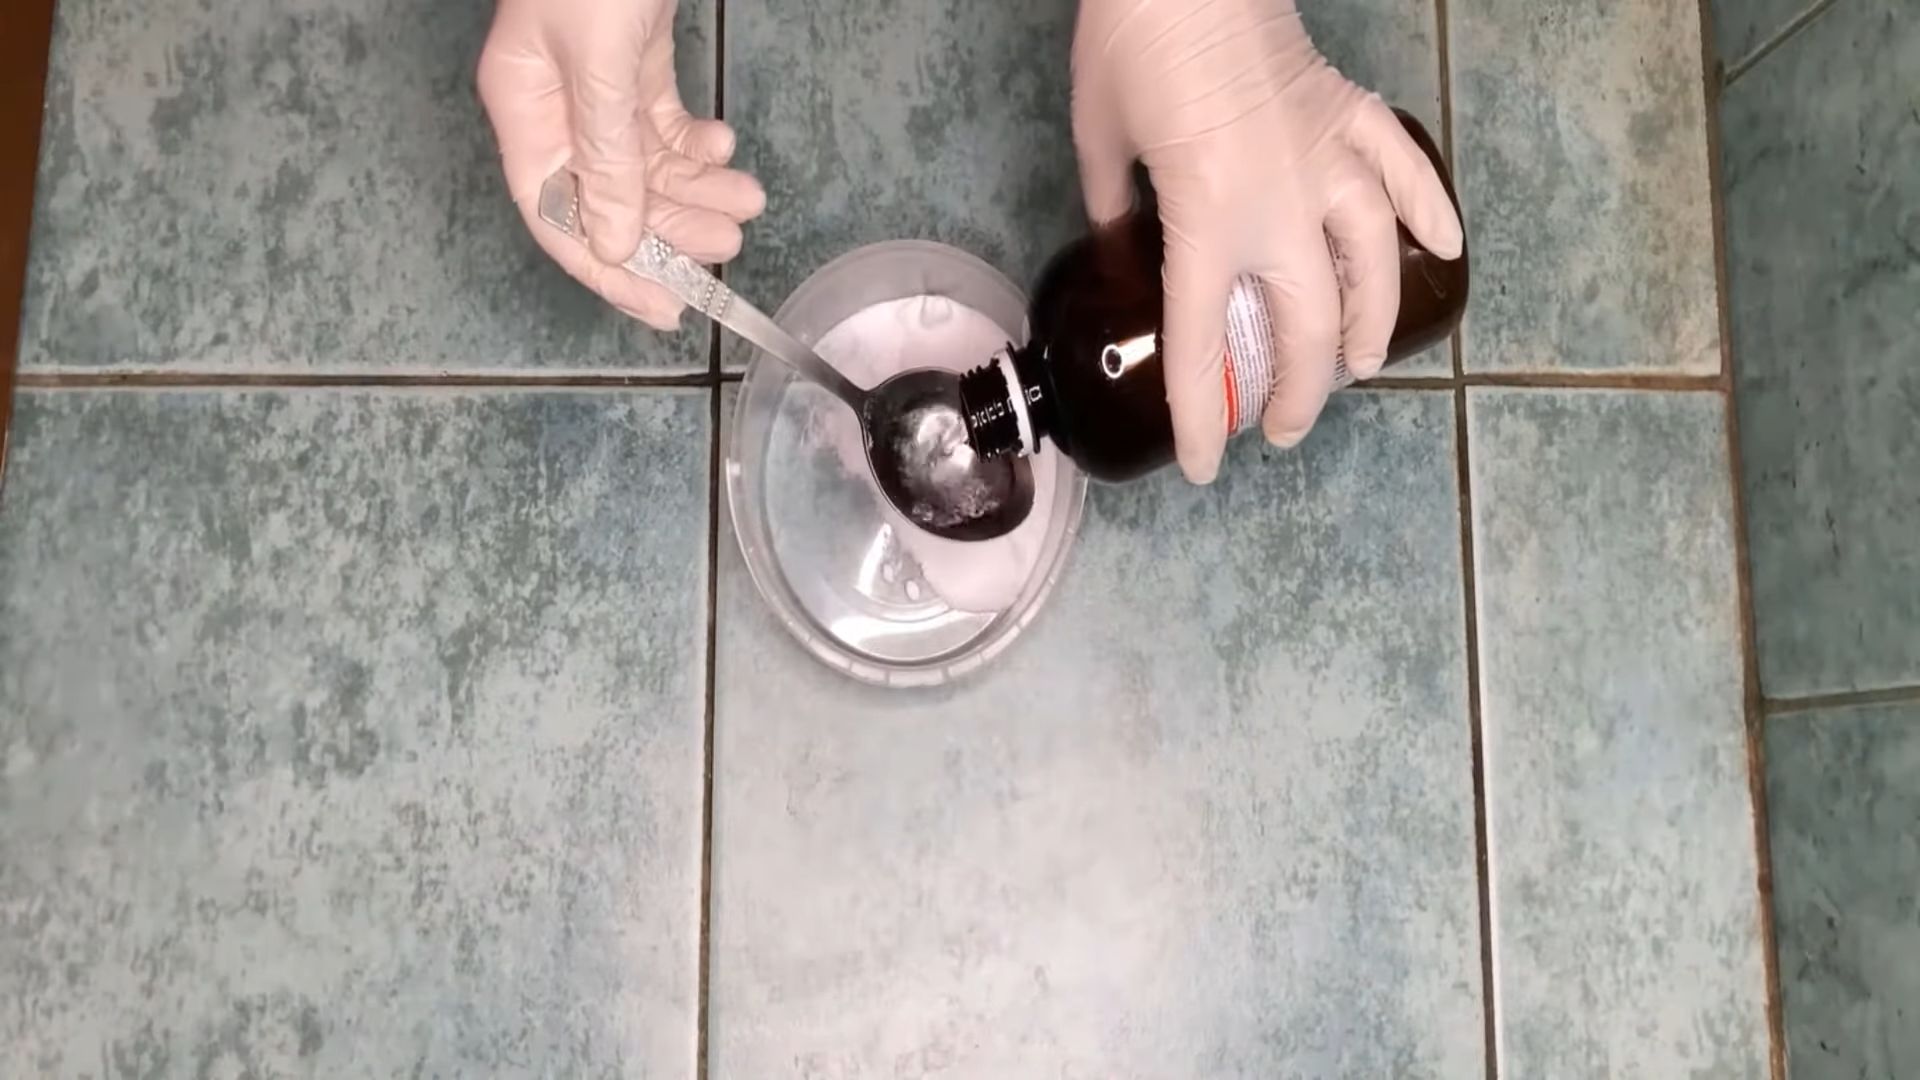
2. Measure the Baking Soda: In your small bowl, measure out about ½ cup of baking soda. The exact amount isn’t crucial, but this is a good starting point.
3. Add the Hydrogen Peroxide: Slowly pour in about ¼ cup of hydrogen peroxide. You’ll notice it starts to fizz a little – that’s the baking soda reacting with the peroxide.
4. A Squirt of Dish Soap: Add a small squirt of dish soap (about a teaspoon). Don’t overdo it, or you’ll end up with a foamy mess!
5. Mix it Up: Use a spoon or your gloved finger to mix the ingredients together until you form a paste. The consistency should be similar to toothpaste. If it’s too thick, add a little more hydrogen peroxide. If it’s too thin, add a little more baking soda.
6. Transfer to Spray Bottle (Optional): While you can apply the paste directly, I find it easier to transfer it to a spray bottle. This makes it easier to target those grout lines. If your paste is too thick to spray, add a little more hydrogen peroxide until it’s a more liquid consistency. Be careful not to make it too watery, or it won’t cling to the grout.
Cleaning Time: Getting Down and Dirty (But Not Really!)
Alright, we’ve got our cleaner, now let’s put it to work!
1. Test in an Inconspicuous Area: Before you go wild, test the cleaner in a small, hidden area of your tile and grout. This is just to make sure it doesn’t discolor or damage your tile. While this recipe is generally safe, it’s always better to be safe than sorry.
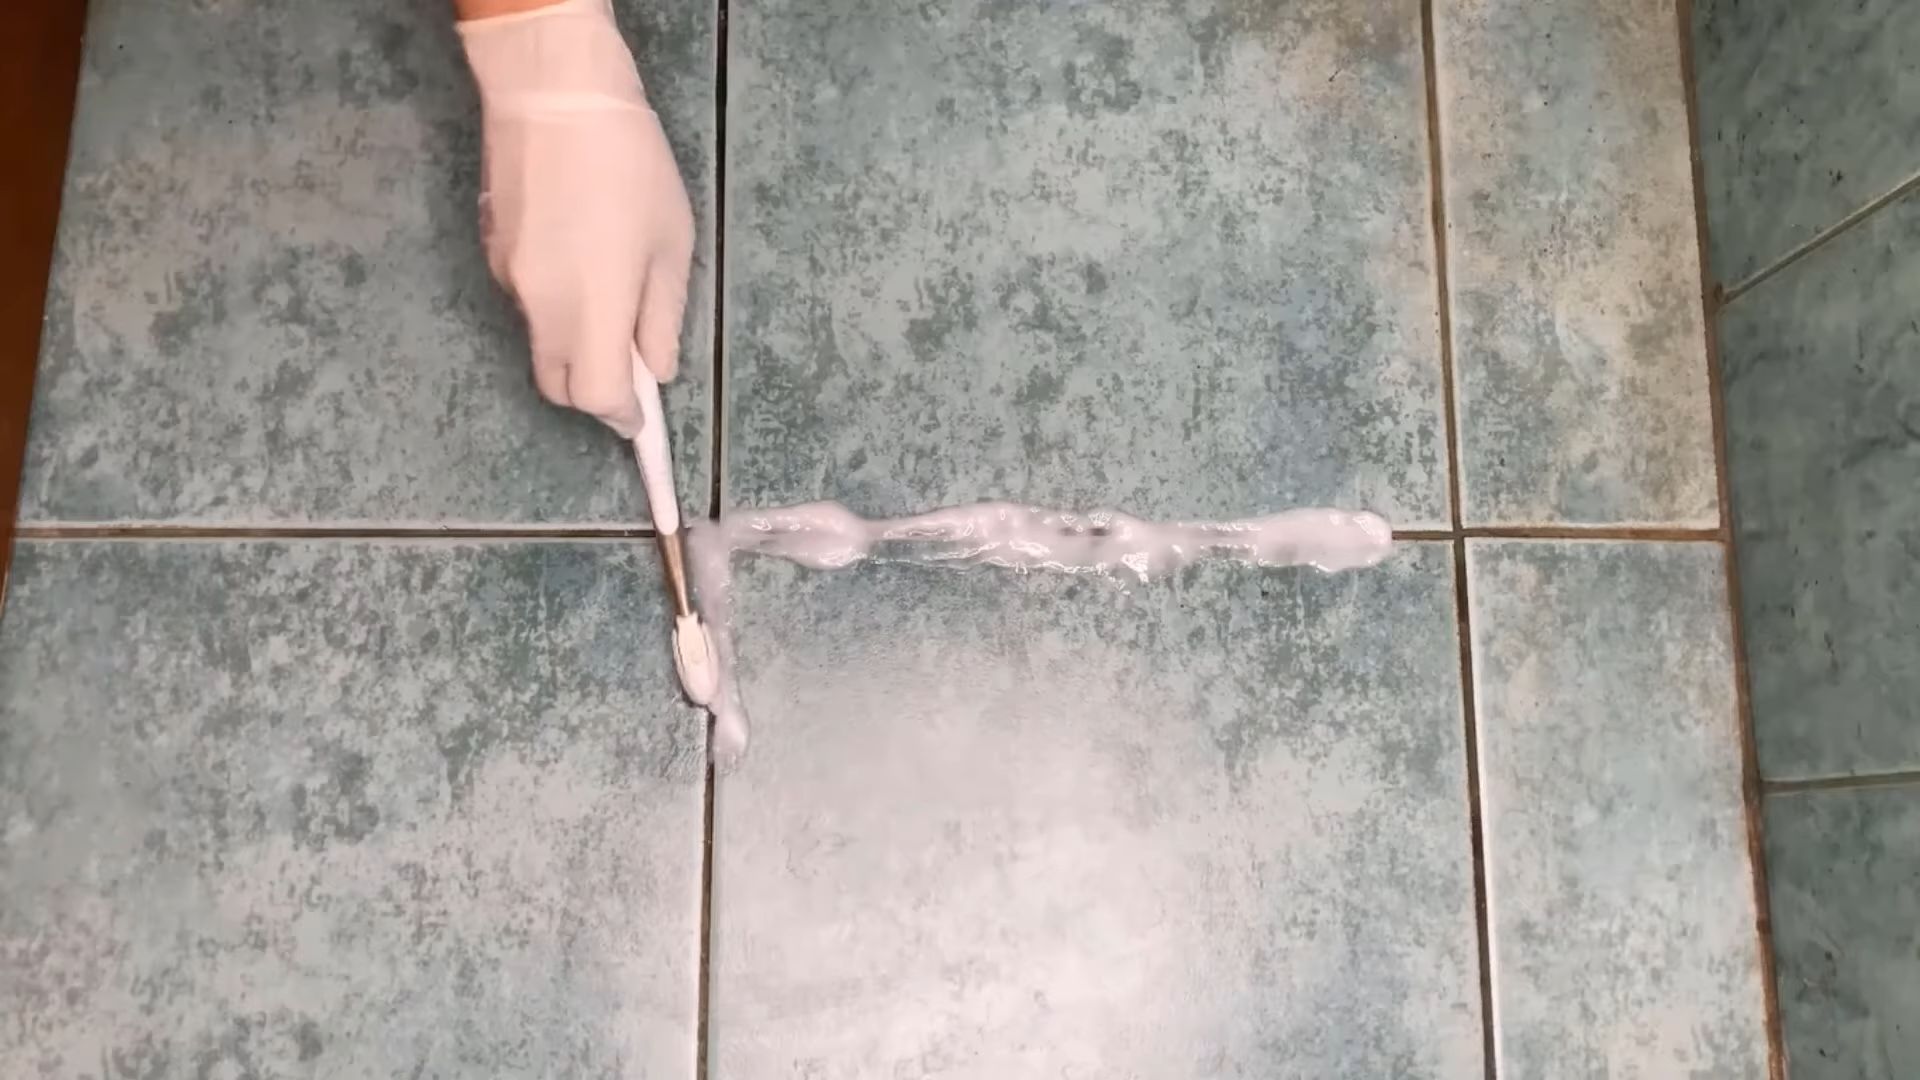
2. Apply the Cleaner: Spray or apply the paste directly onto the tile and grout you want to clean. I like to focus on the grout lines, as that’s where most of the grime tends to accumulate.
3. Let it Sit: Let the cleaner sit for about 5-10 minutes. This gives the baking soda and hydrogen peroxide time to work their magic and loosen the dirt and grime. For really stubborn stains, you can let it sit for up to 30 minutes.
4. Scrub-a-dub-dub: Grab your old toothbrush or grout brush and start scrubbing! Focus on the grout lines, using small, circular motions. You’ll start to see the dirt and grime lifting away.
5. Wipe it Away: Use a damp sponge or cloth to wipe away the cleaner and the loosened dirt. Rinse your sponge or cloth frequently to avoid spreading the grime around.
6. Rinse Thoroughly: Once you’ve wiped away all the cleaner, rinse the area thoroughly with clean water. This will remove any remaining residue.
7. Dry it Off: Use a clean towel to dry the tile and grout. This will help prevent water spots and keep your tile looking its best.
Tackling Tough Stains: Extra Tips and Tricks
Sometimes, you might encounter some really stubborn stains that require a little extra effort. Here are a few tips and tricks I’ve learned over the years:
* For Mold and Mildew: If you’re dealing with mold or mildew, you can add a few drops of tea tree oil to your cleaning solution. Tea tree oil is a natural antifungal and antibacterial agent.
* For Really Stubborn Stains: Make a paste of baking soda and water and apply it directly to the stain. Let it sit for several hours or even overnight before scrubbing and rinsing.
* Steam Cleaning: If you have a steam cleaner, you can use it to deep clean your tile and grout after you’ve applied the DIY cleaner. The steam will help to loosen any remaining dirt and grime.
* Preventative Measures: To prevent future buildup of dirt and grime, try to wipe up spills as soon as they happen. You can also seal your grout to help protect it from stains.
Safety First: Important Considerations
While this DIY cleaner is generally safe, it’s important to take a few precautions:
* Ventilation: Make sure you’re working in a well-ventilated area.
* Avoid Contact with Eyes: Avoid getting the cleaner in your eyes. If you do, rinse immediately with plenty of water.
* Keep Out of Reach of Children and Pets: Store the cleaner out of reach of children and pets.
* Don’t Mix with Other Cleaners: Never mix this cleaner with other cleaning products, especially bleach. This can create dangerous fumes.
* Patch Test is Key: Always test the cleaner in an inconspicuous area before applying it to the entire surface.
Why This Works: The Science Behind the Sparkle
So, why does this simple DIY cleaner work so well? Let’s break it down:
* Baking Soda: As mentioned earlier, baking soda is a mild abrasive. It helps to scrub away dirt and grime without scratching your tile. It’s also alkaline, which helps to neutralize acidic stains.
* Hydrogen Peroxide: Hydrogen peroxide is a mild bleaching agent and disinfectant. It helps to lighten stains and kill bacteria. It also reacts with the baking soda to create a fizzing action that helps to lift away dirt.
* Dish Soap: Dish soap is a surfactant, which means it helps to reduce the surface tension of water. This allows the water to spread out and penetrate the dirt and grime more easily. It also helps to emulsify grease and oil, making it easier to wash away.
Beyond the Bathroom: Where Else Can You Use This?
This DIY tile and grout cleaner isn’t just for bathrooms! You can use it on tile floors, kitchen backsplashes, and even outdoor patios. Just be sure to test it in an inconspicuous area first, especially on delicate surfaces.
Maintaining Your Sparkling Clean Tile: Tips for the Long Haul
Keeping your tile and grout clean doesn’t have to be a constant battle. Here are a few tips to help you maintain your sparkling clean surfaces:
* Regular Cleaning: Wipe down your tile surfaces regularly with a damp cloth or sponge. This will help prevent dirt and grime from building up.
* Seal Your Grout: Sealing your grout will help protect it from stains and make it easier to clean. You can purchase grout sealant at most hardware stores.
* Ventilation is Key: Ensure proper ventilation in your bathroom and kitchen to prevent mold and mildew growth.
* Address Spills Immediately: Clean up spills as soon as they happen to prevent staining.
* Consider a Squeegee: Use a squeegee after showering to remove excess water from your tile walls and floor. This will help prevent water spots and mildew growth.
My Final Thoughts: Embrace the DIY Clean!
I hope you found this DIY tile and grout cleaner recipe helpful! It’s a simple, effective, and affordable way to keep your tile surfaces looking their best. Plus, it’s a great feeling knowing you’re using natural ingredients instead of harsh chemicals. So, ditch the expensive store-bought cleaners and give this DIY version a try. You might be surprised at how well it works! Happy cleaning!
Conclusion
So, there you have it! This DIY tile and grout cleaner isn’t just another cleaning recipe; it’s a game-changer for anyone battling stubborn stains and grime. We’ve all been there, scrubbing endlessly with commercial cleaners that promise the world but deliver little more than a lingering chemical scent and aching muscles. This homemade solution, on the other hand, harnesses the power of simple, readily available ingredients to deliver truly remarkable results.
Why is this DIY trick a must-try? Because it’s effective, affordable, and eco-friendly. You’re ditching harsh chemicals that can irritate your skin and pollute your home, opting instead for a natural, biodegradable alternative. Plus, you’ll save a significant amount of money compared to constantly buying expensive store-bought cleaners. The satisfaction of seeing your tile and grout transform before your eyes, knowing you achieved it with your own two hands and a few common household items, is an added bonus you simply can’t put a price on.
But the beauty of this DIY tile and grout cleaner lies not only in its effectiveness but also in its versatility. Feel free to experiment with variations to suit your specific needs and preferences. For instance, if you’re dealing with particularly stubborn mildew or mold, consider adding a few drops of tea tree oil to the mixture. Tea tree oil is a natural antifungal agent that can help to eliminate these pesky problems. Alternatively, if you prefer a more fragrant cleaning experience, you can add a few drops of your favorite essential oil, such as lemon, lavender, or eucalyptus. Just be sure to test the mixture in an inconspicuous area first to ensure it doesn’t discolor your tile or grout.
Another variation involves adjusting the consistency of the paste. If you’re cleaning vertical surfaces, such as shower walls, you might prefer a thicker paste that will cling better. Simply add a bit more baking soda until you achieve the desired consistency. Conversely, if you’re cleaning large floor areas, you might prefer a slightly thinner paste that’s easier to spread.
Don’t be afraid to experiment and find what works best for you! The key is to start with the basic recipe and then tweak it to your liking.
We are confident that once you try this DIY tile and grout cleaner, you’ll be amazed by the results. It’s a simple, effective, and affordable way to keep your tile and grout looking their best. So, ditch the harsh chemicals and embrace the power of natural cleaning.
We wholeheartedly encourage you to give this DIY trick a try. We’re eager to hear about your experiences! Share your before-and-after photos, your favorite variations, and any tips or tricks you discover along the way. Let’s create a community of DIY cleaning enthusiasts who are passionate about keeping their homes clean and healthy without breaking the bank or harming the environment. Your feedback will not only help others but also inspire us to continue developing and sharing innovative DIY solutions. So, grab your ingredients, put on your gloves, and get ready to transform your tile and grout! We can’t wait to see your sparkling results!
Frequently Asked Questions (FAQs)
What kind of tile is this DIY cleaner safe for?
This DIY tile and grout cleaner is generally safe for most types of tile, including ceramic, porcelain, and glass. However, it’s crucial to exercise caution when using it on natural stone tiles like marble, granite, or travertine. These materials are more porous and can be sensitive to acidic cleaners like vinegar. Before applying the cleaner to natural stone, test it in an inconspicuous area to ensure it doesn’t cause any discoloration or damage. If you’re unsure about the type of tile you have, consult the manufacturer’s instructions or a professional tile installer. For natural stone, consider using a pH-neutral cleaner specifically designed for those surfaces.
How often should I use this DIY tile and grout cleaner?
The frequency of cleaning depends on the amount of foot traffic and the level of dirt and grime accumulation in your tiled areas. For high-traffic areas like kitchens and bathrooms, you may need to clean your tile and grout every one to two weeks. For less frequently used areas, such as guest bathrooms or hallways, you can clean them less often, perhaps once a month. Regular cleaning will prevent the buildup of stubborn stains and make it easier to maintain the cleanliness of your tile and grout.
Can I use this cleaner on colored grout?
Yes, you can use this cleaner on colored grout, but it’s essential to test it in an inconspicuous area first to ensure it doesn’t fade or discolor the grout. The vinegar in the cleaner can sometimes affect the color of certain types of grout, especially if it’s old or porous. If you notice any color change, dilute the cleaner with more water or reduce the amount of vinegar. Alternatively, you can use a baking soda paste without vinegar for colored grout.
What if I don’t have vinegar? Can I substitute it with something else?
While vinegar is a key ingredient in this DIY tile and grout cleaner due to its acidity and cleaning properties, you can try substituting it with lemon juice. Lemon juice also contains citric acid, which can help to break down dirt and grime. However, lemon juice is generally less acidic than vinegar, so it may not be as effective for removing stubborn stains. If you don’t have either vinegar or lemon juice, you can try using a mild dish soap solution. Mix a few drops of dish soap with warm water and use a scrub brush to clean the tile and grout. Rinse thoroughly with clean water.
How do I prevent mold and mildew from growing in my grout?
Preventing mold and mildew growth is crucial for maintaining the cleanliness and hygiene of your tile and grout. Here are some tips to help prevent these problems:
* Ensure proper ventilation: Keep your bathroom well-ventilated by opening windows or using an exhaust fan after showering or bathing. This will help to reduce moisture levels and prevent mold and mildew growth.
* Dry surfaces thoroughly: After showering or bathing, use a squeegee or towel to dry the tile and grout surfaces. This will remove excess water and prevent mold and mildew from taking hold.
* Regular cleaning: Clean your tile and grout regularly with a DIY cleaner or a commercial mold and mildew remover. This will help to remove any existing mold and mildew and prevent it from spreading.
* Seal your grout: Sealing your grout will help to prevent water from penetrating the grout lines, which can create a breeding ground for mold and mildew. Apply a grout sealer every one to two years, or as recommended by the manufacturer.
* Address leaks promptly: Repair any leaks in your plumbing or around your tile and grout as soon as possible. Leaks can create a constant source of moisture, which can promote mold and mildew growth.
The grout is really stained. Will this DIY cleaner work on heavily stained grout?
This DIY cleaner can be effective on heavily stained grout, but it may require some extra effort and patience. For heavily stained grout, try the following:
* Apply the cleaner and let it sit: After applying the DIY cleaner to the grout, let it sit for a longer period, such as 15-20 minutes, to allow the ingredients to penetrate the stains.
* Use a stiff-bristled brush: Use a stiff-bristled brush, such as a grout brush or an old toothbrush, to scrub the grout lines vigorously. This will help to loosen and remove the stains.
* Repeat the process: If the stains are still visible after scrubbing, repeat the process. You may need to apply the cleaner and scrub the grout several times to remove stubborn stains completely.
* Consider a stronger solution: If the DIY cleaner is not effective enough, you can try using a commercial grout cleaner specifically designed for removing heavy stains. Follow the manufacturer’s instructions carefully.
* Steam cleaning: Steam cleaning can be an effective way to remove stubborn stains from grout. The high-temperature steam can help to loosen and dissolve dirt and grime.
Is baking soda harmful to grout?
Baking soda is generally considered safe for grout. It’s a mild abrasive that can help to scrub away dirt and grime without damaging the grout. However, excessive scrubbing or using baking soda on very old or fragile grout could potentially cause some wear and tear. Always test in an inconspicuous area first.

Leave a Comment