

Spring cleaning checklist: Ah, spring! The season of blooming flowers, chirping birds, and… a house begging for a good scrub-down! Let’s be honest, after a long winter indoors, our homes often resemble a bear’s den more than a sanctuary. But fear not, because I’m here to arm you with the ultimate spring cleaning checklist and some seriously clever DIY tricks to make the process not just bearable, but dare I say, even enjoyable!
The tradition of spring cleaning dates back centuries, with roots in various cultures. From the Persian Nowruz (New Year) tradition of “Khaneh Tekani” (shaking the house) to the Jewish tradition of Passover cleaning, the idea of a thorough annual cleaning is deeply ingrained in our collective consciousness. It’s more than just tidying up; it’s about renewal, fresh starts, and creating a healthier, happier living space.
But let’s face it, tackling an entire house can feel overwhelming. That’s where my DIY hacks come in! I’m going to share simple, effective, and often budget-friendly solutions to conquer even the most daunting cleaning tasks. From decluttering tips to natural cleaning recipes, this article is your go-to guide for transforming your home into a sparkling oasis. So, grab your gloves, put on some upbeat music, and let’s get started on our spring cleaning adventure together! I promise, you’ll feel amazing afterwards!

DIY Natural All-Purpose Cleaner: Spring Cleaning Powerhouse!
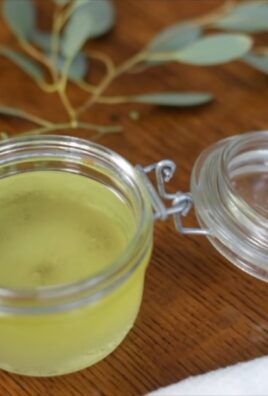
Hey everyone! Spring is in the air, and that means it’s time to tackle that dreaded spring cleaning! But before you reach for those harsh chemicals, let’s whip up a super effective, all-natural cleaner that’s gentle on your home and the environment. I’ve been using this recipe for years, and it’s a game-changer. Trust me, your house will thank you (and so will your lungs!).
Why Go Natural?
Before we dive in, let’s quickly touch on why I’m such a big fan of natural cleaners.
* Healthier Home: No more worrying about lingering chemical fumes that can irritate your skin, eyes, and respiratory system.
* Eco-Friendly: We’re reducing our reliance on harsh chemicals that can pollute our waterways.
* Cost-Effective: You probably already have most of these ingredients in your pantry!
* Surprisingly Effective: Don’t underestimate the power of natural ingredients! This cleaner cuts through grease and grime like a champ.
What You’ll Need: The Ingredient Lineup
Okay, let’s gather our supplies. This recipe is super flexible, so feel free to adjust the amounts to your liking.
* Water: The base of our cleaner. Distilled water is best for a longer shelf life, but tap water works just fine.
* White Vinegar: A natural disinfectant and degreaser. Don’t worry about the smell; it dissipates quickly!
* Rubbing Alcohol (Isopropyl Alcohol): Boosts the cleaning power and helps the cleaner dry faster.
* Liquid Dish Soap: Cuts through grease and grime. Choose a natural, unscented variety if possible.
* Essential Oils (Optional): For a pleasant scent and added cleaning benefits. Lemon, lavender, tea tree, and eucalyptus are all great choices.
* Spray Bottle: To store and dispense our cleaner.
Step-by-Step Instructions: Mixing Up the Magic
Alright, let’s get mixing! This is so easy, you’ll wonder why you haven’t been doing it all along.
1. Gather Your Supplies: Make sure you have everything you need within reach. This will make the process much smoother.
2. Prepare the Spray Bottle: Ensure your spray bottle is clean and dry.
3. Add Water: Pour 2 cups of water into the spray bottle.
4. Add White Vinegar: Add 1/2 cup of white vinegar to the water.
5. Add Rubbing Alcohol: Pour in 1/4 cup of rubbing alcohol.
6. Add Dish Soap: Add 1 tablespoon of liquid dish soap. Be careful not to add too much, or your cleaner will be sudsy.
7. Add Essential Oils (Optional): If you’re using essential oils, add 10-20 drops of your favorite scent. I personally love a combination of lemon and lavender.
8. Close and Shake: Secure the spray bottle lid tightly and shake well to combine all the ingredients.
9. Label Your Bottle: Don’t forget to label your bottle with the name of the cleaner and the date you made it. This will help you keep track of it.
Putting Your Cleaner to Work: Cleaning Applications
Now that you have your amazing all-purpose cleaner, let’s put it to work! Here are some of my favorite ways to use it:
* Kitchen Counters: Spray and wipe down your kitchen counters to remove spills and grime.
* Bathroom Surfaces: Clean your bathroom sinks, toilets, and showers with this cleaner.
* Mirrors and Windows: Spray and wipe down mirrors and windows for a streak-free shine.
* Floors: Add a small amount of the cleaner to a bucket of water and mop your floors. (Always test in an inconspicuous area first!)
* Appliances: Wipe down the exterior of your appliances to remove fingerprints and smudges.
* Doorknobs and Light Switches: Disinfect doorknobs and light switches to kill germs.
* Inside the Microwave: Spray inside the microwave, let it sit for a few minutes, then wipe clean. The steam will loosen any stuck-on food.
Important Considerations: Safety First!
While this cleaner is natural, it’s still important to take some precautions:
* Test in an Inconspicuous Area: Before using the cleaner on any surface, test it in a small, hidden area to make sure it doesn’t damage the finish.
* Avoid Contact with Eyes: If the cleaner gets in your eyes, rinse immediately with plenty of water.
* Keep Out of Reach of Children and Pets: Store the cleaner in a safe place where children and pets cannot access it.
* Don’t Mix with Bleach: Never mix this cleaner with bleach, as it can create harmful fumes.
* Use in a Well-Ventilated Area: When cleaning, make sure the area is well-ventilated.
Troubleshooting: Common Issues and Solutions
Sometimes, things don’t go exactly as planned. Here are some common issues you might encounter and how to fix them:
* Streaky Surfaces: If you’re getting streaks, you might be using too much dish soap. Try reducing the amount of dish soap in your next batch. You can also try wiping the surface with a clean, dry cloth after cleaning.
* Strong Vinegar Smell: The vinegar smell should dissipate quickly. If it’s bothering you, add more essential oils to mask the scent. You can also try opening a window to ventilate the area.
* Cloudy Cleaner: This is usually caused by the dish soap reacting with the other ingredients. It doesn’t affect the cleaning power, but if you’re concerned, try using a different brand of dish soap.
* Clogged Spray Nozzle: If your spray nozzle gets clogged, try running it under warm water to clear the blockage. You can also try using a small pin to unclog the nozzle.
Essential Oil Blends: Level Up Your Cleaning Game
Want to customize your cleaner with different essential oil blends? Here are a few of my favorites:
* Lemon & Tea Tree: A powerful antibacterial and antiviral blend that’s perfect for cleaning bathrooms and kitchens.
* Lavender & Eucalyptus: A calming and refreshing blend that’s great for cleaning bedrooms and living rooms.
* Orange & Clove: A warm and spicy blend that’s perfect for fall and winter cleaning.
* Peppermint & Rosemary: An invigorating and energizing blend that’s great for cleaning your home office or workout space.
Beyond the Basics: Advanced Cleaning Tips
Ready to take your cleaning game to the next level? Here are a few advanced cleaning tips:
* For Stubborn Stains: For tough stains, like grease or dried food, let the cleaner sit on the stain for a few minutes before wiping it away.
* For Grout Cleaning: Spray the cleaner on grout lines and let it sit for a few minutes. Then, scrub with a grout brush and rinse with water.
* For Stainless Steel: Spray the cleaner on a microfiber cloth and wipe down stainless steel appliances. Then, buff with a clean, dry cloth to prevent streaks.
* For Wood Furniture: Use the cleaner sparingly on wood furniture, and always test in an inconspicuous area first. Wipe with a damp cloth and then dry immediately.
Storage: Keeping Your Cleaner Fresh
To keep your cleaner fresh and effective, store it in a cool, dark place. Avoid storing it in direct sunlight or extreme temperatures. The cleaner should last for several months, but if you notice any changes in color or odor, it’s best to discard it and make a fresh batch.
Customizing Your Recipe: Making it Your Own
The best part about this recipe is that you can customize it to suit your needs and preferences. Here are a few ideas:
* Adjust the Vinegar Ratio: If you prefer a stronger cleaner, you can increase the amount of vinegar. Just be careful not to use too much, as it can damage some surfaces.
* Experiment with Different Essential Oils: Try different essential oil blends to find your favorite scent. You can also use essential oils that have specific cleaning properties, such as tea tree oil for its antibacterial properties.
* Add Borax: For extra cleaning power, you can add 1 tablespoon of borax to the recipe. Borax is a natural mineral that helps to remove stains and deodorize surfaces. However, be sure to use it with caution, as it can be irritating to the skin and eyes.
* Make a Larger Batch: If you use this cleaner frequently, you can make a larger batch and store it in a larger container. Just be sure to adjust the ingredient amounts accordingly.
Final Thoughts: Enjoy Your Sparkling Clean Home!
And there you have it! A simple, effective, and natural all-

Conclusion
So, there you have it! Transforming your spring cleaning checklist from a daunting chore list into a manageable, even enjoyable, process is entirely within your reach. This DIY approach isn’t just about ticking boxes; it’s about reclaiming your space, refreshing your mind, and creating a healthier, happier home environment.
Why is this DIY spring cleaning checklist a must-try? Because it empowers you to take control. Instead of feeling overwhelmed by generic advice, you’re crafting a personalized plan that addresses your specific needs and priorities. This tailored approach ensures that you’re focusing your energy where it matters most, leading to more effective and satisfying results.
Think about the satisfaction of finally tackling that cluttered closet or organizing your pantry with a system that actually works. Imagine the feeling of breathing in the fresh, clean air of a home that’s been thoroughly revitalized. This DIY checklist is your roadmap to achieving that feeling.
But don’t stop there! This is just a starting point. Feel free to experiment with variations to suit your lifestyle. For example, if you’re an avid gardener, add specific tasks related to preparing your outdoor space for the growing season. If you have pets, incorporate extra cleaning steps to address pet hair and odors. Consider adding a section dedicated to decluttering digital spaces, like your computer files and email inbox.
Here are a few more ideas to personalize your spring cleaning checklist:
* Theme it: Dedicate each week to a specific theme, such as “Kitchen Week” or “Bedroom Week,” to stay focused.
* Make it a family affair: Assign age-appropriate tasks to family members to share the workload and teach valuable life skills.
* Reward yourself: Plan small rewards for completing milestones on your checklist to stay motivated.
* Go green: Incorporate eco-friendly cleaning products and practices to minimize your environmental impact.
Ultimately, the goal is to create a spring cleaning checklist that works for you. Don’t be afraid to adapt and modify it as needed. The most important thing is to get started and make progress, one task at a time.
We’re confident that this DIY approach will transform your spring cleaning experience. But we want to hear from you! Try out this method, customize it to your liking, and share your results. What worked well? What challenges did you face? What tips and tricks did you discover along the way? Your feedback will not only help us improve this guide but also inspire others to embrace the power of DIY spring cleaning. Share your experiences in the comments below – we can’t wait to hear your stories! Let’s make this spring the cleanest and most organized yet!
Frequently Asked Questions (FAQ)
What if I don’t have time to complete everything on my spring cleaning checklist?
That’s perfectly okay! The beauty of a DIY checklist is that it’s flexible. Prioritize the tasks that are most important to you or that will have the biggest impact on your home. You can also break down larger tasks into smaller, more manageable chunks. Instead of trying to clean your entire kitchen in one day, for example, you could focus on cleaning the refrigerator one day, the oven another day, and the pantry on a third day. Remember, it’s about progress, not perfection. Even tackling a few key areas will make a noticeable difference. Don’t feel pressured to do everything at once. Spread the tasks out over several weeks or even months if needed. The goal is to create a cleaner, more organized space without burning yourself out in the process.
How do I stay motivated throughout the spring cleaning process?
Motivation can be a challenge, especially when faced with a long list of tasks. Here are a few tips to help you stay on track:
* Set realistic goals: Don’t try to do too much too soon. Start with a few achievable tasks and gradually increase the workload as you gain momentum.
* Break down large tasks: As mentioned earlier, breaking down large tasks into smaller ones makes them less daunting and more manageable.
* Reward yourself: Plan small rewards for completing milestones on your checklist. This could be anything from taking a relaxing bath to watching your favorite movie.
* Listen to music or podcasts: Make the cleaning process more enjoyable by listening to your favorite music or podcasts.
* Enlist help: Ask family members or friends to help you with the cleaning. This can make the process more fun and less overwhelming.
* Visualize the end result: Imagine how good it will feel to have a clean and organized home. This can help you stay motivated when you’re feeling discouraged.
* Track your progress: Use a checklist or calendar to track your progress. Seeing how far you’ve come can be a great motivator.
What are some eco-friendly cleaning product alternatives I can use?
There are many eco-friendly cleaning product alternatives that are just as effective as conventional cleaners. Here are a few popular options:
* Vinegar: Vinegar is a natural disinfectant and deodorizer that can be used to clean a variety of surfaces.
* Baking soda: Baking soda is a mild abrasive that can be used to scrub surfaces and remove stains.
* Lemon juice: Lemon juice is a natural degreaser and disinfectant that can be used to clean countertops and appliances.
* Essential oils: Essential oils can be added to cleaning solutions for their antibacterial and antifungal properties, as well as their pleasant scents.
* Castile soap: Castile soap is a gentle, all-purpose cleaner that can be used on a variety of surfaces.
You can find recipes for homemade cleaning solutions online using these ingredients. You can also purchase eco-friendly cleaning products from many retailers.
How do I declutter effectively?
Decluttering can be a challenging but rewarding process. Here are a few tips to help you declutter effectively:
* Start small: Don’t try to declutter your entire home at once. Start with one area, such as a drawer or a shelf.
* Set a timer: Set a timer for 15-30 minutes and focus on decluttering for that amount of time. This can help you stay focused and avoid feeling overwhelmed.
* Ask yourself tough questions: When deciding whether to keep or discard an item, ask yourself questions like: “Have I used this in the past year?” “Do I love this item?” “Is this item useful?”
* Have a system: Have a system for sorting items into categories like “keep,” “donate,” “sell,” and “trash.”
* Be ruthless: Don’t be afraid to get rid of items that you no longer need or use.
* Don’t buy more stuff: Once you’ve decluttered, be mindful of what you bring into your home. Avoid impulse purchases and only buy things that you truly need.
* One in, one out: For every new item you bring into your home, get rid of one old item.
How often should I do a spring cleaning?
While the term “spring cleaning” implies doing it once a year, the frequency depends on your lifestyle and preferences. A deep clean once or twice a year is a good starting point. However, you might find that breaking down the tasks and doing smaller, more frequent cleaning sessions throughout the year is more manageable. Consider your home’s needs and your own schedule to determine the best frequency for your spring cleaning routine. Remember, maintaining a clean and organized home is an ongoing process, not just a once-a-year event.
Leave a Comment