

Grow Yellow Watermelon at Home: Imagine biting into a juicy, vibrant watermelon, but instead of the familiar red, it’s a sunshine yellow! Sounds intriguing, right? Well, you don’t have to just imagine it. This DIY guide will show you how to cultivate your very own yellow watermelons, bringing a touch of the exotic to your backyard garden.
Watermelons, with their sweet and refreshing taste, have been enjoyed for centuries. Originating in Africa, they’ve spread across the globe, becoming a symbol of summer and backyard barbecues. While the traditional red watermelon is a classic, the yellow variety offers a unique twist, often boasting a sweeter, honey-like flavor. But why settle for store-bought when you can experience the joy of nurturing your own?
Many people shy away from growing watermelons, thinking they require vast amounts of space and expert knowledge. But that’s simply not true! With a few simple tricks and this easy-to-follow DIY guide, you can successfully grow yellow watermelon at home, even in a smaller garden or container. I’m going to show you how to select the right seeds, prepare your soil, and provide the care your yellow watermelon plants need to thrive. Get ready to impress your friends and family with this unique and delicious homegrown treat!
Grow Your Own Sweet Yellow Watermelon: A DIY Guide
Hey there, fellow gardening enthusiasts! Ever dreamt of biting into a juicy, vibrant yellow watermelon, grown right in your own backyard? Well, dream no more! I’m here to guide you through the process of cultivating these sunny delights, from seed to sweet success. It might seem daunting, but trust me, with a little patience and these simple steps, you’ll be enjoying homegrown yellow watermelon in no time.
Choosing the Right Variety
First things first, you need to select the right yellow watermelon variety. Not all watermelons are created equal, and some are definitely better suited for home gardens than others. Here are a few popular and reliable choices:
* ‘Yellow Doll’: This is a widely available and popular variety known for its small size (perfect for smaller gardens!), sweet flavor, and early maturity. It’s a great option for beginners.
* ‘Buttercup Yellow’: Another excellent choice, ‘Buttercup Yellow’ offers a slightly larger fruit with a crisp, sweet flesh. It’s known for its disease resistance, which is always a plus.
* ‘Yellow Crimson’: If you’re looking for a larger watermelon, ‘Yellow Crimson’ is a good bet. It boasts a beautiful yellow flesh with a slightly tangy flavor.
* ‘Gold in Gold’: This variety is a bit more unique, with a deep golden-yellow flesh and a slightly nutty flavor. It’s a good choice if you’re looking for something a little different.
Once you’ve chosen your variety, make sure you source your seeds from a reputable supplier to ensure good germination rates and healthy plants.
Starting Your Seeds (or Buying Seedlings)
You have two options here: starting your seeds indoors or buying seedlings from a local nursery. Starting from seed gives you more control over the process, but buying seedlings can save you time and effort.
Starting Seeds Indoors (Recommended for Colder Climates)
If you live in a region with a shorter growing season, starting your seeds indoors is highly recommended. This gives your watermelon plants a head start and ensures they have enough time to mature before the first frost.
1. Timing is Key: Start your seeds about 4-6 weeks before the last expected frost in your area. You can find this information online or by contacting your local agricultural extension office.
2. Prepare Your Seed Starting Mix: Use a well-draining seed starting mix. You can buy this pre-made or create your own by mixing equal parts peat moss, perlite, and vermiculite.
3. Sow the Seeds: Fill small pots or seed trays with the seed starting mix. Make a small indentation (about 1 inch deep) in the center of each pot and place 2-3 watermelon seeds in each. Cover the seeds with the mix and gently water.
4. Provide Warmth and Light: Watermelon seeds need warmth to germinate. Place the pots in a warm location, such as on top of a refrigerator or on a heat mat. You can also use a grow light to provide consistent light.
5. Keep the Soil Moist: Keep the soil consistently moist, but not soggy. Water gently when the top inch of soil feels dry.
6. Thin the Seedlings: Once the seedlings emerge (usually within 7-10 days), thin them to one strong seedling per pot. Snip off the weaker seedlings at the soil line with scissors.
7. Harden Off the Seedlings: Before transplanting the seedlings outdoors, you need to harden them off. This process gradually acclimates the plants to outdoor conditions. Start by placing the seedlings outdoors in a sheltered location for a few hours each day, gradually increasing the amount of time they spend outside over the course of a week.
Buying Seedlings
If you prefer to skip the seed starting process, you can purchase watermelon seedlings from a local nursery. Choose healthy-looking seedlings with sturdy stems and no signs of disease or pests.
Preparing Your Garden Bed
Watermelons are heavy feeders and need plenty of space to grow. Choose a sunny location with well-draining soil.
1. Choose a Sunny Spot: Watermelons need at least 6-8 hours of direct sunlight per day.
2. Test Your Soil: Ideally, your soil should have a pH between 6.0 and 6.8. You can test your soil using a soil testing kit or by sending a sample to your local agricultural extension office.
3. Amend the Soil: Watermelons thrive in rich, well-draining soil. Amend your soil with plenty of compost or well-rotted manure. This will improve drainage, add nutrients, and help retain moisture.
4. Create Mounds or Rows: Watermelons grow best on mounds or rows. This helps improve drainage and warms the soil more quickly. Create mounds or rows that are about 12 inches high and 3-4 feet apart.
5. Consider Using Black Plastic Mulch: Black plastic mulch can help warm the soil, suppress weeds, and conserve moisture. Lay the mulch over the mounds or rows before planting.
Transplanting Your Seedlings (or Direct Sowing)
Now comes the exciting part – getting those watermelon plants into the ground!
1. Transplant Seedlings After the Last Frost: Wait until after the last expected frost to transplant your watermelon seedlings outdoors. The soil temperature should be at least 60°F (15°C).
2. Dig Holes: Dig holes in the mounds or rows that are slightly larger than the root balls of the seedlings. Space the holes about 2-3 feet apart.
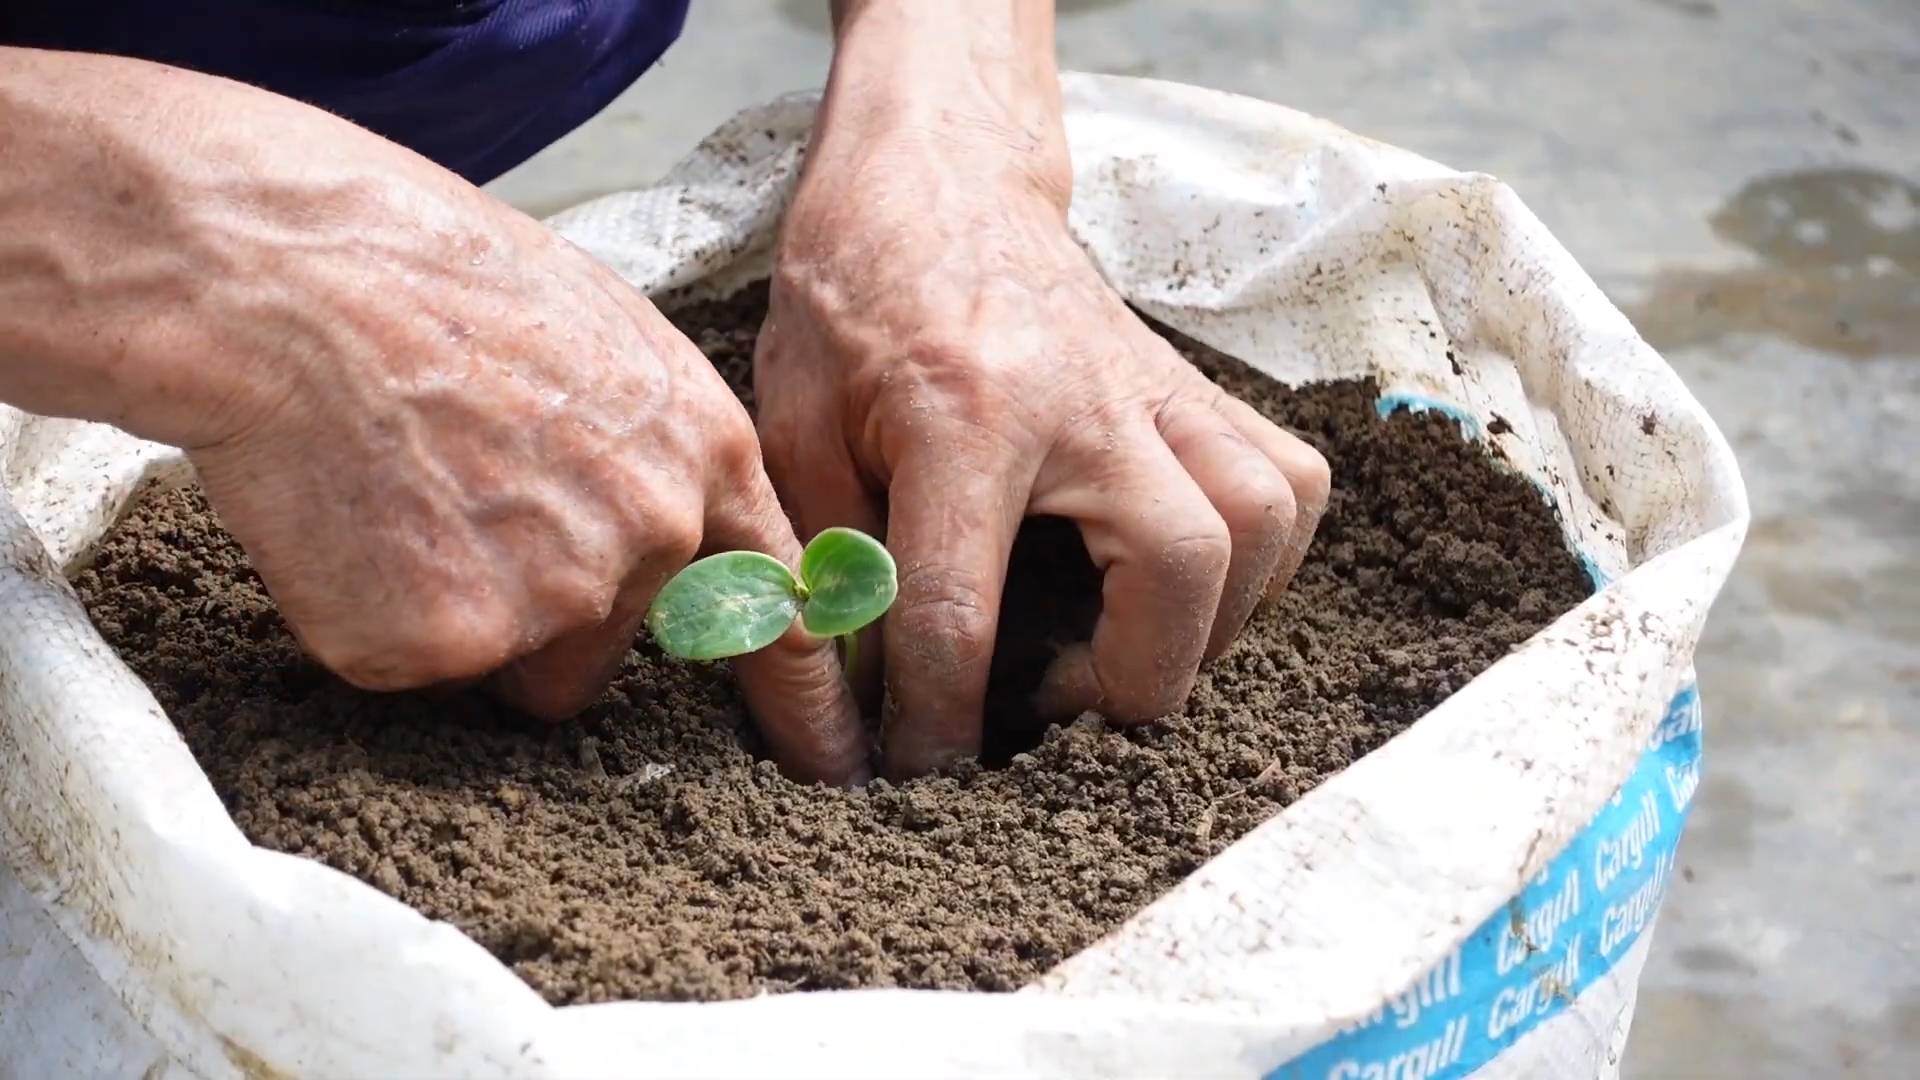
3. Gently Remove Seedlings: Carefully remove the seedlings from their pots, being careful not to damage the roots.
4. Plant the Seedlings: Place the seedlings in the holes and backfill with soil. Gently firm the soil around the base of the plants.
5. Water Thoroughly: Water the seedlings thoroughly after planting.
6. Direct Sowing (If Applicable): If you’re in a warm climate and prefer to direct sow, plant the seeds directly into the prepared mounds or rows after the last frost. Plant the seeds about 1 inch deep and space them about 2-3 feet apart. Keep the soil consistently moist until the seeds germinate.
Caring for Your Watermelon Plants
Once your watermelon plants are in the ground, it’s important to provide them with proper care to ensure a bountiful harvest.
1. Water Regularly: Watermelons need consistent moisture, especially during hot, dry weather. Water deeply and regularly, aiming for about 1-2 inches of water per week. Avoid overhead watering, as this can promote fungal diseases. Drip irrigation is a great option.
2. Fertilize Regularly: Watermelons are heavy feeders and need regular fertilization. Use a balanced fertilizer (such as 10-10-10) every 2-3 weeks. You can also side-dress the plants with compost or well-rotted manure.
3. Weed Regularly: Keep the garden bed free of weeds, as they can compete with the watermelon plants for nutrients and water. Hand-pull weeds carefully to avoid disturbing the roots of the watermelon plants.
4. Prune if Necessary: While not essential, pruning can help improve air circulation and fruit production. Remove any suckers (small shoots that grow from the base of the plant) and any dead or diseased leaves.
5. Protect from Pests and Diseases: Watermelons can be susceptible to various pests and diseases, such as aphids, squash bugs, and powdery mildew. Inspect your plants regularly for signs of pests or diseases and take appropriate action. You can use organic pest control methods, such as insecticidal soap or neem oil, to control pests. For diseases, ensure good air circulation and avoid overhead watering.
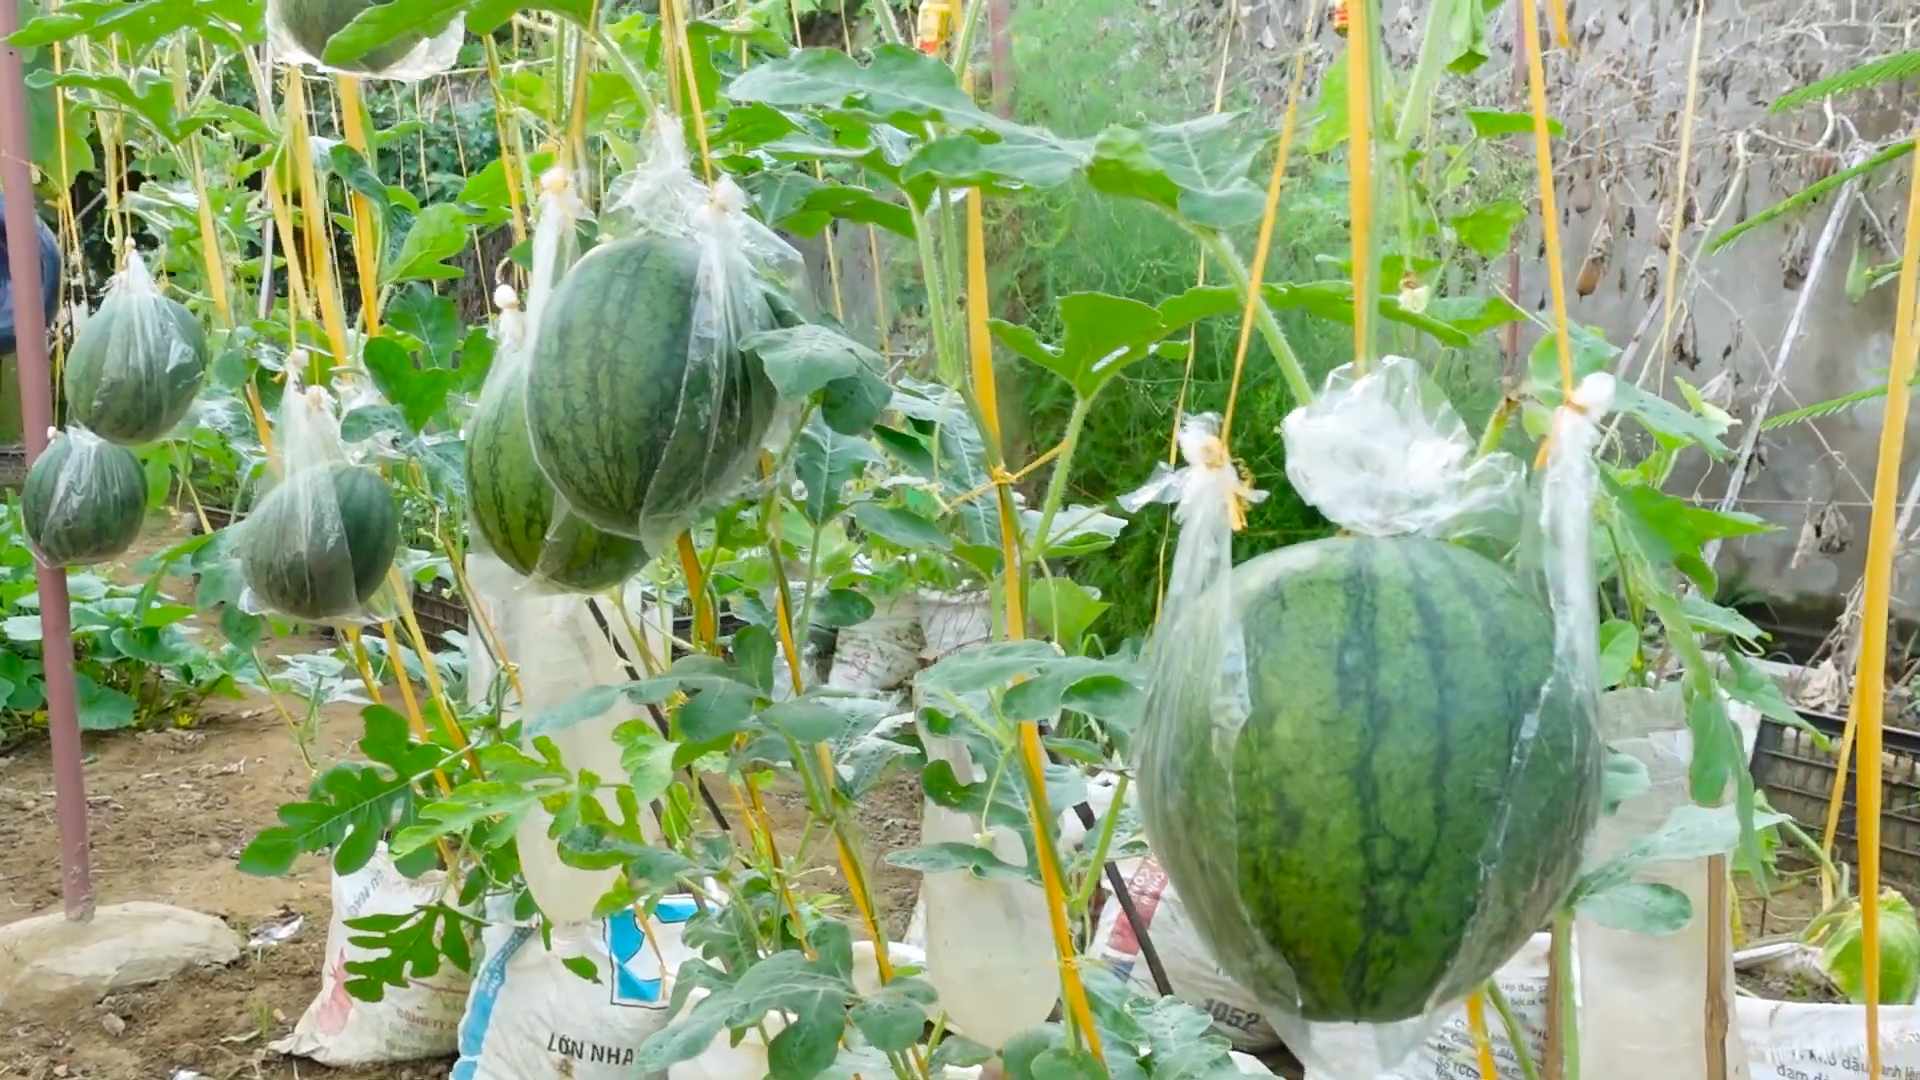
6. Support the Fruit (Optional): As the watermelons grow larger, you may need to support them to prevent them from rotting on the ground. You can use melon cradles or place the watermelons on straw or cardboard.
Pollination
Watermelons need to be pollinated in order to produce fruit. If you don’t see any bees or other pollinators in your garden, you may need to hand-pollinate the flowers.
1. Identify Male and Female Flowers: Watermelon plants produce both male and female flowers. Male flowers have a long, thin stem, while female flowers have a small, immature watermelon at the base of the flower.
2. Hand-Pollinate: In the morning, when the flowers are open, use a small paintbrush to collect pollen from a male flower. Then, gently brush the pollen onto the stigma (the center part) of a female flower.
3. Repeat Daily: Repeat this process daily until you see small watermelons starting to develop.
Harvesting Your Yellow Watermelon
The moment you’ve been waiting for! Knowing when to harvest your yellow watermelon is crucial for getting that perfect sweet taste.
1. Check the Tendril: The tendril closest to the watermelon stem should be brown and
Conclusion
So, there you have it! Growing your own yellow watermelon at home isn’t just a fun gardening project; it’s a gateway to experiencing a unique and incredibly delicious fruit that you simply won’t find in most grocery stores. The vibrant color, the sweeter-than-red flavor profile, and the sheer satisfaction of nurturing a plant from seed to harvest make this endeavor truly worthwhile.
Think about it: you’ll be the talk of the neighborhood barbecue, presenting a stunning yellow watermelon that’s bursting with flavor. Imagine the look on your friends’ and family’s faces when they taste this unexpected treat. Beyond the novelty, you’re also gaining control over the quality of your food. You’ll know exactly what went into growing your watermelon, ensuring it’s free from unwanted chemicals and pesticides.
But the benefits don’t stop there. Gardening itself is a fantastic stress reliever. The simple act of tending to your plants, watching them grow, and connecting with nature can have a profound impact on your mental and emotional well-being. Plus, you’ll be contributing to a more sustainable lifestyle by reducing your reliance on commercially grown produce.
Don’t be intimidated by the process. While growing yellow watermelon requires some attention and care, it’s certainly achievable for gardeners of all levels. Remember to choose a sunny location, provide well-drained soil, and water consistently. And don’t forget to protect your precious melons from pests and diseases.
Ready to take your watermelon game to the next level?
Consider these variations to personalize your growing experience:
* Vertical Gardening: If you’re short on space, try growing your yellow watermelon vertically on a trellis. This not only saves space but also improves air circulation and reduces the risk of fungal diseases.
* Companion Planting: Plant basil, marigolds, or nasturtiums near your watermelon to deter pests and attract beneficial insects.
* Seed Saving: Once you’ve harvested your first yellow watermelon, save some of the seeds to plant next year. This will ensure you have a continuous supply of this delicious fruit.
* Grafting: For more advanced gardeners, consider grafting your yellow watermelon onto a more vigorous rootstock for increased disease resistance and yield.
We’re confident that you’ll find growing your own yellow watermelon at home to be a rewarding and enjoyable experience. It’s a chance to connect with nature, learn new skills, and, most importantly, enjoy a truly exceptional fruit.
So, grab your seeds, prepare your garden, and get ready to embark on this exciting adventure. We can’t wait to hear about your success! Share your photos, tips, and experiences in the comments below. Let’s create a community of yellow watermelon enthusiasts! We encourage you to try this DIY trick and share your experience with us. Happy gardening!
Frequently Asked Questions (FAQ)
What exactly *is* a yellow watermelon, and how is it different from a red one?
Yellow watermelons are a variety of watermelon that, instead of having the typical red flesh, have yellow flesh. The difference lies in the presence of different pigments. Red watermelons get their color from lycopene, the same antioxidant found in tomatoes. Yellow watermelons, on the other hand, have lower levels of lycopene and higher levels of beta-carotene, the pigment that gives carrots their orange color. This results in a sweeter, honey-like flavor that many people find even more appealing than red watermelon. The texture is generally the same, crisp and juicy.
Is it more difficult to grow yellow watermelon compared to red watermelon?
Generally, the growing requirements for yellow and red watermelons are very similar. Both need plenty of sunlight (at least 6-8 hours per day), well-drained soil, and consistent watering. The main difference might be in the availability of specific yellow watermelon varieties. You might need to source seeds from a specialized seed supplier or online retailer. However, once you have the seeds, the cultivation process is largely the same. Keep an eye out for common watermelon pests and diseases, and provide adequate support for the growing vines.
How long does it take to grow a yellow watermelon from seed?
From seed to harvest, you can expect it to take approximately 75-90 days to grow a yellow watermelon. This timeframe can vary depending on your climate, the specific variety you’re growing, and the growing conditions. Start seeds indoors about 4-6 weeks before the last expected frost in your area. Transplant them outdoors once the soil has warmed up and the risk of frost has passed. Be patient and consistent with your care, and you’ll be rewarded with delicious yellow watermelons in due time.
What are some common problems I might encounter when growing yellow watermelon, and how can I prevent them?
Some common problems include:
* Pests: Aphids, squash bugs, and vine borers can attack watermelon plants. Inspect your plants regularly and use organic pest control methods like insecticidal soap or neem oil.
* Diseases: Fungal diseases like powdery mildew and anthracnose can affect the leaves and fruits. Ensure good air circulation by spacing plants adequately and avoid overhead watering. Use a fungicide if necessary.
* Poor pollination: Watermelons need to be pollinated to produce fruit. If you’re not seeing fruit develop, you may need to hand-pollinate the flowers.
* Blossom-end rot: This is caused by calcium deficiency and can result in the bottom of the watermelon rotting. Ensure your soil has adequate calcium and water consistently to prevent this.
How do I know when my yellow watermelon is ripe and ready to harvest?
Determining ripeness can be tricky, but here are a few indicators:
* The tendril closest to the fruit turns brown and dries up.
* The underside of the watermelon (where it rests on the ground) turns from white to a creamy yellow.
* The watermelon sounds dull and hollow when you thump it.
* The rind becomes slightly dull and loses its glossy sheen.
Trust your instincts and don’t be afraid to harvest one to test it. You’ll get better at recognizing the signs of ripeness with experience.
Can I grow yellow watermelon in containers?
Yes, you can grow yellow watermelon in containers, but you’ll need a large container (at least 20 gallons) with good drainage. Choose a dwarf or bush variety of yellow watermelon that is better suited for container growing. Provide adequate support for the vines and water and fertilize regularly. Container-grown watermelons may require more frequent watering than those grown in the ground.
What kind of fertilizer should I use for yellow watermelon?
Use a balanced fertilizer (e.g., 10-10-10) when planting. Once the plants start to flower, switch to a fertilizer that is higher in phosphorus and potassium to promote fruit development. You can also supplement with compost or other organic matter to improve soil fertility. Avoid over-fertilizing, as this can lead to excessive vine growth and reduced fruit production.
Are there different varieties of yellow watermelon?
Yes, there are several varieties of yellow watermelon available, each with its own unique characteristics. Some popular varieties include ‘Yellow Doll’, ‘Buttercup Yellow’, and ‘Honey Cream’. Research different varieties to find one that is well-suited to your climate and growing conditions.
Where can I buy yellow watermelon seeds?
You can find yellow watermelon seeds at many online seed retailers, garden centers, and specialty seed suppliers. Look for reputable sources to ensure you’re getting high-quality seeds. You might also be able to find seeds from local farmers or seed exchanges.
Is growing yellow watermelon organically possible?
Absolutely! Growing yellow watermelon organically is definitely achievable. Focus on building healthy soil with compost and other organic amendments. Use organic pest control methods like neem oil and insecticidal soap. Choose disease-resistant varieties and practice good sanitation to prevent the spread of diseases. With a little extra effort, you can enjoy delicious, organically grown yellow watermelons.


Leave a Comment