

Grow Sweet Jicama, and unlock a world of fresh, crunchy goodness right in your backyard! Have you ever dreamt of harvesting your own exotic, slightly sweet, and incredibly versatile root vegetable? Well, dream no more! This DIY guide is your passport to cultivating this unique crop, even if you’re a complete beginner.
Jicama, also known as the Mexican turnip, boasts a rich history, deeply rooted in Mesoamerican cultures. For centuries, it has been a staple in their diets, prized for its refreshing taste and nutritional benefits. Now, you can bring this ancient tradition to your own garden.
Why should you embark on this jicama-growing adventure? Because store-bought jicama simply can’t compare to the flavor and satisfaction of harvesting your own. Plus, knowing exactly where your food comes from and how it’s grown is incredibly empowering. This DIY project will not only save you money but also provide you with a healthy, delicious, and sustainable food source. I’m going to show you how easy it is to grow sweet jicama, even in limited spaces. Let’s get started and transform your garden into a jicama haven!
Growing Sweet Jicama: A Beginner’s Guide to This Delicious Root Vegetable
Okay, so you want to grow your own jicama? Awesome! I’m here to guide you through the process. Jicama, also known as yam bean or Mexican turnip, is a fantastic root vegetable that’s crisp, sweet, and incredibly versatile. It’s perfect for salads, stir-fries, or just snacking on raw. Don’t be intimidated – growing jicama is totally doable, even for beginners. Let’s get started!
Choosing the Right Jicama Variety and Starting Seeds
First things first, let’s talk about seeds. While you can sometimes find jicama starts at nurseries, it’s more common to grow them from seed.
* Seed Selection: Look for jicama seeds online or at your local garden center. Make sure they are from a reputable source to ensure good germination rates.
* Starting Indoors (Recommended): Jicama has a long growing season, so starting seeds indoors is highly recommended, especially if you live in a cooler climate.
* Timing is Key: Start your seeds about 8-10 weeks before the last expected frost in your area. This gives them a good head start.
Step-by-Step Seed Starting:
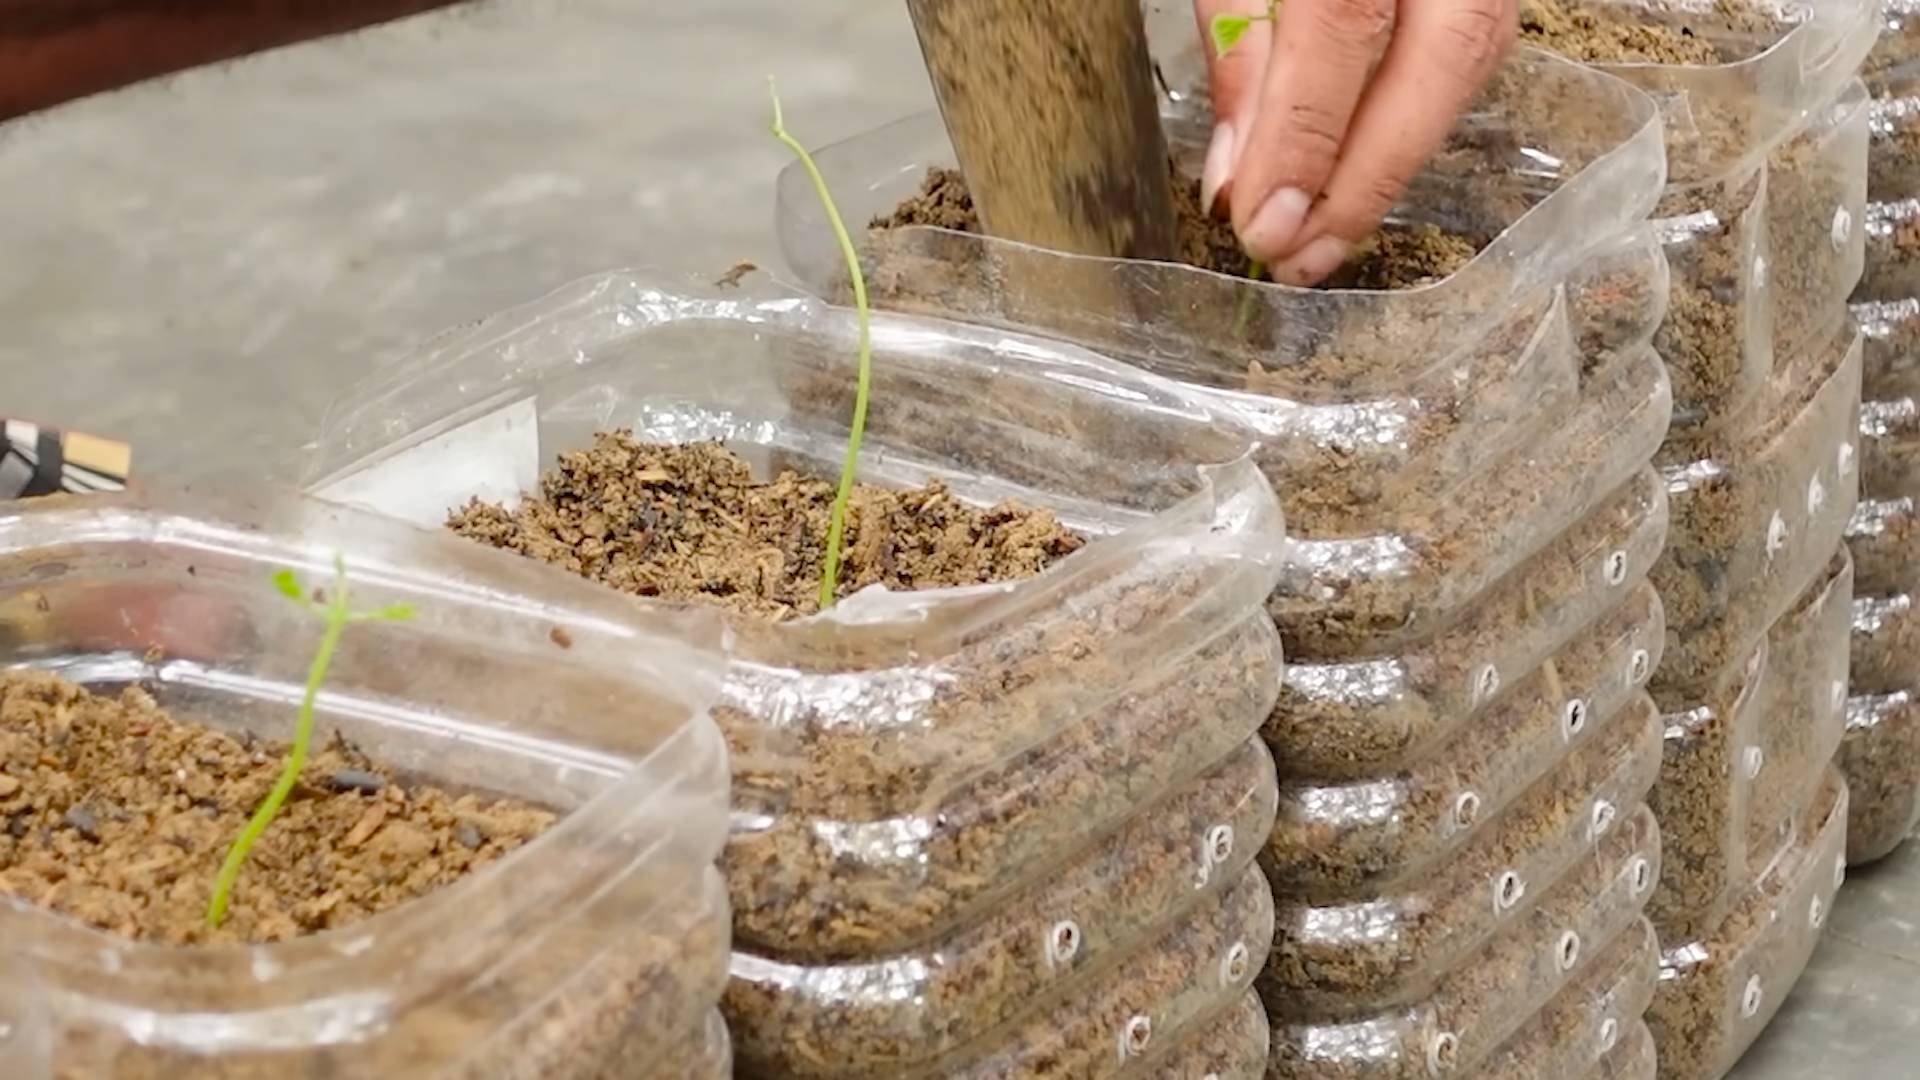
1. Soaking the Seeds: Jicama seeds have a hard outer shell. To improve germination, soak them in warm water for 24 hours before planting. This helps soften the shell and allows moisture to penetrate. I usually use a small bowl and just cover the seeds with water.
2. Preparing Seed Trays or Pots: Fill seed trays or small pots (about 2-3 inches in diameter) with a good quality seed-starting mix. Make sure the mix is well-draining. I like to use a mix that contains peat moss, vermiculite, and perlite.
3. Planting the Seeds: Make a small hole (about ½ inch deep) in the center of each pot or cell. Place one or two seeds in each hole and cover them gently with the seed-starting mix.
4. Watering: Gently water the seeds using a spray bottle or watering can with a fine rose. You want to moisten the soil without disturbing the seeds.
5. Creating a Humid Environment: Cover the seed trays or pots with a clear plastic dome or plastic wrap to create a humid environment. This helps keep the soil moist and promotes germination.
6. Providing Warmth: Place the seed trays or pots in a warm location. The ideal temperature for jicama seed germination is between 70-80°F (21-27°C). You can use a heat mat to provide consistent warmth.
7. Monitoring Germination: Keep an eye on your seeds. Germination usually takes about 7-14 days. Once the seedlings emerge, remove the plastic dome or wrap.
8. Providing Light: Once the seedlings have emerged, they need plenty of light. Place them under grow lights or in a sunny window. If using a window, rotate the seedlings regularly to prevent them from leaning towards the light.
9. Thinning (If Necessary): If you planted two seeds per pot and both germinate, thin them out by snipping off the weaker seedling at the soil line. This ensures that the remaining seedling has enough space and nutrients to grow.
Preparing the Garden Bed
Now, let’s get your garden bed ready for your jicama seedlings!
* Sunlight: Jicama needs at least 6-8 hours of sunlight per day. Choose a location in your garden that receives plenty of sun.
* Soil: Jicama prefers well-drained, sandy loam soil. Heavy clay soil can lead to root rot.
* Soil Testing: It’s always a good idea to test your soil before planting. This will tell you the pH level and nutrient content of your soil. Jicama prefers a slightly acidic to neutral soil pH (around 6.0-7.0).
* Soil Amendment: Amend your soil with compost or well-rotted manure to improve drainage and fertility. I like to add a generous amount of compost to my garden beds before planting anything.
* Creating Mounds or Rows: Jicama grows best when planted in mounds or rows. This helps improve drainage and allows the roots to expand.
Step-by-Step Garden Bed Preparation:
1. Clearing the Area: Remove any weeds, rocks, or debris from the planting area.
2. Tilling or Digging: Till or dig the soil to a depth of at least 12 inches. This loosens the soil and makes it easier for the jicama roots to penetrate.
3. Adding Amendments: Spread a 2-3 inch layer of compost or well-rotted manure over the planting area.
4. Mixing Amendments: Mix the compost or manure into the soil using a garden fork or tiller.
5. Creating Mounds or Rows: Create mounds or rows that are about 12-18 inches apart. The mounds should be about 6-8 inches high.
6. Watering the Soil: Water the soil thoroughly before planting. This helps settle the soil and provides moisture for the seedlings.
Transplanting Jicama Seedlings
Once your seedlings are strong and the danger of frost has passed, it’s time to transplant them into the garden.
* Hardening Off: Before transplanting, you need to harden off your seedlings. This means gradually exposing them to outdoor conditions over a period of 7-10 days. Start by placing them in a sheltered location for a few hours each day, gradually increasing the amount of time they spend outdoors.
* Choosing the Right Time: Transplant your seedlings on a cloudy day or in the late afternoon to minimize stress.
* Spacing: Space the seedlings about 12-18 inches apart in the mounds or rows.
Step-by-Step Transplanting:
1. Digging Holes: Dig holes in the mounds or rows that are slightly larger than the root balls of the seedlings.
2. Removing Seedlings from Pots: Gently remove the seedlings from their pots. Be careful not to damage the roots. If the roots are tightly bound, gently loosen them before planting.
3. Planting Seedlings: Place the seedlings in the holes and cover the roots with soil. Make sure the top of the root ball is level with the soil surface.
4. Watering: Water the seedlings thoroughly after planting.
5. Mulching: Apply a layer of mulch around the seedlings to help retain moisture and suppress weeds. I like to use straw or wood chips.
Caring for Your Jicama Plants
Now that your jicama plants are in the ground, it’s important to provide them with the care they need to thrive.
* Watering: Jicama needs consistent moisture, especially during hot, dry weather. Water deeply and regularly, but avoid overwatering, which can lead to root rot.
* Fertilizing: Fertilize your jicama plants every 2-3 weeks with a balanced fertilizer. Follow the instructions on the fertilizer package.
* Weeding: Keep the area around your jicama plants free of weeds. Weeds can compete with the plants for nutrients and water.
* Pruning: Jicama plants produce vines that can become quite long. Prune the vines regularly to encourage root development. You can also remove any flowers that appear, as this will also help direct energy to the root.
* Support: Jicama vines can benefit from support, such as a trellis or stake. This will help keep the vines off the ground and prevent them from rotting.
Step-by-Step Care:
1. Watering Schedule: Check the soil moisture regularly. Water when the top inch of soil feels dry to the touch.
2. Fertilizing Application: Apply fertilizer according to the package instructions. Avoid over-fertilizing, which can burn the plants.
3. Weeding Regularly: Remove weeds by hand or with a hoe. Be careful not to damage the jicama roots.
4. Pruning Vines: Prune the vines regularly to encourage root development. You can cut back the vines to about 1-2 feet in length.
5. Providing Support: Install a trellis or stake to support the vines. Tie the vines to the support as they grow.
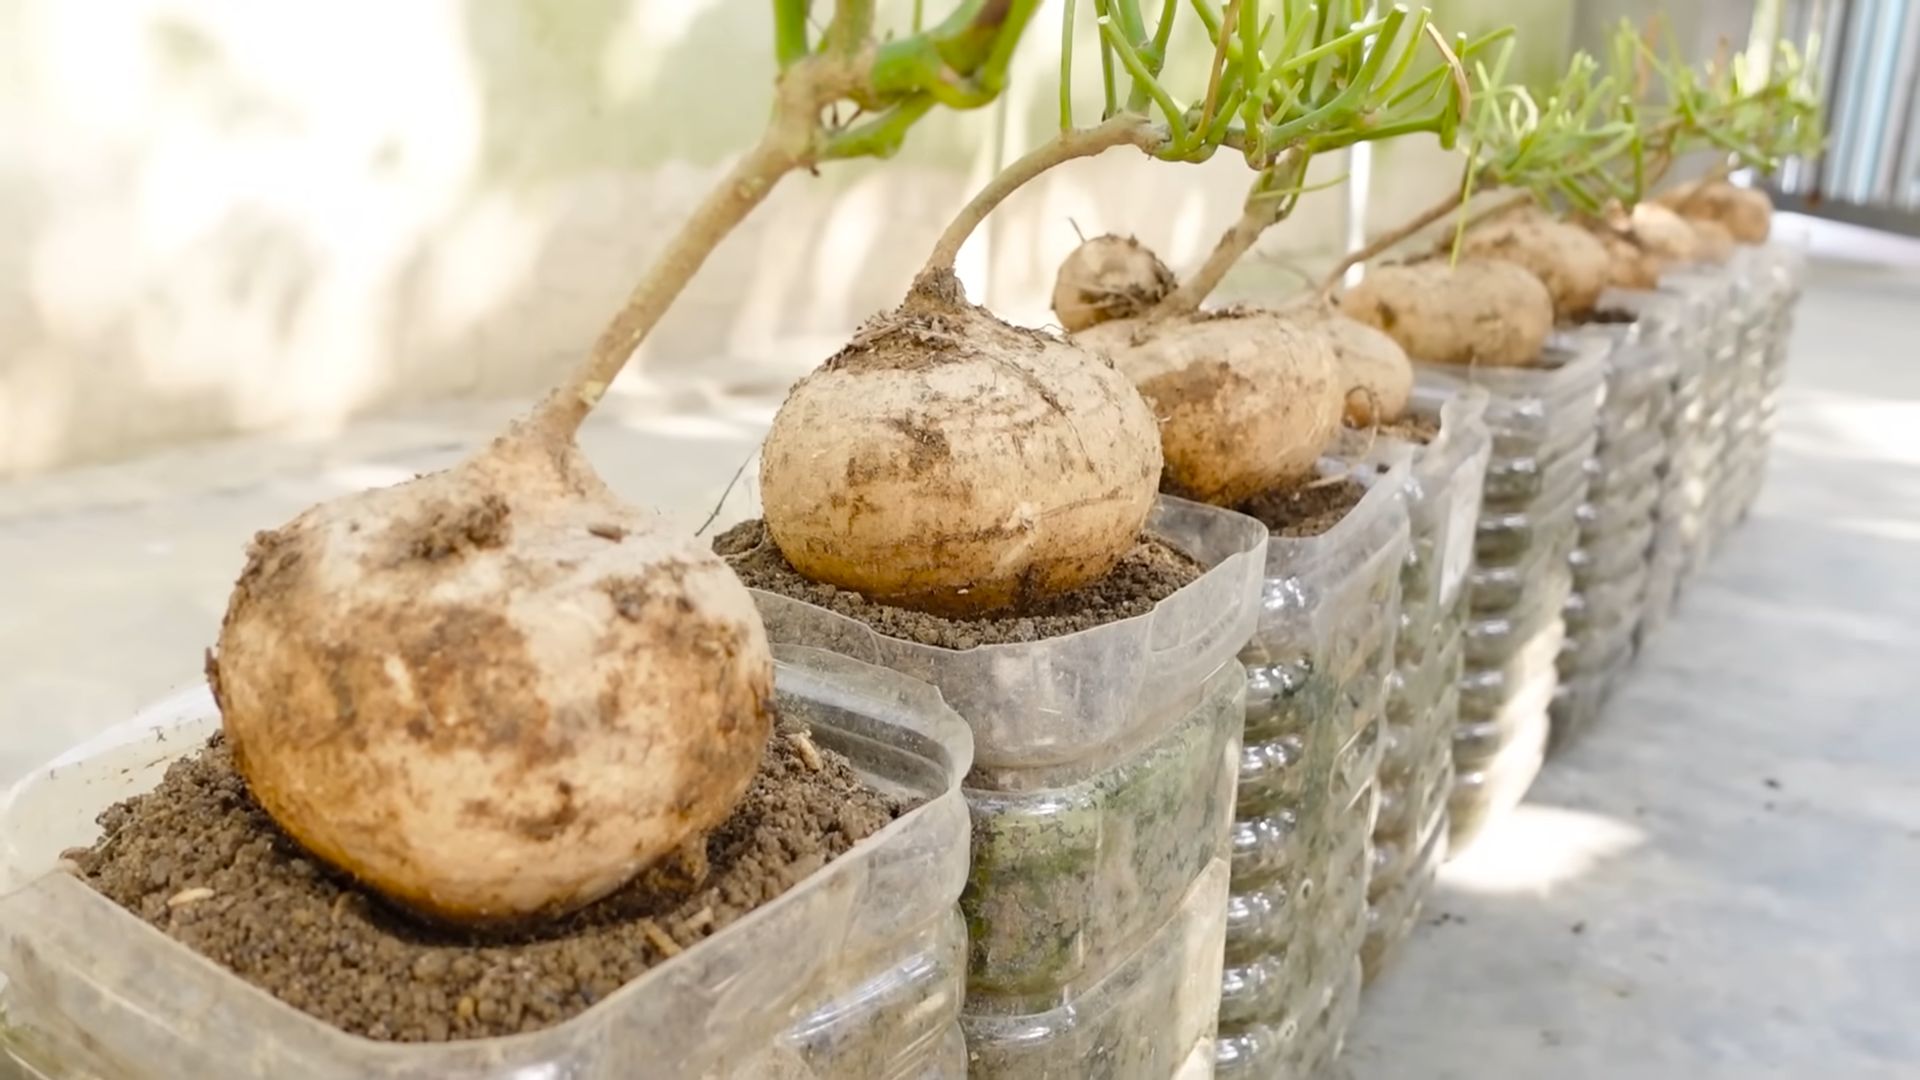
Harvesting Your Jicama
The moment you’ve been waiting for! Harvesting your own jicama is so rewarding.
* Timing: Jicama typically takes about 150-200 days to mature. You can start harvesting when the roots are about 4-6 inches in diameter.
* Checking for Maturity: Gently dig around the base of the plant to check the size of the root. If it’s large enough, you can harvest it.
* Harvesting Technique: Carefully dig around the root and lift it out of the ground. Be careful not
Conclusion
So, there you have it! Growing sweet jicama at home is not only achievable but also incredibly rewarding. Forget the often-bland, sometimes-fibrous jicama you find at the grocery store. With this DIY trick, you’re unlocking the potential for a truly exceptional, naturally sweet, and incredibly crisp jicama experience, right from your own garden.
Why is this a must-try? Because it puts you in control. You control the soil, the watering, the sunlight, and most importantly, the variety. You can select jicama seeds known for their sweetness and tailor the growing conditions to maximize that characteristic. Think about it: no more disappointing jicama salads or lackluster veggie platters. Instead, imagine biting into a jicama stick so sweet and refreshing, it rivals your favorite fruit.
Beyond the basic method, there’s room for experimentation. Consider these variations to personalize your jicama growing journey:
* **Vertical Growing:** If space is limited, try growing your jicama vertically using a trellis or support system. This not only saves space but also improves air circulation around the plant, potentially reducing the risk of fungal diseases.
* **Companion Planting:** Jicama benefits from companion planting. Marigolds can deter nematodes, while beans can help fix nitrogen in the soil, enriching it for your jicama.
* **Sweetness Boost:** Experiment with adding small amounts of molasses or diluted honey to the soil during the tuber development phase. This might further enhance the sweetness of your jicama, but be cautious not to overdo it, as it could attract unwanted pests.
* **Different Varieties:** Explore different jicama varieties! Some are known for their larger size, while others are prized for their exceptional sweetness. Research and choose a variety that suits your taste and growing conditions.
This DIY trick isn’t just about growing jicama; it’s about connecting with your food, understanding the growing process, and enjoying the satisfaction of harvesting something delicious that you nurtured from seed. It’s about elevating your culinary creations with a homegrown ingredient that surpasses anything you can buy in a store.
We wholeheartedly encourage you to give this DIY trick a try. Don’t be intimidated if you’re a beginner gardener. Jicama is relatively easy to grow, and the rewards are well worth the effort. Start small, follow the steps outlined, and be patient.
And most importantly, share your experience! We want to hear about your successes, your challenges, and your unique variations. Did you find a particular variety that grew exceptionally well in your region? Did you discover a secret ingredient that boosted the sweetness? Share your tips and tricks in the comments below. Let’s build a community of jicama enthusiasts and learn from each other. Together, we can unlock the full potential of this amazing root vegetable and enjoy the unparalleled flavor of homegrown, sweet jicama.
Frequently Asked Questions (FAQ)
What exactly is jicama, and what does it taste like?
Jicama (Pachyrhizus erosus) is a root vegetable native to Mexico. It has a crisp, slightly sweet flavor, often described as a cross between an apple, a potato, and a water chestnut. The texture is crunchy and refreshing, making it a popular addition to salads, slaws, and veggie platters. The skin is inedible and should be peeled before consumption. The leaves and seeds of the jicama plant are toxic and should never be eaten.
How long does it take to grow jicama?
Jicama requires a long growing season, typically around 150-200 days from seed to harvest. This means you’ll need to start your seeds indoors several weeks before the last expected frost in your area. The exact time will depend on your climate and the specific variety of jicama you’re growing. Be patient, as the tuber takes time to develop and reach its full size and sweetness.
What are the ideal growing conditions for jicama?
Jicama thrives in warm weather and requires plenty of sunlight (at least 6-8 hours per day). The soil should be well-draining and rich in organic matter. A slightly acidic to neutral pH (around 6.0-7.0) is ideal. Consistent watering is crucial, especially during tuber development. Avoid waterlogging, as this can lead to root rot.
How do I know when my jicama is ready to harvest?
The best way to determine if your jicama is ready to harvest is to check the size of the tuber. It should be at least 4-6 inches in diameter. You can also gently dig around the base of the plant to get a better look at the tuber. The skin should be smooth and relatively free of blemishes. If you’re unsure, it’s better to err on the side of caution and wait a little longer, as the tuber will continue to grow and sweeten.
Can I grow jicama in a container?
Yes, you can grow jicama in a container, but you’ll need a large container (at least 15-20 gallons) to accommodate the tuber’s growth. Choose a container with good drainage and use a high-quality potting mix. Be sure to provide adequate support for the vines, as they can become quite long. Container-grown jicama may require more frequent watering and fertilization than jicama grown in the ground.
What are some common pests and diseases that affect jicama?
Jicama is relatively pest-resistant, but some common pests include aphids, spider mites, and nematodes. Aphids and spider mites can be controlled with insecticidal soap or neem oil. Nematodes can be a more serious problem, so it’s important to choose nematode-resistant varieties and practice crop rotation. Fungal diseases, such as root rot, can occur in poorly drained soil. To prevent fungal diseases, ensure good drainage and avoid overwatering.
How do I store jicama after harvesting?
After harvesting, brush off any excess soil and store the jicama in a cool, dry place. A root cellar or refrigerator is ideal. Jicama can be stored for several months if properly stored. Avoid storing jicama near apples or bananas, as these fruits release ethylene gas, which can cause the jicama to spoil more quickly.
Can I save seeds from my jicama plant?
While it’s technically possible to save seeds from your jicama plant, it’s not recommended unless you’re an experienced seed saver. Jicama seeds can be difficult to germinate, and the resulting plants may not be true to type. It’s generally easier and more reliable to purchase jicama seeds from a reputable seed supplier. Remember that the seeds themselves are toxic and should not be consumed.
What are some delicious ways to eat jicama?
Jicama is incredibly versatile and can be enjoyed in a variety of ways. It’s delicious raw in salads, slaws, and veggie platters. It can also be stir-fried, roasted, or grilled. Jicama fries are a healthy and delicious alternative to potato fries. Jicama can also be used in soups and stews. Its mild flavor makes it a great complement to a wide range of flavors and cuisines. Experiment and find your favorite way to enjoy this amazing root vegetable!
Is jicama healthy? What are its nutritional benefits?
Yes, jicama is a very healthy vegetable. It’s low in calories and high in fiber, making it a great choice for weight management. It’s also a good source of vitamin C, potassium, and magnesium. The high fiber content can help regulate blood sugar levels and promote digestive health. Jicama is also a prebiotic, meaning it feeds the beneficial bacteria in your gut. Incorporating jicama into your diet can contribute to overall health and well-being.

Leave a Comment