

Bottle Gourd Small Space Growing might sound like an impossible feat, especially if you’re picturing sprawling vines taking over your entire balcony! But trust me, it’s absolutely achievable, and I’m here to show you how. For centuries, bottle gourds, also known as calabash, have been cultivated across various cultures, not just for their edible fruit but also for their versatility in crafting utensils, musical instruments, and even decorative items. Think of ancient civilizations relying on these gourds for water containers – pretty cool, right?
Now, you might be thinking, “Why should I bother growing bottle gourds in my limited space?” Well, imagine harvesting your own fresh, organic gourds for delicious curries, soups, or even using the dried shells for unique DIY projects. Plus, growing your own food, no matter how small the scale, is incredibly rewarding and connects you to nature in a meaningful way. This DIY guide is packed with clever tricks and hacks to maximize your yield, even if you only have a tiny balcony or patio. I’ll walk you through everything from choosing the right container and soil to providing the necessary support and care for your bottle gourd vines. So, let’s ditch the “impossible” and embrace the “I can do this!” attitude. Get ready to transform your small space into a thriving bottle gourd haven!
Growing Bottle Gourds in Small Spaces: A DIY Vertical Garden Guide
Hey there, fellow gardening enthusiasts! So, you’re dreaming of fresh, homegrown bottle gourds but are short on space? Don’t worry, I’ve got you covered! I’m going to walk you through building a vertical garden system perfect for growing these amazing vegetables, even if you only have a balcony or a small patio. It’s easier than you think, and the results are incredibly rewarding.
Choosing the Right Bottle Gourd Variety
Before we dive into the construction, let’s talk gourds. Not all bottle gourds are created equal, especially when it comes to small-space gardening.
* Consider Bush or Compact Varieties: Look for varieties specifically bred for smaller spaces. These tend to have shorter vines and require less sprawling. Seed packets will usually indicate if a variety is suitable for containers or vertical growing.
* Fruit Size Matters: Think about the size of the gourds you want to grow. Smaller gourds will be easier to support on a vertical structure.
* Read Seed Packet Descriptions Carefully: Pay close attention to the plant’s mature size, sunlight requirements, and any specific growing instructions.
Building Your Vertical Support Structure
This is where the magic happens! We’re going to create a sturdy and attractive structure to support your bottle gourd vines as they climb. I’m going to describe a simple trellis system that you can adapt to your own space and materials.
Materials You’ll Need:
* Wooden Posts: Four wooden posts (2×2 or 4×4 lumber) – the length will depend on how tall you want your trellis to be. I recommend at least 6 feet tall.
* Wooden Boards: Several wooden boards (1×4 or 1×6 lumber) to create the frame of the trellis. The length will depend on the width of your trellis.
* Heavy-Duty Wire or Twine: For creating the climbing grid. Galvanized wire is durable and weather-resistant.
* Screws or Nails: For assembling the wooden frame.
* Wood Stain or Paint (Optional): To protect the wood and make your trellis look pretty.
* Potting Soil: High-quality potting mix suitable for vegetables.
* Large Container: A large, sturdy container (at least 20 gallons) to accommodate the bottle gourd’s root system.
* Drill: For pre-drilling holes and driving screws.
* Saw: For cutting the wooden posts and boards to size.
* Measuring Tape: For accurate measurements.
* Gloves: To protect your hands.
* Safety Glasses: To protect your eyes.
Step-by-Step Construction:
1. Prepare the Wooden Frame:
* Measure and cut the wooden posts and boards to the desired lengths. I like to make the base of my trellis slightly wider than the container to provide extra stability.
* Assemble the frame by attaching the boards to the posts using screws or nails. Make sure the frame is square and sturdy.
* If you’re using wood stain or paint, apply it now and let it dry completely. This will help protect the wood from the elements.
2. Create the Climbing Grid:
* Drill holes along the inside of the wooden frame, spacing them evenly apart. The spacing will depend on how dense you want the climbing grid to be. I usually space them about 6-8 inches apart.
* Thread the heavy-duty wire or twine through the holes, creating a grid pattern. Secure the ends of the wire or twine tightly to the frame. You can use knots or staples to secure them.
* Make sure the climbing grid is taut and strong enough to support the weight of the bottle gourd vines and fruits.
3. Prepare the Container:
* Choose a large, sturdy container that is at least 20 gallons in size. This will provide enough room for the bottle gourd’s root system to grow.
* Make sure the container has drainage holes to prevent waterlogging.
* Fill the container with high-quality potting mix suitable for vegetables.
4. Position the Trellis:
* Place the container in a sunny location that receives at least 6-8 hours of direct sunlight per day.
* Position the trellis behind the container, making sure it is stable and secure. You may need to anchor the trellis to the ground or a wall for extra support.
Planting Your Bottle Gourd Seedlings
Now for the fun part – planting!
1. Start Seeds Indoors (Optional):
* To get a head start, you can start your bottle gourd seeds indoors about 4-6 weeks before the last expected frost.
* Sow the seeds in small pots filled with seed-starting mix.
* Keep the soil moist and warm, and provide plenty of light.
* Once the seedlings have developed a few true leaves, they are ready to be transplanted outdoors.
2. Transplant Seedlings or Direct Sow:
* If you started seeds indoors, gently transplant the seedlings into the container, spacing them about 12-18 inches apart.
* If you are direct sowing, sow the seeds directly into the container, following the instructions on the seed packet.
* Water the seedlings or seeds thoroughly after planting.
Caring for Your Bottle Gourd Plants
Consistent care is key to a bountiful harvest.
1. Watering:
* Bottle gourds need consistent watering, especially during hot weather.
* Water deeply whenever the top inch of soil feels dry to the touch.
* Avoid overwatering, as this can lead to root rot.
2. Fertilizing:
* Feed your bottle gourd plants with a balanced fertilizer every 2-3 weeks.
* Look for a fertilizer that is specifically formulated for vegetables.
* Follow the instructions on the fertilizer package for application rates.
3. Training the Vines:
* As the bottle gourd vines grow, gently train them to climb the trellis.
* Use plant ties or clips to secure the vines to the trellis.
* Prune any unwanted side shoots to encourage the main vines to grow upwards.
4. Pollination:
* Bottle gourds are pollinated by insects, such as bees.
* If you are not seeing any fruit set, you may need to hand-pollinate the flowers.
* To hand-pollinate, use a small brush to transfer pollen from the male flowers to the female flowers.
5. Pest and Disease Control:
* Keep an eye out for common pests, such as aphids, squash bugs, and vine borers.
* Use organic pest control methods, such as insecticidal soap or neem oil, to control pests.
* Prevent fungal diseases by providing good air circulation and avoiding overwatering.
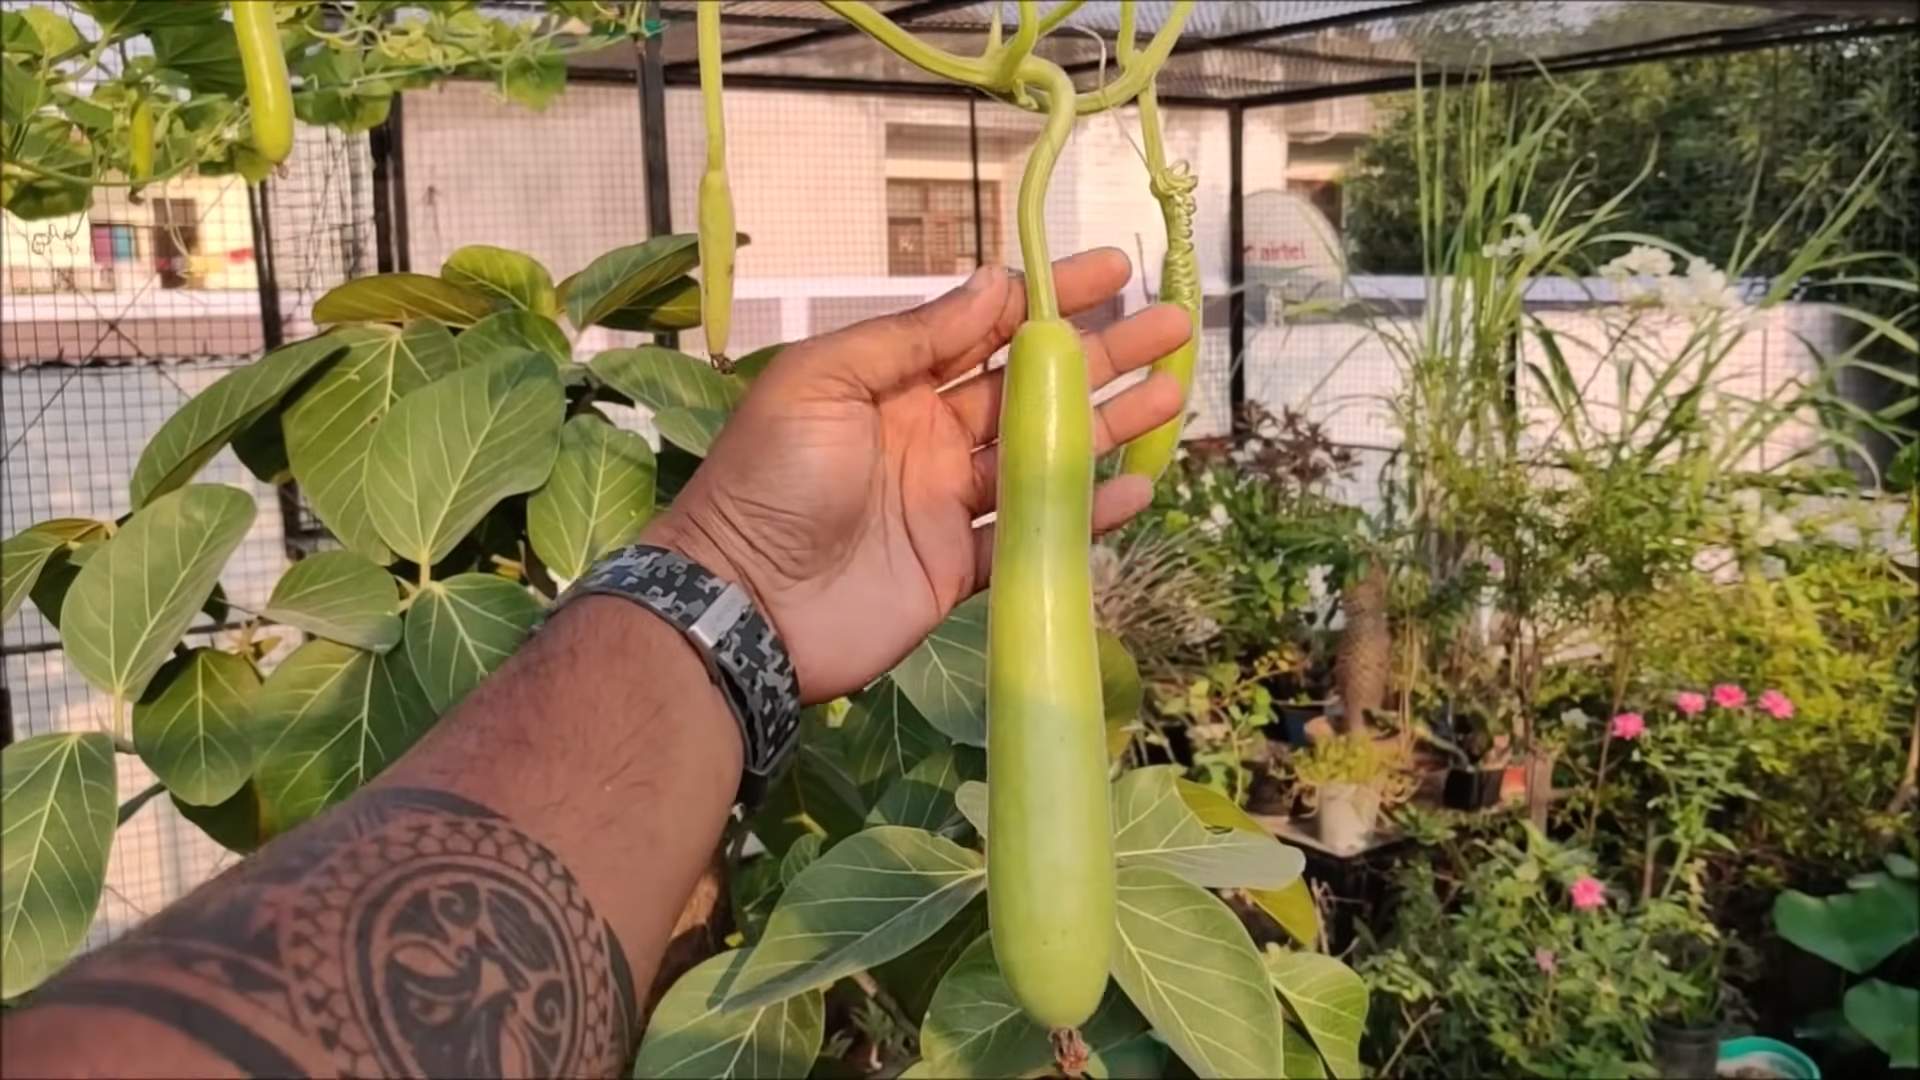
Harvesting Your Bottle Gourds
The moment you’ve been waiting for!
1. Harvest Time:
* Bottle gourds are typically ready to harvest in about 90-120 days after planting.
* The gourds should be firm and have a smooth, hard skin.
* The stem should be dry and brown.
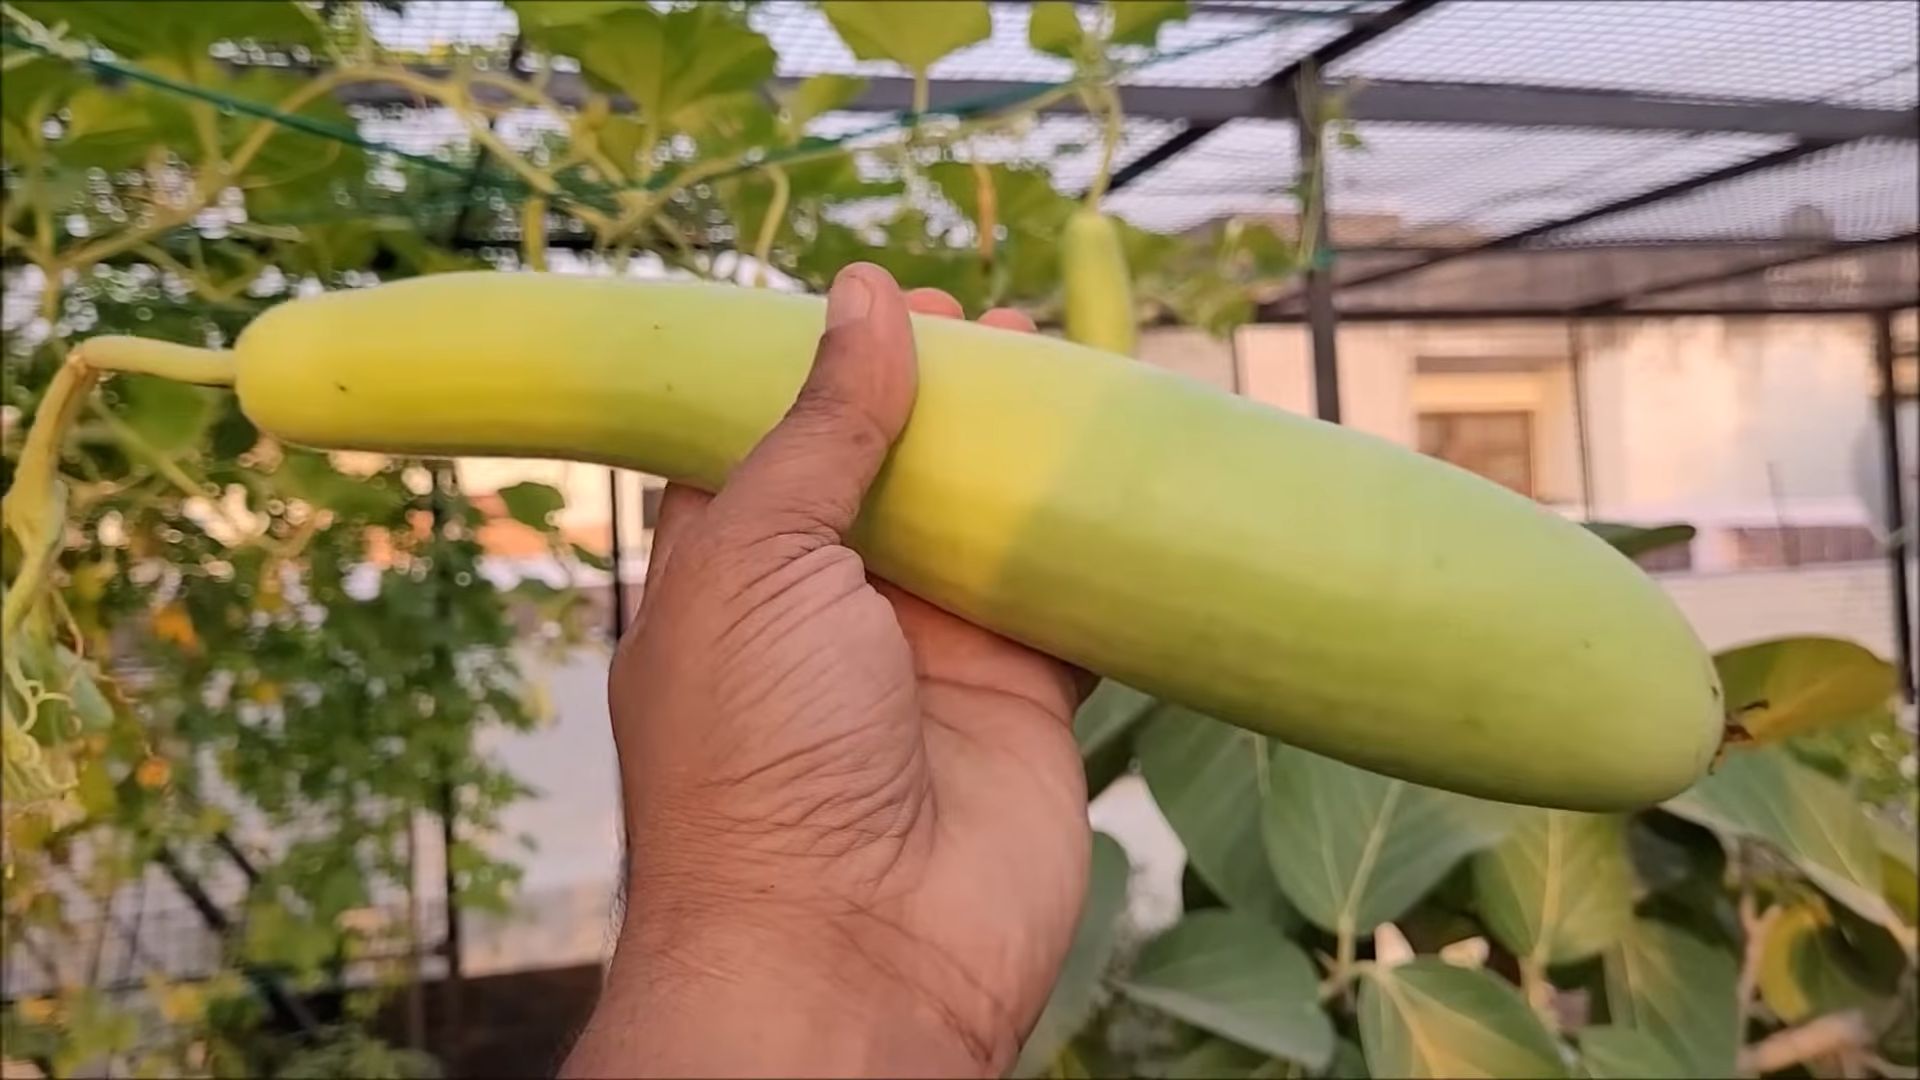
2. Harvesting Technique:
* Use a sharp knife or pruning shears to cut the gourd from the vine, leaving a few inches of stem attached.
* Handle the gourds carefully to avoid bruising or damaging them.
3. Curing (Optional):
* If you plan to use the bottle gourds for crafts or decoration, you will need to cure them first.
* To cure the gourds, place them in a dry, well-ventilated area for several weeks, or even months, until they are completely dry and hard.
Troubleshooting Tips
Even with the best planning, things can sometimes go awry. Here are a few common issues and how to tackle them:
* Yellowing Leaves: This could indicate overwatering, underwatering, or a nutrient deficiency. Check the soil moisture and adjust your watering schedule accordingly. Fertilize with a balanced fertilizer to address any nutrient deficiencies.
* Lack of Fruit Set: This could be due to poor pollination. Try hand-pollinating the flowers, as described above. You can also attract more pollinators to your garden by planting flowers that attract bees and other beneficial insects.
* Pest Infestations: Regularly inspect your plants for pests and take action promptly. Insecticidal soap and neem oil are effective organic options.
* Slow Growth: Ensure your plants are getting enough sunlight, water, and nutrients. Amend the soil with compost or other organic matter to improve its fertility.
Enjoying Your Harvest
Growing bottle gourds in a small space is totally achievable with a little planning and effort. I hope this guide has
Conclusion
So, there you have it! Growing bottle gourds in a small space is not only achievable but also incredibly rewarding. This DIY trick, focusing on vertical growth and strategic pruning, unlocks the potential of even the tiniest gardens or balconies. We’ve shown you how to maximize your yield without sacrificing precious square footage. Think about the satisfaction of harvesting your own fresh bottle gourds, knowing you nurtured them from seed to table, all within the confines of your limited space.
This isn’t just about growing a vegetable; it’s about embracing a sustainable lifestyle, connecting with nature, and proving that even the most ambitious gardening dreams can come true, regardless of spatial constraints. The vibrant green foliage climbing upwards, the delicate white flowers, and the eventual emergence of those unique bottle-shaped gourds – it’s a visual spectacle that adds beauty and character to any small space.
But the benefits extend beyond aesthetics. Homegrown bottle gourds are fresher, tastier, and free from the harmful pesticides often found in commercially grown produce. You have complete control over the growing process, ensuring the highest quality and nutritional value. Plus, the act of gardening itself is a fantastic stress reliever, providing a therapeutic escape from the hustle and bustle of daily life.
Consider these variations to personalize your small-space bottle gourd growing experience:
* Experiment with different varieties: Explore various bottle gourd cultivars, from the smaller, more compact types to the longer, more slender varieties, to find the perfect fit for your space and culinary preferences.
* Companion planting: Introduce companion plants like marigolds or basil to deter pests and attract beneficial insects, creating a healthier and more balanced ecosystem in your small garden.
* Creative trellising: Get creative with your trellising system! Use repurposed materials like old ladders, bamboo poles, or even sturdy branches to create a unique and visually appealing support structure for your bottle gourds.
* Container gardening: If you’re truly limited on space, consider growing your bottle gourds in large containers. Ensure the containers have adequate drainage and are filled with a nutrient-rich potting mix.
This DIY method for bottle gourd small space growing is more than just a gardening technique; it’s an invitation to transform your limited area into a thriving, productive oasis. Don’t be intimidated by the perceived challenges of small-space gardening. With a little planning, creativity, and the right techniques, you can enjoy a bountiful harvest of fresh, homegrown bottle gourds.
We wholeheartedly encourage you to give this DIY trick a try. Start small, be patient, and don’t be afraid to experiment. The rewards are well worth the effort. And most importantly, we want to hear about your experience! Share your photos, tips, and challenges in the comments below. Let’s build a community of small-space bottle gourd growers and inspire others to embrace the joy of gardening, no matter how limited their space may be. Your success story could be the inspiration someone else needs to start their own gardening journey. So, grab your seeds, prepare your soil, and get ready to experience the magic of growing bottle gourds in your very own small space!
Frequently Asked Questions (FAQs)
What is the best time to start growing bottle gourds in a small space?
The best time to start growing bottle gourds is typically in the late spring or early summer, after the last frost has passed. Bottle gourds are warm-season crops and require temperatures of at least 70°F (21°C) for optimal growth. If you live in a region with a shorter growing season, you can start the seeds indoors 4-6 weeks before the last expected frost and then transplant them outdoors once the weather warms up. Starting indoors gives the seedlings a head start and ensures they have enough time to mature and produce fruit before the end of the growing season. Consider your local climate and growing conditions when determining the best time to plant.
What type of soil is best for growing bottle gourds in containers?
Bottle gourds thrive in well-draining, fertile soil that is rich in organic matter. When growing in containers, it’s crucial to use a high-quality potting mix specifically formulated for container gardening. Avoid using garden soil directly in containers, as it can become compacted and poorly drained, hindering root growth. A good potting mix should contain a blend of peat moss, perlite, vermiculite, and compost. You can also amend the potting mix with additional compost or aged manure to boost its nutrient content. Ensure the soil pH is slightly acidic to neutral, ideally between 6.0 and 7.0. Proper soil preparation is essential for healthy bottle gourd growth and abundant yields.
How much sunlight do bottle gourds need when grown in a small space?
Bottle gourds require at least 6-8 hours of direct sunlight per day to thrive. When growing in a small space, it’s essential to choose a location that receives ample sunlight throughout the day. If your balcony or patio is partially shaded, consider using reflective surfaces like white walls or mirrors to bounce sunlight onto the plants. You can also supplement natural sunlight with grow lights, especially if you live in a region with limited sunlight. Insufficient sunlight can lead to stunted growth, reduced flowering, and poor fruit production. Monitor your plants closely and adjust their position as needed to ensure they receive adequate sunlight.
How often should I water bottle gourds grown in containers?
Bottle gourds require consistent moisture, especially when grown in containers, as the soil tends to dry out more quickly. Water your bottle gourds deeply whenever the top inch of soil feels dry to the touch. Avoid overwatering, as this can lead to root rot. The frequency of watering will depend on factors such as the weather, the size of the container, and the type of potting mix used. During hot, dry weather, you may need to water daily, while during cooler, wetter periods, you can reduce the frequency. Use a watering can or hose with a gentle spray nozzle to avoid damaging the plants. Mulching around the base of the plants can help retain moisture and reduce the need for frequent watering.
What type of fertilizer should I use for bottle gourds in small spaces?
Bottle gourds are heavy feeders and benefit from regular fertilization. Use a balanced fertilizer with an NPK ratio (nitrogen, phosphorus, potassium) of 10-10-10 or 14-14-14. You can also use a fertilizer specifically formulated for vegetables. Apply the fertilizer according to the manufacturer’s instructions, typically every 2-3 weeks during the growing season. In addition to chemical fertilizers, you can also use organic fertilizers such as compost tea, fish emulsion, or seaweed extract. These organic fertilizers provide essential nutrients and also improve soil health. Avoid over-fertilizing, as this can lead to excessive vegetative growth and reduced fruit production. Monitor your plants closely and adjust the fertilizer application as needed.
How do I prune bottle gourds for small space growing?
Pruning is essential for managing the growth of bottle gourds in small spaces. Prune the lateral branches to encourage vertical growth and prevent the plant from becoming too bushy. Remove any yellowing or diseased leaves to improve air circulation and prevent the spread of diseases. You can also prune the tips of the vines to encourage branching and fruit production. When pruning, use clean, sharp pruning shears to avoid damaging the plant. Prune in the morning to allow the cuts to dry quickly. Regular pruning will help keep your bottle gourd plant healthy, productive, and manageable in a small space.
How do I deal with pests and diseases affecting bottle gourds?
Bottle gourds can be susceptible to various pests and diseases, including aphids, squash bugs, powdery mildew, and downy mildew. Regularly inspect your plants for signs of pests or diseases. If you detect any problems, take action immediately to prevent them from spreading. For aphids and squash bugs, you can use insecticidal soap or neem oil. For powdery mildew and downy mildew, you can use a fungicide specifically formulated for these diseases. Ensure good air circulation around the plants to prevent fungal diseases. You can also use companion planting to deter pests and attract beneficial insects. Organic gardening practices, such as using compost and avoiding synthetic pesticides, can help keep your plants healthy and resistant to pests and diseases.
How long does it take for bottle gourds to mature and be ready for harvest?
The time it takes for bottle gourds to mature and be ready for harvest depends on the variety and growing conditions. Generally, it takes about 90-120 days from planting to harvest. The gourds are ready to harvest when they are firm, mature, and have a hard outer shell. The stem connecting the gourd to the vine will also start to dry out. Use a sharp knife or pruning shears to cut the gourd from the vine, leaving a few inches of stem attached. Handle the gourds carefully to avoid bruising or damaging them. After harvesting, you can cure the gourds in a dry, well-ventilated place for several weeks to harden the shell and improve their storage life.
Can I grow bottle gourds in hanging baskets?
While it’s possible to grow smaller varieties of bottle gourds in very large, sturdy hanging baskets, it’s generally not recommended for most types. The weight of the mature gourds can become quite substantial, potentially exceeding the weight capacity of the hanging basket and its support structure. This poses a safety risk. Additionally, the limited soil volume in a hanging basket may not provide enough nutrients and


Leave a Comment