

Daily home cleaning routine – sounds daunting, right? But what if I told you it doesn’t have to be a monumental chore that consumes your entire weekend? For generations, maintaining a clean home has been a cornerstone of healthy living and a reflection of personal pride. From ancient civilizations meticulously sweeping their dwellings to modern-day Marie Kondo-inspired decluttering, the desire for a tidy space is deeply ingrained in us.
Let’s face it, in today’s fast-paced world, who has the time for endless scrubbing and polishing? That’s where this article comes in! I’m going to share some super effective, time-saving DIY tricks and hacks that will transform your approach to your daily home cleaning routine. These aren’t your grandma’s cleaning methods (though, respect to grandma!). We’re talking smart, efficient strategies that fit seamlessly into your busy life.
Imagine coming home each day to a space that feels fresh, inviting, and stress-free – without having spent hours toiling away. These DIY cleaning solutions and routines will not only save you time and energy but also help you create a healthier and happier home environment. So, ditch the overwhelm and get ready to discover the secrets to a sparkling clean home, one simple step at a time!

DIY Daily Home Cleaning Routine: Conquer the Chaos!
Okay, let’s be honest, nobody *loves* cleaning. But a little bit each day can make a HUGE difference in how your home feels. I’m going to walk you through my daily routine, which is designed to be manageable and keep things from getting out of control. This isn’t about perfection; it’s about maintaining a comfortable and relatively tidy space.
The Core Principles:
Before we dive into the nitty-gritty, let’s establish some ground rules. These are the principles that make this daily routine actually work:
* Consistency is Key: Even if you only have 15 minutes, do *something*. A little bit every day is far more effective than a marathon cleaning session once a week.
* Focus on High-Traffic Areas: Kitchens and bathrooms tend to get dirty the fastest, so they’ll get the most attention.
* Multi-tasking is Your Friend: While you’re waiting for your coffee to brew, wipe down the counters. While you’re watching TV, fold laundry.
* Don’t Overthink It: This isn’t about deep cleaning every single day. It’s about maintaining a baseline level of cleanliness.
* Adapt to Your Needs: This is *my* routine, but you should feel free to adjust it to fit your lifestyle and the specific needs of your home.
Morning Mayhem Management:
This is all about setting the tone for the day. A clean start can make a huge difference in your mood and productivity.
1. Make the Bed: Seriously, this takes less than a minute, and it instantly makes your bedroom look more put-together. It’s a small victory that starts your day off right.
2. Quick Kitchen Clean-Up: After breakfast, immediately wash any dishes or load them into the dishwasher. Wipe down the counters and stovetop to remove any spills or crumbs. I find that using a simple all-purpose cleaner spray and a microfiber cloth works wonders.
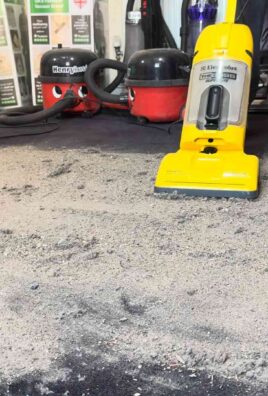
3. Sweep or Vacuum High-Traffic Areas: Focus on areas like the kitchen, entryway, and hallways. A quick sweep or vacuum will prevent dirt and debris from accumulating throughout the day. I use a lightweight cordless vacuum for this – it’s so much easier than lugging out the big one!
4. Empty Trash Cans (If Needed): If any trash cans are full or overflowing, take them out. This prevents odors and keeps your home smelling fresh.
Midday Maintenance:
This is where you tackle the little messes that accumulate throughout the day.
1. Spot Clean Spills Immediately: Don’t let spills sit and stain! Grab a cloth and clean them up as soon as they happen. This is especially important for carpets and upholstery.
2. Quick Bathroom Wipe-Down: After using the bathroom, give the sink and countertop a quick wipe-down. This prevents soap scum and water spots from building up. I keep a container of disinfecting wipes under the sink for this purpose.
3. Tidy Up Clutter: Take a few minutes to put away any items that are out of place. This could include toys, books, mail, or anything else that’s contributing to clutter. A quick decluttering session can make a big difference in how your home feels.
4. One Load of Laundry: Start a load of laundry in the morning and switch it to the dryer during the day. Folding it as soon as it’s dry prevents wrinkles and keeps it from piling up.
Evening Efficiency:
This is about preparing your home for a relaxing evening and setting yourself up for success the next day.
1. Kitchen Deep Dive (Relatively Speaking): After dinner, thoroughly wash all dishes, load the dishwasher, and wipe down all surfaces. Sweep or mop the floor to remove any food particles or spills. This is the most intensive kitchen cleaning of the day.
2. Living Room Reset: Straighten up the living room by fluffing pillows, folding blankets, and putting away any items that are out of place. A tidy living room creates a more relaxing atmosphere for the evening.
3. Bathroom Refresh: Give the bathroom a quick once-over. Wipe down the sink, countertop, and toilet. Hang up any wet towels and replace them with fresh ones.
4. Final Sweep/Vacuum: Do a final sweep or vacuum of high-traffic areas to remove any dirt or debris that has accumulated throughout the day.
5. Prepare for Tomorrow: Take a few minutes to prepare for the next day. This could include laying out your clothes, packing your lunch, or making a to-do list.
Specific Room Focus (Rotating Schedule):
To prevent any one area from getting neglected, I incorporate a rotating schedule for focusing on specific rooms. This allows me to give each room a little extra attention without feeling overwhelmed.
* Monday: Bathrooms (Deep Clean): In addition to the daily bathroom refresh, I spend a little extra time cleaning the bathrooms on Mondays. This includes scrubbing the toilets, showers, and floors. I also clean the mirrors and polish the fixtures.
1. Gather Supplies: I get my cleaning supplies ready. This includes toilet bowl cleaner, shower cleaner, glass cleaner, disinfecting wipes, and microfiber cloths.
2. Toilet Scrub: I apply toilet bowl cleaner and let it sit for a few minutes before scrubbing with a toilet brush.
3. Shower Power: I spray the shower with shower cleaner and let it sit for the recommended time before scrubbing with a sponge or brush.
4. Sink and Counter Shine: I wipe down the sink and countertop with disinfecting wipes.
5. Mirror Magic: I clean the mirrors with glass cleaner and a microfiber cloth.
6. Floor Finish: I sweep and mop the bathroom floor.
* Tuesday: Bedrooms (Dusting and Decluttering): On Tuesdays, I focus on dusting and decluttering the bedrooms. This includes dusting furniture, shelves, and picture frames. I also declutter surfaces and put away any items that are out of place.
1. Gather Supplies: I grab my dusting cloths, furniture polish (if needed), and a decluttering basket.
2. Dusting Duty: I dust all surfaces, starting from the top and working my way down.
3. Decluttering Dash: I quickly declutter surfaces, putting away any items that don’t belong.
4. Floor Focus: I vacuum or sweep the bedroom floor.
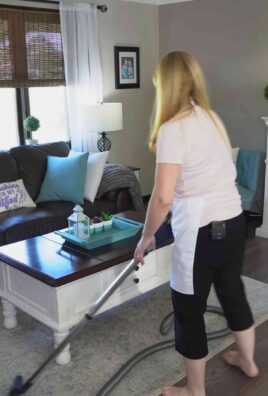
* Wednesday: Living Room (Vacuuming and Organizing): Wednesdays are for vacuuming and organizing the living room. This includes vacuuming the carpets and upholstery, as well as organizing shelves, drawers, and cabinets.
1. Gather Supplies: I get my vacuum cleaner, upholstery attachment, and organizing containers.
2. Vacuum Victory: I thoroughly vacuum the carpets and upholstery.
3. Organizing Operation: I organize shelves, drawers, and cabinets, getting rid of any clutter.
4. Surface Sweep: I dust and wipe down all surfaces.
* Thursday: Kitchen (Appliance Cleaning): On Thursdays, I focus on cleaning kitchen appliances. This includes cleaning the oven, microwave, refrigerator, and dishwasher.
1. Gather Supplies: I gather my appliance cleaning supplies, including oven cleaner, microwave cleaner, refrigerator cleaner, and dishwasher cleaner.
2. Oven Overhaul: I clean the oven according to the manufacturer’s instructions.
3. Microwave Makeover: I clean the microwave with microwave cleaner.
4. Refrigerator Refresh: I clean the refrigerator, removing any expired food and wiping down the shelves and drawers.
5. Dishwasher Detox: I run a dishwasher cleaner cycle.
* Friday: Laundry Room (Cleaning and Organizing): Fridays are dedicated to the laundry room. This includes cleaning the washing machine and dryer, as well as organizing laundry supplies.
1. Gather Supplies: I get my washing machine cleaner, dryer sheets, and organizing containers.
2. Washer Wonder: I run a washing machine cleaner cycle.
3. Dryer Detail: I clean the dryer lint trap and wipe down the exterior.
4. Supply Sort: I organize laundry supplies, getting rid of any expired or unused items.
* Saturday & Sunday: Flexible Days: These days are for catching up on any missed tasks or tackling larger cleaning projects. I might also use this time to relax and enjoy my clean home!
Essential Tools and Supplies:
Having the right tools and supplies on hand makes cleaning much easier and more efficient. Here’s a list of my must-haves:
* Microfiber Cloths: These are great for dusting, wiping surfaces, and cleaning windows.
* All-Purpose Cleaner: A good all-purpose cleaner can be used on a variety of surfaces.
* Disinfecting Wipes: These

Conclusion
So, there you have it! Transforming your daily home cleaning routine with this simple yet incredibly effective DIY trick is more than just a way to save time and money; it’s about reclaiming your space and creating a healthier, happier environment for yourself and your loved ones. We’ve walked you through the process, highlighting the ease and accessibility of the ingredients and the straightforward nature of the application. But why is this DIY approach a must-try?
Firstly, it empowers you to take control of the products you use in your home. No more wondering about hidden chemicals or questionable ingredients. You know exactly what’s going into your cleaning solution, ensuring a safer and more natural approach to maintaining a clean home. This is especially crucial for households with children, pets, or individuals with sensitivities to harsh chemicals.
Secondly, it’s incredibly cost-effective. Compared to purchasing pre-made cleaning products, this DIY solution significantly reduces your expenses. The ingredients are readily available and often already present in your pantry, making it a budget-friendly alternative without compromising on cleaning power.
Thirdly, and perhaps most importantly, it works! This DIY trick effectively tackles everyday dirt, grime, and odors, leaving your home feeling fresh and revitalized. It’s a testament to the power of simple, natural ingredients when combined thoughtfully.
But the beauty of this DIY approach lies in its adaptability. Feel free to experiment with variations to suit your specific needs and preferences. For instance, if you prefer a stronger scent, add a few extra drops of your favorite essential oil. Lavender, lemon, and tea tree oil are all excellent choices, known for their antibacterial and antiviral properties. If you’re dealing with particularly stubborn stains, consider adding a small amount of baking soda to the mixture for extra scrubbing power. Remember to always test any new variation on a small, inconspicuous area first to ensure it doesn’t damage the surface.
Another variation to consider is the type of vinegar used. While white vinegar is the most common and readily available, apple cider vinegar can also be used, offering a slightly milder scent and additional benefits. Experiment and see which vinegar works best for you and your cleaning needs.
Furthermore, consider the application method. While a spray bottle is convenient for general cleaning, a microfiber cloth dampened with the solution can be more effective for wiping down surfaces. For floors, a mop and bucket with the diluted solution will work wonders.
We firmly believe that incorporating this DIY trick into your daily home cleaning routine will revolutionize the way you approach cleaning. It’s a simple, effective, and sustainable way to maintain a clean and healthy home environment.
So, what are you waiting for? Give this DIY trick a try and experience the difference for yourself! We’re confident that you’ll be amazed by the results. And more importantly, we want to hear about your experience! Share your thoughts, tips, and variations in the comments below. Let’s build a community of DIY cleaning enthusiasts and learn from each other. Your feedback is invaluable and will help us refine and improve this DIY trick for everyone. Let us know what worked for you, what challenges you faced, and any creative solutions you came up with. Together, we can make our homes cleaner, healthier, and happier places to be. Embrace the power of DIY and transform your daily home cleaning routine today!
FAQ
What exactly is the “DIY trick” you’re referring to?
The DIY trick we’ve been discussing involves creating a homemade cleaning solution using simple, readily available ingredients like vinegar, water, and essential oils. This solution can be used for a variety of cleaning tasks around the house, from wiping down countertops to mopping floors. The specific recipe and application methods are detailed in the main article.
Is vinegar safe to use on all surfaces?
While vinegar is a fantastic natural cleaner, it’s not suitable for all surfaces. Avoid using vinegar on natural stone surfaces like marble, granite, and limestone, as the acidity can etch and damage them. It’s also best to avoid using vinegar on waxed wood, as it can strip the wax finish. Always test the solution on a small, inconspicuous area first to ensure it doesn’t cause any damage or discoloration. For delicate surfaces, consider diluting the vinegar solution further or using a different cleaning agent altogether.
Can I use any type of essential oil in the cleaning solution?
While you can technically use any essential oil you like, some are better suited for cleaning than others. Essential oils with antibacterial, antiviral, and antifungal properties are particularly effective. Popular choices include lavender, lemon, tea tree, eucalyptus, and peppermint. Consider the scent you prefer and the specific cleaning task you’re tackling when choosing your essential oil. For example, lemon and tea tree oil are great for disinfecting, while lavender is known for its calming and relaxing scent. Always use pure, high-quality essential oils for the best results.
How long will the DIY cleaning solution last?
The DIY cleaning solution can typically last for several weeks when stored properly in a cool, dark place. However, it’s best to use it within a month to ensure the essential oils retain their potency. Over time, the scent of the essential oils may fade, and the solution may become less effective. To maximize its shelf life, store the solution in an airtight container, such as a glass spray bottle, away from direct sunlight and heat.
What if I don’t like the smell of vinegar?
The strong smell of vinegar is a common concern for many people. Fortunately, there are several ways to minimize the vinegar odor. First, use a higher concentration of essential oils to mask the vinegar scent. Citrus essential oils like lemon and orange are particularly effective at neutralizing the vinegar smell. Second, allow the surface to air dry after cleaning, as the vinegar smell will dissipate as it dries. Third, consider using apple cider vinegar instead of white vinegar, as it has a milder scent. Finally, you can also add a few drops of your favorite fragrance oil to the solution to further mask the vinegar odor.
Can I use this DIY cleaning solution on my floors?
Yes, this DIY cleaning solution can be used on most types of floors, including tile, linoleum, and sealed hardwood. However, as mentioned earlier, avoid using vinegar on waxed wood floors. When cleaning floors, dilute the solution with plenty of water to prevent any damage or discoloration. Use a mop and bucket to apply the solution, and be sure to wring out the mop thoroughly to avoid leaving excess water on the floor. After mopping, allow the floor to air dry completely.
Is this DIY cleaning solution safe for pets and children?
This DIY cleaning solution is generally considered safe for pets and children, as it’s made with natural ingredients. However, it’s still important to exercise caution. Keep the solution out of reach of children and pets, and avoid spraying it directly on them. If your pet or child accidentally ingests the solution, contact a veterinarian or poison control center immediately. While the ingredients are generally safe, they can still cause irritation or discomfort if ingested in large quantities.
How often should I use this DIY cleaning solution?
The frequency of use depends on your individual cleaning needs and preferences. For daily cleaning tasks, such as wiping down countertops and sinks, you can use the solution as often as needed. For deeper cleaning tasks, such as mopping floors and cleaning bathrooms, you can use the solution once or twice a week. Adjust the frequency based on the level of dirt and grime in your home.
What are some other uses for this DIY cleaning solution?
Besides general cleaning, this DIY solution can also be used for a variety of other purposes. It can be used to clean windows and mirrors, remove hard water stains, deodorize garbage disposals, and even clean your microwave. The versatility of this solution makes it a valuable addition to any home cleaning arsenal.
What if I experience any allergic reactions to the ingredients?
If you experience any allergic reactions to the ingredients in the DIY cleaning solution, discontinue use immediately. Common allergic reactions include skin irritation, redness, and itching. If you have sensitive skin, consider wearing gloves when using the solution. If the allergic reaction is severe, seek medical attention. You can also try substituting the ingredient you’re allergic to with a different, hypoallergenic alternative. For example, if you’re allergic to vinegar, you can try using lemon juice instead.
Leave a Comment