

DIY Ant Killer Garden: Are ants turning your garden dreams into a six-legged nightmare? I know the feeling! You’ve lovingly nurtured your plants, only to find them swarming with these tiny invaders. But don’t reach for harsh chemicals just yet! This article is your ultimate guide to creating a safe, effective, and totally DIY ant killer solution right in your own garden.
For centuries, gardeners have battled pests using natural remedies passed down through generations. From ancient civilizations using herbal infusions to modern-day organic farming, the quest for pest control without harming the environment is a long and fascinating one. We’re tapping into that rich history, but with a modern twist!
Why is a DIY ant killer garden so important? Because store-bought solutions can be expensive and often contain chemicals that can harm beneficial insects, your pets, and even your plants. Plus, there’s a real satisfaction in knowing you’re protecting your garden with something you made yourself, using simple ingredients you probably already have at home. I’m going to show you how to create a safe and effective ant deterrent that will keep your garden thriving, naturally. Let’s get started!
DIY Ant Killer for Your Garden: A Safe and Effective Solution
Tired of those pesky ants marching all over your precious plants? I know I was! Store-bought ant killers can be harsh and full of chemicals that I didn’t want anywhere near my veggies and flowers. So, I embarked on a mission to find a safe, effective, and DIY solution. And guess what? I found a few! This article will walk you through my favorite methods for getting rid of ants in your garden without harming your plants, beneficial insects, or the environment. Let’s get started!
Understanding the Enemy: Ant Behavior
Before we dive into the DIY recipes, it’s important to understand how ants operate. Ants are social creatures, and they live in colonies. They follow scent trails left by other ants to find food sources. This is why you often see them marching in a line. Our goal is to disrupt these trails and eliminate the colony, not just kill the ants we see on the surface.
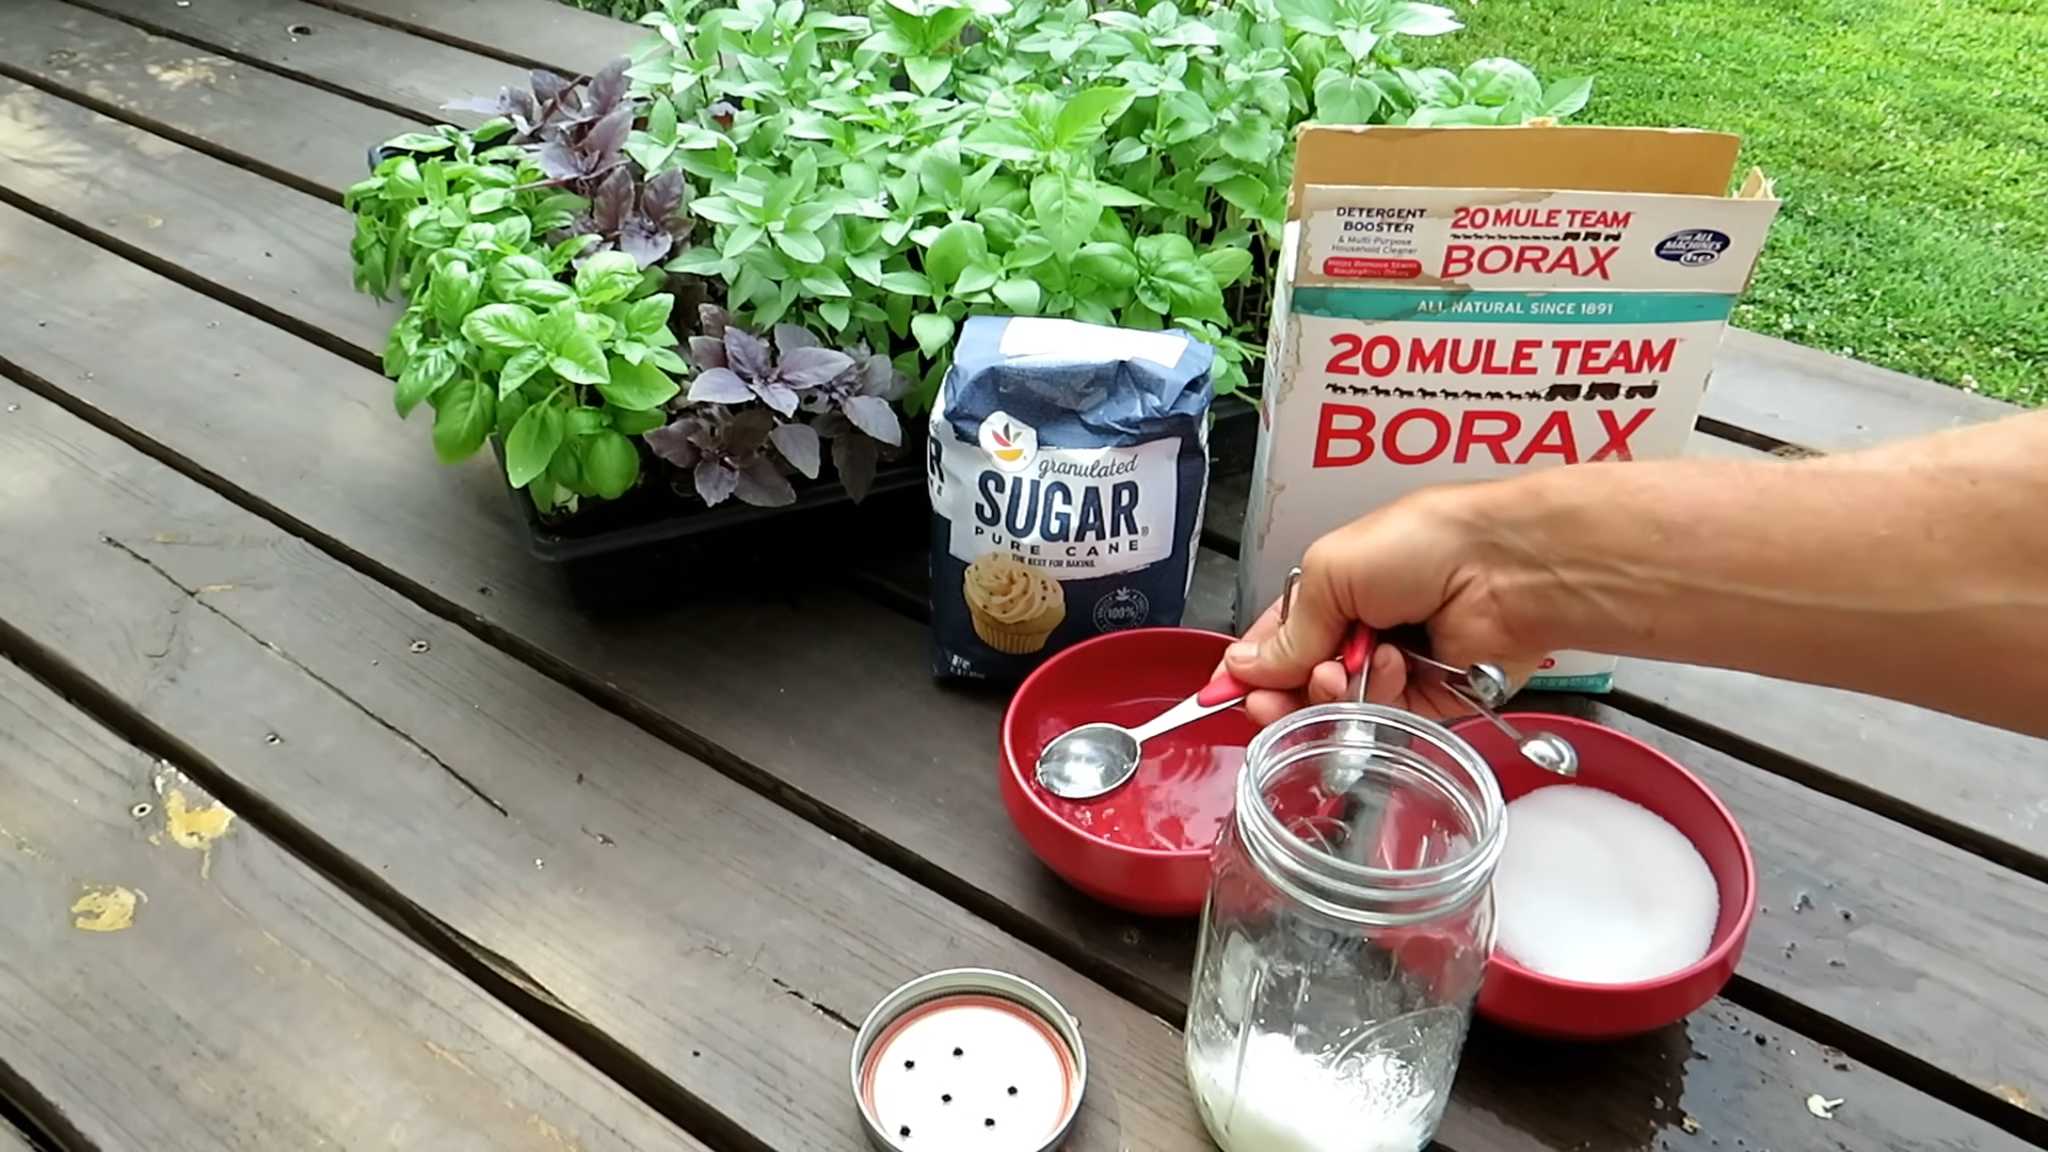
Method 1: Borax and Sugar Ant Bait
This is my go-to method because it’s incredibly effective and relatively safe when used properly. Borax, also known as sodium borate, is a naturally occurring mineral that acts as a slow-acting poison for ants. The sugar attracts them, and they carry the borax back to the colony, eventually eliminating the entire nest.
Materials You’ll Need:
* Borax (available in the laundry aisle of most grocery stores)
* Granulated sugar
* Water
* Small containers (old jar lids, plastic containers with holes punched in them, or even cotton balls)
* Spoon or mixing stick
Step-by-Step Instructions:
1. Prepare the Bait Solution: In a small bowl, mix 1 teaspoon of borax with 3 tablespoons of granulated sugar. This ratio is crucial! Too much borax will kill the ants too quickly, and they won’t have time to carry it back to the colony.
2. Add Water: Slowly add water, a teaspoon at a time, to the sugar and borax mixture. Stir until the sugar and borax are completely dissolved, and you have a syrupy solution. The consistency should be thin enough for the ants to drink easily.
3. Set Up the Bait Stations: Pour the bait solution into your small containers. If you’re using plastic containers, punch a few small holes in the sides near the bottom so the ants can easily access the bait. If you’re using cotton balls, soak them in the solution.
4. Place the Bait Stations: Place the bait stations near ant trails or areas where you’ve seen ant activity in your garden. Be sure to place them in areas where pets and children cannot reach them. I usually put them under overturned flower pots or inside small, covered containers with ant-sized entrances.
5. Monitor and Replenish: Check the bait stations regularly and replenish the solution as needed. You should see ants swarming the bait stations at first. Don’t be alarmed! This means it’s working.
6. Be Patient: It may take a few days or even a week to see a significant reduction in the ant population. Be patient and continue to replenish the bait until the ants are gone.
Important Note: Borax can be harmful if ingested in large quantities. Keep bait stations out of reach of children and pets. If you have pets that are particularly curious, consider using a covered bait station that only ants can access.
Method 2: Diatomaceous Earth (DE)
Diatomaceous earth (DE) is another fantastic natural ant killer. It’s made from the fossilized remains of diatoms, a type of algae. DE is non-toxic to humans and pets, but it’s deadly to insects with exoskeletons, like ants. The tiny, sharp edges of the DE particles cut into the ants’ exoskeletons, causing them to dehydrate and die.
Materials You’ll Need:
* Food-grade diatomaceous earth (make sure it’s food-grade, not pool-grade!)
* Duster or shaker (optional)
Step-by-Step Instructions:
1. Identify Ant Trails and Nests: Locate the ant trails and any visible ant nests in your garden.
2. Apply Diatomaceous Earth: Using a duster or shaker, lightly sprinkle the diatomaceous earth around ant trails, nest entrances, and areas where you’ve seen ant activity. You can also create a barrier around plants you want to protect.
3. Reapply After Rain: Diatomaceous earth is only effective when it’s dry. Reapply it after rain or watering.
4. Be Careful Not to Inhale: While food-grade DE is non-toxic, it can irritate your lungs if inhaled. Wear a mask when applying it, especially if you’re using a duster.
Important Note: Use food-grade diatomaceous earth only. Pool-grade DE is treated with chemicals and is not safe for use in your garden.
Method 3: Vinegar Spray
Vinegar is a simple and effective way to disrupt ant trails and kill ants on contact. It’s also a great natural weed killer!
Materials You’ll Need:
* White vinegar
* Spray bottle
Step-by-Step Instructions:
1. Fill the Spray Bottle: Pour undiluted white vinegar into a spray bottle.
2. Spray Ant Trails and Ants: Spray the vinegar directly onto ant trails, ants, and any areas where you’ve seen ant activity.
3. Repeat as Needed: Vinegar is a contact killer, so you’ll need to reapply it regularly to keep the ants away.
Important Note: Vinegar can be harmful to some plants, so avoid spraying it directly on foliage. Test it on a small area first to make sure it doesn’t damage the plant.
Method 4: Boiling Water
This is a simple but effective method for eliminating ant nests, especially those located in cracks in pavement or in areas where you don’t mind disturbing the soil.
Materials You’ll Need:
* Boiling water
* Kettle or pot
Step-by-Step Instructions:
1. Locate the Ant Nest: Find the entrance to the ant nest.
2. Pour Boiling Water: Carefully pour boiling water directly into the ant nest entrance.
3. Repeat as Needed: You may need to repeat this process several times to completely eliminate the colony.
Important Note: Be extremely careful when handling boiling water to avoid burns. This method can also kill plants if poured directly on them.
Method 5: Dish Soap and Water
This method works by suffocating the ants. The soap breaks down the surface tension of the water, allowing it to penetrate the ants’ exoskeletons and drown them.
Materials You’ll Need:
* Dish soap (any kind will do)
* Water
* Spray bottle
Step-by-Step Instructions:
1. Mix the Solution: In a spray bottle, mix 1-2 tablespoons of dish soap with 1 quart of water.
2. Spray Ant Trails and Ants: Spray the solution directly onto ant trails, ants, and any areas where you’ve seen ant activity.
3. Repeat as Needed: Reapply as needed to keep the ants away.
Important Note: While generally safe for plants, test the solution on a small area first to make sure it doesn’t cause any damage.
Preventing Future Ant Infestations
Once you’ve gotten rid of the ants, it’s important to take steps to prevent them from coming back. Here are a few tips:
* Keep Your Garden Clean: Remove any food scraps, fallen fruit, or other debris that might attract ants.
* Seal Cracks and Crevices: Seal any cracks or crevices in your foundation or around your home to prevent ants from entering.
* Trim Vegetation: Trim back any vegetation that touches your house, as ants can use it as a bridge to get inside.
* Use Natural Repellents: Plant natural ant repellents like peppermint, lavender, or tansy around your garden.
* Maintain Good Drainage: Ants are attracted to moisture, so make sure your garden has good drainage.
Choosing the Right Method for Your Garden
The best method for getting rid of ants in your garden will depend on the severity of the infestation, the location of the ants, and your personal preferences. I usually start with the borax and sugar bait, as it’s very effective at eliminating entire colonies. If that doesn’t work, I’ll try diatomaceous earth or vinegar spray. For nests located in cracks in pavement, boiling water is a quick and easy solution.
Remember to be patient and persistent. It may take some time to completely eliminate the ants from your garden. But with a little effort and these DIY methods, you can keep your plants safe and healthy without resorting to harsh chemicals. Good luck!

Conclusion
So, there you have it! This simple, effective, and eco-friendly DIY ant killer for your garden is more than just a quick fix; it’s a sustainable solution for keeping those pesky ants at bay without resorting to harsh chemicals that can harm your plants, beneficial insects, and even your pets. We’ve walked you through the process, highlighting the ease and affordability of creating your own ant deterrent right in your kitchen.
Why is this DIY trick a must-try? Because it empowers you to take control of your garden’s ecosystem in a responsible way. You’re not just eliminating ants; you’re fostering a healthier environment for your plants to thrive. Store-bought ant killers often contain ingredients that can leach into the soil, potentially harming your vegetables and flowers. This homemade solution minimizes that risk, allowing you to enjoy the fruits (and vegetables!) of your labor with peace of mind.
But the benefits don’t stop there. This method is incredibly versatile. Feel free to experiment with different ingredients to find what works best for your specific ant problem and garden environment. For example, if you’re dealing with a particularly stubborn infestation, you can increase the concentration of borax in the mixture. Or, if you’re concerned about attracting other insects, you can add a few drops of essential oils like peppermint or tea tree, which are known ant repellents.
Consider these variations to tailor the recipe to your needs:
* Spicy Kick: Add a pinch of cayenne pepper to the mixture. Ants are not fond of spicy flavors, and this can act as an extra deterrent.
* Citrus Power: Incorporate lemon or orange peels into the sugar syrup. The citrus scent can confuse ants and disrupt their trails.
* Herbal Infusion: Steep fresh mint or basil leaves in the warm water before mixing in the sugar and borax. The herbal scent can further repel ants.
* Diatomaceous Earth Boost: Sprinkle food-grade diatomaceous earth around the bait stations for an added layer of protection. Diatomaceous earth is a natural powder made from fossilized algae that dehydrates insects.
Remember to always monitor the bait stations and replenish the solution as needed. The key to success is consistency. By regularly providing this tempting (yet deadly for ants) treat, you’ll gradually reduce the ant population in your garden.
We are confident that this DIY ant killer will become your go-to solution for managing ants in your garden. It’s a cost-effective, environmentally friendly, and highly customizable method that delivers real results.
Now, it’s your turn! We encourage you to try this DIY ant killer for your garden and see the difference it can make. Don’t be afraid to experiment with the variations and find what works best for you. And most importantly, share your experience with us! Let us know how it worked, what variations you tried, and any tips you discovered along the way. Your feedback will help us refine this recipe and make it even more effective for everyone. Share your stories in the comments below – we can’t wait to hear from you! Let’s work together to create healthier, ant-free gardens, one DIY solution at a time.
Frequently Asked Questions (FAQ)
What exactly is borax, and is it safe to use in my garden?
Borax, also known as sodium borate, is a naturally occurring mineral compound. While it’s a natural substance, it’s important to use it responsibly. In small quantities, as used in this DIY ant killer, it’s generally considered safe for garden use, especially when compared to harsh chemical pesticides. The borax acts as a slow-acting poison for the ants. They ingest it and carry it back to the colony, eventually eliminating the entire nest. However, it’s crucial to avoid direct contact with plants and soil, as excessive amounts can be harmful. Always wear gloves when handling borax and keep it out of reach of children and pets. The bait stations are designed to minimize exposure to non-target organisms.
How does this DIY ant killer actually work?
The magic lies in the combination of sugar and borax. The sugar acts as a powerful attractant, luring the ants to the bait station. Once they find the sweet treat, they eagerly consume it and carry it back to their colony to share with other ants, including the queen. The borax, however, is a slow-acting poison. It disrupts the ants’ digestive system, eventually leading to their demise. Because it’s slow-acting, the ants have ample time to spread the borax throughout the colony before it takes effect, ensuring a more comprehensive elimination of the infestation. This is a much more effective strategy than simply killing the ants you see on the surface.
What if I don’t have borax? Are there any alternatives?
While borax is the most commonly used and effective ingredient in this DIY ant killer, some alternatives can be considered, although they may not be as potent. One option is to use boric acid, which is a similar compound with the same mode of action. However, boric acid can be more difficult to find and may be more expensive. Another alternative, although less effective, is to use baking soda. Baking soda can disrupt the ants’ digestive system, but it’s not as toxic as borax or boric acid. If you choose to use baking soda, you may need to increase the concentration in the mixture and be prepared for slower results. Ultimately, borax remains the preferred choice for its effectiveness and availability.
How long does it take to see results with this DIY ant killer?
Patience is key! It typically takes several days to a couple of weeks to see a significant reduction in the ant population. The exact timeframe depends on the size of the colony, the severity of the infestation, and the effectiveness of the bait. Remember, the ants need time to find the bait, consume it, and carry it back to the colony. Don’t be discouraged if you don’t see immediate results. Continue to monitor the bait stations and replenish the solution as needed. Consistency is crucial for long-term success.
Where should I place the bait stations in my garden?
Strategic placement of the bait stations is essential for maximizing their effectiveness. Look for areas where you’ve observed ant activity, such as along ant trails, near plant roots, or around cracks and crevices. Place the bait stations in sheltered locations to protect them from rain and wind, which can dilute the solution or blow them away. If you have pets or small children, be sure to place the bait stations in areas that are inaccessible to them. You can also use bait stations with lids or covers to prevent accidental ingestion.
Can I use this DIY ant killer indoors?
Yes, this DIY ant killer can be used indoors as well, but with extra caution. Follow the same guidelines for placement, focusing on areas where you’ve seen ant activity, such as near kitchen counters, under sinks, or along baseboards. Be especially careful to keep the bait stations out of reach of children and pets. Consider using covered bait stations to minimize the risk of accidental ingestion. Regularly monitor the bait stations and replenish the solution as needed.
Is this DIY ant killer safe for my plants?
When used correctly, this DIY ant killer is generally safe for plants. The key is to avoid direct contact between the solution and the plants. Place the bait stations away from plant foliage and roots. If you accidentally spill some of the solution on a plant, rinse it off immediately with water. The borax in the solution can be harmful to plants if it’s absorbed through their leaves or roots.
Will this DIY ant killer attract other insects besides ants?
While the sugar in the solution is primarily intended to attract ants, it may also attract other insects, such as bees or flies. To minimize this risk, consider adding a few drops of essential oils like peppermint or tea tree to the mixture. These oils are known ant repellents and can help deter other insects from being attracted to the bait stations. You can also try using covered bait stations to prevent other insects from accessing the solution.
What do I do if the ants stop eating the bait?
If you notice that the ants have stopped eating the bait, there could be several reasons. The solution may have become diluted by rain or condensation, or it may have dried out. Try replenishing the solution with a fresh batch. It’s also possible that the ants have found a more appealing food source elsewhere. In this case, try moving the bait stations to a different location or experimenting with different variations of the recipe, such as adding a pinch of cayenne pepper or some citrus peels.
How often should I replenish the bait stations?
The frequency with which you need to replenish the bait stations depends on the severity of the infestation and the weather conditions. In general, you should check the bait stations every few days and replenish the solution as needed. If the solution has dried out or become diluted, replace it with a fresh batch. If the ants are actively feeding on the bait, you may need to replenish it more frequently. Continue to monitor the bait stations until the ant population has significantly decreased.
Leave a Comment