

DIY basket weaving bucket – sounds a little intimidating, right? But trust me, it’s way more achievable (and rewarding!) than you might think. Forget those boring plastic planters; we’re diving headfirst into a world where your garden is as stylish as it is bountiful.
Basket weaving, in general, has been around for ages! Think ancient Egyptians using reeds to create containers, or indigenous cultures crafting intricate baskets for everything from food storage to ceremonial purposes. While we’re not aiming for museum-quality artifacts here, we are tapping into that same resourceful spirit, giving a modern twist to a timeless craft.
Why a DIY basket weaving bucket, you ask? Well, let’s be honest, store-bought planters can be expensive and often lack personality. Plus, many of us are looking for ways to be more sustainable, and repurposing materials is a fantastic way to do just that. Imagine transforming an old bucket into a charming, rustic planter that perfectly complements your herbs, flowers, or even a small vegetable garden. It’s a chance to add a unique, handmade touch to your outdoor space, impress your neighbors, and feel a real sense of accomplishment. Ready to get your hands dirty (in a good way)? Let’s weave some magic!
DIY Basket Weaving Bucket: A Rustic Storage Solution
Hey there, fellow DIY enthusiasts! Today, I’m super excited to share a project that combines practicality with a touch of rustic charm: a basket-woven bucket! This isn’t just any bucket; it’s a beautiful and functional storage solution you can create yourself. We’ll be transforming a plain, ordinary bucket into something truly special. Get ready to learn some basic weaving techniques and add a unique, handmade touch to your home!
Materials You’ll Need
Before we dive in, let’s gather all the necessary materials. Trust me, having everything organized beforehand will make the whole process much smoother and more enjoyable.
* **A sturdy bucket:** Choose a bucket made of plastic or metal. The size is entirely up to you and depends on what you plan to store in it. I recommend a bucket with a smooth, slightly tapered shape for easier weaving.
* **Natural weaving material:** This is where you can get creative! I personally love using reed, willow branches, or even thick jute rope. You can find these at craft stores, online retailers, or even forage them yourself (if you’re feeling adventurous!). Make sure your chosen material is flexible enough to bend around the bucket.
* **Vertical stakes (also made of your chosen weaving material):** These will form the vertical structure of your basket. They need to be slightly longer than the height of your bucket.
* **Scissors or pruning shears:** For cutting your weaving material and stakes.
* **Strong glue (optional):** For securing the ends of your weaving material, especially if you’re using something that tends to fray.
* **Clothespins or clips:** These will be your best friends for holding the weaving in place as you work.
* **Measuring tape or ruler:** To ensure your stakes are evenly spaced.
* **Pencil or marker:** For marking stake positions.
* **Gloves (optional):** To protect your hands, especially if you’re working with rougher materials like willow.
* **A damp cloth or spray bottle:** To keep your weaving material pliable, especially if you’re using reed or willow.
Preparing the Bucket and Stakes
This initial prep work is crucial for a successful weaving project. A little patience here will pay off big time later!
1. **Clean the Bucket:** Give your bucket a good scrub with soap and water to remove any dirt or grime. Make sure it’s completely dry before you start.
2. **Mark Stake Positions:** Using your measuring tape and pencil, mark evenly spaced points around the top and bottom rims of the bucket. The number of stakes you use will depend on the size of your bucket and the thickness of your weaving material. I usually aim for about 1-2 inches between stakes.
3. **Attach the Stakes:** This is where the glue comes in handy (if you choose to use it). Apply a small dab of glue to each marked point on the bottom rim of the bucket. Attach the bottom of each stake to the glue, making sure it’s securely in place. If you’re not using glue, you can temporarily secure the stakes with tape or clothespins.
4. **Secure the Top of the Stakes:** Bend each stake upwards along the outside of the bucket. Use clothespins or clips to temporarily secure the stakes to the top rim of the bucket, ensuring they are evenly spaced and taut. This will hold them in place while you start weaving.
The Weaving Process: Over-Under, Over-Under!
Now for the fun part! This is where your bucket starts to transform into a beautiful basket.
1. **Prepare Your Weaving Material:** If you’re using reed or willow, soak it in water for about 30 minutes to make it more pliable. This will prevent it from cracking or breaking as you weave. Jute rope usually doesn’t need soaking.
2. **Starting the Weave:** Choose a starting point near the bottom of the bucket. Take your first piece of weaving material and weave it *over* the first stake, *under* the second stake, *over* the third stake, and so on, all the way around the bucket.
3. **Securing the First Row:** Once you’ve completed the first row, overlap the end of your weaving material with the beginning, creating a secure join. You can use a small dab of glue to reinforce this join if desired.
4. **Continuing the Weave:** Continue weaving, alternating the over-under pattern with each row. So, if your first row went *over-under*, your second row should go *under-over*. This creates a strong and visually appealing weave.
5. **Maintaining Tension:** As you weave, make sure to keep the weaving material taut but not too tight. You want a consistent and even weave without distorting the shape of the bucket. Use clothespins or clips to hold the weaving in place as you work.
6. **Joining New Pieces:** When you run out of weaving material, simply overlap the end of the old piece with the beginning of the new piece, weaving them together for a few inches. Again, a little glue can help secure the join. Try to stagger the joins so they aren’t all in the same place, which will create a stronger and more visually appealing basket.
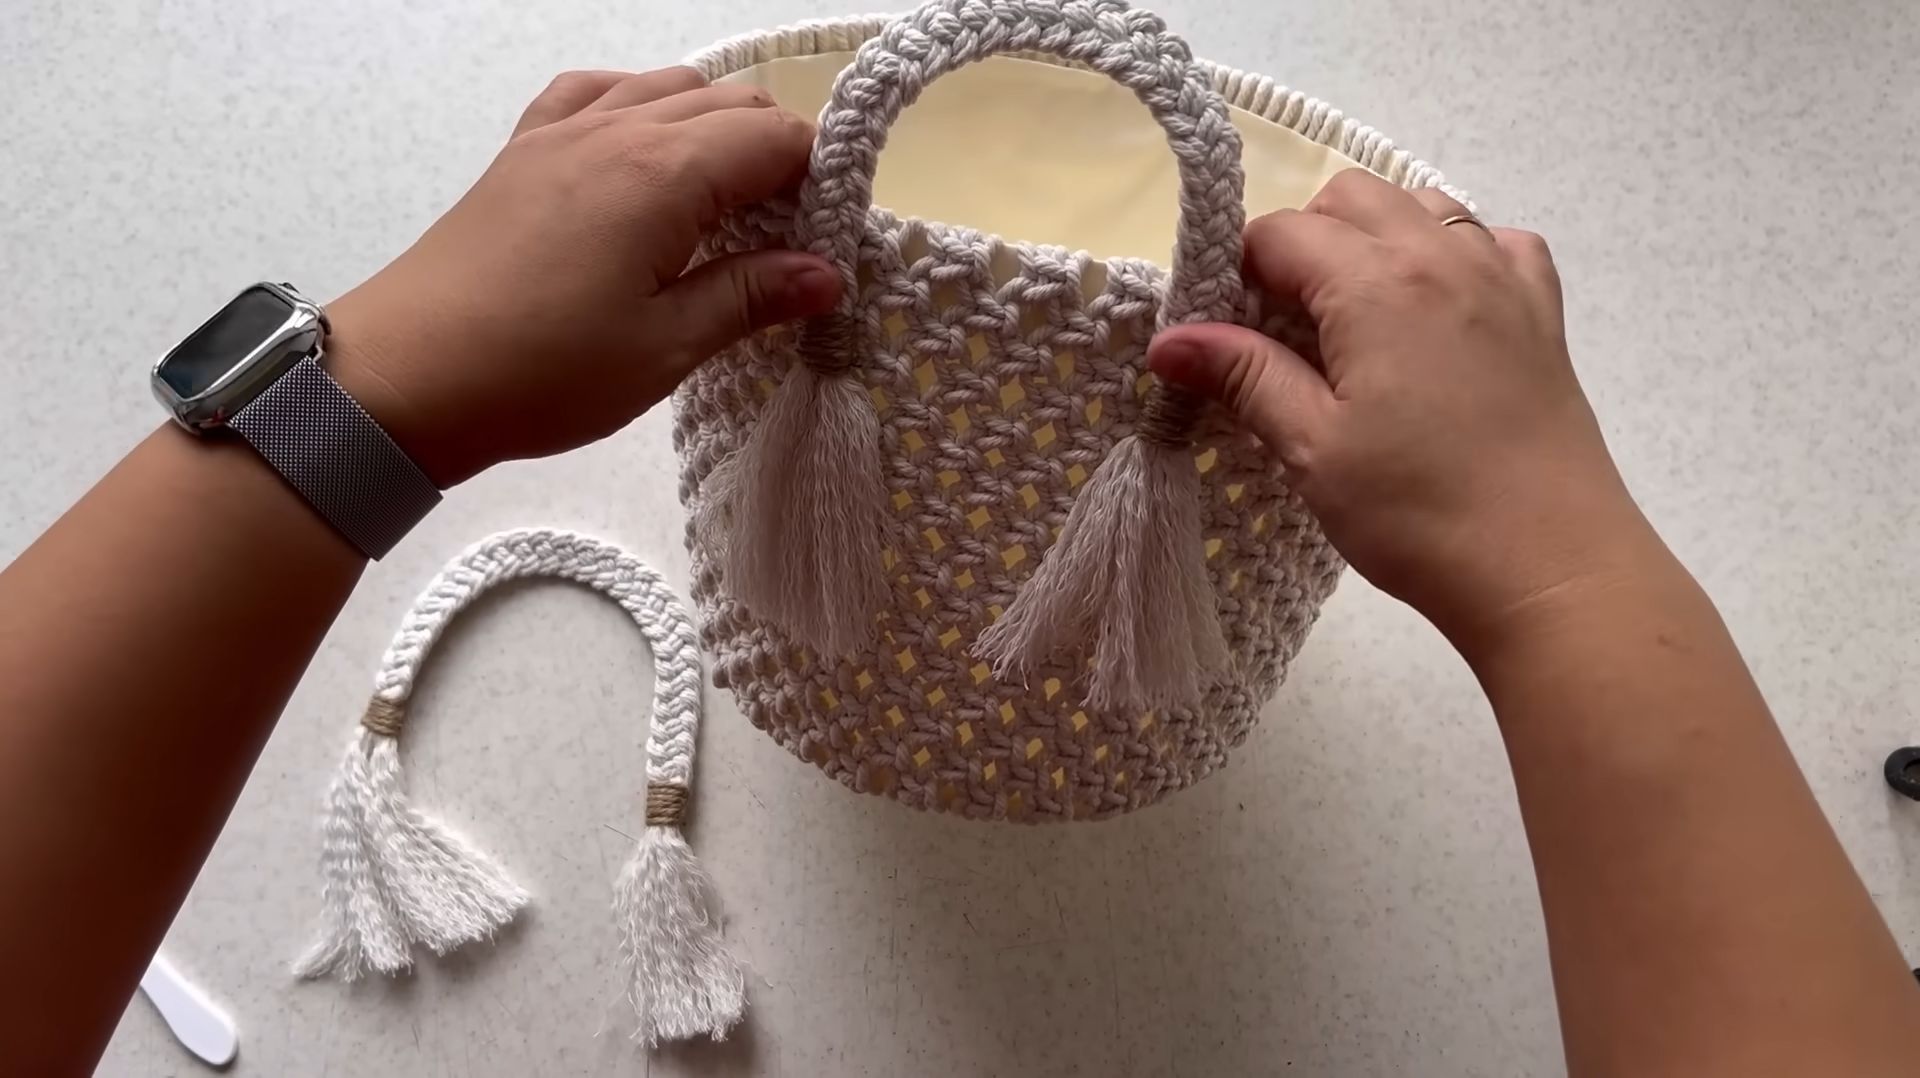
7. **Weaving Around the Handle (If Applicable):** If your bucket has a handle, you’ll need to weave around it. Simply weave as normal until you reach the handle. Then, carefully weave the material around the base of the handle, ensuring it’s securely attached. Continue weaving on the other side of the handle.
Finishing Touches: Making it Perfect
Almost there! These final steps will give your basket-woven bucket a polished and professional look.
1. **Reaching the Top:** Continue weaving until you reach the top rim of the bucket. Leave about an inch or two of the stakes exposed above the weaving.
2. **Securing the Top Edge:** There are a few ways to finish the top edge. One option is to simply fold the stakes down over the top row of weaving and secure them with glue. Another option is to create a more decorative edge by weaving the stakes together in a braid or other pattern.
3. **Trimming Excess Material:** Once you’ve secured the top edge, trim any excess weaving material or stake ends with your scissors or pruning shears.
4. **Final Touches:** Inspect your basket for any loose ends or gaps. Use glue to secure any loose ends and fill in any small gaps with extra weaving material.
5. **Let it Dry:** Allow the glue to dry completely before using your basket. This usually takes a few hours.
Alternative Weaving Patterns
Once you’ve mastered the basic over-under weave, you can experiment with different patterns to add even more visual interest to your basket. Here are a few ideas:
* **Twining:** This involves using two strands of weaving material simultaneously, twisting them around each stake.
* **Waling:** This is a stronger weave that uses three or more strands of weaving material.
* **Adding Color:** Use different colored weaving materials to create stripes, patterns, or even intricate designs.
Tips and Tricks for Success
* Keep your weaving material moist: Dry reed or willow is brittle and prone to cracking. Keep it damp by soaking it in water or spraying it with a spray bottle as you work.
* Use clothespins liberally: Clothespins are your best friend for holding the weaving in place and maintaining tension.
* Don’t be afraid to experiment: Try different weaving patterns, materials, and colors to create a truly unique basket.
* Take breaks: Weaving can be tiring, especially for your hands. Take breaks as needed to avoid fatigue.
* Embrace imperfections: Remember, this is a handmade project. Don’t strive for perfection. Embrace the imperfections and enjoy the process.
And there you have it! Your very own basket-woven bucket. I hope you enjoyed this DIY project as much as I did. Now you have a beautiful and functional storage solution that you can proudly display in your home. Happy weaving!
Conclusion
So, there you have it! Transforming an ordinary bucket into a charming, rustic basket using simple weaving techniques is not only achievable but incredibly rewarding. This DIY basket weaving bucket project is more than just a craft; it’s a chance to personalize your storage solutions, add a touch of handmade elegance to your home, and reconnect with the satisfaction of creating something beautiful with your own two hands.
Why is this a must-try? Because it’s economical, eco-friendly (especially if you’re repurposing an old bucket!), and endlessly customizable. Forget those mass-produced plastic bins; this woven bucket offers a unique aesthetic that elevates any space. Imagine using it to store blankets in your living room, toys in a child’s bedroom, or even as a stylish planter on your patio. The possibilities are truly endless.
But the real magic lies in the process. The rhythmic weaving is surprisingly meditative, allowing you to unwind and focus on the present moment. And the sense of accomplishment you’ll feel when you step back and admire your finished creation is simply unmatched.
Ready to take your DIY skills to the next level?
Don’t be afraid to experiment with different materials! While we’ve focused on natural fibers like jute or cotton rope, you could also use strips of fabric, colorful yarn, or even repurposed plastic bags for a more sustainable approach. Consider adding embellishments like beads, buttons, or painted designs to further personalize your basket.
For a more structured look, try using a thicker rope or cord. If you prefer a softer, more relaxed aesthetic, opt for a thinner, more pliable material. You can also play with different weaving patterns to create unique textures and designs. Try a simple over-under weave, a more intricate herringbone pattern, or even a spiral weave for a truly eye-catching effect.
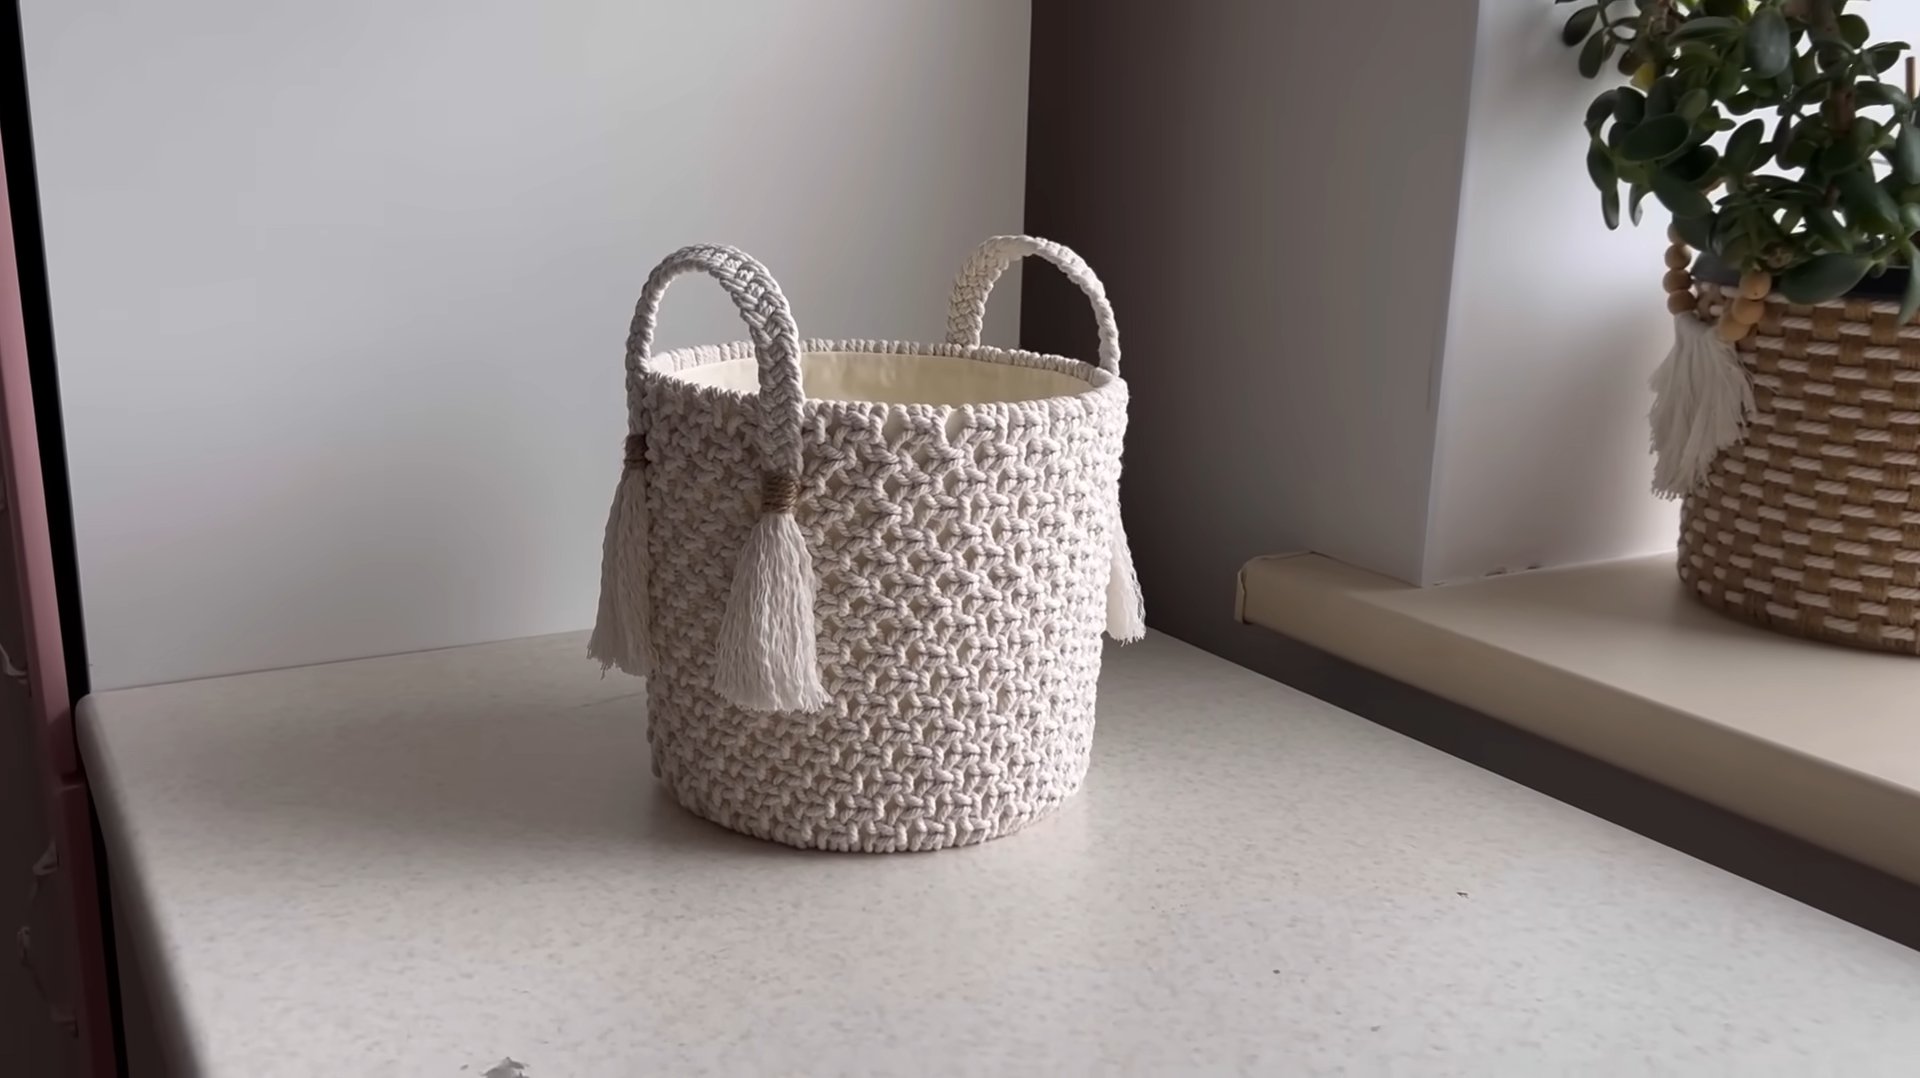
And if you’re feeling particularly ambitious, why not try adding handles to your basket? Simply attach two sturdy loops of rope or leather to the sides of the bucket before you begin weaving. This will make it even easier to carry and transport your finished creation.
We encourage you to embrace your creativity and make this project your own. Don’t be afraid to experiment, make mistakes, and learn from the process. After all, that’s what DIY is all about!
So, grab a bucket, gather your materials, and get weaving! We can’t wait to see what you create. Share your finished projects with us on social media using #DIYBasketBucket and let us know what you think. We’re always looking for new ideas and inspiration, and we love to see our readers putting their own unique spin on our projects. Happy weaving!
FAQ
What kind of bucket works best for this project?
Almost any bucket can be used for this DIY basket weaving project, but some are better suited than others. Plastic buckets are generally the easiest to work with because they are lightweight and readily available. Metal buckets can also be used, but they may require a bit more effort to drill holes for attaching the weaving material. Consider the size and shape of the bucket as well. A wider bucket will result in a shorter, wider basket, while a taller bucket will create a taller, narrower basket. Also, make sure the bucket is clean and free of any sharp edges or burrs that could snag your weaving material.
What type of rope or material should I use for weaving?
The choice of weaving material is largely a matter of personal preference. Natural fibers like jute, cotton rope, and hemp cord are popular choices for their rustic aesthetic and durability. Synthetic materials like nylon rope and paracord are also viable options, offering greater resistance to moisture and wear. Consider the thickness and texture of the material as well. Thicker ropes will create a more substantial basket, while thinner cords will result in a finer, more delicate weave. Experiment with different materials to find what works best for you and complements your desired style. You can even use fabric strips cut from old clothing for a truly upcycled project.
How do I secure the rope to the bucket to start weaving?
There are several ways to secure the rope to the bucket to begin weaving. One common method is to drill small holes around the top rim of the bucket and thread the rope through the holes, tying a knot on the inside to secure it. Another option is to use a strong adhesive, such as hot glue or construction adhesive, to attach the rope directly to the bucket. If you’re using hot glue, work in small sections to prevent the glue from cooling too quickly. For a more secure hold, you can also use a combination of both methods: drill holes and thread the rope, then reinforce with adhesive. Make sure the rope is securely attached before you begin weaving to prevent it from unraveling.
How do I maintain even tension while weaving?
Maintaining even tension is crucial for creating a neat and uniform basket. As you weave, periodically check the tension of the rope and adjust as needed. If the rope is too loose, the basket will be floppy and uneven. If the rope is too tight, it will be difficult to weave and may distort the shape of the bucket. Aim for a consistent, snug fit without pulling the rope so tightly that it causes the bucket to buckle. It can be helpful to use a weaving needle or a large crochet hook to guide the rope and maintain even tension. Practice makes perfect, so don’t be discouraged if your first attempt isn’t perfect.
Can I add handles to my woven bucket?
Yes, adding handles to your woven bucket is a great way to make it more functional and portable. There are several ways to attach handles. One option is to create rope handles by braiding or twisting several strands of rope together. Attach the handles to the bucket by threading them through holes drilled near the top rim and securing them with knots or adhesive. Another option is to use leather straps or metal handles, which can be attached using rivets or screws. Consider the weight and size of the bucket when choosing your handles to ensure they are strong enough to support the load.
How do I clean my woven bucket?
The best way to clean your woven bucket depends on the material used for weaving. For natural fibers like jute or cotton, spot clean with a damp cloth and mild soap. Avoid soaking the entire basket in water, as this can cause the fibers to shrink or warp. For synthetic materials like nylon or paracord, you can gently wash the basket with soap and water and allow it to air dry. If your basket has any embellishments, such as beads or buttons, take extra care when cleaning to avoid damaging them. Regular dusting can help prevent dirt and debris from accumulating on the surface of the basket.
What if my rope runs out in the middle of weaving?
Running out of rope in the middle of weaving is a common occurrence, but it’s easily remedied. Simply overlap the end of the old rope with the beginning of the new rope for several inches, and continue weaving. You can secure the overlapping ends with a dab of adhesive or by tucking them under the adjacent rows of weaving. If you’re using a natural fiber rope, you can also try splicing the ends together for a seamless join. The key is to ensure that the join is secure and inconspicuous so that it doesn’t detract from the overall appearance of the basket.
Can I use different colors of rope to create a pattern?
Absolutely! Using different colors of rope is a fantastic way to add visual interest and create unique patterns on your woven bucket. You can alternate colors in stripes, chevrons, or other geometric designs. You can also use different colors to highlight specific areas of the basket, such as the top rim or the base. When changing colors, be sure to secure the ends of the ropes properly to prevent them from unraveling. Experiment with different color combinations to find what you like best.
What can I use my finished woven bucket for?
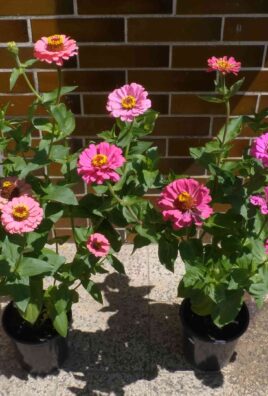
The possibilities are endless! Your finished woven bucket can be used for a variety of purposes, both practical and decorative. Use it to store blankets, pillows, toys, magazines, or other household items. It can also be used as a stylish planter for indoor or outdoor plants. Place it in your living room, bedroom, bathroom, or patio to add a touch of rustic charm to your decor. You can even use it as a gift basket, filled with goodies for a special occasion. Let your imagination be your guide!
Leave a Comment