

DIY Bottle Glasses: Ever looked at a discarded glass bottle and thought, “There has to be something cool I can do with that?” I know I have! Instead of tossing them into the recycling bin (though recycling is great!), why not transform them into stylish and unique drinking glasses? This isn’t just a fun craft project; it’s a fantastic way to reduce waste and add a personal touch to your home.
The art of repurposing glass has been around for centuries. From ancient civilizations melting down broken glass to create new objects, to modern-day artisans crafting stunning sculptures, the idea of giving discarded glass a new life is deeply ingrained in our history. Today, with a growing awareness of environmental issues, upcycling has become more popular than ever.
But why should you bother making your own DIY Bottle Glasses? Well, for starters, it’s incredibly satisfying! There’s something special about drinking from a glass you made yourself. Plus, it’s a budget-friendly way to expand your glassware collection. And let’s be honest, store-bought glasses can be a bit…boring. With this DIY project, you can create glasses that perfectly match your style and personality. So, grab those empty bottles, and let’s get crafting! I’m excited to show you how easy and rewarding it is to turn trash into treasure.
DIY Bottle Glasses: Turn Trash into Treasure!
Hey there, fellow DIY enthusiasts! Ever looked at a pile of empty bottles and thought, “There has to be something cool I can do with these?” Well, you’re in luck! Today, I’m going to walk you through the process of transforming those discarded bottles into stylish and unique drinking glasses. It’s a surprisingly satisfying project, and the end result is something you can proudly use or even give as a handmade gift.
What You’ll Need: The Essential Supplies
Before we dive in, let’s gather our materials. Safety first, so make sure you have everything you need before you start.
* Empty Glass Bottles: The star of the show! Choose bottles with interesting shapes and colors. Wine bottles, beer bottles, even some juice bottles can work. Just make sure they’re clean and dry.
* Glass Cutter: This is a crucial tool. A good quality glass cutter will make a clean, even score, which is essential for a successful break. I recommend a pistol-grip cutter for better control.
* Safety Glasses: Seriously, don’t skip this. Glass shards can fly, and you want to protect your eyes.
* Gloves: Protect your hands from cuts and abrasions. Leather or heavy-duty work gloves are ideal.
* Sandpaper (Various Grits): We’ll need coarse, medium, and fine grit sandpaper to smooth the sharp edges of the glass. I usually start with 120 grit, then move to 220, and finish with 400 or even 600 grit.
* Water: We’ll be using hot and cold water to create thermal shock and separate the bottle.
* Two Large Pots or Buckets: One for hot water and one for ice water. Make sure they’re large enough to fully submerge the bottle.
* Propane Torch (Optional, but Recommended): A small propane torch can help create a more even heat distribution, leading to a cleaner break.
* Oven Mitts or Tongs: To safely handle the hot bottles.
* Soft Cloth or Towel: For cleaning and drying the glasses.
* Cutting Oil (Optional): A little cutting oil can help the glass cutter glide smoothly.
Step-by-Step Guide: From Bottle to Glass
Okay, let’s get started! This process might seem a little intimidating at first, but trust me, with a little patience and practice, you’ll be turning out beautiful bottle glasses in no time.
Phase 1: Scoring the Bottle
This is the most important step. A clean, even score is key to a clean break.
1. Prepare the Bottle: Make sure your bottle is clean and dry. Remove any labels. You can soak the bottle in warm, soapy water to loosen stubborn labels.
2. Mark the Cutting Line: Decide where you want to cut the bottle. You can use a ruler or a piece of string to mark a straight line around the bottle. This will help you guide the glass cutter.
3. Apply Cutting Oil (Optional): A small amount of cutting oil on the cutting wheel can help it glide more smoothly.
4. Score the Bottle: Hold the glass cutter firmly and apply even pressure as you roll the cutting wheel around the bottle, following your marked line. You should hear a light scratching sound. Important: Only score the bottle once! Multiple passes will actually weaken the glass and make it harder to break cleanly.
5. Inspect the Score: Carefully examine the score line. It should be a continuous, even line all the way around the bottle. If there are any gaps or uneven spots, you may need to start over with a new bottle.
Phase 2: Separating the Bottle
This is where the magic happens! We’ll use thermal shock to separate the bottle along the score line.
1. Prepare the Hot and Cold Water: Fill one pot or bucket with very hot water (almost boiling) and the other with ice water.
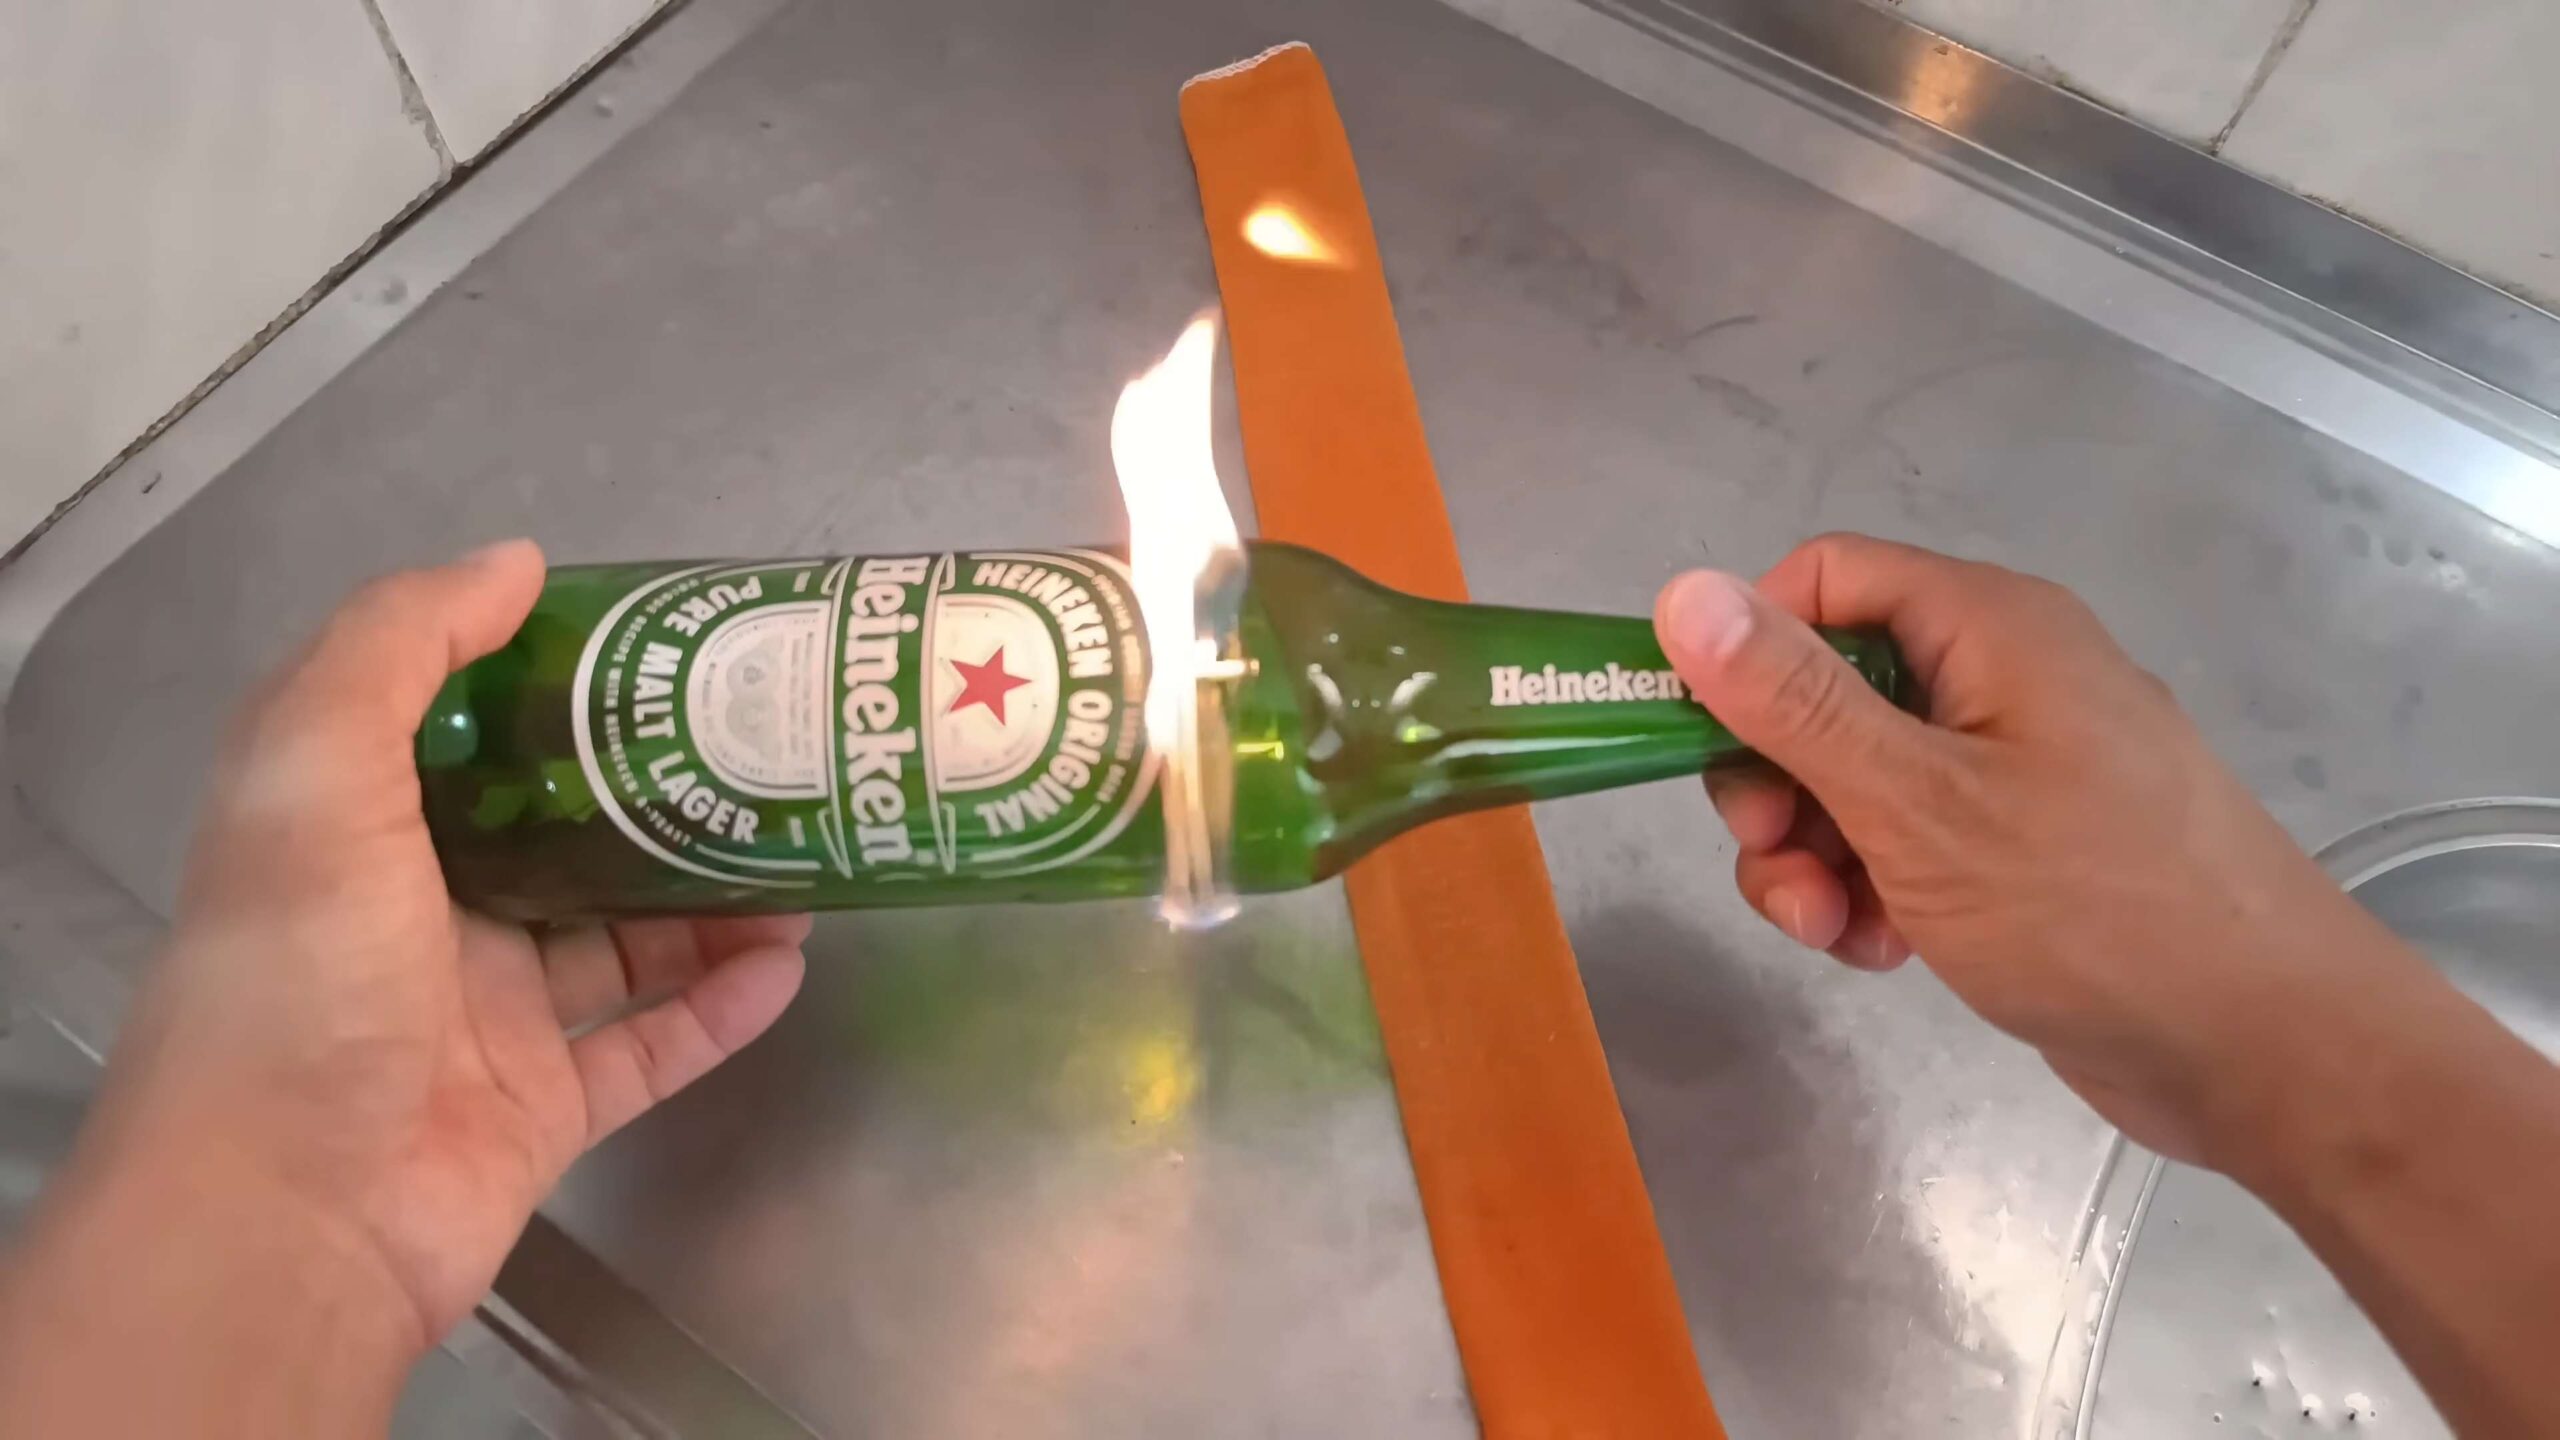
2. Heat the Score Line: This is where the propane torch comes in handy. Carefully heat the score line with the torch, rotating the bottle slowly and evenly. Don’t hold the flame in one spot for too long, or you risk cracking the glass. If you don’t have a torch, you can skip this step, but the break might not be as clean.
3. Thermal Shock: Using oven mitts or tongs, carefully submerge the bottle in the hot water, making sure the score line is completely submerged. Leave it in the hot water for about 30 seconds.
4. Quickly Transfer to Cold Water: Immediately transfer the bottle to the ice water, again making sure the score line is submerged.
5. Wait and See: You should hear a cracking sound as the glass separates along the score line. If it doesn’t separate immediately, leave it in the ice water for a few more seconds. You can also try gently tapping the bottle near the score line.
6. Repeat if Necessary: If the bottle doesn’t separate cleanly, you can repeat the heating and cooling process a few more times. Sometimes it takes a little persistence.
Phase 3: Smoothing the Edges
Now that we have our separated bottle, we need to smooth the sharp edges to make it safe to drink from.
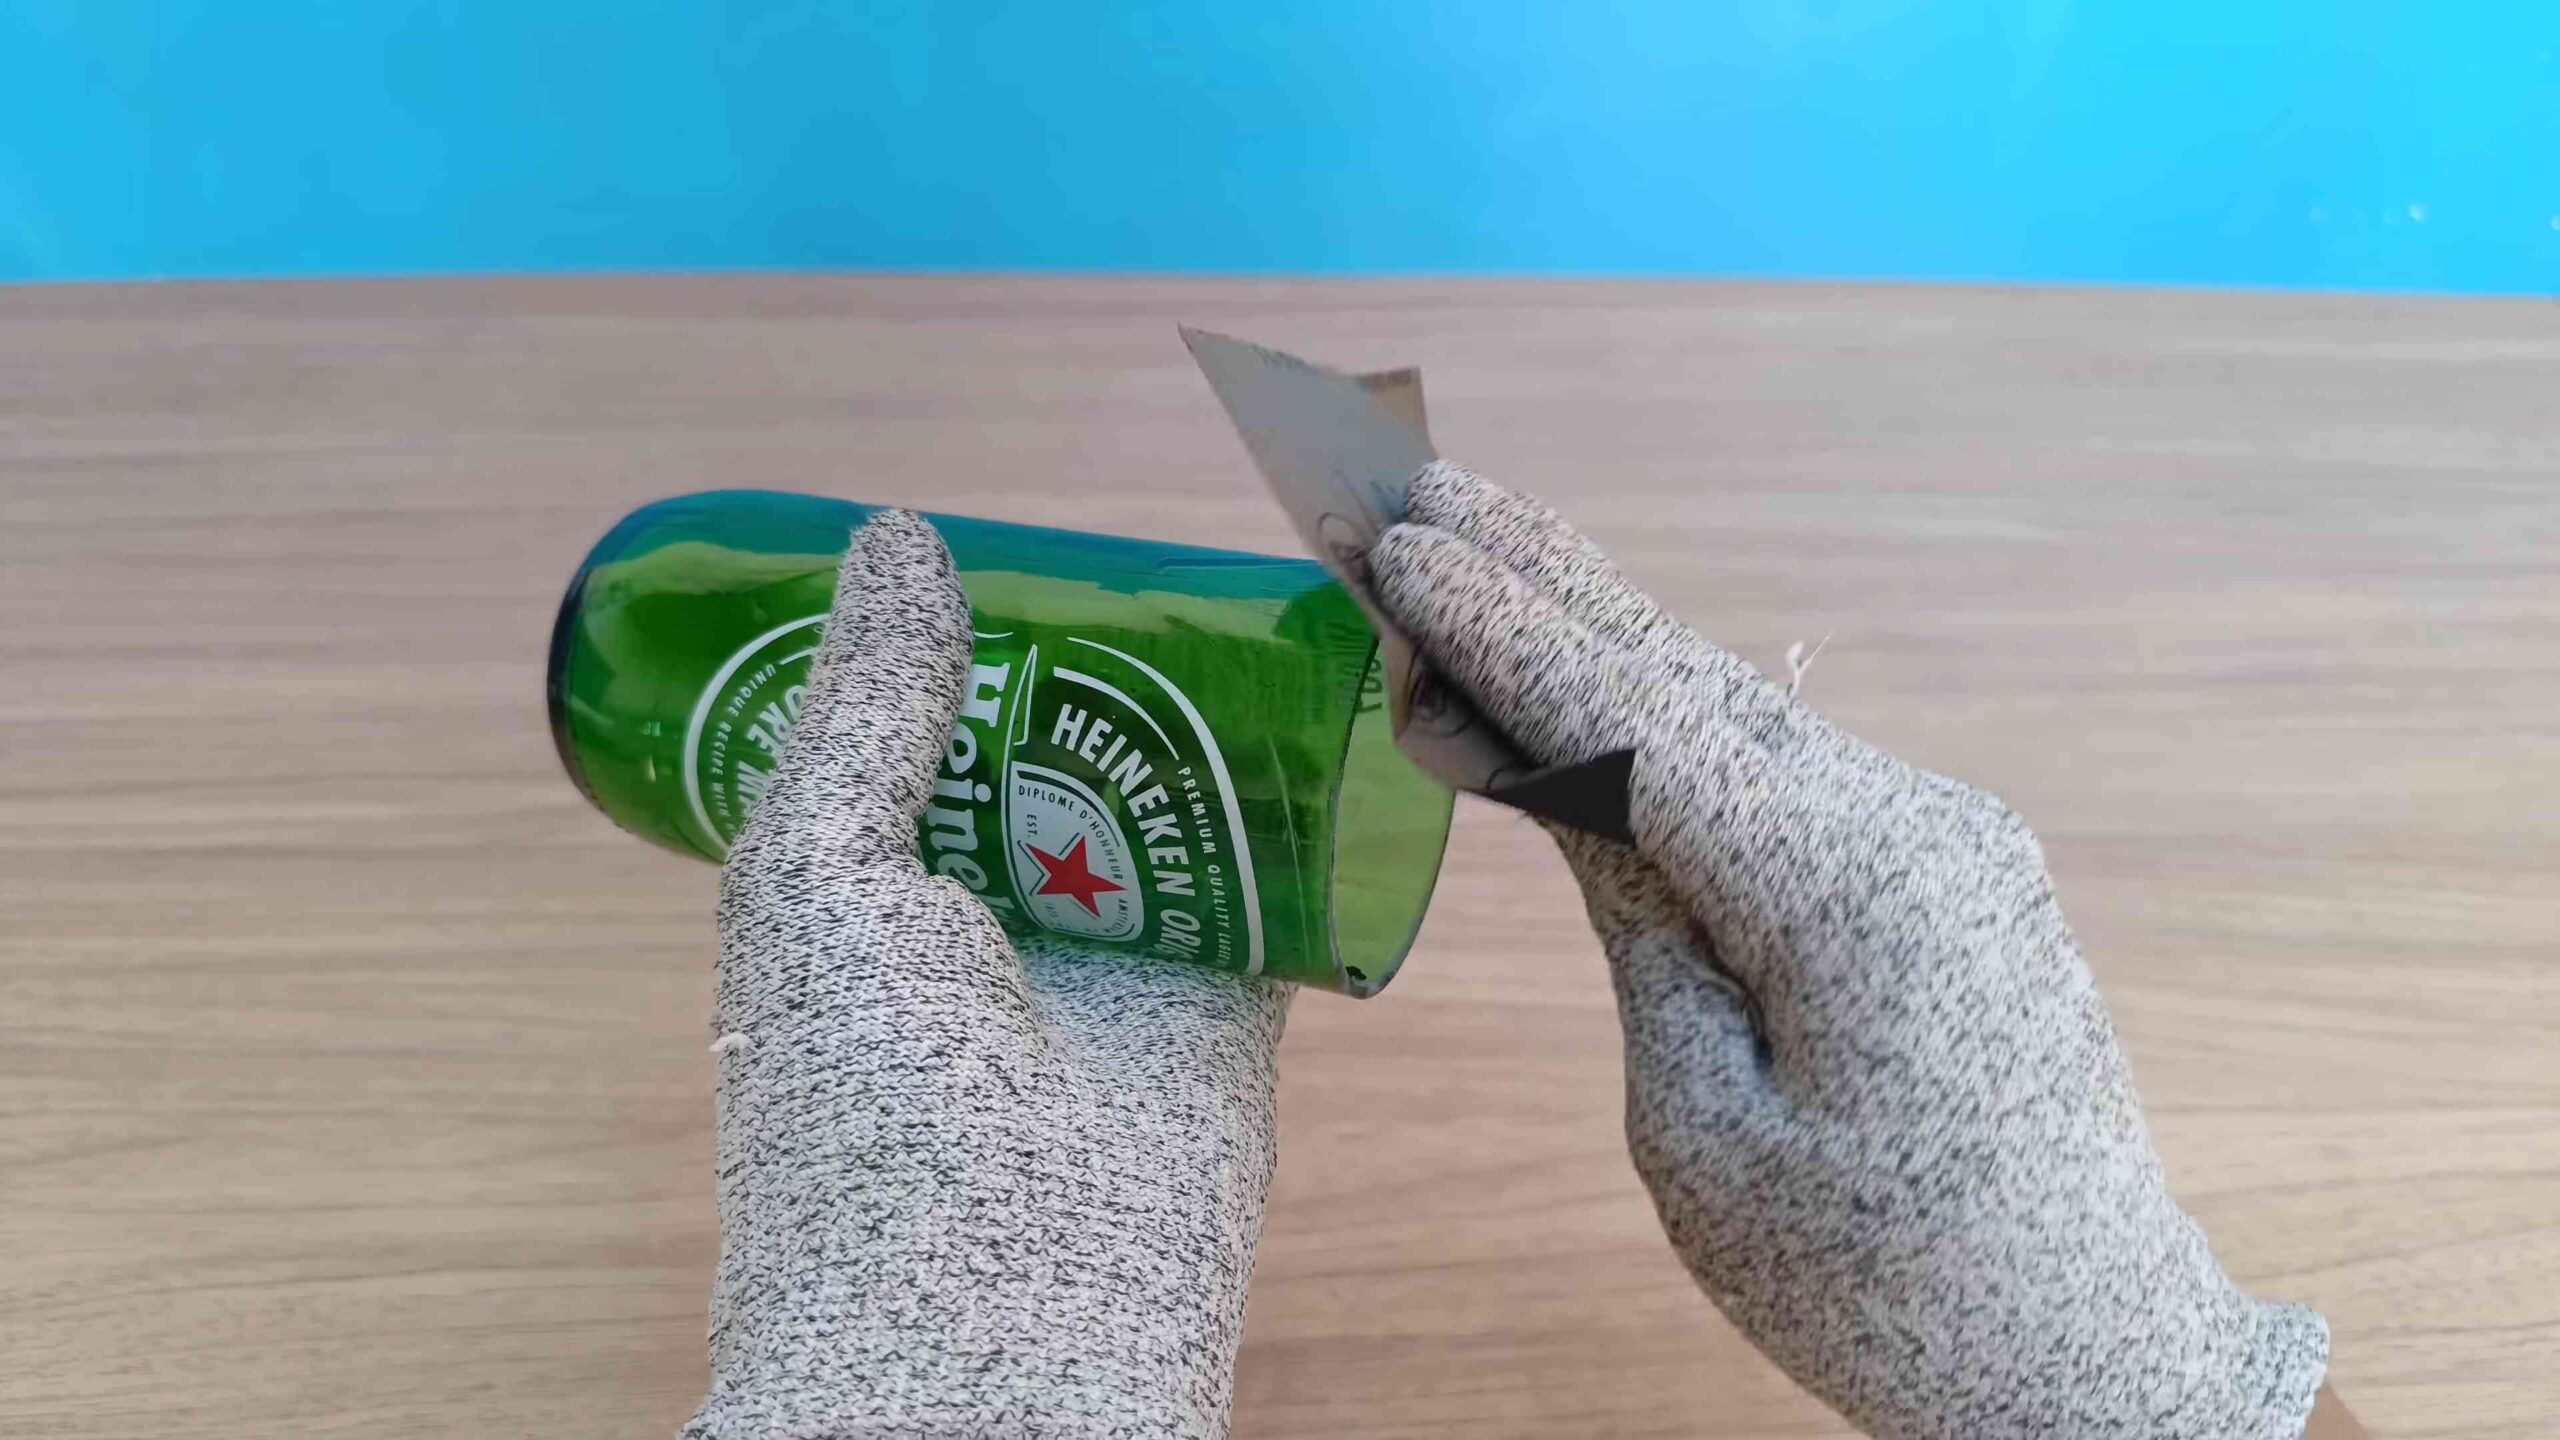
1. Initial Sanding: Start with the coarse grit sandpaper (120 grit). Wet the sandpaper and the edge of the glass. Sand the edge of the glass using a circular motion, applying even pressure. This will remove the sharpest edges and create a more rounded shape.
2. Medium Grit Sanding: Switch to the medium grit sandpaper (220 grit). Repeat the sanding process, continuing to wet the sandpaper and the glass. This will further smooth the edge and remove any scratches left by the coarse grit sandpaper.
3. Fine Grit Sanding: Finally, switch to the fine grit sandpaper (400 or 600 grit). Repeat the sanding process one last time. This will create a smooth, polished edge.
4. Inspect and Refine: Carefully inspect the edge of the glass. If there are any rough spots, continue sanding with the fine grit sandpaper until they are smooth.
5. Final Polish (Optional): For an extra smooth finish, you can use a polishing compound and a soft cloth to polish the edge of the glass.
Tips and Tricks for Success
Here are a few extra tips to help you get the best results:
* Practice Makes Perfect: Don’t be discouraged if your first few attempts aren’t perfect. It takes a little practice to get the hang of scoring the bottle evenly and creating the right thermal shock.
* Choose the Right Bottles: Bottles with smooth, even surfaces are easier to cut than bottles with textured surfaces or irregular shapes.
* Use Even Pressure: When scoring the bottle, apply even pressure to the glass cutter. Too much pressure can cause the glass to crack, while too little pressure won’t create a deep enough score.
* Be Patient: Don’t rush the process. Take your time and be careful, especially when handling hot glass.
* Experiment with Different Techniques: There are many different ways to separate the bottle. Experiment with different heating and cooling methods to find what works best for you. Some people use a candle to heat the score line, while others use a wire wrapped around the bottle and heated with electricity.
* Safety First: Always wear safety glasses and gloves when working with glass.
* Clean Up Carefully: Dispose of any broken glass shards carefully. Sweep up any small pieces and dispose of them in a sealed container.
Creative Ideas for Your Bottle Glasses
Now that you’ve mastered the art of making bottle glasses, here are a few creative ideas to inspire you:
* Personalized Glasses: Use glass etching cream or paint to add personalized designs to your glasses. You can add names, initials, or even small drawings.
* Themed Glasses: Create themed glasses for different occasions. For example, you could make festive glasses for holidays or sports-themed glasses for game day.
* Candle Holders: Instead of making drinking glasses, you can also use the bottom half of the bottle to create unique candle holders.
* Planters: The bottom half of the bottle can also be used as a small planter for succulents or other small plants.
* Gifts: Handmade bottle glasses make thoughtful and unique gifts for friends and family.
So there you have it! A comprehensive guide to turning those empty bottles into something beautiful and useful. Have fun, be creative, and most importantly, be safe! Happy crafting!
Conclusion
So, there you have it! Transforming ordinary glass bottles into stylish and functional drinking glasses is not only a rewarding DIY project, but also a fantastic way to reduce waste and add a personal touch to your home. We’ve walked you through the process, highlighting the key steps and safety precautions to ensure a smooth and successful crafting experience.
Why is this DIY bottle glasses trick a must-try? Beyond the obvious environmental benefits of upcycling, creating your own glassware allows for unparalleled customization. You’re no longer limited to mass-produced designs. You can choose bottles that resonate with your personal style, whether it’s a sleek wine bottle for a sophisticated water glass or a quirky beer bottle for a casual cocktail tumbler. The possibilities are truly endless.
Furthermore, the satisfaction of sipping your favorite beverage from a glass you crafted yourself is simply unmatched. It’s a conversation starter, a testament to your creativity, and a tangible reminder of your commitment to sustainable living. Plus, think of the unique and thoughtful gifts you can create for friends and family!
But the fun doesn’t stop there! Consider these variations to elevate your DIY bottle glasses even further:
* Etched Designs: Use etching cream and stencils to add intricate patterns or personalized monograms to your glasses. This is a great way to create themed sets for different occasions.
* Painted Bottoms: Dip the bottom of your finished glasses in glass paint for a pop of color. Choose colors that complement your existing tableware or reflect your personal aesthetic.
* Frosted Finish: Achieve a sophisticated frosted look by using a specialized glass frosting spray. This adds a touch of elegance and diffuses the light beautifully.
* Handle Addition: For a more traditional mug-like feel, explore adding handles to your glasses using epoxy and suitable handle materials. This requires a bit more skill but can result in truly unique pieces.
* Candle Holders: Instead of making drinking glasses, shorten the bottles even more and use them as unique candle holders. The glass will protect the flame and create a warm, inviting ambiance.
We wholeheartedly encourage you to give this DIY bottle glasses project a try. It’s a fun, affordable, and environmentally conscious way to express your creativity and add a personal touch to your home. Don’t be intimidated by the process; with a little patience and attention to detail, you’ll be amazed at what you can create.
Once you’ve crafted your own set of DIY bottle glasses, we’d love to hear about your experience! Share your photos and tips in the comments section below. Let’s inspire each other with our creative upcycling endeavors and build a community of passionate DIYers. What bottle types did you use? What designs did you incorporate? What challenges did you face, and how did you overcome them? Your insights will be invaluable to others embarking on this exciting journey. So, grab those bottles, gather your supplies, and get ready to transform trash into treasure! Happy crafting!
Frequently Asked Questions (FAQ)
Is it safe to drink from DIY bottle glasses?
Yes, it is generally safe to drink from DIY bottle glasses, but only if you follow the proper cutting and sanding techniques. The most crucial step is ensuring that the cut edge is completely smooth and free of any sharp edges or imperfections. Sharp edges can not only cause cuts but can also lead to the glass chipping or shattering over time. Use progressively finer grits of sandpaper to achieve a smooth, rounded edge. If you are unsure about the safety of your finished glasses, it’s best to err on the side of caution and use them for decorative purposes only, such as holding flowers or candles. Always prioritize safety when working with glass.
What kind of bottles are best for making DIY glasses?
The best bottles for making DIY bottle glasses are those with smooth, uniform surfaces and minimal imperfections. Wine bottles, beer bottles, and some types of juice bottles are generally good choices. Avoid bottles with heavily textured surfaces or those that are very thin, as they may be more prone to cracking during the cutting process. Also, consider the size and shape of the bottle. Taller bottles will yield taller glasses, while wider bottles will result in wider glasses. Experiment with different bottle types to find what works best for your desired aesthetic. Clear glass is often preferred for its versatility, but colored glass can add a unique and stylish touch.
What tools do I need to cut glass bottles safely?
To safely cut glass bottles for your DIY bottle glasses project, you’ll need a few essential tools:
* Glass Bottle Cutter: This is the primary tool for scoring the glass. Choose a cutter with a carbide cutting wheel for durability and precision.
* Safety Glasses: Protect your eyes from glass shards.
* Gloves: Protect your hands from cuts.
* Sandpaper (various grits): Essential for smoothing the cut edges. Start with a coarse grit (e.g., 120 grit) and gradually move to finer grits (e.g., 220, 400, 600 grit) for a polished finish.
* Water: Used for thermal shock separation and for keeping the sandpaper wet during sanding.
* Heat Source (optional): A candle or lighter can be used to heat the score line for thermal shock separation.
* Container for Ice Water: For the cold shock part of the thermal shock separation.
* Towel or Cloth: To protect your work surface and provide a grip when separating the bottle.
How do I smooth the edges of the glass after cutting?
Smoothing the edges of your DIY bottle glasses is crucial for safety and aesthetics. Start by using a coarse grit sandpaper (around 120 grit) to remove any large shards or imperfections. Wet the sandpaper and the glass to reduce friction and prevent dust. Sand in a circular motion, applying even pressure. Gradually move to finer grits of sandpaper (220, 400, 600 grit, and even higher) to achieve a smooth, rounded edge. The finer the grit, the smoother the finish. You can also use a specialized glass polishing compound for an extra-smooth and professional-looking result. Be patient and take your time, as this step is essential for creating safe and beautiful glassware.
Can I put my DIY bottle glasses in the dishwasher?
While it might be tempting to put your DIY bottle glasses in the dishwasher, it’s generally not recommended, especially if you’ve added any decorative elements like paint or etching. The high heat and harsh detergents in dishwashers can damage the glass and cause the decorative elements to fade or peel. Hand washing is the safest option. Use warm, soapy water and a soft sponge to clean your glasses. Avoid using abrasive cleaners or scouring pads, as they can scratch the surface of the glass. Rinse thoroughly and dry with a soft cloth. With proper care, your DIY bottle glasses will last for years to come.
What if the bottle breaks unevenly during the separation process?
Sometimes, despite your best efforts, the bottle may break unevenly during the thermal shock separation process. Don’t despair! You can still salvage the project. Use a wet tile saw or a diamond grinding wheel to even out the edge. If you don’t have access to these tools, you can use a coarse grit sandpaper to gradually grind down the uneven areas. This will take more time and effort, but it’s still possible to achieve a smooth, even edge. Remember to wear safety glasses and gloves during this process. If the break is too severe, you may need to start with a new bottle, but don’t let a minor setback discourage you from trying again.
Are there any safety precautions I should take when making DIY bottle glasses?
Yes, safety is paramount when working with glass. Here are some essential safety precautions to keep in mind when making DIY bottle glasses:
* Always wear safety glasses to protect your eyes from glass shards.
* Wear gloves to protect your hands from cuts.
* Work in a well-ventilated area, especially if you are using etching cream or spray paint.
* Be careful when handling broken glass. Dispose of any sharp shards properly.
* Take your time and be patient. Rushing the process can increase the risk of accidents.
* If you are using a heat source, be careful not to burn yourself.
* If you are unsure about any step of the process, consult a tutorial or seek guidance from an experienced DIYer.
* Keep children and pets away from your work area.
By following these safety precautions, you can minimize the risk of accidents and enjoy a safe and rewarding crafting experience.
Leave a Comment