

DIY cabbage growing bottles: Ever dreamt of harvesting plump, juicy cabbages right from your own backyard, even if you’re short on space or battling pesky garden critters? I know I have! For centuries, cabbage has been a staple in diets around the world, from the hearty stews of Eastern Europe to the vibrant slaws of Asia. But let’s be honest, growing them can sometimes feel like a battle against slugs, cabbage worms, and unpredictable weather.
That’s where this ingenious DIY trick comes in! Forget sprawling garden beds and endless pesticide applications. We’re diving into the world of upcycling and creating mini-cabbage havens using simple plastic bottles. This method not only protects your precious plants but also helps retain moisture and warmth, giving your cabbages the perfect head start.
Why do you need this? Because everyone deserves the satisfaction of growing their own food, regardless of their gardening experience or available space. Plus, who wouldn’t want to impress their friends and family with homegrown cabbages nurtured in their very own DIY cabbage growing bottles? Let’s get started and transform those empty bottles into thriving cabbage cradles!
DIY Cabbage Growing Bottles: A Space-Saving Garden Hack!
Hey there, fellow gardening enthusiasts! Are you dreaming of fresh, homegrown cabbage but short on garden space? Well, I’ve got a fantastic solution for you: growing cabbage in repurposed plastic bottles! This method is not only eco-friendly but also incredibly efficient, allowing you to maximize your yield even in the smallest of spaces. Let’s dive into this fun and rewarding DIY project!
What You’ll Need:
Before we get started, let’s gather all the necessary materials. Here’s what you’ll need:
* Plastic Bottles: The larger, the better! Think 2-liter soda bottles, juice bottles, or even larger water bottles. Make sure they are clean and free of any residue.
* Cabbage Seeds or Seedlings: Choose your favorite cabbage variety! I personally love growing ‘Golden Acre’ for its compact size and early maturity.
* Potting Mix: A good quality potting mix is crucial for healthy cabbage growth. Look for a mix that’s well-draining and rich in nutrients.
* Drill or Utility Knife: For creating drainage holes and modifying the bottles.
* Scissors: For trimming and shaping the bottles.
* Watering Can or Hose: For watering your cabbage plants.
* Fertilizer (Optional): A balanced fertilizer can help boost growth, especially during the early stages.
* Gloves (Optional): To protect your hands while working with soil.
* Measuring tape or ruler: For accurate cutting and spacing.
Preparing the Bottles:
This is where we transform those ordinary plastic bottles into mini cabbage-growing containers!
1. Clean the Bottles: Thoroughly wash the bottles with soap and water to remove any dirt, debris, or sticky residue. Rinse them well and let them dry completely. This step is important to prevent any contamination that could harm your cabbage plants.
2. Cut the Bottles: Decide how you want to use the bottles. There are a few options:
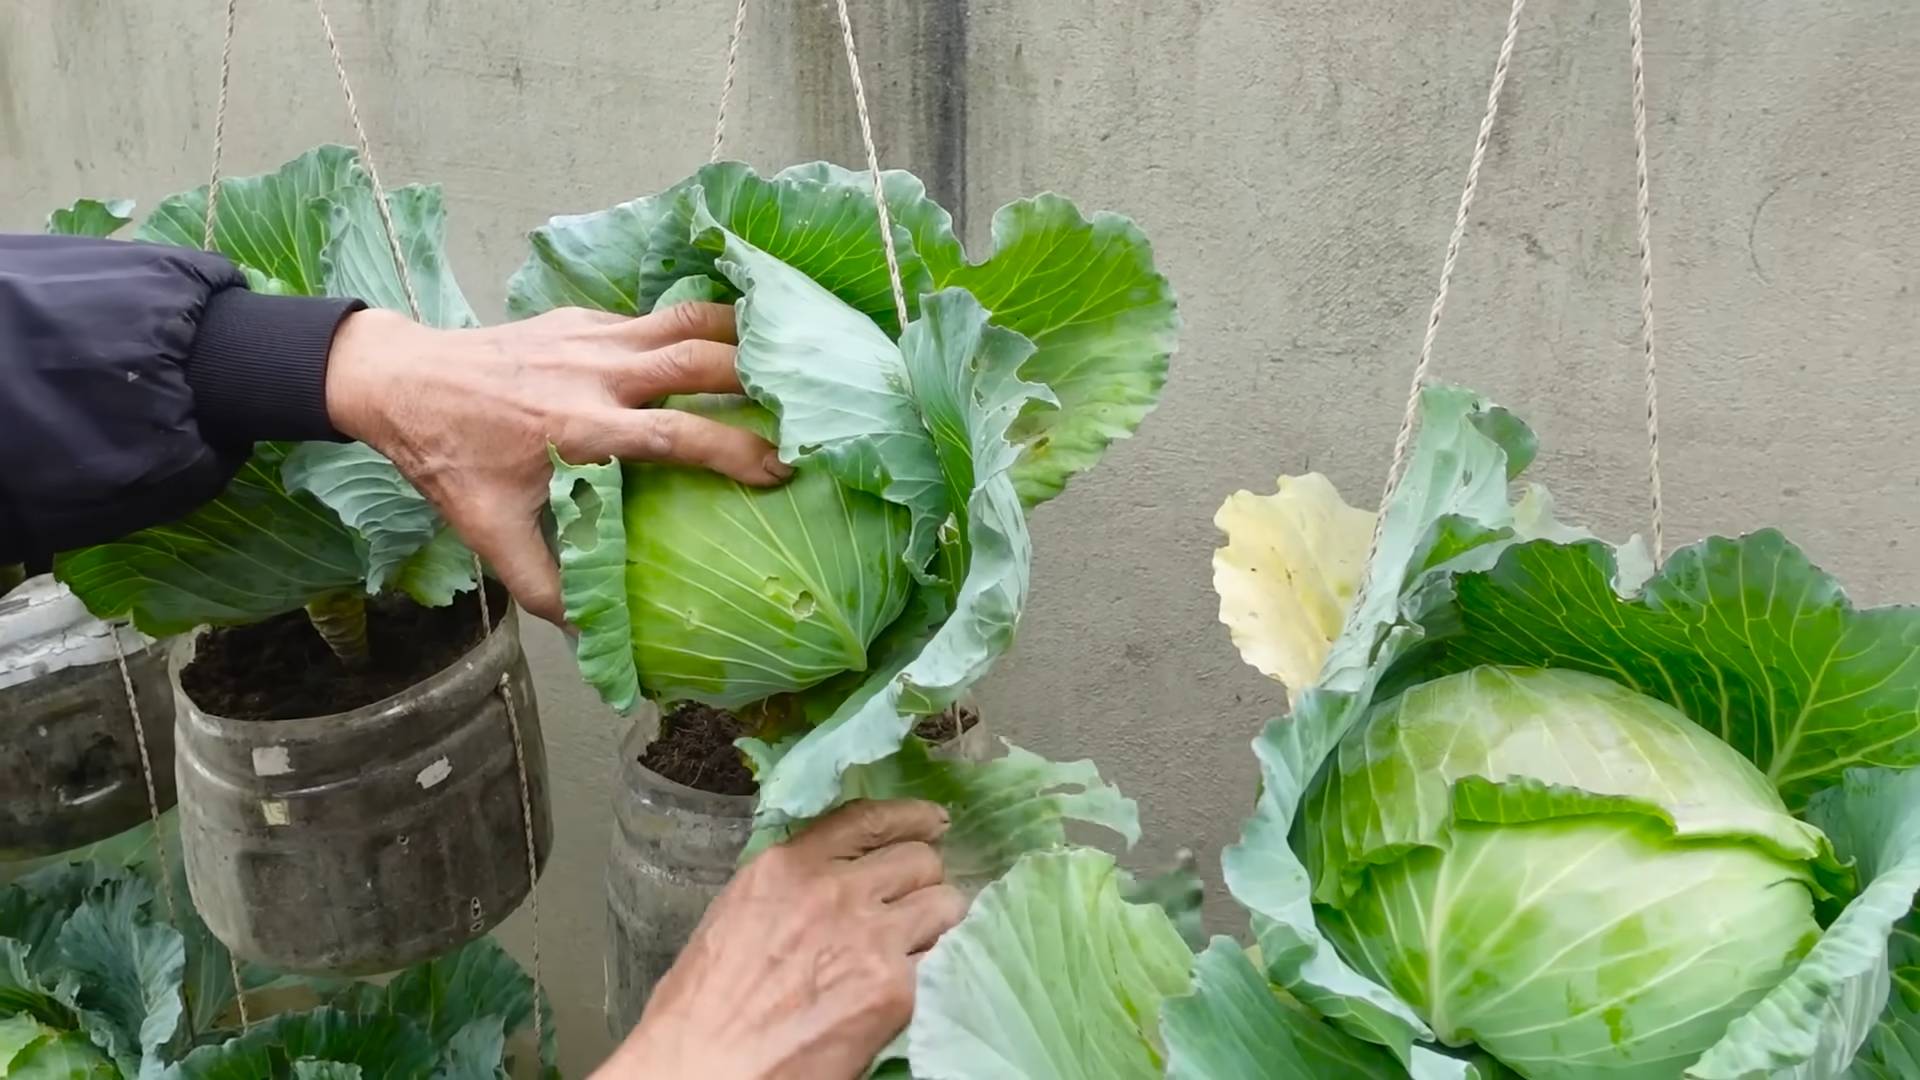
* Option 1: Single Plant Containers: Cut the bottle in half, discarding the top portion (or saving it for another project!). The bottom half will serve as your container.
* Option 2: Stacked Containers: Cut the bottom off of one bottle and the top off of another. The bottle with the bottom cut off will sit inside the bottle with the top cut off, creating a taller container. This is great for deeper-rooted cabbage varieties.
* Option 3: Horizontal Planters: Cut a large rectangular opening along the side of the bottle, leaving the top and bottom intact. This creates a trough-like planter that can be hung or placed on a shelf.
I personally prefer Option 1 for its simplicity and ease of use.
3. Create Drainage Holes: This is absolutely crucial! Cabbage plants need well-draining soil to prevent root rot. Use a drill or utility knife to create several drainage holes in the bottom of each bottle. I usually make about 5-6 holes, each about ¼ inch in diameter.
4. Smooth the Edges: After cutting the bottles, the edges can be sharp. Use scissors or sandpaper to smooth them out to prevent any accidental cuts.
Planting Your Cabbage:
Now for the fun part – planting your cabbage seeds or seedlings!
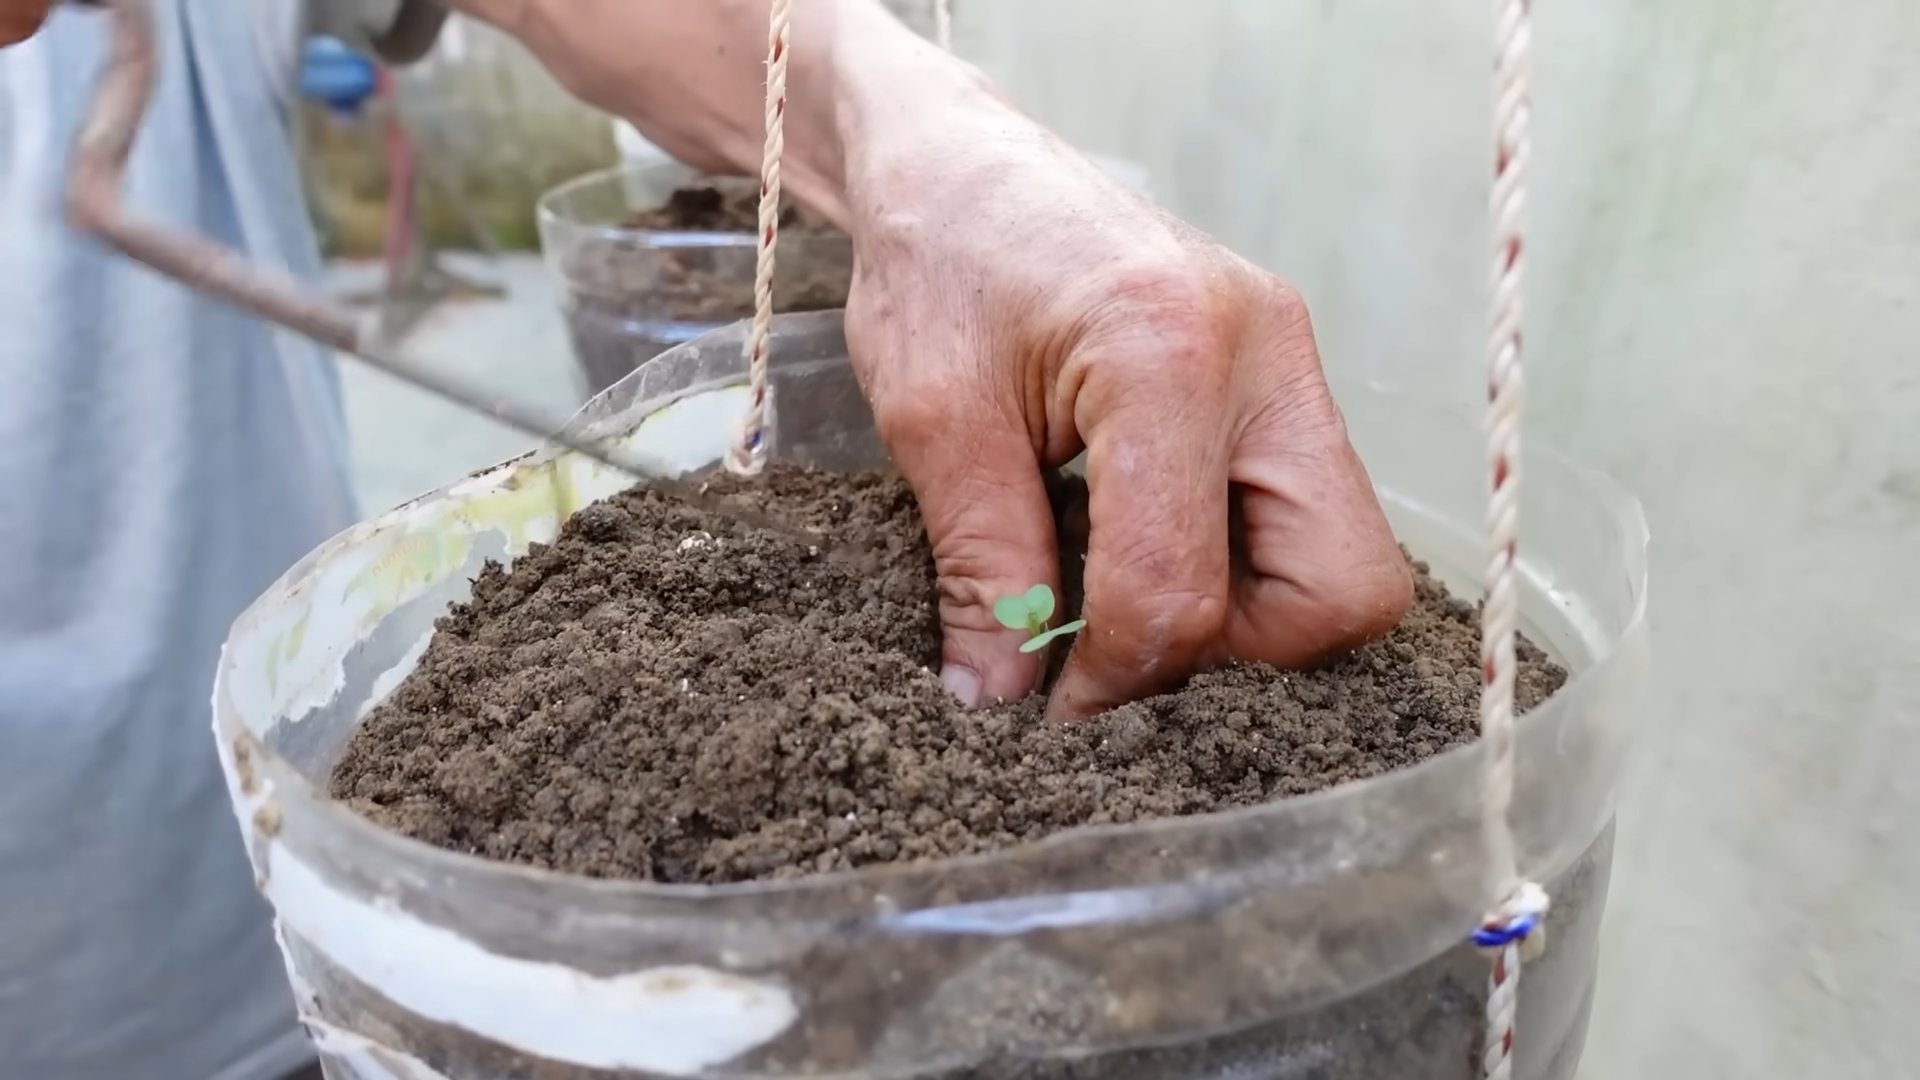
1. Fill the Bottles with Potting Mix: Carefully fill each bottle with your chosen potting mix, leaving about an inch of space at the top. Gently tap the bottle to settle the soil and remove any air pockets.
2. Sow Seeds or Transplant Seedlings:
* For Seeds: Follow the instructions on your seed packet for sowing depth and spacing. Generally, you’ll want to sow the seeds about ¼ inch deep and space them about an inch apart. After sowing, gently water the soil.
* For Seedlings: Dig a small hole in the center of the bottle, large enough to accommodate the root ball of your seedling. Carefully remove the seedling from its original container and gently loosen the roots. Place the seedling in the hole and backfill with potting mix. Gently water the soil.
I usually start my cabbage seeds indoors and then transplant the seedlings into the bottles once they are a few inches tall. This gives them a head start and protects them from pests.
3. Water Thoroughly: After planting, water the soil thoroughly until water drains out of the drainage holes. This helps to settle the soil and ensure that the roots are properly hydrated.
Caring for Your Cabbage Plants:
Consistent care is key to growing healthy and productive cabbage plants.
1. Sunlight: Cabbage plants need at least 6 hours of sunlight per day. Place your bottles in a sunny location, such as a patio, balcony, or windowsill. If you don’t have enough natural sunlight, you can supplement with grow lights.
2. Watering: Water your cabbage plants regularly, especially during hot and dry weather. The soil should be consistently moist but not waterlogged. Check the soil moisture by sticking your finger into the soil. If the top inch feels dry, it’s time to water.
3. Fertilizing: Cabbage plants are heavy feeders and benefit from regular fertilization. Use a balanced fertilizer, such as 10-10-10, every 2-3 weeks. Follow the instructions on the fertilizer package for application rates. You can also use organic fertilizers, such as compost tea or fish emulsion.
4. Pest Control: Cabbage plants are susceptible to various pests, such as cabbage worms, aphids, and flea beetles. Regularly inspect your plants for signs of pests and take action immediately. You can use organic pest control methods, such as insecticidal soap or neem oil. You can also handpick pests off the plants.
5. Weed Control: Keep the soil around your cabbage plants free of weeds. Weeds compete with cabbage plants for nutrients and water. You can hand-pull weeds or use a hoe to cultivate the soil.
6. Support (Optional): As your cabbage heads grow larger, they may become heavy and cause the plants to topple over. You can provide support by staking the plants or using a tomato cage.
Harvesting Your Cabbage:
The moment we’ve all been waiting for – harvesting your homegrown cabbage!
1. Check for Maturity: Cabbage is typically ready to harvest when the heads are firm and compact. The size of the head will vary depending on the variety.
2. Harvesting: Use a sharp knife to cut the cabbage head from the stem. Leave a few outer leaves on the stem to protect the remaining plant.
3. Storage: Store your harvested cabbage in the refrigerator for up to 2 weeks.
Tips and Tricks for Success:
Here are a few extra tips to help you grow the best cabbage possible in your repurposed bottles:
* Choose the Right Variety: Select cabbage varieties that are well-suited for container gardening. Compact varieties, such as ‘Golden Acre’ and ‘Dwarf Blue Vates’, are ideal.
* Use High-Quality Potting Mix: Don’t skimp on the potting mix! A good quality potting mix will provide your cabbage plants with the nutrients they need to thrive.
* Provide Adequate Drainage: Drainage is essential for preventing root rot. Make sure your bottles have plenty of drainage holes.
* Water Regularly: Cabbage plants need consistent moisture. Water them regularly, especially during hot and dry weather.
* Fertilize Regularly: Cabbage plants are heavy feeders and benefit from regular fertilization.
* Protect from Pests: Regularly inspect your plants for pests and take action immediately.
* Rotate Your Crops: Avoid planting cabbage in the same bottles year after year. Crop rotation helps to prevent soilborne diseases and pests.
* Consider Companion Planting: Plant companion plants, such as marigolds and nasturtiums, around your cabbage plants to deter pests.
* Experiment! Don’t be afraid to experiment with different cabbage varieties, potting mixes, and fertilizers to find what works best for you.
Troubleshooting:
Even with the best care, you may encounter some problems while growing cabbage in bottles. Here are some common issues and how to address them:
* Yellowing Leaves: Yellowing leaves can be a sign of nutrient deficiency, overwatering, or underwatering. Check the soil moisture and fertilize if necessary.
* Stunted Growth: Stunted growth can be caused by poor soil, lack of sunlight, or pest infestation. Make sure your plants are getting enough sunlight and nutrients, and control any pests.
* Root Rot: Root rot is caused by overwatering and poor drainage. Make sure your bottles have adequate drainage and avoid overwatering.
* Pest Infestation: Regularly inspect your plants for pests and take action immediately.
Why This Method Rocks!
Growing cabbage in bottles is a fantastic way to enjoy fresh, homegrown produce even if you have limited space. It’s also a great way
Conclusion
So, there you have it! Transforming ordinary plastic bottles into miniature cabbage-growing powerhouses is not just a quirky gardening experiment; it’s a practical, sustainable, and incredibly rewarding way to cultivate fresh, delicious cabbage right at your doorstep. We’ve walked you through the simple steps, highlighting the benefits of this ingenious method, from space-saving efficiency to enhanced pest control.
Why is this DIY cabbage growing bottles trick a must-try? Because it empowers you to take control of your food source, even with limited space or resources. Imagine the satisfaction of harvesting crisp, vibrant cabbage heads that you nurtured from seedling to maturity, all within the confines of recycled plastic bottles. It’s a testament to the power of resourcefulness and a step towards a greener, more self-sufficient lifestyle.
But the beauty of this method lies not only in its practicality but also in its adaptability. Feel free to experiment with different varieties of cabbage, from the classic green to the vibrant red or the delicate savoy. Consider adding companion plants like marigolds or nasturtiums to your bottle gardens to further deter pests and attract beneficial insects. You can even explore different soil mixtures to optimize growth for your specific climate and cabbage variety.
Don’t be afraid to get creative! Try painting your bottles with bright colors to add a touch of whimsy to your garden, or use different sizes of bottles to accommodate varying cabbage sizes. You could even create a vertical garden by hanging your bottle planters from a fence or balcony, maximizing your space and creating a stunning visual display.
We wholeheartedly encourage you to embark on this DIY cabbage growing adventure. It’s a fun, educational, and ultimately delicious way to connect with nature and enjoy the fruits (or rather, vegetables) of your labor.
Once you’ve tried this method, we’d love to hear about your experience! Share your photos, tips, and challenges in the comments section below. Let’s build a community of bottle-gardening enthusiasts and inspire others to embrace this sustainable and rewarding practice. Your insights could be invaluable to fellow gardeners, helping them overcome obstacles and achieve their own cabbage-growing success.
Remember, gardening is a journey of learning and discovery. Embrace the process, experiment with different techniques, and most importantly, have fun! With a little creativity and dedication, you’ll be amazed at what you can achieve with a few recycled plastic bottles and a handful of cabbage seeds. So, grab your bottles, gather your supplies, and get ready to grow some delicious, homegrown cabbage!
Frequently Asked Questions (FAQ)
1. What type of plastic bottles are best for growing cabbage?
Ideally, you should use food-grade plastic bottles, such as those that previously contained water, juice, or soda. Avoid using bottles that held harsh chemicals or cleaning products, as these may contaminate the soil and affect the cabbage’s growth. PET (polyethylene terephthalate) bottles are a common and generally safe choice. Ensure the bottles are clean and free of any residue before using them. The size of the bottle will depend on the variety of cabbage you are growing; larger varieties will need larger bottles.
2. How do I prepare the plastic bottles for planting?
First, thoroughly clean the bottles with soap and water to remove any lingering residue. Then, cut the bottle according to the instructions provided in the main article (usually cutting off the top portion and inverting it to create a self-watering system). Be sure to create drainage holes in the bottom of the bottle to prevent waterlogging, which can lead to root rot. You can use a drill, a nail, or even a heated screwdriver to create these holes.
3. What type of soil should I use for growing cabbage in bottles?
A well-draining potting mix is essential for growing healthy cabbage in bottles. You can use a commercially available potting mix or create your own by combining equal parts of garden soil, compost, and perlite or vermiculite. The compost will provide essential nutrients, while the perlite or vermiculite will improve drainage and aeration. Avoid using heavy clay soil, as it can become compacted and restrict root growth.
4. How often should I water my cabbage plants in bottles?
The frequency of watering will depend on the climate, the size of the bottle, and the type of soil you are using. Generally, you should water your cabbage plants when the top inch of soil feels dry to the touch. Avoid overwatering, as this can lead to root rot. The self-watering system created by inverting the top of the bottle will help regulate moisture levels, but it’s still important to monitor the soil regularly.
5. How much sunlight do cabbage plants need?
Cabbage plants need at least 6 hours of direct sunlight per day to thrive. Choose a location that receives plenty of sunlight, especially during the morning hours. If you live in a hot climate, you may need to provide some afternoon shade to prevent the plants from overheating.
6. How do I fertilize my cabbage plants in bottles?
Cabbage plants are heavy feeders and require regular fertilization to produce healthy heads. You can use a balanced liquid fertilizer, such as a 10-10-10 or 20-20-20 formula, diluted according to the manufacturer’s instructions. Fertilize your plants every 2-3 weeks, starting a few weeks after transplanting. You can also amend the soil with compost or other organic matter to provide a slow-release source of nutrients.
7. How do I protect my cabbage plants from pests and diseases?
Cabbage plants are susceptible to a variety of pests and diseases, including cabbage worms, aphids, and clubroot. To prevent pest infestations, you can cover your plants with netting or row covers. You can also use organic pest control methods, such as insecticidal soap or neem oil. To prevent diseases, ensure good air circulation and avoid overwatering. If you notice any signs of disease, remove the affected leaves immediately.
8. When is the best time to harvest my cabbage?
Cabbage is typically ready to harvest when the head is firm and compact. The exact time will depend on the variety of cabbage you are growing and the climate. Check the seed packet or plant tag for specific harvesting instructions. To harvest, simply cut the head from the stem with a sharp knife.
9. Can I grow other vegetables in plastic bottles using this method?
Yes, this method can be adapted to grow a variety of other vegetables, such as lettuce, spinach, herbs, and even smaller varieties of tomatoes or peppers. The key is to choose plants that are well-suited to container gardening and to provide them with the appropriate soil, water, and sunlight.
10. What are the benefits of growing cabbage in plastic bottles?
Growing cabbage in plastic bottles offers several benefits, including:
* Space-saving: Ideal for small gardens, balconies, or patios.
* Cost-effective: Utilizes recycled materials, reducing waste and saving money.
* Pest control: Easier to monitor and protect plants from pests.
* Portability: Allows you to move plants to optimal locations for sunlight and temperature.
* Sustainability: Promotes recycling and reduces reliance on commercially grown produce.

Leave a Comment