

DIY canvas art home decor – ever feel like your walls are staring back at you, begging for a splash of personality? I know I have! Forget those generic, mass-produced prints; let’s dive into the wonderful world of creating your own stunning wall art. For centuries, humans have adorned their living spaces with handmade creations, from ancient cave paintings to intricate tapestries. This innate desire to personalize our surroundings is still alive and well today.
But why spend a fortune on expensive artwork when you can unleash your inner artist and craft something truly unique? This article is packed with easy-to-follow DIY canvas art home decor tricks and hacks that will transform your blank canvases into masterpieces. Whether you’re a seasoned crafter or a complete beginner, I’ll show you how to create eye-catching pieces that reflect your individual style and add a touch of warmth and character to your home.
Imagine the satisfaction of telling your guests, “Oh, that? I made it myself!” Not only will you save money, but you’ll also gain a sense of accomplishment and have a one-of-a-kind piece that no one else has. So, grab your brushes, gather your supplies, and let’s get creative! I promise, you’ll be amazed at what you can achieve with a little bit of inspiration and these simple DIY canvas art home decor techniques.
DIY Canvas Art: Unleash Your Inner Artist and Decorate Your Home!
Hey there, fellow DIY enthusiasts! Are you looking to add a personal touch to your home decor without breaking the bank? Well, you’ve come to the right place! I’m going to walk you through some super fun and easy DIY canvas art ideas that will transform your blank walls into stunning masterpieces. Trust me, you don’t need to be Picasso to pull these off. Let’s get started!
Gathering Your Supplies
Before we dive into the creative process, let’s make sure we have everything we need. This will save you from running to the store mid-project (we’ve all been there!).
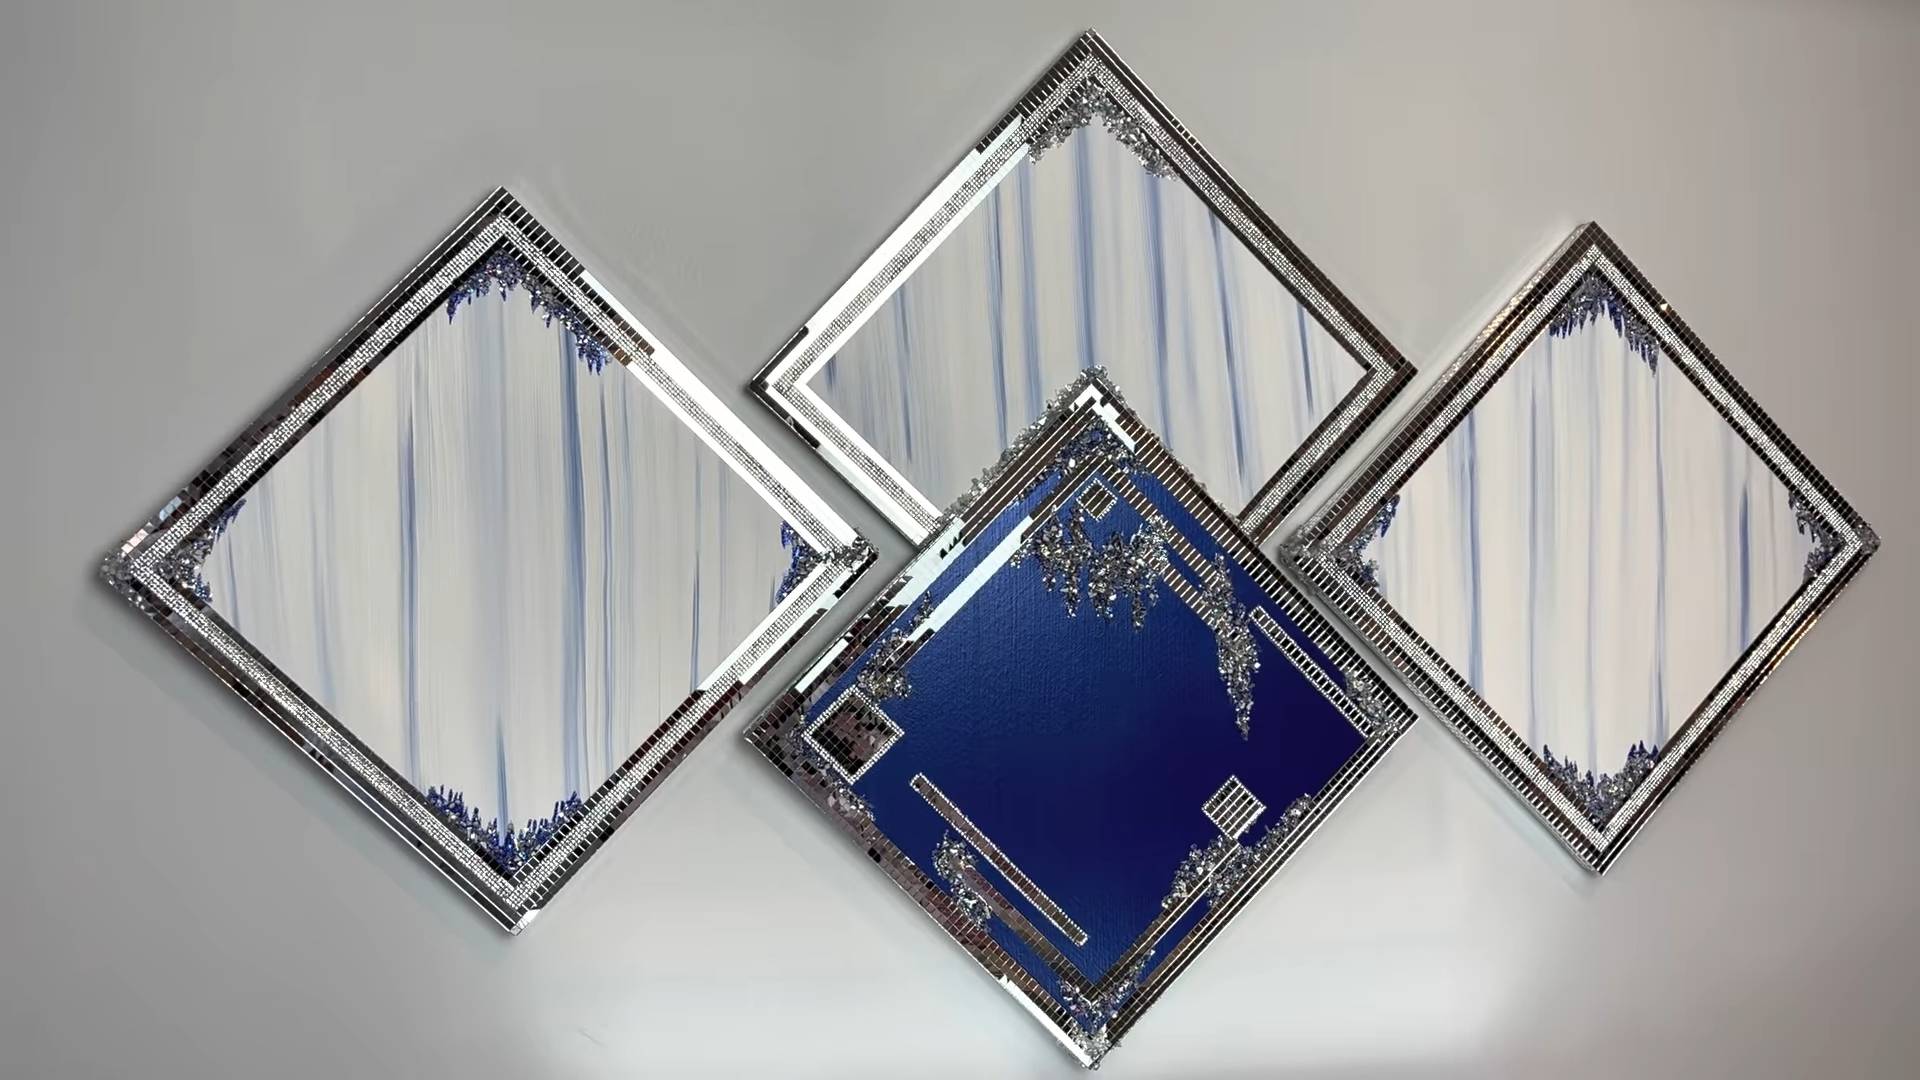
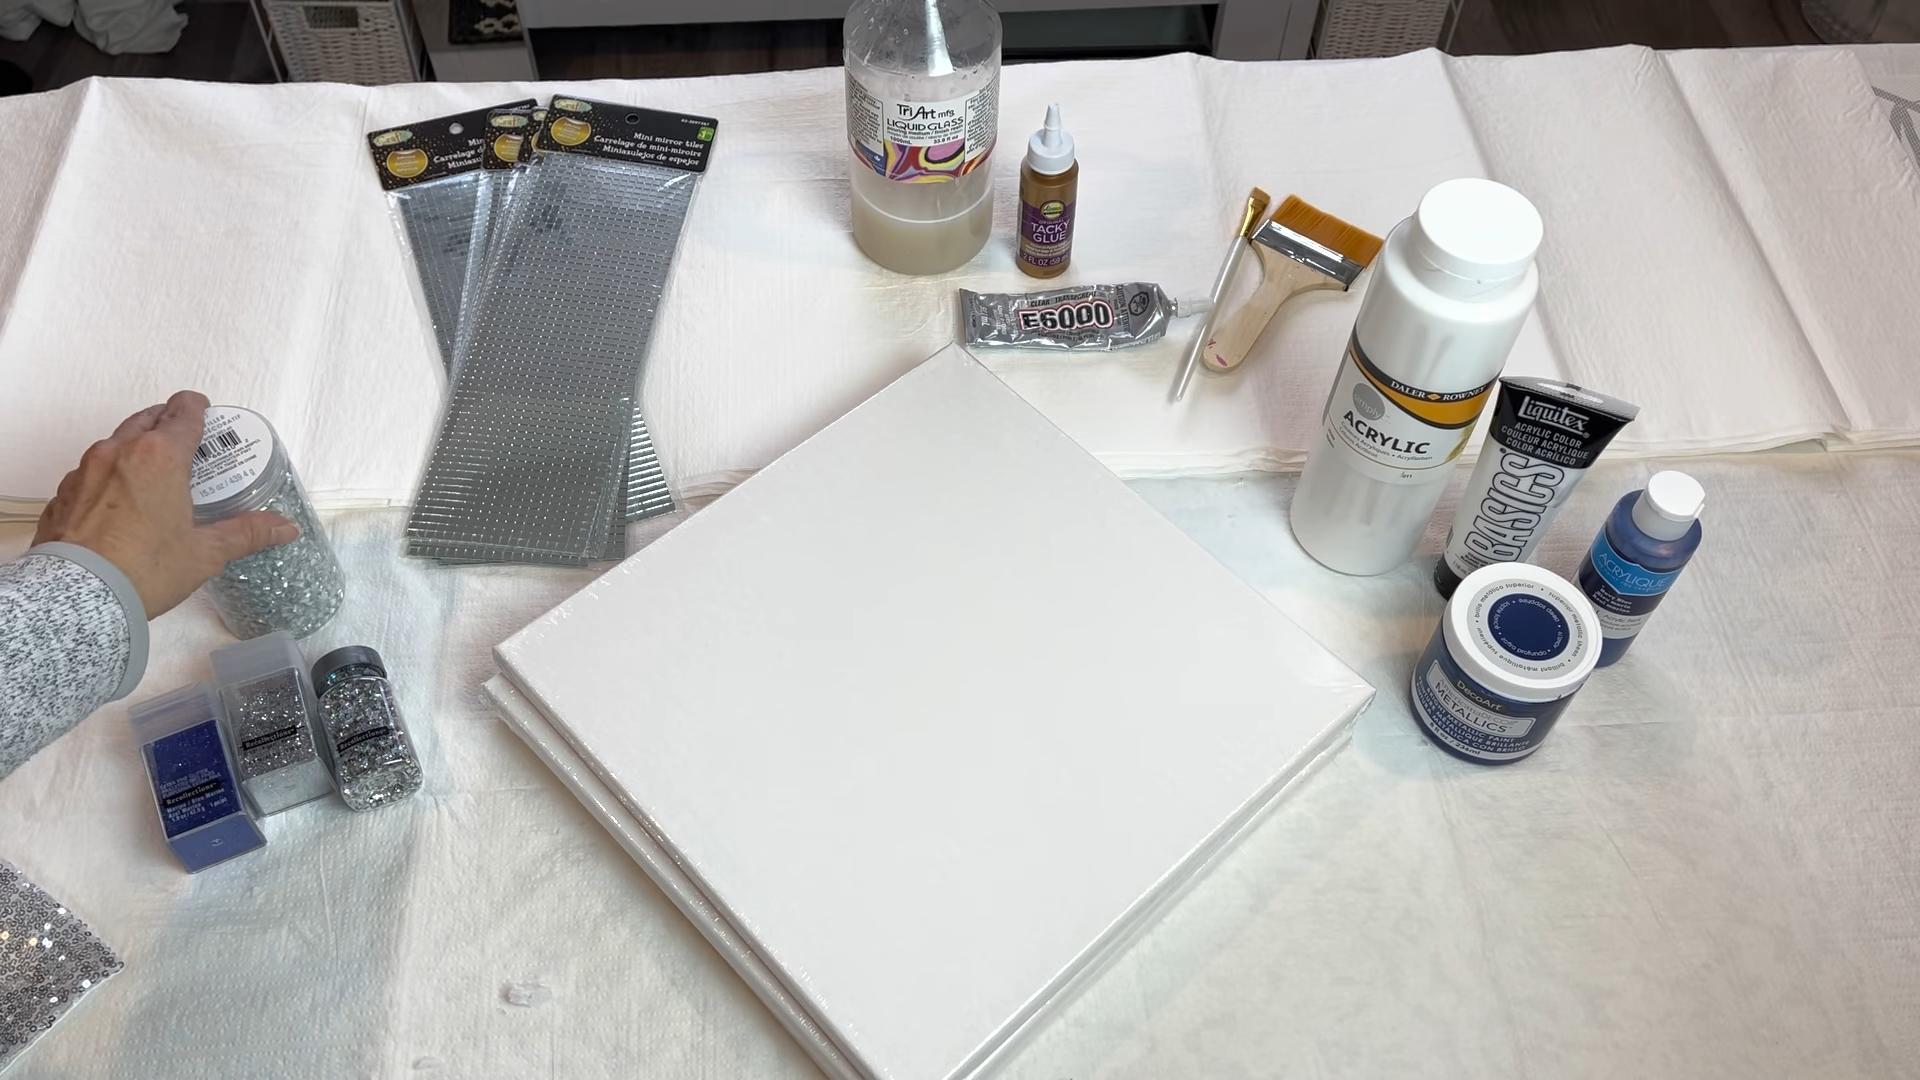
* **Blank Canvases:** Choose the size and shape that best suits your space. I personally love using a mix of sizes to create a gallery wall. You can find these at any craft store or even online.
* **Acrylic Paints:** Acrylics are your best friend for canvas art. They’re versatile, dry quickly, and come in a rainbow of colors. Invest in a basic set and then add individual colors as needed.
* **Paintbrushes:** A variety of brush sizes is essential. You’ll need large brushes for covering large areas, medium brushes for details, and small, fine-tipped brushes for intricate work.
* **Palette:** A palette is where you’ll mix your paints. You can use a traditional palette, a paper plate, or even a piece of cardboard.
* **Water Container:** Keep a container of water handy for rinsing your brushes.
* **Paper Towels or Rags:** For wiping up spills and cleaning your brushes.
* **Painter’s Tape:** This is crucial for creating clean lines and geometric designs.
* **Optional Supplies:** Depending on the technique you choose, you might also need:
* Gold leaf or metallic paint
* Stencils
* Sponges
* Texture paste or modeling paste
* Glitter (because why not?)
* Mod Podge or other sealant
Technique 1: Abstract Acrylic Pouring
Acrylic pouring is a super trendy and mesmerizing technique that’s perfect for creating unique and eye-catching art. The best part? It’s almost impossible to mess up!
What you’ll need:
* Blank canvas
* Acrylic paints
* Pouring medium (this thins the paint and helps it flow)
* Silicone oil (optional, for creating cells)
* Cups or containers for mixing paint
* Stir sticks
* Drop cloth or newspaper to protect your work surface
* Gloves (optional, but recommended)
Step-by-Step Instructions:
1. Prepare your workspace: Cover your work surface with a drop cloth or newspaper. This can get messy!
2. Mix your paints: In separate cups, mix your acrylic paints with the pouring medium according to the instructions on the pouring medium bottle. A good ratio is usually 1 part paint to 2 parts pouring medium. Stir well until the mixture is smooth and consistent.
3. Add silicone oil (optional): If you want to create cells in your pour, add a few drops of silicone oil to each cup of paint and stir gently. Be careful not to over-stir, as this can prevent the cells from forming.
4. Choose your pouring method: There are several different pouring methods you can try:
* Dirty Pour: Pour all of your different colored paints into one cup without stirring. Then, flip the cup onto the canvas and let the paint flow out.
* Puddle Pour: Pour small puddles of each color onto the canvas, overlapping them slightly.
* Flip Cup: Pour each color into a separate cup. Flip each cup onto the canvas and let the paint flow out.
* Swipe: Pour lines of paint onto the canvas and then use a palette knife or piece of cardboard to swipe across the paint, creating interesting patterns.
5. Pour your paint: Carefully pour your paint onto the canvas using your chosen method.
6. Tilt the canvas: Gently tilt the canvas in different directions to spread the paint and create your desired design.
7. Pop any bubbles: Use a heat gun or a lighter to pop any bubbles that may have formed in the paint.
8. Let it dry: Allow the painting to dry completely for at least 24-48 hours. The drying time will depend on the thickness of the paint.
9. Seal (optional): Once the painting is dry, you can seal it with a coat of varnish or resin to protect it and give it a glossy finish.
Technique 2: Geometric Tape Art
This technique is perfect for creating modern and minimalist art with clean lines and bold colors. It’s also a great way to experiment with different color combinations.
What you’ll need:
* Blank canvas
* Acrylic paints
* Painter’s tape
* Paintbrushes
Step-by-Step Instructions:
1. Plan your design: Before you start taping, take some time to plan out your design. You can create simple geometric shapes, intricate patterns, or even abstract designs.
2. Tape off your design: Use painter’s tape to create the lines and shapes of your design. Make sure the tape is firmly adhered to the canvas to prevent paint from bleeding underneath.
3. Paint your design: Use acrylic paints to fill in the areas between the tape lines. You can use one color or multiple colors, depending on your design.
4. Let the paint dry: Allow the paint to dry completely before removing the tape.
5. Remove the tape: Carefully peel off the painter’s tape to reveal your finished design.
6. Touch up (optional): If there are any areas where the paint has bled under the tape, you can touch them up with a small brush.
Technique 3: Textured Canvas Art
Adding texture to your canvas art can create a whole new dimension and make your piece truly unique. There are many different ways to add texture, from using texture paste to incorporating found objects.
What you’ll need:
* Blank canvas
* Acrylic paints
* Texture paste or modeling paste
* Palette knife or other spreading tool
* Optional: Found objects (e.g., sand, shells, fabric scraps, buttons)
Step-by-Step Instructions:
1. Apply texture paste: Use a palette knife or other spreading tool to apply texture paste to the canvas. You can create smooth, even layers or build up thick, textured areas.
2. Create texture: While the texture paste is still wet, you can create different textures by using various tools or techniques. For example, you can use a comb to create lines, a sponge to create a stippled effect, or your fingers to create organic shapes.
3. Incorporate found objects (optional): If you want to add found objects to your texture, press them into the wet texture paste.
4. Let the texture paste dry: Allow the texture paste to dry completely before painting. This may take several hours or even overnight, depending on the thickness of the paste.
5. Paint your design: Once the texture paste is dry, you can paint your design using acrylic paints. You can use one color or multiple colors, and you can paint the entire canvas or just highlight certain areas.
6. Dry brush technique (optional): To enhance the texture, try using a dry brush technique. Dip a dry brush into a small amount of paint and then wipe off most of the paint onto a paper towel. Then, lightly brush the canvas, allowing the paint to catch on the raised areas of the texture.
Technique 4: Stencil Art
Stencils are a fantastic way to create precise and detailed designs on your canvas. You can buy pre-made stencils or even create your own using cardboard or acetate.
What you’ll need:
* Blank canvas
* Acrylic paints
* Stencils
* Stencil brush or sponge
* Painter’s tape
Step-by-Step Instructions:
1. Secure the stencil: Position the stencil on the canvas and secure it with painter’s tape.
2. Apply the paint: Use a stencil brush or sponge to apply the paint to the canvas through the stencil. Use a light, dabbing motion to prevent the paint from bleeding under the stencil.
3. Remove the stencil: Carefully remove the stencil while the paint is still wet.
4. Repeat (optional): Repeat the process with different stencils or colors to create a more complex design.
5. Let the paint dry: Allow the paint to dry completely.
6. Touch up (optional): If there are any areas where the paint has bled under the stencil, you can touch them up with a small brush.
Technique 5: Gold Leaf Accents
Adding gold leaf to your
Conclusion
So, there you have it! Transforming your living space with personalized art doesn’t require a hefty budget or advanced artistic skills. This DIY canvas art home decor trick is a game-changer for anyone looking to inject personality and style into their home without breaking the bank. It’s more than just a craft project; it’s an opportunity to express your creativity, curate a space that truly reflects you, and enjoy the satisfaction of creating something beautiful with your own two hands.
Why is this a must-try? Because it’s incredibly versatile, budget-friendly, and allows for complete customization. Forget generic store-bought prints that lack character. With this method, you can create artwork that perfectly complements your existing decor, reflects your personal taste, and even holds sentimental value. Imagine showcasing a stunning abstract piece inspired by your favorite vacation, a minimalist design that adds a touch of sophistication to your living room, or a vibrant pop art creation that injects energy into your workspace. The possibilities are truly endless.
Looking for variations? Consider using different textures to add depth and interest to your canvas. Experiment with fabric scraps, textured paint, or even natural elements like dried flowers or leaves. For a more polished look, try using stencils to create intricate patterns or geometric designs. You can also explore different painting techniques, such as dry brushing, sponge painting, or pouring, to achieve unique and eye-catching effects. Don’t be afraid to mix and match mediums – combine acrylics with watercolors, inks, or even pastels for a truly one-of-a-kind piece.
Another fantastic variation is to create a gallery wall using multiple canvases of different sizes and shapes. This allows you to tell a story, showcase a collection of related images, or simply create a visually dynamic focal point in your room. You can even incorporate photographs into your DIY canvas art, either by transferring them directly onto the canvas or by creating a collage effect.
But the real beauty of this DIY project lies in its simplicity. Even if you’re a complete beginner, you can achieve stunning results with just a few basic supplies and a little bit of imagination. The key is to have fun, experiment, and not be afraid to make mistakes. After all, art is subjective, and the most important thing is that you create something that you love.
We wholeheartedly encourage you to give this DIY canvas art home decor trick a try. It’s a rewarding and fulfilling experience that will transform your living space and unleash your inner artist. And once you’ve created your masterpiece, we’d love to see it! Share your creations with us on social media using [Your Hashtag] and let us know what you think. We can’t wait to see what you come up with! Let your creativity flow and transform your house into a home, one canvas at a time.
FAQ
What kind of canvas should I use?
The type of canvas you use depends on your budget and the style of art you want to create. Stretched canvases are the most common and readily available option. They come in a variety of sizes and thicknesses, and are generally pre-primed, which means they’re ready to paint on. For beginners, a medium-weight canvas is a good choice. If you’re planning on using heavy paints or mixed media, you might want to opt for a heavier-weight canvas. Canvas panels are a more affordable option, but they’re not as sturdy as stretched canvases. They’re a good choice for smaller projects or for practicing techniques. You can also buy canvas rolls and stretch your own canvases, which is a more economical option if you’re planning on creating a lot of art.
What kind of paint should I use?
Acrylic paint is the most versatile and beginner-friendly option for DIY canvas art. It’s water-based, dries quickly, and is available in a wide range of colors and finishes. Acrylics are also relatively inexpensive and easy to clean up. Oil paints are another option, but they require more specialized techniques and materials. They also take longer to dry and require the use of solvents for cleaning. Watercolors are a good choice for creating delicate and translucent effects, but they’re not as durable as acrylics or oils. You can also experiment with other types of paint, such as spray paint, fabric paint, or even house paint, depending on the effect you’re trying to achieve.
How do I prepare the canvas before painting?
Most stretched canvases come pre-primed, which means they’re ready to paint on. However, if you’re using a canvas panel or a canvas that hasn’t been primed, you’ll need to apply a layer of gesso before painting. Gesso is a white primer that creates a smooth, even surface for the paint to adhere to. It also helps to prevent the paint from soaking into the canvas and damaging the fibers. Apply one or two coats of gesso to the canvas, allowing each coat to dry completely before applying the next. You can also lightly sand the gessoed surface for an even smoother finish.
How do I transfer an image onto the canvas?
There are several ways to transfer an image onto the canvas. One method is to use graphite transfer paper. Simply place the transfer paper between the image and the canvas, and then trace the outline of the image with a pencil. The graphite will transfer the image onto the canvas. Another method is to use a projector. Project the image onto the canvas and then trace the outline with a pencil. You can also use a grid method, which involves drawing a grid on both the image and the canvas, and then transferring the image square by square. For photographs, you can try image transfer mediums available at craft stores.
How do I protect my finished artwork?
Once your artwork is finished and completely dry, you can protect it with a layer of varnish. Varnish will protect the paint from dust, dirt, and UV damage, and will also enhance the colors and sheen of the paint. There are different types of varnish available, including gloss, satin, and matte. Choose the varnish that best suits your personal preference and the style of your artwork. Apply the varnish in thin, even coats, allowing each coat to dry completely before applying the next.
What if I make a mistake?
Don’t worry, mistakes happen! If you make a mistake while painting, you can simply paint over it with another layer of paint. Acrylic paint dries quickly, so you can usually correct mistakes within a few minutes. If you’re using oil paint, you’ll need to wait longer for the paint to dry before painting over it. You can also use a wet cloth or cotton swab to wipe away mistakes while the paint is still wet.
How do I hang my finished artwork?
There are several ways to hang your finished artwork. You can use picture hooks, which are designed to hold the weight of the canvas. You can also use D-rings and wire, which are attached to the back of the canvas and then hung on a nail or hook. For larger canvases, you might want to use a French cleat, which is a two-part hanging system that provides extra support. Make sure to use the appropriate hardware for the weight of your canvas and the type of wall you’re hanging it on.
Can I use this technique to create gifts?
Absolutely! DIY canvas art makes a thoughtful and personalized gift for any occasion. You can create artwork that reflects the recipient’s interests, hobbies, or personality. You can also create artwork that commemorates a special event, such as a wedding, birthday, or graduation. Handmade gifts are always appreciated, and DIY canvas art is a great way to show someone that you care.
Where can I find inspiration for my DIY canvas art?
Inspiration is everywhere! Look around you, browse magazines and books, visit art galleries and museums, and explore online resources like Pinterest and Instagram. Pay attention to the colors, patterns, and textures that you find appealing. Don’t be afraid to experiment and try new things. The most important thing is to have fun and let your creativity flow.
Leave a Comment