

DIY Cardboard Table Fan: Beat the heat this summer without breaking the bank! Are you tired of sweltering in the summer heat, but dread the thought of a hefty electricity bill from running your AC all day? I totally get it! That’s why I’m so excited to share this incredibly simple and effective DIY project with you: building your very own cardboard table fan.
While electric fans are a relatively modern invention, the desire to create a cooling breeze has been around for centuries. From ancient Egyptians using palm leaves as hand fans to the elaborate mechanical fans of the Victorian era, people have always sought relief from the heat. This project taps into that same ingenuity, using readily available materials to create a practical and eco-friendly solution.
This DIY Cardboard Table Fan isn’t just a fun craft project; it’s a game-changer for anyone looking to save money, reduce their environmental impact, or simply enjoy a refreshing breeze without relying on expensive appliances. Plus, it’s a fantastic way to repurpose those cardboard boxes that seem to multiply in our homes! So, let’s dive in and discover how you can create your own personal oasis with just a few simple steps. You’ll be amazed at how effective and easy it is to build your own cooling companion.
DIY Cardboard Table Fan: Stay Cool on a Budget!
Hey everyone! Feeling the heat but don’t want to break the bank on a fancy fan? I’ve got you covered! This DIY cardboard table fan is a super fun and surprisingly effective way to cool down. It’s a great project for a hot afternoon, and you probably already have most of the materials lying around. Let’s get started!
Materials You’ll Need:
* Cardboard: The sturdier, the better! Think old boxes from deliveries. A large piece is ideal, but you can piece smaller ones together.
* Small DC Motor: You can find these online or salvage them from old toys. A 3-6V motor works great.
* 9V Battery: To power the motor.
* 9V Battery Connector: This makes connecting the battery to the motor super easy.
* Switch (Optional but Recommended): A small on/off switch will save you from constantly plugging and unplugging the battery.
* Hot Glue Gun and Glue Sticks: For assembling everything.
* Craft Knife or Scissors: For cutting the cardboard.
* Ruler or Measuring Tape: For accurate measurements.
* Pencil or Marker: For marking the cardboard.
* Wire Strippers (If using a switch): To strip the ends of the wires for connecting to the switch.
* Safety Glasses: Always protect your eyes when cutting cardboard!
Tools You’ll Need:
* Hot Glue Gun
* Craft Knife or Scissors
* Ruler or Measuring Tape
* Pencil or Marker
* Wire Strippers (If using a switch)
* Safety Glasses
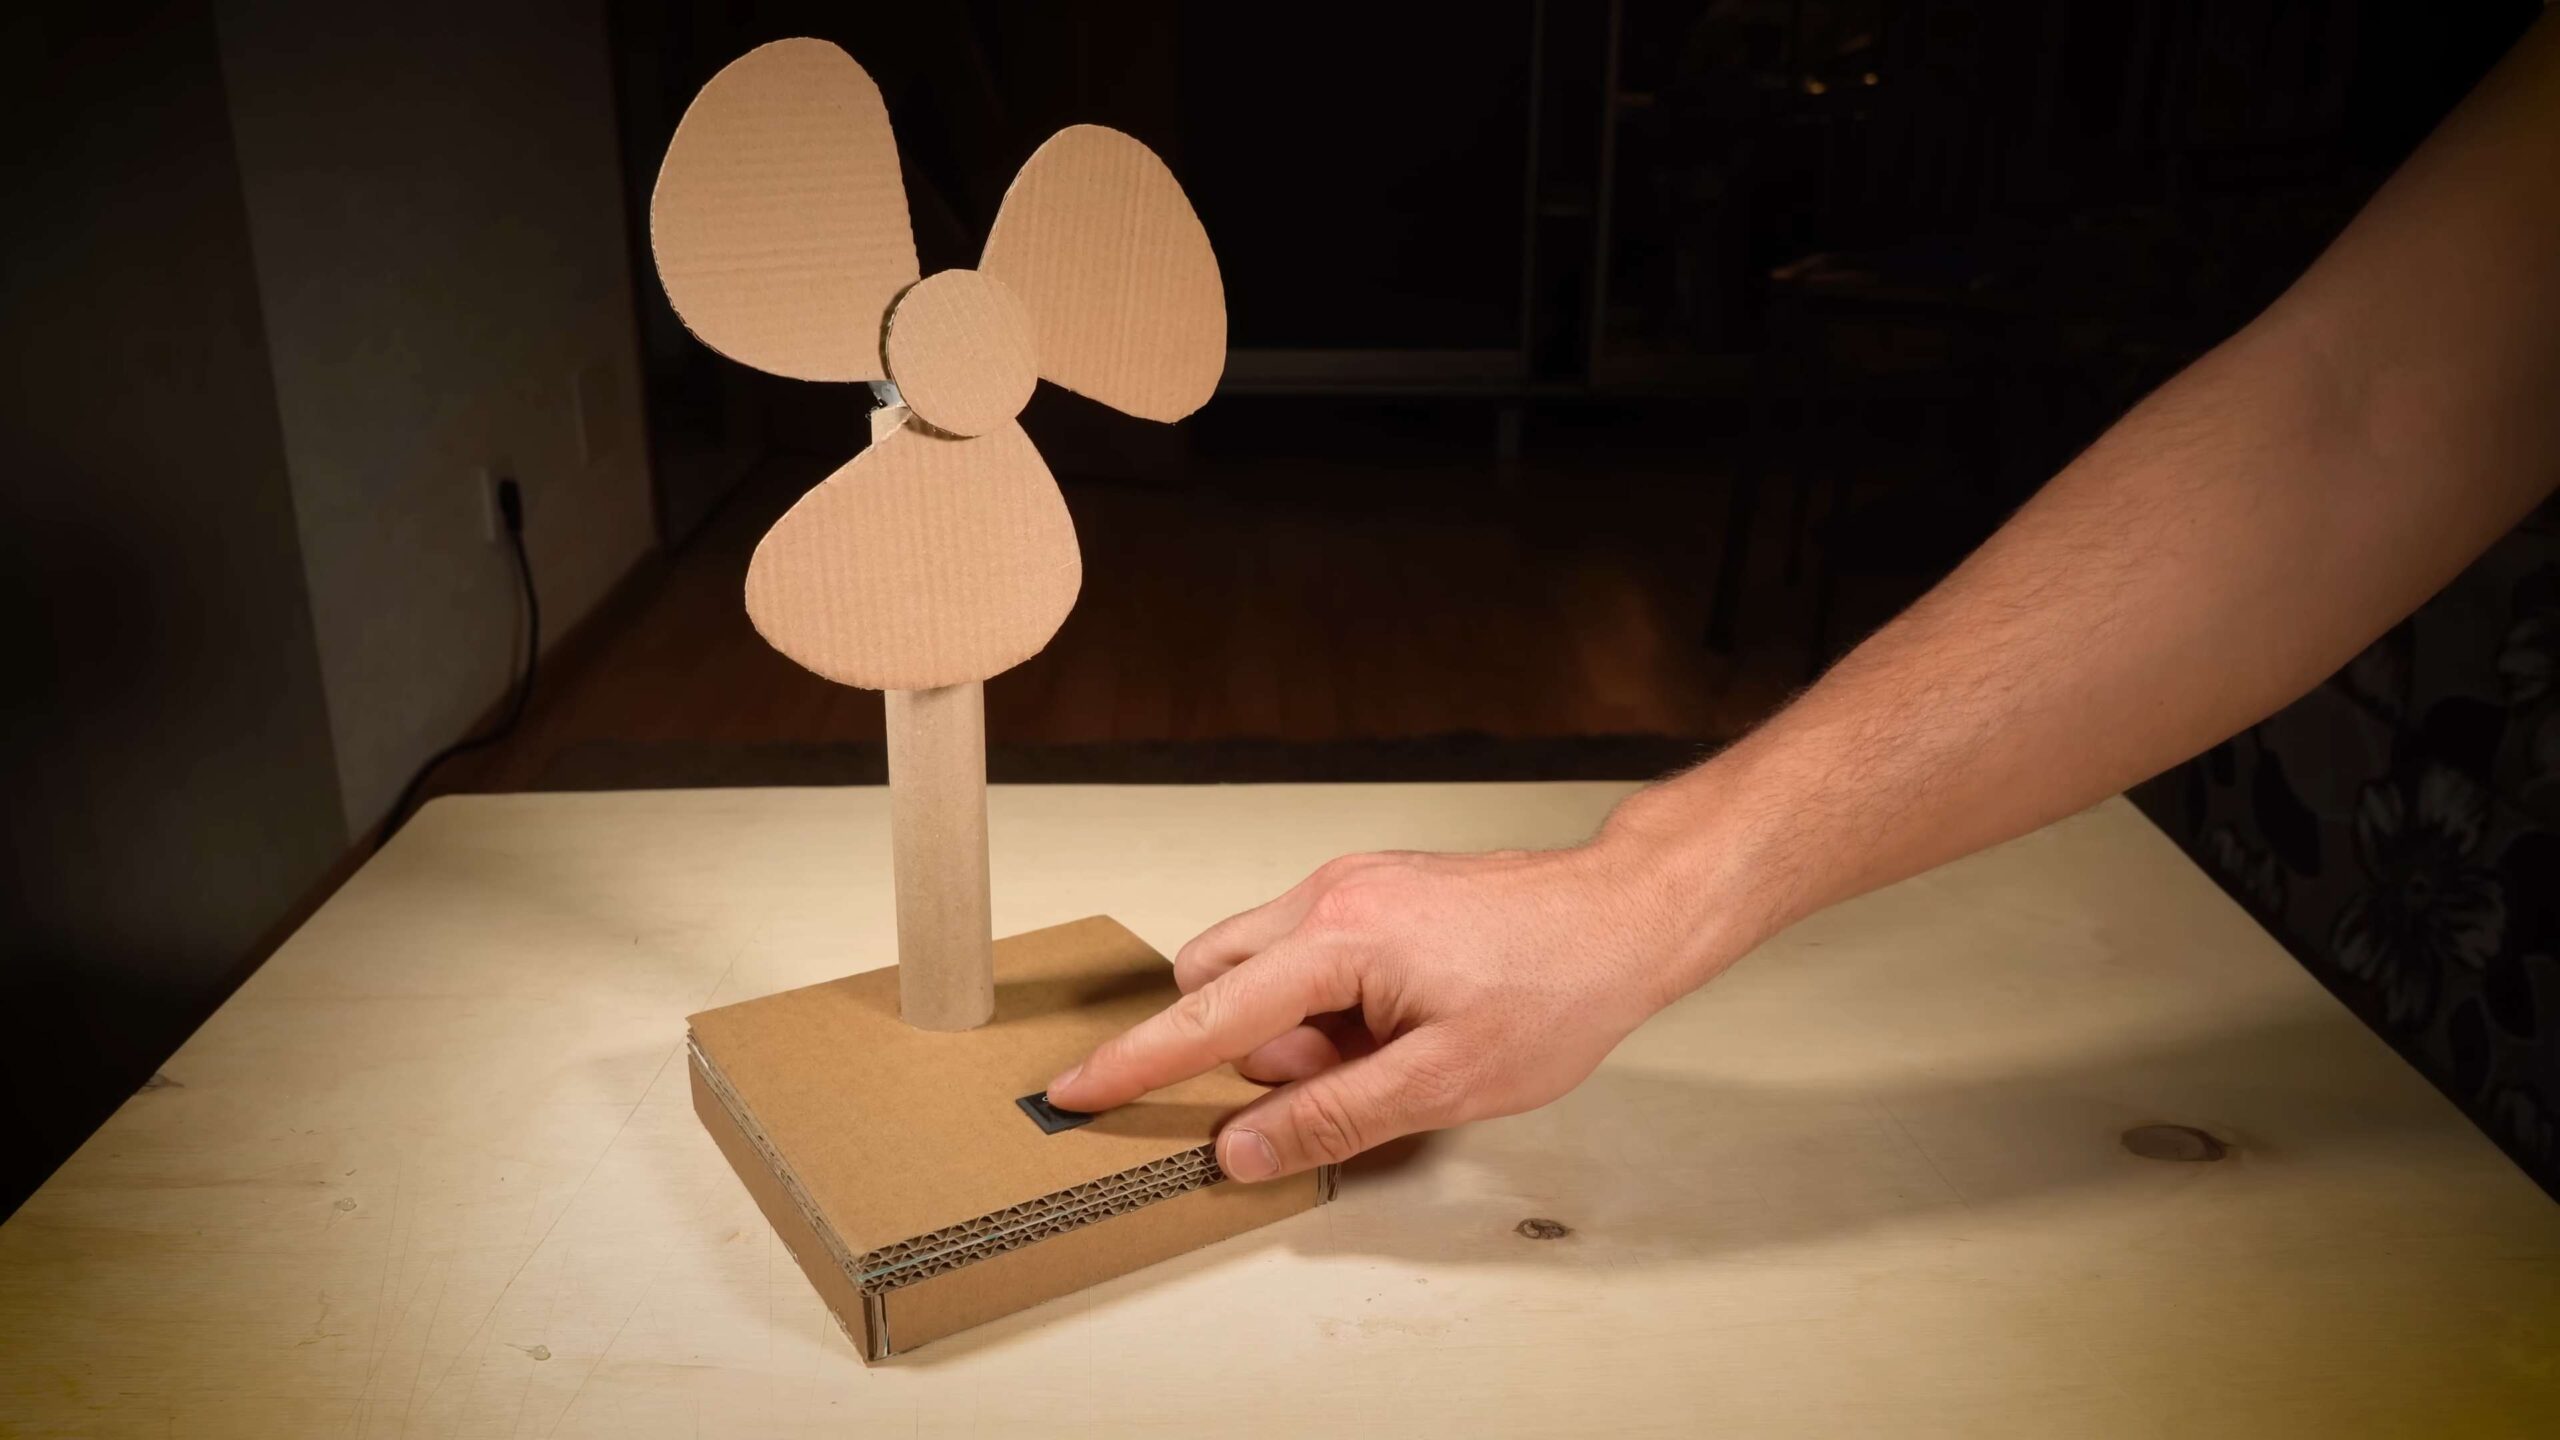
Building the Fan Base
This is where we create a stable foundation for our fan. A wobbly fan is no fun!
1. Cut the Base Pieces: I like to make a rectangular base for stability. Cut two pieces of cardboard that are the same size. I usually go for something around 6 inches wide and 8 inches long, but you can adjust this based on the size of your cardboard and how big you want your fan to be.
2. Cut the Support Pieces: Now, we need to create supports to hold the motor and fan blades. Cut two more pieces of cardboard. These should be tall enough to allow the fan blades to spin freely without hitting the base. I usually aim for around 4-5 inches tall and about 2-3 inches wide.
3. Assemble the Base: Take your two rectangular base pieces and glue them together using the hot glue gun. This will make the base extra sturdy.
4. Attach the Supports: Glue the support pieces to the base, standing them upright. Make sure they are parallel to each other and spaced far enough apart to accommodate the motor. I usually place them about 1-2 inches apart, depending on the size of my motor. Let the glue dry completely before moving on.
Creating the Fan Blades
This is the heart of our fan! The shape and size of the blades will affect how much air it moves.
1. Design the Blades: On a piece of cardboard, draw the shape of your fan blades. I find that a simple curved shape works best. You can experiment with different shapes to see what works best for you. Each blade should be around 3-4 inches long.
2. Cut Out the Blades: Carefully cut out the fan blades using your craft knife or scissors. Make sure to cut out at least three blades for a balanced fan.
3. Create the Hub: Cut out a small circle of cardboard, about 1-2 inches in diameter. This will be the hub that holds the blades together and attaches to the motor.
4. Attach the Blades to the Hub: Glue the fan blades to the circular hub, spacing them evenly around the edge. Make sure the blades are angled slightly in the same direction. This angle is what will create the airflow. Let the glue dry completely.
5. Reinforce the Blades (Optional): For extra durability, you can reinforce the blades with extra cardboard or tape. This will help prevent them from bending or breaking.
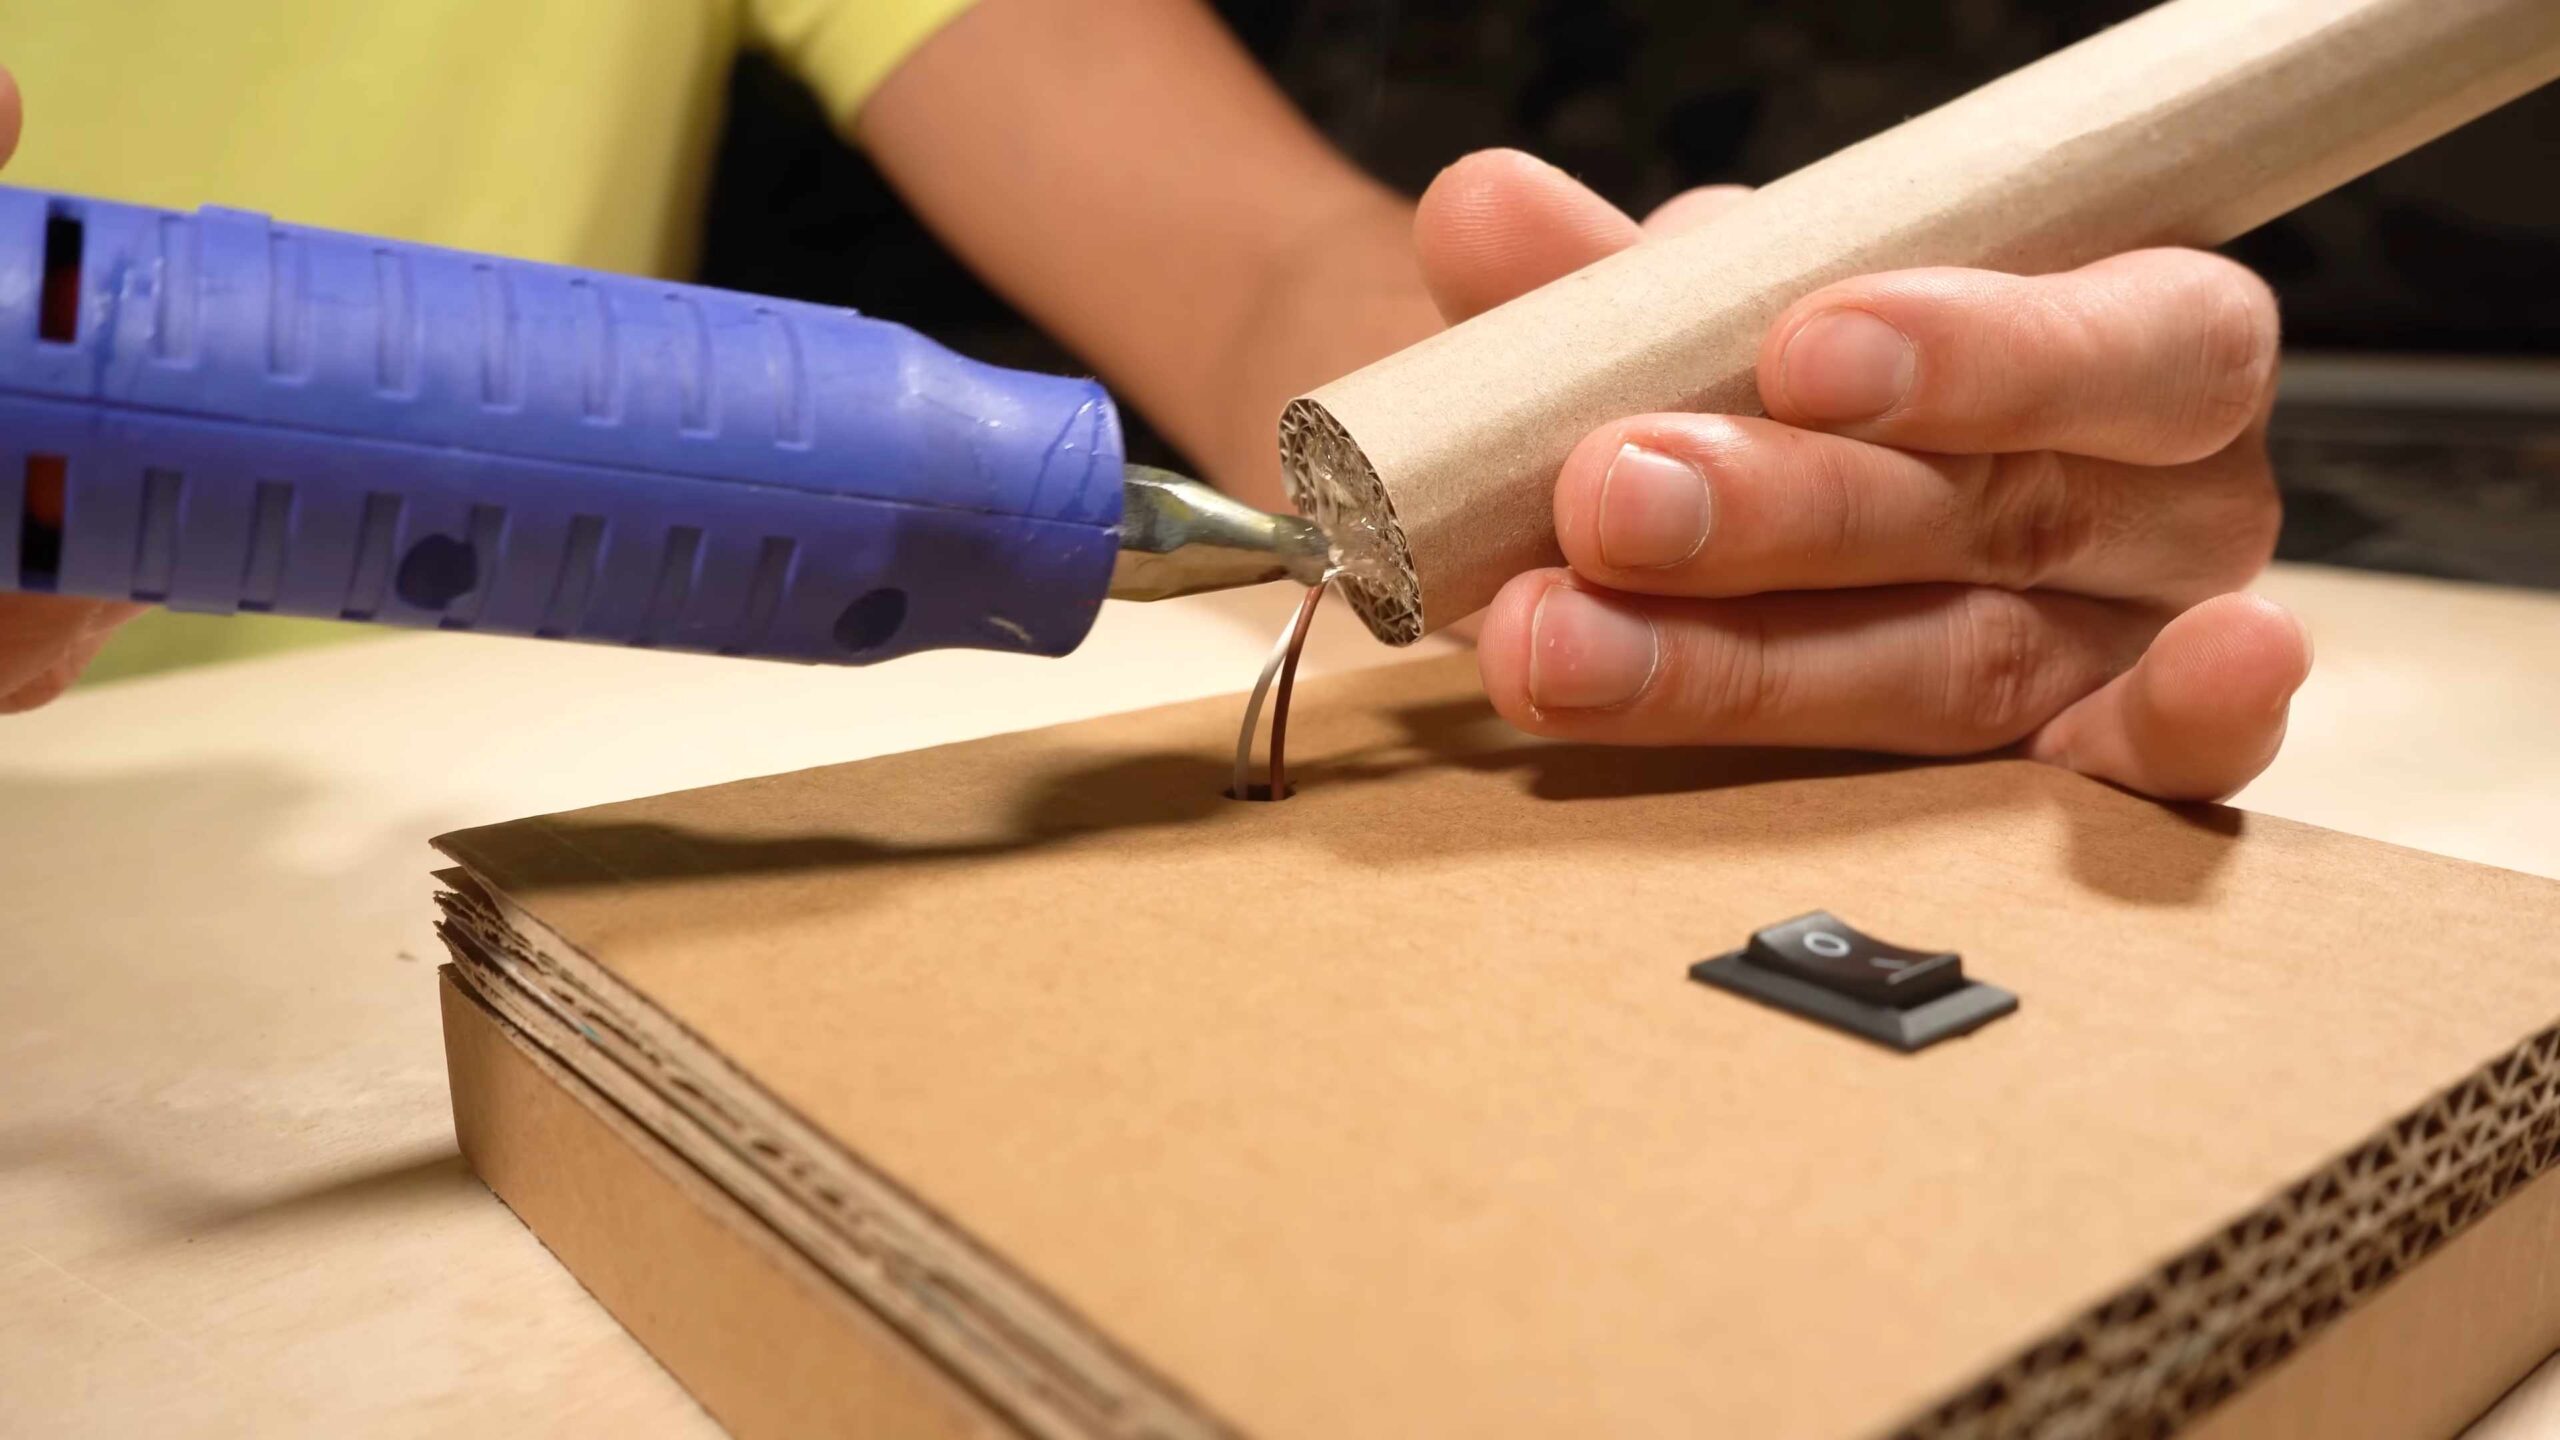
Wiring and Assembly
Time to bring everything together and get this fan spinning!
1. Attach the Motor to the Supports: Glue the DC motor to the support pieces on the base. Make sure the motor shaft is facing forward, allowing the fan blades to be attached.
2. Attach the Fan Blades to the Motor: Carefully attach the fan blade hub to the motor shaft. You might need to use a small amount of glue to secure it in place. Make sure the blades are centered on the shaft to prevent wobbling.
3. Wire the Motor: Connect the 9V battery connector to the motor. The red wire goes to the positive terminal of the motor, and the black wire goes to the negative terminal.
4. Add the Switch (Optional): If you’re using a switch, cut one of the wires from the battery connector (either the red or black wire). Strip the ends of the cut wire using wire strippers. Connect the stripped ends of the wire to the terminals on the switch. This will allow you to turn the fan on and off easily.
5. Connect the Battery: Plug the 9V battery into the battery connector. If you’ve wired everything correctly, the fan should start spinning!
Troubleshooting and Tips
Sometimes things don’t go exactly as planned. Here are a few tips to help you troubleshoot any issues:
* Fan Not Spinning: Double-check all your wiring connections. Make sure the battery is fresh and that the motor is working properly.
* Fan Spinning Slowly: Try using a higher voltage battery or a more powerful motor.
* Fan Wobbling: Make sure the fan blades are balanced and centered on the motor shaft. You can add small pieces of cardboard to the blades to balance them.
* Fan Blades Breaking: Reinforce the blades with extra cardboard or tape. You can also try using a thicker cardboard for the blades.
* Motor Getting Hot: Don’t run the fan for extended periods of time. Give the motor a break to cool down.
Adding Some Flair (Optional)
Now that your fan is working, you can add some personal touches to make it your own!
* Paint it: Use acrylic paints to decorate the cardboard base and fan blades.
* Add Stickers: Decorate the fan with stickers or decals.
* Cover it with Fabric: Wrap the base with fabric for a more polished look.
* Add a Grill: Create a cardboard grill to protect the fan blades and prevent fingers from getting caught.
Safety First!
* Always supervise children when they are working on this project.
* Use caution when using the craft knife or scissors.
* Be careful when using the hot glue gun.
* Do not run the fan for extended periods of time, as the motor may overheat.
* Keep the fan away from water and other liquids.
And there you have it! Your very own DIY cardboard table fan. I hope you enjoyed this project and that it helps you stay cool this summer. Have fun experimenting with different designs and features to create the perfect fan for your needs. Let me know in the comments if you have any questions or if you come up with any cool modifications! Happy crafting!
Conclusion
So, there you have it! Creating your own DIY Cardboard Table Fan isn’t just a fun project; it’s a practical solution for staying cool on a budget, a testament to resourcefulness, and a fantastic way to reduce your environmental footprint. In a world increasingly conscious of sustainability, repurposing materials like cardboard offers a tangible way to contribute to a greener lifestyle. Forget those expensive, energy-guzzling electric fans – this simple, effective alternative proves that innovation doesn’t always require a hefty price tag.
The beauty of this DIY project lies in its adaptability. Feel free to experiment with different cardboard thicknesses to find the optimal balance between sturdiness and airflow. Consider adding decorative elements like paint, stickers, or even fabric scraps to personalize your fan and make it a true reflection of your style. For an extra boost of coolness, try placing a small bowl of ice water in front of the fan – the evaporating water will create a refreshing breeze. You could even explore different blade shapes to see how they affect the airflow; perhaps a slightly curved blade will generate a stronger current.
Beyond the immediate benefits of a cool breeze, this project offers a valuable learning experience, especially for children. It’s a hands-on lesson in basic engineering principles, demonstrating how simple components can be combined to create a functional device. It encourages problem-solving skills, creativity, and an appreciation for the power of repurposing. Plus, it’s a fantastic way to spend quality time together as a family, working collaboratively on a rewarding project.
But the real magic happens when you share your creation with the world. We wholeheartedly encourage you to try this DIY Cardboard Table Fan project and document your experience. Take photos or videos of your progress, share your tips and tricks, and let us know how it worked for you. Did you encounter any challenges? Did you discover any innovative modifications? Your feedback is invaluable, and it can inspire others to embrace the joy of DIY and the satisfaction of creating something useful from scratch.
Don’t hesitate to tweak the design to suit your specific needs and preferences. Perhaps you need a smaller, more portable fan for your desk at work. Or maybe you want to build a larger, more powerful fan for your living room. The possibilities are endless! The key is to experiment, have fun, and let your creativity guide you.
Ultimately, this DIY Cardboard Table Fan is more than just a fan; it’s a symbol of ingenuity, sustainability, and the power of human creativity. It’s a reminder that we don’t always need to rely on expensive, mass-produced products to meet our basic needs. With a little bit of resourcefulness and a few simple materials, we can create our own solutions and make a positive impact on the world around us. So, grab some cardboard, gather your tools, and get ready to experience the refreshing breeze of your very own DIY creation! We are confident that you will find this **DIY Cardboard Table Fan** project to be both rewarding and surprisingly effective.
Frequently Asked Questions (FAQ)
1. What type of cardboard is best for making the fan?
The ideal cardboard is corrugated cardboard, which is the type commonly used for shipping boxes. It’s strong enough to hold its shape and withstand the pressure of the motor, yet still relatively easy to cut and work with. Avoid using thin cardboard like cereal boxes, as it may not be sturdy enough. If you only have thinner cardboard, consider layering it to increase its strength. Experiment with different thicknesses to find what works best for your motor and desired fan size.
2. What kind of motor should I use?
A small DC motor is perfect for this project. You can often find these in old toys, electronics, or online. A motor with a voltage rating of 3-6V is generally recommended. The higher the voltage, the faster the fan will spin, but be mindful of the power source you’re using. Ensure the motor has enough torque to spin the blades effectively. If the motor is too weak, the fan will barely move. You can also use a small computer fan motor, which is readily available and designed for airflow.
3. How do I attach the blades to the motor?
The most common method is to use a hot glue gun. Apply a generous amount of hot glue to the motor shaft and quickly attach the center of the cardboard blades. Make sure the blades are centered and balanced to prevent wobbling. Alternatively, you can use a small piece of plastic tubing or a bottle cap with a hole drilled in the center to create a more secure connection. Super glue can also be used, but be careful not to get it on your skin. Ensure the blades are firmly attached and won’t come loose during operation.
4. What power source can I use for the motor?
You can use a variety of power sources, depending on the voltage rating of your motor. AA batteries connected in series are a common option. A 4-AA battery pack will provide 6V, which is suitable for many small DC motors. You can also use a USB cable connected to a computer or a USB wall adapter. Cut the end of the USB cable and expose the red and black wires. Connect the red wire to the positive terminal of the motor and the black wire to the negative terminal. Be careful not to short-circuit the wires. For a more permanent setup, consider using a small power adapter with the appropriate voltage and amperage.
5. How can I make the fan more stable?
A wide, sturdy base is essential for stability. You can create a base from multiple layers of cardboard glued together or use a small box filled with sand or rocks for added weight. Ensure the base is large enough to prevent the fan from tipping over. You can also add rubber feet to the bottom of the base to prevent it from sliding. Experiment with different base designs to find what works best for your fan.
6. How can I make the fan blow more air?
The size and shape of the blades play a crucial role in airflow. Experiment with different blade designs to see what works best. Slightly curved blades tend to generate more airflow than flat blades. You can also increase the number of blades or make the blades larger. However, be mindful of the motor’s power; too many or too large blades may overload the motor. Ensure the blades are properly balanced to prevent wobbling and reduce noise. You can also try adding a shroud or housing around the blades to direct the airflow.
7. Is this DIY fan safe to use?
While this project is relatively safe, it’s important to take precautions. Always supervise children when they are building or using the fan. Ensure the blades are securely attached to the motor to prevent them from flying off. Avoid using the fan near water or flammable materials. Do not leave the fan unattended while it’s running. If the motor starts to overheat, turn it off immediately. Use a low-voltage power source to minimize the risk of electric shock.
8. Can I paint or decorate the cardboard fan?
Absolutely! Painting and decorating the fan is a great way to personalize it and make it more visually appealing. Use acrylic paints, markers, or stickers to add your own unique touch. Be careful not to use too much paint, as it can weigh down the blades and affect the fan’s performance. Consider using stencils or masking tape to create intricate designs. Let your creativity run wild and transform your cardboard fan into a work of art!
9. How long will this DIY cardboard fan last?
The lifespan of the fan depends on the quality of the materials used and how frequently it’s used. With proper care, it can last for several months or even longer. Avoid exposing the cardboard to moisture, as it can weaken the material. If the motor starts to wear out, you can easily replace it. The cardboard blades may eventually become damaged or worn, but you can easily create new ones.
10. What if my motor is spinning too fast or too slow?
If the motor is spinning too fast, you can reduce the voltage of the power source. For example, if you’re using a 6V battery pack, try using a 4.5V battery pack instead. You can also add a resistor in series with the motor to reduce the voltage. If the motor is spinning too slow, you can increase the voltage of the power source. However, be careful not to exceed the motor’s voltage rating, as this can damage it. You can also try using a more powerful motor.


Leave a Comment