

DIY Carpet Stain Remover: Oh no! That dreaded moment when you spill something on your beautiful carpet. We’ve all been there, haven’t we? A glass of red wine, a muddy paw print, or a rogue coffee splash – life happens, and carpets often bear the brunt of it. But before you resign yourself to living with a permanent eyesore or shelling out for professional cleaning, let me tell you a secret: you can conquer those stains with a powerful, homemade DIY carpet stain remover!
For generations, resourceful homeowners have relied on simple, readily available ingredients to tackle household messes. Think back to your grandmother’s cleaning wisdom – often passed down through families, these natural remedies were effective and eco-friendly long before “green cleaning” became a buzzword. This tradition of resourcefulness is what inspires me to share these easy and effective DIY solutions.
Why spend a fortune on harsh chemicals when you can create a safe and effective stain remover with items you probably already have in your pantry? Not only is it budget-friendly, but it’s also a healthier option for your family and pets. Plus, knowing you can quickly and easily tackle any unexpected spill gives you peace of mind. So, let’s dive into the world of DIY carpet stain removal and reclaim the pristine beauty of your floors!

DIY Carpet Stain Remover: Banish Stains Like a Pro!
Okay, let’s face it, accidents happen. And when they happen on your carpet, it can feel like a mini-disaster. But don’t panic! Before you call in the professionals (and spend a fortune!), let me share my go-to DIY carpet stain remover recipe and method. I’ve used this on everything from coffee spills to pet messes, and it works like a charm.
What You’ll Need: Your Stain-Fighting Arsenal
Before we dive in, let’s gather our supplies. This is a pretty simple recipe, so you probably already have most of these things lying around:
* **White Vinegar:** The star of the show! Vinegar is a natural cleaner and deodorizer.
* **Baking Soda:** Another powerhouse ingredient. Baking soda helps absorb odors and lift stains.
* **Dish Soap (Clear, Non-Bleach):** A gentle surfactant to help break down the stain. Avoid anything with bleach, as it can damage your carpet.
* **Spray Bottle:** For easy application.
* **Clean White Cloths or Paper Towels:** Essential for blotting and absorbing the stain.
* **Vacuum Cleaner:** To finish the job and remove any residue.
* **Warm Water:** To dilute the vinegar and dish soap.
* **Optional: An Old Toothbrush:** For scrubbing stubborn stains.
The Magic Formula: Mixing Your Stain Remover
Alright, let’s get mixing! This is where the magic happens.
1. **Prepare the Solution:** In your spray bottle, combine:
* 1/2 cup of white vinegar
* 1/4 cup of warm water
* 1 tablespoon of clear dish soap
Gently swirl the bottle to mix the ingredients. Avoid shaking vigorously, as this can create too many bubbles.
Tackling the Stain: A Step-by-Step Guide
Now for the main event: removing that pesky stain! Remember, the sooner you treat a stain, the better your chances of removing it completely.
1. **Blot, Blot, Blot! (Don’t Rub!)** This is crucial! If the stain is still wet, immediately blot it with a clean white cloth or paper towel. Work from the outside of the stain inward to prevent it from spreading. Apply firm pressure to absorb as much liquid as possible. Resist the urge to rub, as this can grind the stain deeper into the carpet fibers.
2. **Spray the Solution:** Generously spray the stain with your DIY stain remover solution. Make sure the area is thoroughly saturated, but not soaking wet. You want the solution to penetrate the stain, but you don’t want to over-saturate the carpet padding underneath.
3. **Let it Sit:** Allow the solution to sit on the stain for 5-10 minutes. This gives the vinegar and dish soap time to break down the stain and lift it from the carpet fibers. For older or more stubborn stains, you can let it sit for up to 30 minutes.
4. **Blot Again:** After the solution has had time to work its magic, blot the area again with a clean white cloth or paper towel. Continue blotting until you’re no longer lifting any stain from the carpet.
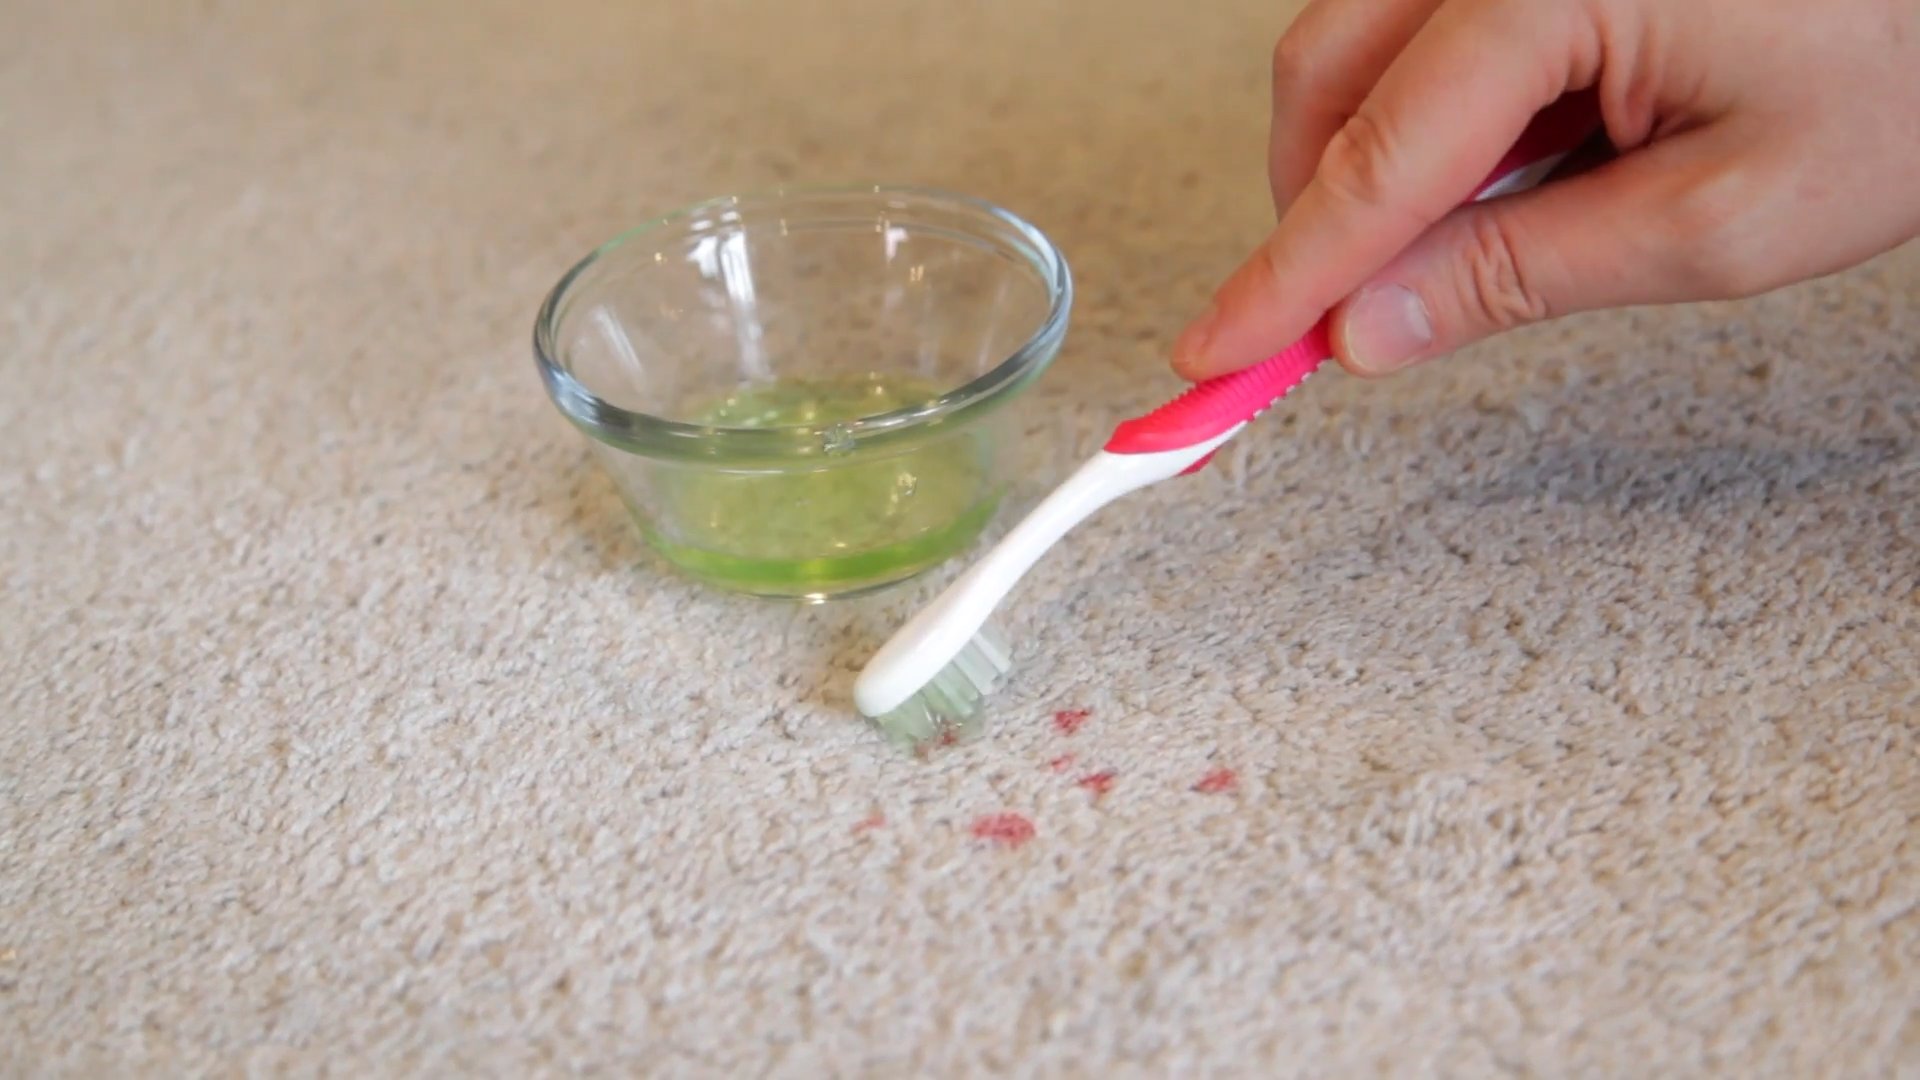
5. **Scrub (If Necessary):** If the stain is particularly stubborn, you can gently scrub the area with an old toothbrush. Use a circular motion and avoid applying too much pressure, as this can damage the carpet fibers. After scrubbing, blot the area again with a clean cloth.
6. **Rinse (Optional):** If you’re concerned about leaving a soapy residue on your carpet, you can rinse the area with clean water. Simply spray the area with water and then blot it dry with a clean cloth.
7. **Baking Soda Power:** Once you’ve removed as much of the stain as possible, sprinkle a generous amount of baking soda over the affected area. The baking soda will help absorb any remaining moisture and odors.
8. **Let it Dry:** Allow the baking soda to sit on the carpet for several hours, or even overnight. This will give it plenty of time to absorb any lingering moisture and odors.
9. **Vacuum it Up:** Once the baking soda is completely dry, vacuum it up thoroughly. Make sure to go over the area several times to remove all traces of the baking soda.
10. **Inspect and Repeat (If Needed):** After vacuuming, inspect the area to see if the stain is completely gone. If not, repeat the process as needed. Sometimes, it takes a few tries to completely remove a stubborn stain.
Dealing with Specific Stains: A Few Extra Tips
While this DIY stain remover works well on a variety of stains, here are a few extra tips for dealing with specific types of messes:
* **Coffee Stains:** For coffee stains, try adding a pinch of salt to the stain remover solution. The salt will help absorb the stain and prevent it from setting.
* **Pet Stains:** Pet stains can be particularly tricky due to their strong odors. After removing the stain, consider using an enzymatic cleaner to neutralize any lingering odors. You can find these cleaners at most pet stores.
* **Red Wine Stains:** Red wine stains are notorious for being difficult to remove. The key is to act quickly! Immediately blot the stain with a clean cloth and then pour a generous amount of salt over the area. The salt will absorb the wine and prevent it from setting. After the salt has dried, vacuum it up and then treat the area with your DIY stain remover.
* **Grease Stains:** For grease stains, try sprinkling cornstarch over the area and letting it sit for several hours. The cornstarch will absorb the grease. After the cornstarch has dried, vacuum it up and then treat the area with your DIY stain remover.
Preventing Future Stains: A Proactive Approach
Of course, the best way to deal with carpet stains is to prevent them from happening in the first place! Here are a few tips for keeping your carpets clean and stain-free:
* **Act Fast:** As I mentioned earlier, the sooner you treat a stain, the better your chances of removing it completely. Don’t let stains sit for days or weeks before addressing them.
* **Use Rugs and Mats:** Place rugs and mats in high-traffic areas to protect your carpets from dirt and spills.
* **Regular Vacuuming:** Vacuum your carpets regularly to remove dirt and debris that can contribute to staining.
* **Professional Cleaning:** Consider having your carpets professionally cleaned once or twice a year to remove deep-seated dirt and stains.
Important Considerations: Test Before You Commit!
Before you go wild spraying your entire carpet, it’s always a good idea to test your DIY stain remover in an inconspicuous area first. This will help you ensure that the solution doesn’t damage or discolor your carpet. Choose a hidden spot, like inside a closet or under a piece of furniture, and apply a small amount of the solution. Let it sit for a few minutes and then blot it dry. If you don’t see any adverse effects, you can proceed with treating the stain.
Also, remember that different carpets are made from different materials. What works on one type of carpet might not work on another. If you’re unsure about the best way to clean your carpet, consult the manufacturer’s instructions or contact a professional carpet cleaner.
And finally, always wear gloves when working with cleaning solutions to protect your skin.
So there you have it! My tried-and-true DIY carpet stain remover recipe and method. I hope this helps you banish those pesky stains and keep your carpets looking their best. Happy cleaning!
Conclusion
So, there you have it! This DIY carpet stain remover isn’t just another cleaning hack; it’s a game-changer for anyone who wants to keep their carpets looking fresh and vibrant without resorting to harsh chemicals or expensive professional services. We’ve all been there – that sinking feeling when a spill happens, knowing the potential damage it could inflict on your beloved carpet. But with this simple, effective, and budget-friendly solution, you can tackle those stains head-on with confidence.
The beauty of this DIY carpet stain remover lies in its simplicity. Using readily available ingredients that you likely already have in your pantry, you can whip up a powerful cleaning solution in minutes. No more frantic trips to the store or waiting days for a professional cleaner to arrive. This is about taking control of your cleaning routine and achieving professional-level results on your own terms.
But why is this DIY trick a must-try? Beyond the cost savings and convenience, it’s about creating a healthier home environment. Commercial carpet cleaners often contain harsh chemicals that can irritate sensitive skin, trigger allergies, and even release harmful fumes into the air. By using natural ingredients like vinegar, baking soda, and dish soap, you’re minimizing your exposure to these toxins and creating a safer space for your family and pets.
Furthermore, this DIY carpet stain remover is incredibly versatile. While the basic recipe is effective for a wide range of stains, you can easily customize it to suit your specific needs. For instance, for particularly stubborn stains like red wine or coffee, you can add a small amount of hydrogen peroxide to the mixture. Just be sure to test it on an inconspicuous area of your carpet first to ensure it doesn’t cause any discoloration. For pet stains, adding a few drops of essential oils like lavender or eucalyptus can help neutralize odors and leave your carpet smelling fresh and clean.
Variations to Consider:
* For older, set-in stains: Create a paste of baking soda and water, apply it to the stain, and let it sit overnight before vacuuming.
* For greasy stains: Sprinkle cornstarch on the stain to absorb the grease, let it sit for 30 minutes, and then vacuum. Follow up with the DIY carpet stain remover.
* For a natural fragrance boost: Add a few drops of your favorite essential oil to the spray bottle. Lemon, tea tree, and lavender are all great options.
We’re confident that once you try this DIY carpet stain remover, you’ll be amazed by the results. It’s a simple, effective, and affordable way to keep your carpets looking their best. So, ditch the expensive commercial cleaners and give this DIY solution a try.
Don’t just take our word for it! We encourage you to experiment with this recipe, adapt it to your specific needs, and share your experiences with us. Let us know what works best for you, what variations you’ve tried, and any tips or tricks you’ve discovered along the way. Together, we can create a community of DIY cleaning enthusiasts who are passionate about keeping their homes clean, healthy, and beautiful.
We truly believe that this DIY carpet stain remover will become your go-to solution for tackling those inevitable spills and stains. It’s a simple, effective, and eco-friendly way to keep your carpets looking their best, and we can’t wait to hear about your success stories. So, grab your ingredients, roll up your sleeves, and get ready to say goodbye to those pesky carpet stains once and for all!
Frequently Asked Questions (FAQ)
What types of stains does this DIY carpet stain remover work on?
This DIY carpet stain remover is effective on a wide range of common household stains, including food spills, pet accidents, dirt, mud, coffee, tea, and juice. However, its effectiveness may vary depending on the type of stain, the age of the stain, and the type of carpet fiber. For particularly stubborn or set-in stains, you may need to repeat the cleaning process or try a variation of the recipe. Always test the solution on an inconspicuous area of your carpet first to ensure it doesn’t cause any discoloration.
Is this DIY carpet stain remover safe for all types of carpets?
While this DIY carpet stain remover is generally safe for most types of carpets, it’s always best to test it on an inconspicuous area first, especially if you have delicate or natural fiber carpets like wool or silk. Some ingredients, such as vinegar, can be acidic and may potentially damage certain types of fibers. If you’re unsure about the suitability of this solution for your carpet, consult with a professional carpet cleaner.
How do I test the solution on an inconspicuous area?
To test the solution, apply a small amount to a hidden area of your carpet, such as under a piece of furniture or in a closet. Let it sit for a few minutes, then blot it with a clean, white cloth. Check for any discoloration, fading, or damage to the carpet fibers. If you don’t notice any adverse effects, you can proceed with using the solution on the stain.
Can I use this DIY carpet stain remover on upholstery?
Yes, this DIY carpet stain remover can also be used on upholstery, but it’s essential to test it on an inconspicuous area first, just as you would with carpet. The same precautions apply – avoid using it on delicate or natural fiber upholstery without testing it first.
How often can I use this DIY carpet stain remover?
You can use this DIY carpet stain remover as needed to address spills and stains. However, avoid over-cleaning your carpet, as excessive moisture can lead to mold and mildew growth. Always allow your carpet to dry thoroughly after cleaning.
What if the stain doesn’t come out completely after the first application?
For stubborn stains, you may need to repeat the cleaning process. Apply the solution, let it sit for a few minutes, blot it with a clean cloth, and repeat as necessary. You can also try using a soft-bristled brush to gently scrub the stain.
How do I prevent future carpet stains?
Prevention is always better than cure! Consider using carpet protectors or stain-resistant sprays to help prevent stains from setting in. Clean up spills immediately, and avoid eating or drinking in carpeted areas. Regular vacuuming can also help prevent dirt and debris from accumulating in your carpet fibers.
Can I use a carpet cleaning machine with this DIY solution?
While you can technically use this DIY solution in a carpet cleaning machine, it’s generally not recommended. Carpet cleaning machines are designed to work with specific cleaning solutions, and using a DIY solution may damage the machine or void its warranty. Additionally, some DIY solutions may not be compatible with the machine’s components.
How long does the DIY carpet stain remover last?
The DIY carpet stain remover is best used fresh. While it can be stored for a few days in a sealed container, its effectiveness may diminish over time. It’s best to mix up a new batch each time you need it.
What are some alternative ingredients I can use?
If you don’t have vinegar on hand, you can substitute it with lemon juice. For a stronger cleaning solution, you can add a small amount of hydrogen peroxide (test on an inconspicuous area first). You can also add a few drops of essential oils for a natural fragrance boost.
Leave a Comment