

DIY Drain Cleaner Baking Soda Vinegar: Are you tired of slow-draining sinks and the nasty chemical smells of commercial drain cleaners? I know I am! There’s something incredibly satisfying about tackling household problems with simple, natural solutions. For generations, resourceful folks have relied on the power of pantry staples to keep their homes running smoothly. Think about it – our grandmothers probably didn’t have a bottle of harsh chemicals under the sink; they used what they had on hand, and often, that included baking soda and vinegar.
This simple yet effective method isn’t just a modern trend; it’s a time-tested technique that taps into the power of chemistry without harming the environment or your plumbing. A clogged drain can be a real headache, disrupting your daily routine and even leading to more serious plumbing issues down the line. But before you reach for that expensive and potentially damaging drain cleaner, let me show you how to create your own powerful DIY drain cleaner baking soda vinegar solution. It’s easy, affordable, and surprisingly effective. I’m excited to share this simple trick with you, so you can say goodbye to clogged drains and hello to a happier, healthier home!
DIY Drain Cleaner: Baking Soda and Vinegar Power!
Hey everyone! Clogged drains are the bane of my existence. Seriously, nothing is more frustrating than standing in ankle-deep water while showering. Store-bought drain cleaners are harsh and often smell terrible, plus, I’m always a little worried about what they’re doing to my pipes. That’s why I’ve become a huge fan of this simple, effective, and eco-friendly DIY drain cleaner using just baking soda and vinegar. It’s seriously a game-changer!
What You’ll Need
Before we dive in, let’s gather our supplies. This is a super simple list, which is one of the things I love about this method!
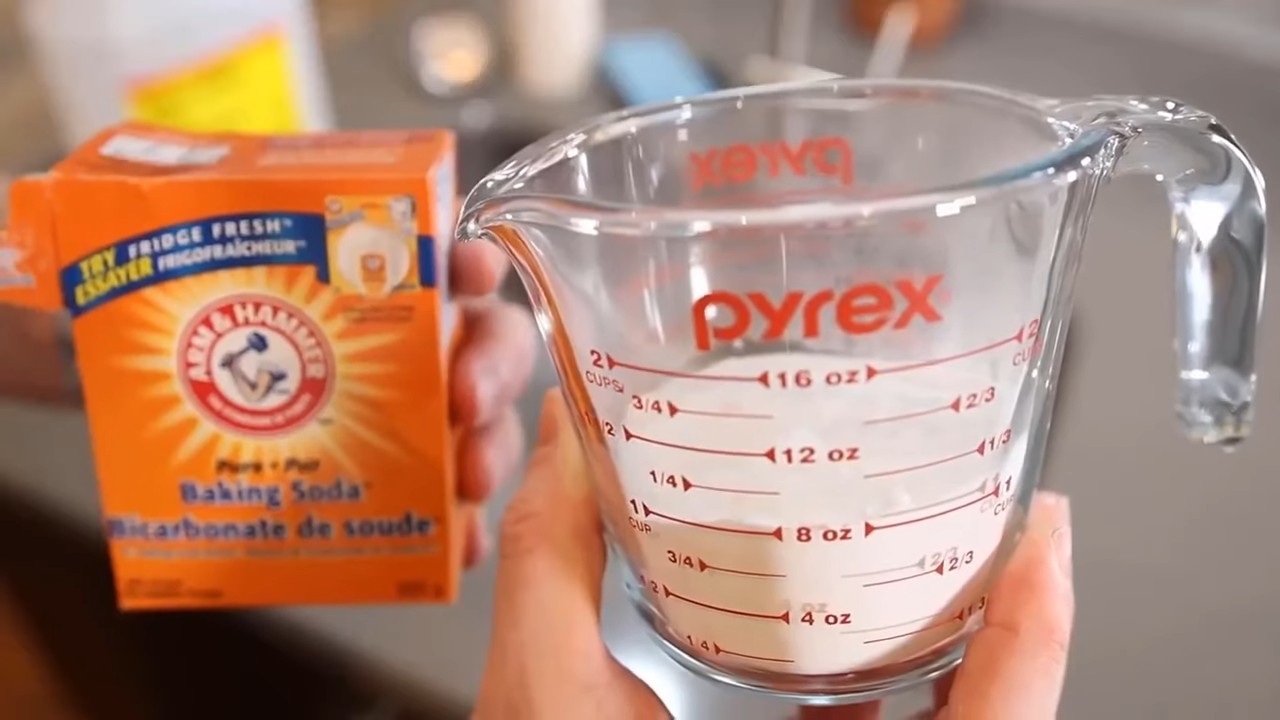
* Baking Soda: The workhorse of this cleaning duo. You’ll need about one cup.
* White Vinegar: The acid that reacts with the baking soda to create the fizzing action that dislodges clogs. Again, about one cup.
* Hot Water: To flush everything down and help dissolve the clog.
* Measuring Cup: To accurately measure the baking soda and vinegar.
* Kettle or Pot: To heat up the water.
* Rubber Gloves (Optional): While baking soda and vinegar are generally safe, gloves can protect your hands, especially if you have sensitive skin.
* Plunger (Optional): For stubborn clogs, a plunger can give you an extra boost.
* Old Rag or Paper Towels: To clean up any spills.
Step-by-Step Instructions: Unclogging Your Drain
Alright, let’s get down to business! Here’s how I use baking soda and vinegar to clear my clogged drains:
1. Clear the Area: First things first, remove any standing water from the sink or tub. You want the baking soda and vinegar to directly target the clog, not just sit on top of a pool of water. I usually use a cup or small bucket to scoop out the excess water.
2. Pour in the Baking Soda: Carefully pour about one cup of baking soda down the drain. Try to get as much of it down the drain opening as possible. A funnel can be helpful here if you have one.
3. Add the Vinegar: Now for the fun part! Slowly pour one cup of white vinegar down the drain on top of the baking soda. You should immediately see and hear a fizzing reaction. This is the magic happening!
4. Let it Fizz: Let the baking soda and vinegar mixture fizz and bubble for at least 30 minutes. I usually set a timer for an hour just to be sure. This gives the mixture time to break down the clog. Don’t skip this step! The longer it sits, the better it works.
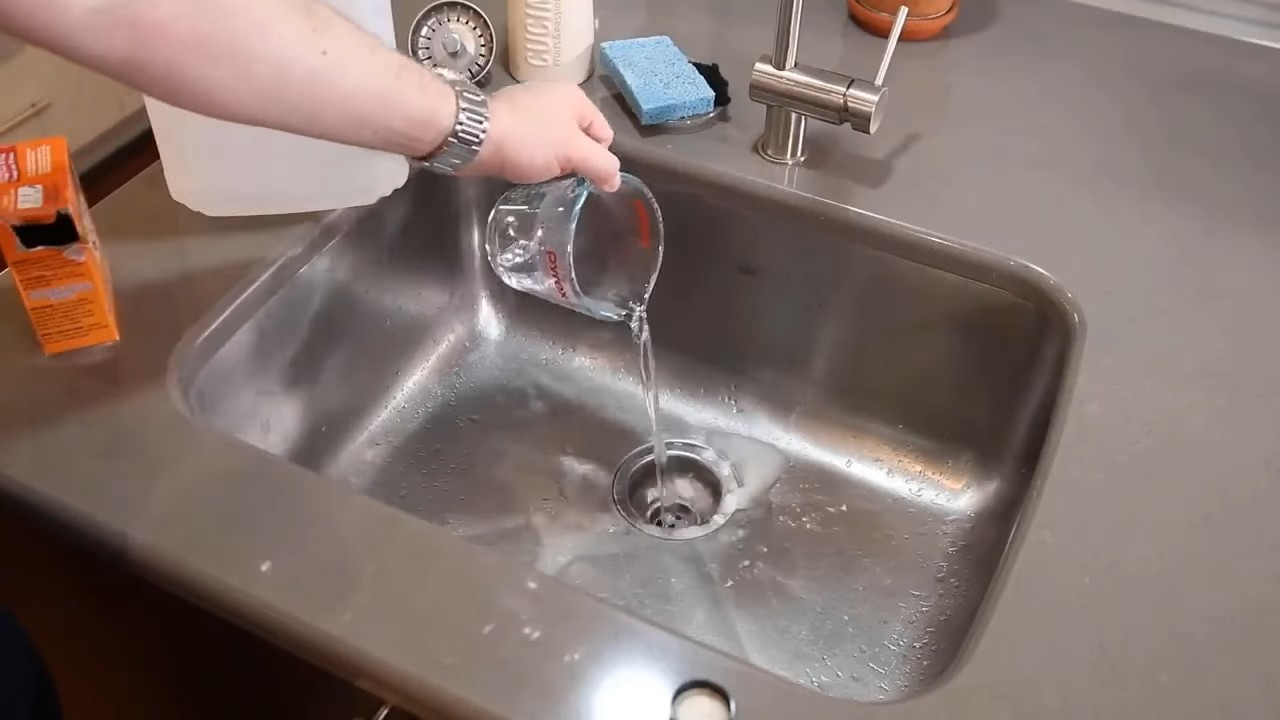
5. Flush with Hot Water: After the waiting period, carefully pour a kettle or pot of boiling hot water down the drain. This will help flush away the loosened clog. Be careful not to splash yourself with the hot water.
6. Check the Drain: Turn on the faucet and see if the water drains freely. If it does, congratulations! You’ve successfully unclogged your drain. If the water is still draining slowly, move on to the next step.
7. Repeat (If Necessary): If the drain is still clogged or draining slowly, repeat steps 2-5. Sometimes, a particularly stubborn clog requires a second treatment.
8. Plunge (If Needed): If you’ve repeated the baking soda and vinegar treatment and the drain is still clogged, it’s time to bring out the plunger. Make sure there’s enough water in the sink or tub to cover the cup of the plunger. Create a tight seal around the drain opening and plunge vigorously for several minutes.
9. Final Flush: After plunging, flush the drain with hot water again to clear away any remaining debris.
Dealing with Stubborn Clogs
Sometimes, even the baking soda and vinegar power combo isn’t enough to tackle a really tough clog. Here are a few extra tips and tricks I’ve learned over the years:
* Boiling Water Only: Before you even try the baking soda and vinegar, sometimes just pouring boiling water down the drain can dislodge a minor clog. I always try this first as a quick and easy solution.
* Baking Soda and Salt: For a slightly stronger cleaning action, try mixing half a cup of baking soda with half a cup of salt and pouring it down the drain, followed by boiling water. The salt adds extra abrasive power.
* The Wire Hanger Trick: Straighten out a wire coat hanger and bend one end into a small hook. Carefully insert the hooked end into the drain and try to fish out any hair, debris, or gunk that might be causing the clog. Be careful not to push the clog further down the drain. This is a bit gross, but it can be surprisingly effective!
* Check the P-Trap: The P-trap is the curved pipe under your sink. It’s designed to trap debris and prevent sewer gases from entering your home. Sometimes, the P-trap itself can become clogged. To clean it, place a bucket under the P-trap to catch any water. Loosen the slip nuts that connect the P-trap to the drain pipes. Carefully remove the P-trap and clean out any debris. Reassemble the P-trap and tighten the slip nuts.
Preventing Future Clogs
Prevention is always better than cure! Here are a few things I do to prevent clogs from forming in the first place:
* Use Drain Screens: These inexpensive mesh screens fit over your drain openings and catch hair and other debris before they can go down the drain. I have them in all my sinks and showers.
* Avoid Pouring Grease Down the Drain: Grease is a major culprit when it comes to clogged drains. Never pour grease down the drain. Instead, let it cool and solidify, then scrape it into the trash.
* Flush Regularly with Hot Water: Once a week, I flush all my drains with hot water to help prevent buildup.
* Baking Soda and Vinegar Maintenance: Every month or two, I do a preventative baking soda and vinegar treatment to keep my drains clear.
Safety First!
While baking soda and vinegar are generally safe, it’s always a good idea to take a few precautions:
* Wear Gloves: If you have sensitive skin, wear rubber gloves to protect your hands.
* Avoid Mixing with Other Cleaners: Never mix baking soda and vinegar with other drain cleaners, especially those containing bleach. This can create dangerous fumes.
* Ventilation: Make sure the area is well-ventilated.
* Eye Protection: Consider wearing eye protection, especially if you’re dealing with a particularly stubborn clog that might splash.
Why I Love This Method
I’ve tried all sorts of drain cleaners over the years, and this baking soda and vinegar method is by far my favorite. Here’s why:
* It’s Effective: It really works! It’s amazing how well this simple combination can break down clogs.
* It’s Eco-Friendly: Baking soda and vinegar are natural and biodegradable, so you don’t have to worry about harming the environment.
* It’s Affordable: Baking soda and vinegar are inexpensive and readily available.
* It’s Safe: It’s much safer than using harsh chemical drain cleaners.
* It’s Easy: It’s so simple to do!
So, there you have it! My go-to method for unclogging drains using baking soda and vinegar. I hope this helps you keep your drains clear and flowing freely! Happy cleaning!
Conclusion
So, there you have it! Ditching the harsh chemicals and embracing this simple, yet incredibly effective, DIY drain cleaner using baking soda and vinegar is more than just a trend; it’s a smart choice for your home, your wallet, and the environment. We’ve walked you through the easy steps, highlighting how the fizzing action of baking soda and vinegar works wonders to loosen clogs and freshen up your drains.
Why is this DIY trick a must-try? Because it’s a powerful alternative to expensive, store-bought drain cleaners that often contain corrosive chemicals. These chemicals can damage your pipes over time and pose a risk to your health and the environment. This homemade solution is gentle yet effective, making it a safer and more sustainable option for maintaining your plumbing. Plus, you likely already have baking soda and vinegar in your pantry, making it an incredibly convenient and cost-effective solution.
But the benefits don’t stop there. This DIY drain cleaner is also incredibly versatile. While the basic recipe of baking soda and vinegar is a powerhouse on its own, you can easily customize it to suit your specific needs. For a more stubborn clog, try adding a cup of boiling water after the baking soda and vinegar mixture has fizzed for about 30 minutes. The hot water can help to further break down grease and debris.
Another variation involves using essential oils. A few drops of tea tree oil or eucalyptus oil can add a refreshing scent and provide additional antibacterial properties. Simply add the essential oils to the baking soda before pouring it down the drain. Lavender or lemon essential oils are also great choices for a clean and pleasant fragrance.
For preventative maintenance, consider using this DIY drain cleaner once a month to keep your drains flowing smoothly and prevent clogs from forming in the first place. This simple routine can save you time, money, and the hassle of dealing with major plumbing issues down the road.
We’re confident that once you try this DIY drain cleaner, you’ll be amazed by its effectiveness and simplicity. It’s a game-changer for maintaining a clean and healthy home. So, ditch the chemicals, embrace the fizz, and experience the power of baking soda and vinegar for yourself!
Now, we want to hear from you! Have you tried this DIY drain cleaner? What were your results? Do you have any variations or tips to share? We encourage you to try this simple solution and share your experiences in the comments below. Your feedback will not only help other readers but also contribute to a community of eco-conscious homeowners who are committed to finding safer and more sustainable ways to care for their homes. Let’s work together to keep our drains clean and our planet healthy, one fizz at a time!
Frequently Asked Questions (FAQ)
Is this DIY drain cleaner safe for all types of pipes?
Yes, this DIY drain cleaner is generally safe for most types of pipes, including PVC, copper, and older metal pipes. Unlike harsh chemical drain cleaners, baking soda and vinegar are non-corrosive and won’t damage your plumbing system. However, if you have very old or fragile pipes, it’s always a good idea to test a small amount of the solution in an inconspicuous area first to ensure there are no adverse reactions. If you are unsure about your pipes, consult a plumber.
How often should I use this DIY drain cleaner?
For preventative maintenance, using this DIY drain cleaner once a month is a great way to keep your drains flowing smoothly and prevent clogs from forming. If you have a particularly slow drain or a recurring clog, you can use it more frequently, such as once a week, until the problem is resolved. Just be mindful not to overuse it, as excessive use could potentially disrupt the natural balance of bacteria in your septic system (if you have one).
What if the clog is really stubborn and the baking soda and vinegar don’t work?
If the baking soda and vinegar mixture doesn’t completely clear the clog, there are a few things you can try. First, repeat the process. Sometimes, a second application is all it takes to loosen the remaining debris. You can also try using a plunger after the baking soda and vinegar have had time to work. The plunging action can help to dislodge the clog and push it through the drain. As mentioned earlier, pouring a cup of boiling water down the drain after the baking soda and vinegar mixture has fizzed can also help to break down grease and debris. If all else fails, you may need to resort to a plumbing snake or call a professional plumber.
Can I use this DIY drain cleaner in my toilet?
While you can technically use this DIY drain cleaner in your toilet, it’s generally not as effective as it is in sinks and showers. Toilets often have larger clogs that require more force to dislodge. If you want to try it, use the same method as described above, but be prepared to use a plunger as well. For stubborn toilet clogs, a toilet auger (also known as a closet auger) is often the most effective tool.
Does the type of vinegar matter? Can I use white vinegar or apple cider vinegar?
White vinegar is the most commonly used and recommended type of vinegar for this DIY drain cleaner because of its high acidity. However, apple cider vinegar can also be used as a substitute, although it may not be quite as effective. Avoid using other types of vinegar, such as balsamic vinegar or red wine vinegar, as they may contain sugars or other ingredients that could potentially worsen the clog.
Is there anything I should avoid pouring down my drains to prevent clogs?
Absolutely! There are several things you should avoid pouring down your drains to prevent clogs. Grease is a major culprit, as it solidifies as it cools and can stick to the inside of your pipes. Coffee grounds are another common cause of clogs, as they don’t dissolve in water and can accumulate over time. Hair, food scraps, and feminine hygiene products should also be disposed of properly in the trash, not down the drain.
Can I use this DIY drain cleaner if I have a septic system?
Yes, this DIY drain cleaner is generally safe to use if you have a septic system. Unlike harsh chemical drain cleaners, baking soda and vinegar are natural and won’t harm the beneficial bacteria in your septic tank. However, it’s important to use it in moderation, as excessive use could potentially disrupt the balance of your septic system. As a general rule, using this DIY drain cleaner once a month should be fine.
What are some other natural ways to prevent drain clogs?
Besides using this DIY drain cleaner, there are several other natural ways to prevent drain clogs. Using drain screens or strainers in your sinks and showers can help to catch hair and food scraps before they go down the drain. Regularly flushing your drains with hot water can also help to prevent grease and other debris from building up. Avoid pouring grease down the drain, and dispose of food scraps properly in the trash or compost.

Leave a Comment