

DIY Floor Puff Cushion: Imagine sinking into a cloud of comfort, right in your living room, crafted entirely by your own two hands. Sounds dreamy, right? Well, it’s totally achievable with a DIY floor puff cushion! For centuries, cultures around the globe have embraced floor cushions as versatile seating options, from the vibrant souks of Marrakech to the serene tea rooms of Japan. These cushions aren’t just about comfort; they’re about creating a relaxed, inviting atmosphere in your home.
In today’s fast-paced world, we all crave a little more relaxation and personalization in our living spaces. That’s where this DIY project comes in. A DIY floor puff cushion is the perfect solution for adding extra seating, creating a cozy reading nook, or simply injecting some unique style into your decor. Plus, it’s a fantastic way to upcycle old fabrics and reduce waste! I’m going to guide you through each step, making it easy and fun to create a beautiful and functional piece that you’ll love for years to come. So, grab your sewing kit and let’s get started on this amazing DIY adventure!

DIY Floor Puff Cushion: A Cozy Seating Project
Hey there, fellow DIY enthusiasts! Ever wanted a super comfy, oversized floor cushion to lounge on? Well, today, I’m going to walk you through creating your very own floor puff cushion. It’s a fantastic project for using up fabric scraps, old clothes, or even repurposing old bedding. Plus, it’s way cheaper than buying one from a store!
Materials You’ll Need
Before we dive in, let’s gather our supplies. This is crucial for a smooth crafting experience.
* Fabric: Lots of it! Think old jeans, t-shirts, curtains, or any sturdy fabric you have lying around. The amount depends on the size of your desired cushion. For a 3-foot diameter cushion, you’ll need roughly 6-8 yards of fabric. Mix and match for a fun, eclectic look!
* Lining Fabric (Optional but Recommended): This will hold the stuffing and prevent it from poking through your outer fabric. Muslin or an old bedsheet works perfectly. You’ll need about the same amount as your outer fabric.
* Stuffing: This is where you can get creative! You can use:
* Polyester fiberfill (the classic choice)
* Shredded foam (great for a firmer cushion)
* Old clothes or fabric scraps (a fantastic way to recycle!)
* A combination of these!
For a 3-foot diameter cushion, you’ll need around 5-7 pounds of fiberfill, or an equivalent amount of other stuffing.
* Sewing Machine: A reliable sewing machine is essential.
* Thread: Choose a strong thread that matches your fabric.
* Scissors or Rotary Cutter: For precise fabric cutting.
* Measuring Tape or Ruler: Accuracy is key!
* Pins: Lots of pins to hold your fabric in place.
* Chalk or Fabric Marker: For marking your fabric.
* Large Compass or String and Pencil: To draw a perfect circle.
* Hand Sewing Needle: For closing the final opening.
* Patience: This project takes time and effort, so be patient with yourself!
Planning Your Cushion
Before you start cutting and sewing, let’s plan the size and design of your cushion.
* Decide on the Size: Consider where you’ll be using the cushion and how much space you have. A 3-foot diameter cushion is a good starting point, but feel free to adjust it to your liking.
* Choose Your Fabric Combination: Lay out your fabric scraps and experiment with different arrangements. Do you want a patchwork look, a solid color, or a combination of both?
* Sketch Your Design (Optional): If you’re feeling creative, sketch out your design on paper. This will help you visualize the finished product and plan your fabric placement.
Sewing the Cushion Cover
This is where the real fun begins! We’ll start by creating the outer cover of our floor puff.
1. Cutting the Fabric Circles
* Prepare Your Fabric: Iron your fabric to remove any wrinkles. This will make it easier to cut and sew.
* Draw the Circles: Using your compass or string and pencil, draw two large circles on your fabric. The diameter of the circles should be the same as your desired cushion size (e.g., 3 feet). If you’re using multiple fabric scraps, you can piece them together to create larger pieces before drawing the circles.
* Cut Out the Circles: Carefully cut out the circles along the lines you drew.
2. Creating the Side Panel
* Measure the Circumference: Measure the circumference of one of your fabric circles. This will be the length of your side panel.
* Determine the Width: Decide how thick you want your cushion to be. This will be the width of your side panel. A width of 8-12 inches is a good starting point.
* Cut the Side Panel: Cut a long strip of fabric that is the length of the circumference and the width you determined. If you don’t have a single piece of fabric long enough, you can sew multiple pieces together to create the desired length.
* Sew the Side Panel Ends Together: Fold the side panel in half, right sides together, and sew the short ends together to create a loop. This will form the side of your cushion.
3. Attaching the Side Panel to the Top Circle
* Pin the Side Panel to the Top Circle: Pin the side panel to one of the fabric circles, right sides together. Start by matching the seam of the side panel to one point on the circle. Then, continue pinning around the entire circle, easing the fabric as needed to distribute it evenly. This step requires patience!
* Sew the Side Panel to the Top Circle: Sew the side panel to the top circle, using a 1/2-inch seam allowance. Go slowly and carefully, making sure to catch both layers of fabric.
* Clip the Curves: Clip the curves of the seam allowance to reduce bulk and allow the fabric to lie flat. Be careful not to cut through the seam!
4. Attaching the Side Panel to the Bottom Circle
* Pin the Side Panel to the Bottom Circle: Pin the side panel to the remaining fabric circle, right sides together, just like you did with the top circle. Leave a 12-18 inch opening for stuffing.
* Sew the Side Panel to the Bottom Circle: Sew the side panel to the bottom circle, using a 1/2-inch seam allowance, leaving the opening unsewn. Remember to backstitch at the beginning and end of your stitching to secure the seam.
* Clip the Curves: Clip the curves of the seam allowance to reduce bulk and allow the fabric to lie flat.
Creating the Lining (Optional but Recommended)
Creating a lining will make your cushion more durable and prevent the stuffing from escaping.
1. Cutting the Lining Fabric
* Use the Same Pattern: Use the same fabric circles and side panel measurements you used for the outer cover to cut out the lining fabric.
2. Sewing the Lining
* Follow the Same Steps: Follow the same sewing steps you used for the outer cover to sew the lining together, leaving a larger opening (around 18-24 inches) for stuffing.
Stuffing the Cushion
This is where your cushion starts to take shape!
1. Stuffing the Lining (If Using)
* Turn the Lining Right Side Out: Turn the lining right side out.
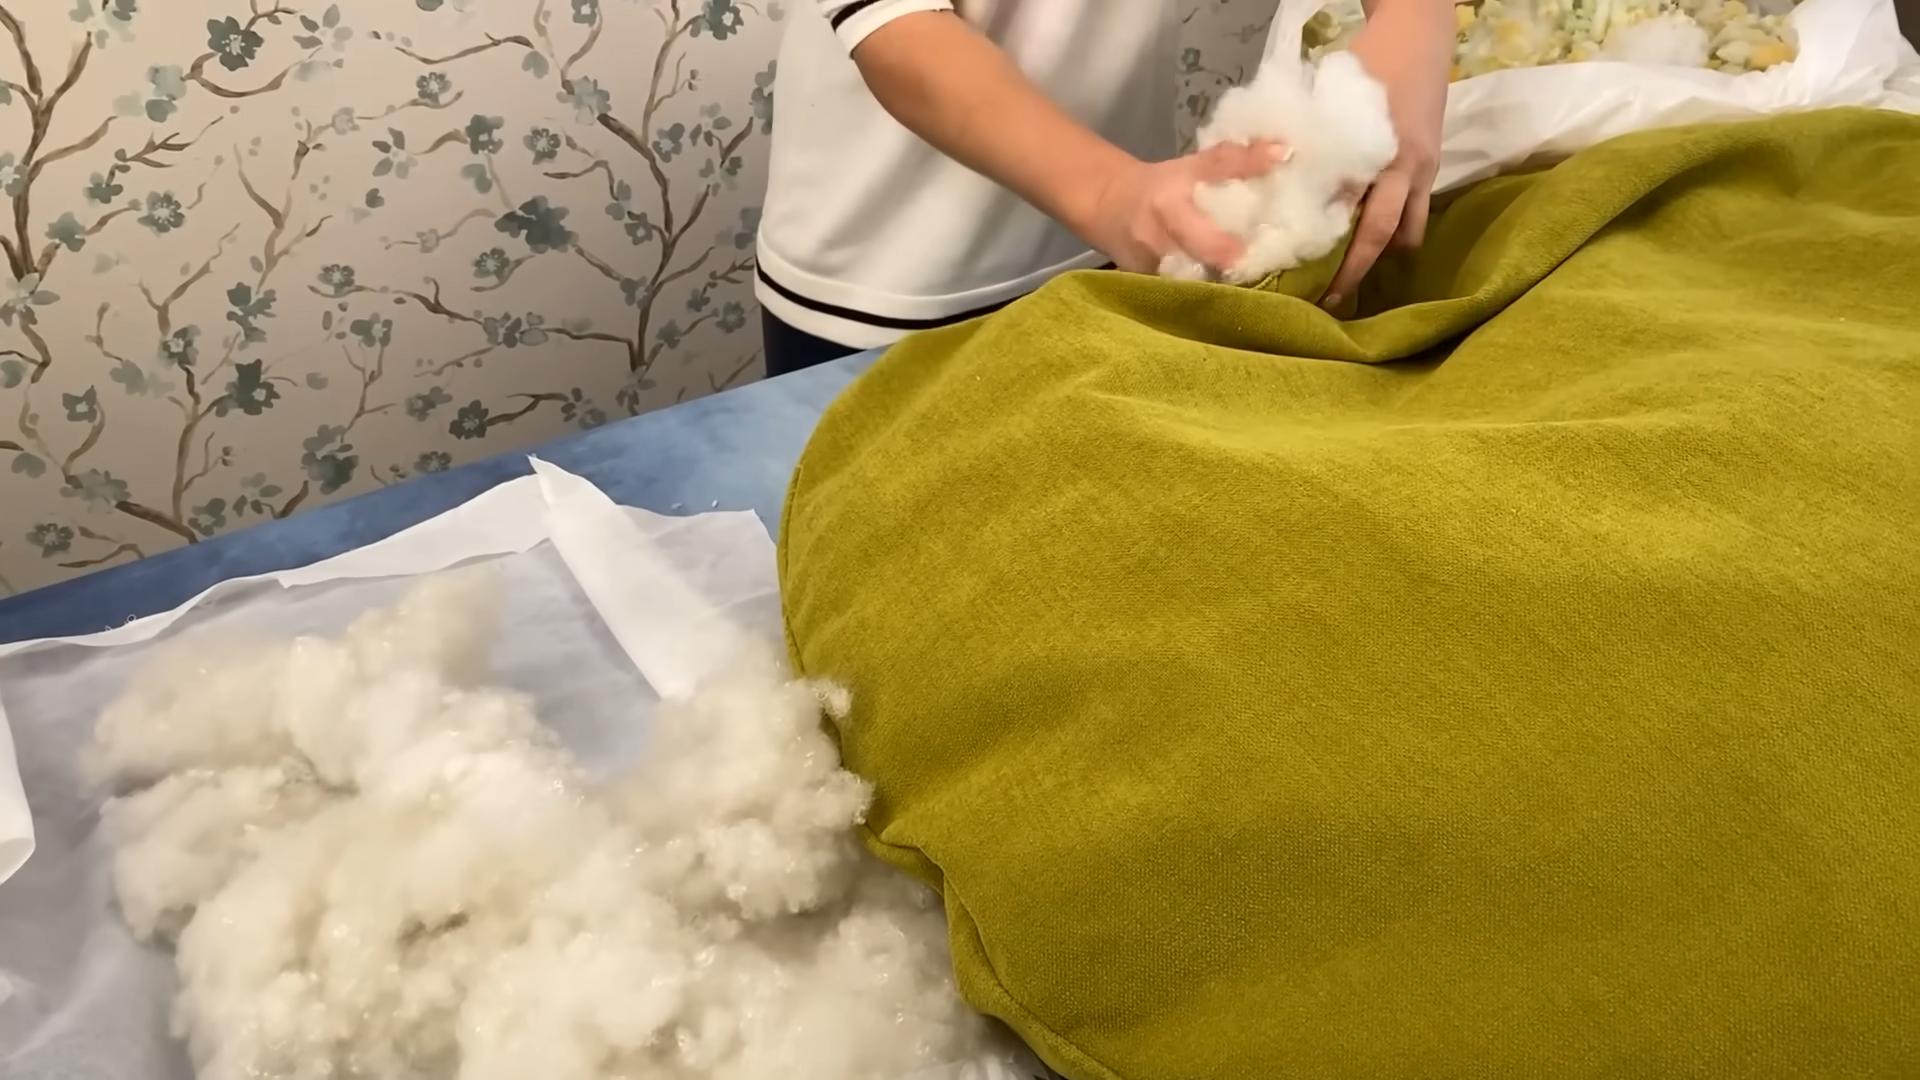
* Start Stuffing: Begin stuffing the lining with your chosen filling. Start with small handfuls and distribute the filling evenly throughout the cushion.
* Add More Filling: Continue adding filling until the lining is firm and plump, but not overly stuffed. You want it to be comfortable to sit on.
* Close the Opening: Once the lining is stuffed to your liking, hand-sew the opening closed using a hidden stitch.
2. Inserting the Lining into the Cover (If Using)
* Turn the Cover Inside Out: Turn the outer cover inside out.
* Insert the Lining: Carefully insert the stuffed lining into the outer cover.
3. Stuffing the Cover (If Not Using a Lining)
* Turn the Cover Right Side Out: Turn the outer cover right side out.
* Start Stuffing: Begin stuffing the cover with your chosen filling. Start with small handfuls and distribute the filling evenly throughout the cushion.
* Add More Filling: Continue adding filling until the cover is firm and plump, but not overly stuffed. You want it to be comfortable to sit on.
4. Closing the Opening
* Fold the Edges In: Fold the raw edges of the opening inward, creating a clean edge.
* Pin the Opening Closed: Pin the opening closed, making sure the edges are aligned.
* Hand-Sew the Opening Closed: Hand-sew the opening closed using a hidden stitch. This will create a seamless finish.
Finishing Touches
Now that your cushion is stuffed and closed, it’s time for the finishing touches!
* Fluff and Shape: Fluff and shape your cushion to distribute the filling evenly.
* Add Decorative Details (Optional): You can add decorative details such as buttons, tassels, or embroidery to personalize your cushion.
* Enjoy Your New Floor Puff Cushion! Find a cozy spot and enjoy your new, handmade floor puff cushion!
And there you have it! Your very own DIY floor puff cushion. I hope you enjoyed this project as much as I did. Remember, the beauty of DIY is that you can customize it to your own taste and needs. So, get creative, experiment with different fabrics and fillings, and have fun! Happy crafting!
Conclusion
So, there you have it! Creating your own DIY floor puff cushion isn’t just a fun project; it’s a game-changer for your home comfort and style. Forget those expensive store-bought options that often lack personality and don’t quite fit your space. This method empowers you to craft a unique, comfortable, and budget-friendly seating solution that perfectly reflects your taste and needs.
Why is this a must-try? Because it’s incredibly versatile. Need extra seating for movie night? Done. A cozy spot for reading? Absolutely. A playful addition to a child’s room? Perfect. And the best part? You control every aspect, from the size and shape to the fabric and filling. This means you can create a floor puff cushion that seamlessly integrates into your existing decor, adding a touch of personalized charm that no mass-produced item can match.
But the benefits extend beyond aesthetics. This DIY project is also a fantastic way to upcycle old clothes, blankets, or fabric scraps, giving them a new lease on life and reducing textile waste. It’s a win-win for your home and the environment!
Looking for variations? Consider adding a handle for easy portability. Experiment with different filling materials, such as shredded memory foam for extra support or buckwheat hulls for a more natural and breathable option. You could even create a patchwork design using various fabric scraps for a truly unique and eye-catching floor puff cushion. Think about adding embellishments like tassels, pom-poms, or embroidery to further personalize your creation. For a more structured puff, consider adding an inner lining made of sturdy canvas or denim. And if you’re feeling adventurous, try creating a giant floor puff cushion that can double as a makeshift bed!
Don’t be intimidated by the idea of DIY. This project is surprisingly simple, even for beginners. With a little patience and creativity, you can transform ordinary materials into a comfortable and stylish addition to your home.
We wholeheartedly encourage you to give this DIY floor puff cushion project a try. It’s a rewarding experience that will not only enhance your living space but also unleash your inner creativity. Once you’ve completed your masterpiece, we’d love to see it! Share your creations with us on social media using #DIYFloorPuffCushion and tell us about your experience. What fabrics did you use? What challenges did you overcome? What tips do you have for other DIY enthusiasts? Your insights could inspire others to embark on their own creative journeys. So go ahead, get crafting, and transform your space with a touch of handmade comfort!
Frequently Asked Questions (FAQ)
What kind of fabric is best for a DIY floor puff cushion?
The best fabric for your DIY floor puff cushion depends on your desired aesthetic, durability requirements, and budget. For a durable and long-lasting option, consider heavier fabrics like denim, canvas, upholstery fabric, or even repurposed outdoor fabrics. These materials can withstand regular use and are less likely to tear or wear out quickly. If you’re looking for a softer and more comfortable feel, consider using cotton, linen, velvet, or fleece. These fabrics are gentle on the skin and provide a cozy seating experience. For a more luxurious look, consider using silk or satin, but keep in mind that these fabrics may be more delicate and require special care. Ultimately, the choice is yours, so choose a fabric that you love and that complements your existing decor. Don’t be afraid to experiment with different textures and patterns to create a truly unique floor puff cushion.
What is the best filling for a floor puff cushion?
The filling you choose for your floor puff cushion will significantly impact its comfort and support. Here are some popular options:
* Polystyrene Beads (Beanbag Filling): This is a common and affordable option. They are lightweight and provide good support, but they can flatten over time and may require occasional refilling.
* Shredded Memory Foam: This option offers excellent support and conforms to your body shape for maximum comfort. It’s more expensive than polystyrene beads but provides a more luxurious feel.
* Buckwheat Hulls: A natural and eco-friendly option that provides firm support and allows for good airflow. They are heavier than other fillings and may make the cushion less portable.
* Kapok Fiber: A lightweight and fluffy natural fiber that provides good insulation and is resistant to mold and mildew.
* Old Clothes/Fabric Scraps: A great way to upcycle old materials and save money. Cut the fabric into small pieces and stuff them tightly into the cushion. This option may not provide as much support as other fillings, but it’s a sustainable and budget-friendly choice.
* Combination of Fillings: You can also combine different fillings to achieve the desired level of comfort and support. For example, you could use a base of polystyrene beads and top it with a layer of shredded memory foam.
Consider your personal preferences and budget when choosing the filling for your floor puff cushion.
How much filling do I need for my floor puff cushion?
The amount of filling you need will depend on the size and shape of your floor puff cushion. A good rule of thumb is to start with more filling than you think you’ll need and then gradually remove it until you achieve the desired level of firmness. It’s always better to have too much filling than not enough, as you can always remove excess filling but you can’t easily add more once the cushion is sewn shut. As a general guideline, a small floor puff cushion (approximately 24 inches in diameter) may require around 5-7 cubic feet of filling, while a larger cushion (approximately 36 inches in diameter) may require around 10-12 cubic feet of filling. However, these are just estimates, so it’s best to experiment and adjust the amount of filling as needed.
How do I clean my DIY floor puff cushion?
Cleaning your DIY floor puff cushion will depend on the fabric you used and the type of filling. If you used a washable fabric like cotton or linen, you can typically remove the cover and machine wash it on a gentle cycle. However, it’s always best to check the fabric care instructions before washing. For fabrics that are not machine washable, you can spot clean them with a mild detergent and a damp cloth. Avoid using harsh chemicals or bleach, as these can damage the fabric. If your floor puff cushion is filled with polystyrene beads, you may need to remove the beads before washing the cover. You can do this by carefully opening the cushion and pouring the beads into a large bag or container. Once the cover is clean and dry, you can refill it with the beads. For fillings like shredded memory foam or buckwheat hulls, it’s best to air out the cushion regularly to prevent moisture buildup and odors. You can also vacuum the cushion to remove dust and debris.
Can I make a floor puff cushion without sewing?
Yes, you can! While sewing provides a more durable and professional finish, there are no-sew methods for creating a floor puff cushion. One popular method involves using a large piece of fabric and tying the corners together to create a pouch. You can then fill the pouch with your desired filling and tie the opening shut. Another method involves using fabric glue or fusible webbing to attach the fabric pieces together. However, keep in mind that no-sew methods may not be as durable as sewn methods, so they may be better suited for occasional use or for projects where durability is not a primary concern.
How can I make my floor puff cushion more durable?
To make your floor puff cushion more durable, consider using a heavy-duty fabric like denim or canvas. Reinforce the seams by using a strong thread and sewing multiple rows of stitching. You can also add an inner lining made of sturdy fabric to protect the filling from wear and tear. If you’re using polystyrene beads as filling, consider using a double-layered bag to prevent the beads from escaping. Avoid placing your floor puff cushion in direct sunlight or exposing it to harsh weather conditions, as this can damage the fabric and filling. Regularly clean and maintain your floor puff cushion to prevent dirt and debris from accumulating.
Where can I find inspiration for my DIY floor puff cushion design?
There are many places to find inspiration for your DIY floor puff cushion design. You can browse online platforms like Pinterest, Instagram, and Etsy for ideas. Look through home decor magazines and blogs for inspiration. Visit fabric stores and craft stores to see the latest trends in fabrics and embellishments. Don’t be afraid to experiment with different colors, patterns, and textures to create a floor puff cushion that reflects your personal style. Consider the overall aesthetic of your home and choose a design that complements your existing decor. You can also draw inspiration from nature, art, and other sources. The possibilities are endless, so let your creativity run wild!

Leave a Comment