

DIY gold chain wall lamp – ever dreamt of adding a touch of Hollywood glamour to your home without breaking the bank? I know I have! Forget those overpriced designer lighting fixtures; we’re diving headfirst into a dazzling DIY project that’s both stylish and surprisingly simple.
Throughout history, lighting has been more than just a necessity; it’s been a symbol of status, creativity, and warmth. From ancient oil lamps to elaborate chandeliers, the way we illuminate our spaces speaks volumes. Now, we’re taking a modern twist on that tradition with a DIY project that’s as unique as you are.
Let’s be honest, finding the perfect lighting can be a real struggle. It’s either too expensive, doesn’t quite match your décor, or just lacks that special something. That’s where this DIY gold chain wall lamp comes in! It’s the perfect solution for adding a personalized, luxurious touch to any room. Imagine the warm glow reflecting off the gold chains, creating a sophisticated and inviting atmosphere. Plus, it’s a fantastic way to express your creativity and impress your friends with your crafting skills. I’m so excited to show you how to create this stunning piece – let’s get started!
DIY Gold Chain Wall Lamp: A Touch of Glamour You Can Make!
Hey there, fellow DIY enthusiasts! Are you looking to add a touch of elegance and unique style to your home without breaking the bank? I’ve got just the project for you: a stunning DIY gold chain wall lamp! This project is surprisingly simple, customizable to your taste, and will definitely be a conversation starter. Let’s get started!
What You’ll Need: The Supply List
Before we dive in, let’s gather all the necessary materials. Having everything on hand will make the process smooth and enjoyable.
* **Gold Chain:** This is the star of the show! I recommend using a sturdy, decorative chain. The length will depend on how long you want your lamp to be. I used about 6 feet for mine, but measure your space to be sure. Consider the weight capacity of the chain if you plan on using a heavier lampshade.
* **Wall Sconce:** You’ll need a basic wall sconce. You can find these at most hardware stores or online. Look for one with a simple design that will complement the gold chain. I chose one with a matte black finish to create a nice contrast.
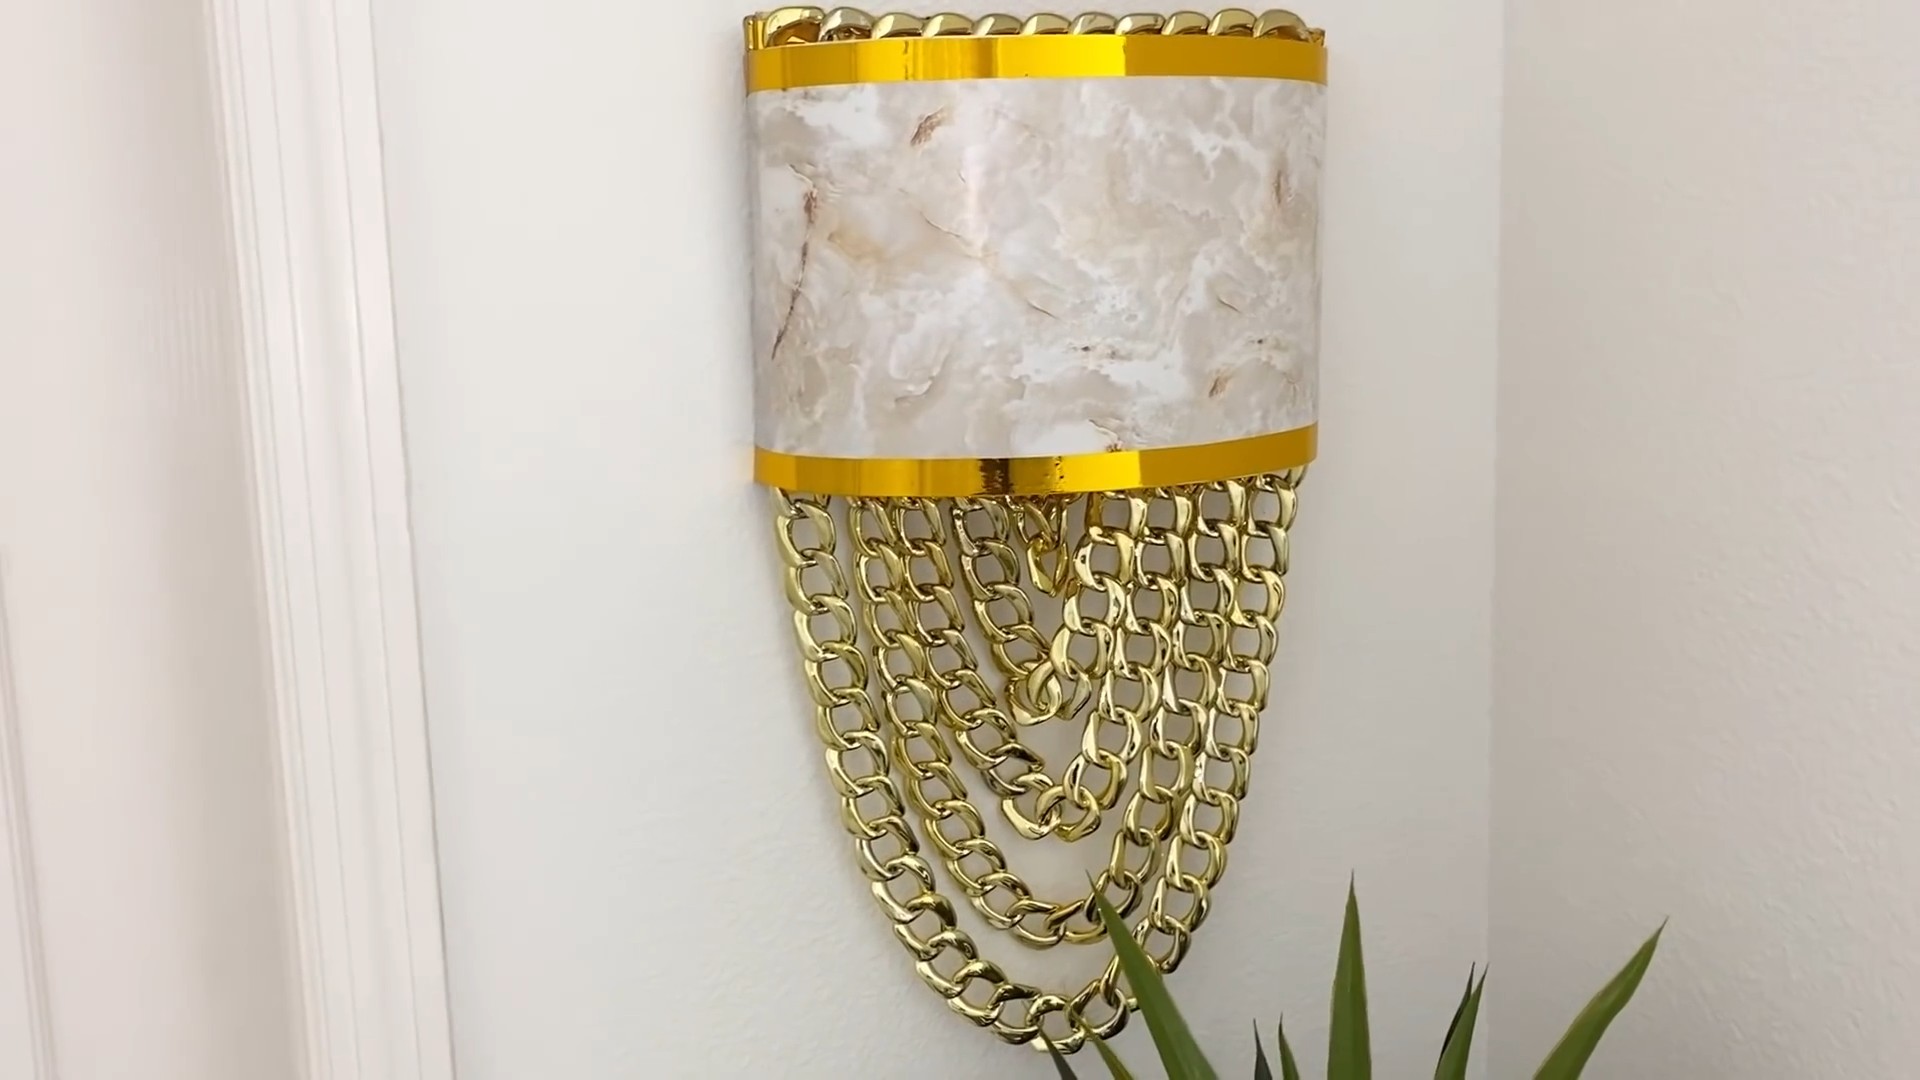
* **Lampshade:** The lampshade is another opportunity to personalize your lamp. Choose a shape, size, and color that you love. I went with a drum shade in a neutral linen fabric.
* **Light Bulb:** Select a light bulb that fits your sconce and provides the desired amount of light. I prefer LED bulbs for their energy efficiency and long lifespan.
* **Electrical Wire (Lamp Cord):** You’ll need enough wire to connect the sconce to the outlet. Make sure it’s the appropriate gauge for your lamp.
* **Wire Strippers:** Essential for safely stripping the insulation from the electrical wire.
* **Screwdrivers:** You’ll need a variety of screwdrivers to assemble the sconce and connect the wiring.
* **Pliers:** Helpful for bending and manipulating the chain and wire.
* **Electrical Tape:** For insulating wire connections. Safety first!
* **Wire Connectors (Wire Nuts):** To securely connect the wires.
* **Measuring Tape:** To ensure accurate measurements.
* **Pencil:** For marking measurements.
* **Drill (Optional):** If you need to create new holes in the sconce or wall.
* **Safety Glasses:** Protect your eyes from debris.
* **Gloves (Optional):** To protect your hands.
* **Gold Spray Paint (Optional):** If you want to paint the sconce or other hardware to match the chain.
* **Chain Connectors (S-Hooks or Similar):** To easily attach the chain to the sconce and lampshade.
* **Level:** To ensure the sconce is mounted straight.
Phase 1: Preparing the Sconce and Chain
This phase involves getting the sconce ready for the chain and ensuring the chain is the right length.
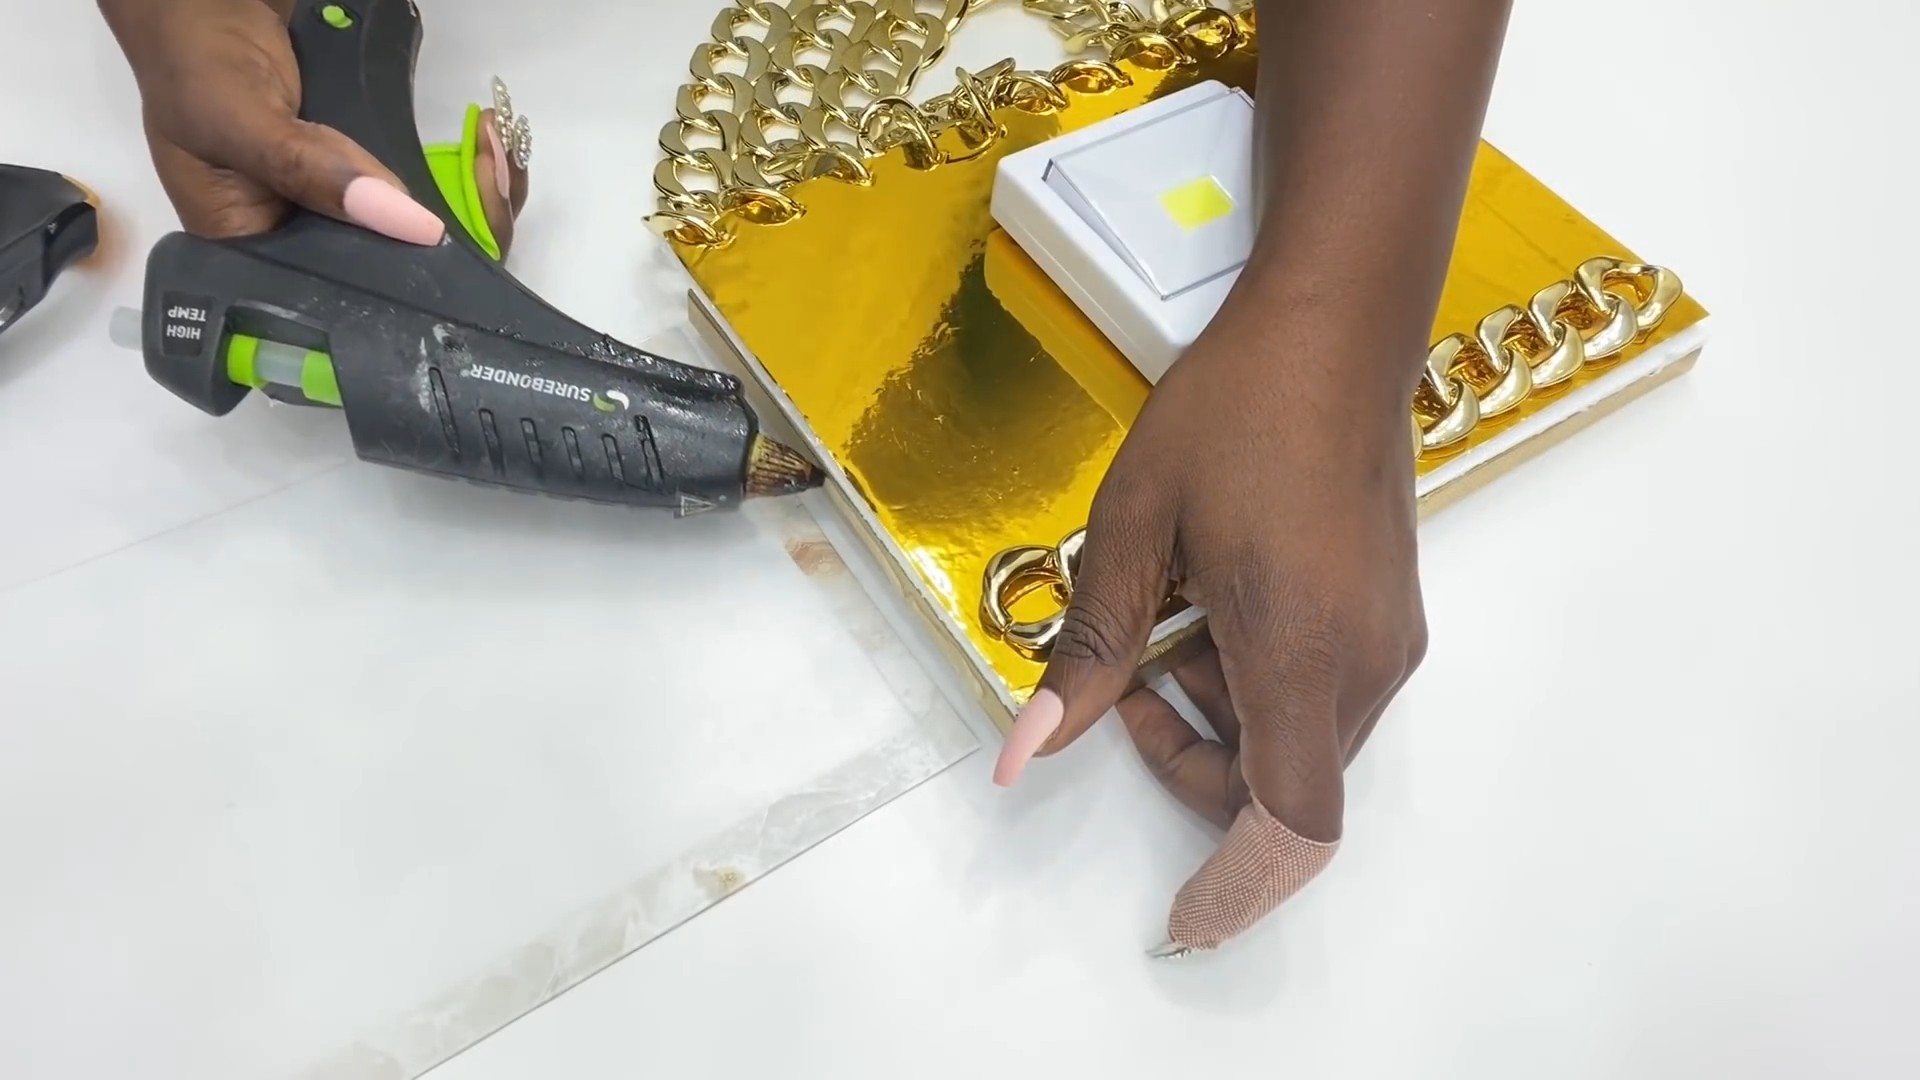
1. **Prepare the Sconce:** First, unpack your wall sconce and familiarize yourself with its components. If you want to paint the sconce gold to match the chain, now is the time to do it. Apply several light coats of spray paint, allowing each coat to dry completely before applying the next. Let it dry completely before moving on.
2. **Measure and Cut the Chain:** Use your measuring tape to determine the desired length of the chain. Remember to account for the distance between the sconce and the lampshade. I recommend hanging the chain from a temporary hook to visualize the length before cutting. Once you’re satisfied, use pliers to cut the chain to the correct length.
3. **Attach Chain Connectors:** Attach chain connectors (S-hooks or similar) to both ends of the chain. These will be used to connect the chain to the sconce and the lampshade.
Phase 2: Wiring the Sconce
Important Safety Note: If you’re not comfortable working with electrical wiring, please consult a qualified electrician. Electricity can be dangerous, and it’s always better to be safe than sorry.
1. **Disconnect Power:** Before you start working with any electrical wiring, make sure to disconnect the power to the circuit at the breaker box. This is crucial for your safety.
2. **Prepare the Wires:** Using wire strippers, carefully strip about ½ inch of insulation from the ends of the electrical wire (lamp cord).
3. **Connect the Wires:** Connect the wires from the sconce to the wires from the lamp cord using wire connectors (wire nuts). Typically, you’ll connect the black wire (hot) to the black wire, the white wire (neutral) to the white wire, and the green or bare wire (ground) to the ground screw on the sconce. Make sure the connections are secure.
4. **Secure the Connections:** Wrap each wire connection with electrical tape for added insulation and security.
5. **Tuck the Wires:** Carefully tuck the wires into the sconce’s wiring compartment.
Phase 3: Assembling the Lamp
Now for the fun part – putting everything together!
1. **Attach the Chain to the Sconce:** Use one of the chain connectors to attach the chain to the sconce. You may need to find a suitable point on the sconce to attach the chain, such as a screw or a pre-existing hole. If necessary, you can drill a new hole, but be careful not to damage the sconce.
2. **Mount the Sconce to the Wall:** Follow the manufacturer’s instructions to mount the sconce to the wall. Use a level to ensure that it’s straight.
3. **Attach the Lampshade to the Chain:** Use the other chain connector to attach the lampshade to the chain. Make sure the lampshade is hanging straight and securely.
4. **Install the Light Bulb:** Screw in your chosen light bulb.
5. **Restore Power:** Turn the power back on at the breaker box.
6. **Test the Lamp:** Turn on the lamp to make sure everything is working correctly.
Troubleshooting
* **Lamp Doesn’t Turn On:** Double-check all wire connections. Make sure the light bulb is working. Check the breaker box to ensure the circuit is not tripped.
* **Sconce is Crooked:** Use a level to adjust the sconce’s position on the wall.
* **Lampshade is Hanging Crooked:** Adjust the chain connectors to ensure the lampshade is hanging straight.
Customization Ideas
The beauty of this DIY project is that you can customize it to perfectly match your style. Here are a few ideas:
* **Different Chain Styles:** Experiment with different types of chains, such as rope chains, beaded chains, or even vintage chains.
* **Unique Lampshades:** Choose a lampshade with a bold pattern, texture, or color.
* **Add Embellishments:** Add beads, crystals, or other embellishments to the chain for extra sparkle.
* **Paint the Chain:** If you can’t find a gold chain you like, you can always paint a plain chain gold.
* **Vary the Chain Length:** Create a dramatic effect by using a longer chain that hangs lower.
* Use Different Finishes: Instead of gold, consider using silver, copper, or even a painted finish for the chain and sconce.
Final Thoughts
And there you have it! Your very own DIY gold chain wall lamp. I hope you enjoyed this project as much as I did. It’s a simple and affordable way to add a touch of glamour and personality to your home. Remember to always prioritize safety when working with electricity, and don’t be afraid to get creative and customize the lamp to your liking. Happy crafting!
Conclusion
So, there you have it! Transforming an ordinary space into something truly extraordinary doesn’t require a hefty budget or professional help. This DIY gold chain wall lamp project is more than just a craft; it’s an opportunity to infuse your personality and style into your home decor. The shimmering elegance of the gold chain, combined with the warm glow of the light, creates an ambiance that is both sophisticated and inviting.
Why is this DIY trick a must-try? Because it’s incredibly versatile, budget-friendly, and allows for complete customization. You’re not limited to the designs you find in stores; you’re the designer! You control the length of the chain, the style of the lamp, and the overall aesthetic. It’s a chance to unleash your creativity and create a truly unique piece that reflects your individual taste.
Consider these variations to further personalize your DIY gold chain wall lamp:
* **Chain Style:** Experiment with different types of gold chains. A thicker, chunkier chain will create a bolder statement, while a delicate, finer chain will offer a more subtle and elegant look. You could even incorporate chains of varying sizes for a textured effect.
* **Lamp Shade:** The lampshade is another area where you can really let your creativity shine. Opt for a classic drum shade for a timeless look, or choose a more modern geometric shape for a contemporary feel. Consider the color and material of the shade as well. A linen shade will diffuse the light beautifully, while a metallic shade will add a touch of glamour.
* **Light Bulb:** Don’t underestimate the impact of the light bulb! A warm white bulb will create a cozy and inviting atmosphere, while a cool white bulb will provide brighter, more focused light. Edison bulbs are a popular choice for their vintage aesthetic and warm, ambient glow.
* **Adding Embellishments:** For an extra touch of personality, consider adding embellishments to the chain or lampshade. You could string beads along the chain, attach small charms, or even paint the lampshade with a custom design.
* **Placement is Key:** Think about where you’ll be placing your DIY gold chain wall lamp. Is it for a reading nook, a bedside table, or a hallway? The placement will influence the size and style of the lamp you create.
This project is not only about creating a beautiful light fixture; it’s about the satisfaction of making something with your own hands. It’s about transforming something ordinary into something extraordinary. It’s about adding a personal touch to your home that reflects your unique style and creativity.
We are confident that you’ll love the results of this DIY project. The combination of the gold chain’s luxurious appeal and the soft, inviting light will transform any space into a haven of style and comfort.
So, what are you waiting for? Gather your materials, unleash your creativity, and get started on your own DIY gold chain wall lamp today! We can’t wait to see what you create.
Don’t forget to share your creations with us! Tag us in your photos on social media and let us know how this DIY project has transformed your space. We’re always inspired by the creativity of our readers and love to see the unique ways you put your own spin on our projects. Happy crafting!
Frequently Asked Questions (FAQ)
What kind of chain should I use for my DIY gold chain wall lamp?
The type of chain you use is entirely up to your personal preference and the overall aesthetic you’re aiming for. Consider the weight and thickness of the chain, as it will need to be strong enough to support the lamp and any additional embellishments you might add. Options include:
* **Cable Chain:** A classic and versatile choice, cable chain is strong and readily available in various sizes and finishes.
* **Rolo Chain:** Similar to cable chain but with rounder links, rolo chain offers a slightly more delicate look.
* **Figaro Chain:** Characterized by alternating sizes of links, figaro chain adds a touch of visual interest.
* **Box Chain:** Made up of square links, box chain has a sleek and modern appearance.
* **Ball Chain:** Consisting of small metal balls connected by short bars, ball chain offers a unique and industrial feel.
When choosing your chain, be sure to consider the overall weight capacity and ensure it’s appropriate for the lamp you’re creating.
What type of lamp kit should I use?
A basic pendant light kit is ideal for this project. Look for a kit that includes a socket, wire, and a canopy or ceiling plate for mounting. Ensure the kit is rated for the wattage of the bulb you plan to use. You can find these kits at most hardware stores or online retailers. Consider the color of the cord as well; a clear or gold cord will complement the gold chain nicely.
How do I attach the chain to the lamp kit?
This will depend on the specific lamp kit you’re using. However, a common method is to use pliers to open a link in the chain and attach it to the loop or hook on the lamp socket. You may also need to use a chain connector or a small metal ring to securely attach the chain. Make sure the connection is strong and secure to prevent the lamp from falling.
Can I use a dimmer switch with this DIY gold chain wall lamp?
Yes, you can use a dimmer switch, but you’ll need to ensure that both the lamp kit and the light bulb are compatible with dimmer switches. Look for a lamp kit that is specifically designed for use with dimmers, and choose a dimmable light bulb. LED bulbs are often a good choice for dimming, but be sure to check the packaging to confirm that they are compatible.
How do I clean my DIY gold chain wall lamp?
To clean your gold chain wall lamp, gently dust it with a soft cloth. For more stubborn dirt or grime, you can use a damp cloth with a mild soap solution. Be sure to dry the chain thoroughly after cleaning to prevent tarnishing. Avoid using harsh chemicals or abrasive cleaners, as these can damage the finish of the chain.
What if I don’t want to use a gold chain?
That’s perfectly fine! The beauty of this DIY project is that you can customize it to your liking. You can use any type of chain you prefer, such as silver, copper, or even a colored chain. You could also use rope, twine, or other materials to create a unique and personalized look.
Is this project suitable for beginners?
Yes, this project is relatively simple and suitable for beginners. However, it’s important to take your time and follow the instructions carefully. If you’re not comfortable working with electrical wiring, it’s always best to consult with a qualified electrician.
How much does this DIY project cost?
The cost of this project will vary depending on the materials you choose and where you purchase them. However, it’s generally a very budget-friendly project. You can often find affordable chain and lamp kits at hardware stores or online retailers.
Where can I find inspiration for my DIY gold chain wall lamp?
There are many sources of inspiration online, such as Pinterest, Instagram, and home decor blogs. You can also browse through magazines and catalogs to get ideas for different styles and designs. Don’t be afraid to experiment and create something that is truly unique to you.
How long will it take to complete this project?
The time it takes to complete this project will depend on your skill level and the complexity of the design. However, it’s generally a quick and easy project that can be completed in a few hours.


Leave a Comment