

DIY Laundry Basket from Bottle Caps: Sounds crazy, right? But trust me, you’re about to discover a surprisingly stylish and eco-friendly way to tackle that mountain of laundry! For generations, resourceful crafters have found innovative ways to repurpose everyday items, transforming what others see as trash into treasure. Think about it – our grandparents mended clothes, reused containers, and found value in everything. Now, we’re bringing that spirit of ingenuity into the 21st century with a fun, functional, and totally unique project.
Let’s face it, laundry baskets are often bulky, boring, and frankly, a bit of an eyesore. But what if yours could be a conversation starter, a testament to your creativity, and a small step towards a more sustainable lifestyle? This DIY Laundry Basket from Bottle Caps isn’t just about having a place to toss your dirty clothes; it’s about making a statement. It’s about showing that you care about the environment and that you’re not afraid to get your hands dirty (literally!).
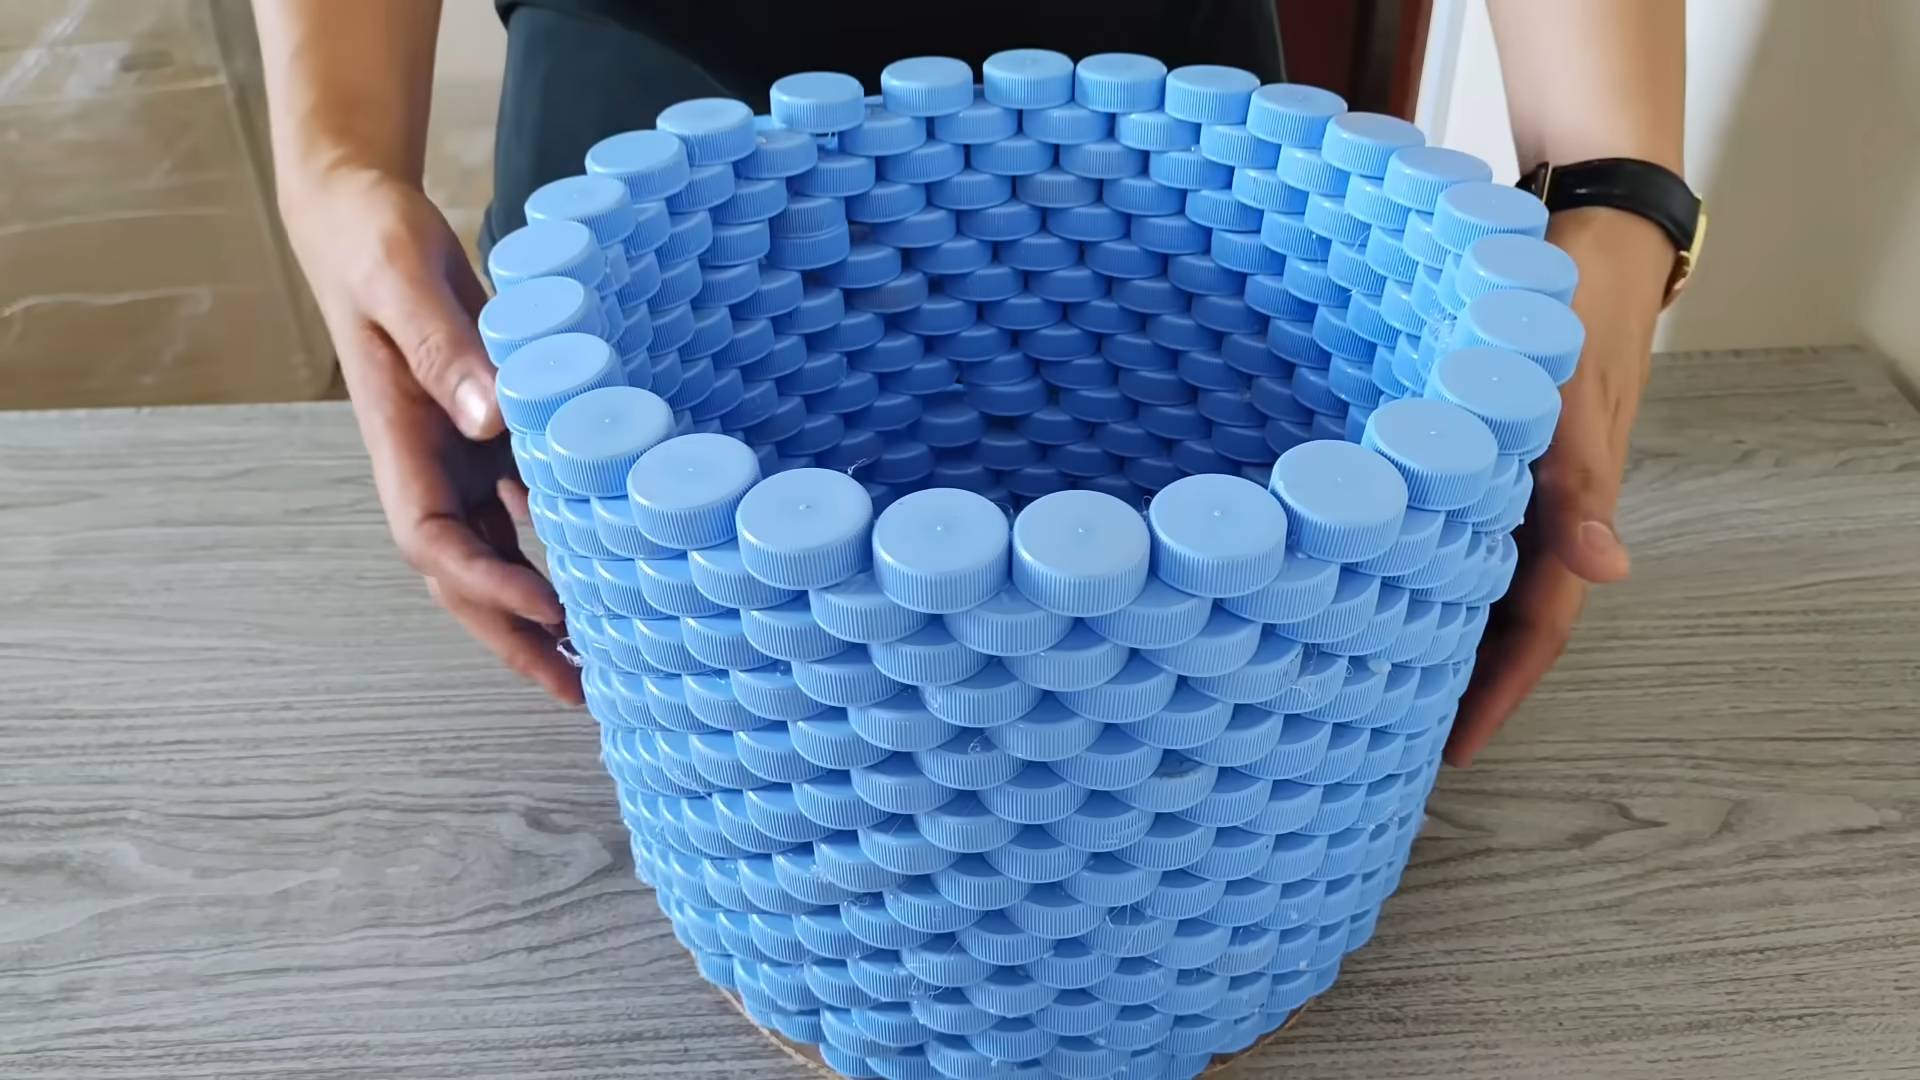
I know what you’re thinking: “Bottle caps? Really?” But imagine the vibrant colors, the unique texture, and the satisfaction of knowing you created something beautiful and useful from something that would have otherwise ended up in a landfill. Plus, it’s a fantastic way to involve the whole family in a fun and rewarding project. So, gather your bottle caps, grab your glue gun, and let’s get crafting! I’m excited to show you how to turn those humble bottle caps into a stunning and practical addition to your home.
DIY Laundry Basket from Bottle Caps: A Unique and Eco-Friendly Project
Hey there, fellow DIY enthusiasts! Are you looking for a creative and sustainable way to tackle your laundry woes? Well, look no further! I’m going to guide you through building a sturdy and eye-catching laundry basket entirely from recycled bottle caps. Yes, you read that right! This project is not only a fantastic way to reduce waste but also results in a truly unique and conversation-starting piece for your home. It’s a bit of a commitment, I won’t lie, but the satisfaction of creating something beautiful and functional from discarded materials is totally worth it.
Materials You’ll Need:
Before we dive in, let’s gather our supplies. This is crucial for a smooth and enjoyable crafting experience.
* Tons of Bottle Caps: Seriously, you’ll need a lot. Start collecting now! Aim for at least 2000-3000 depending on the size of your desired basket. The more, the merrier (and the bigger the basket!). Different colors will add visual interest.
* Strong Adhesive: Epoxy resin is my top recommendation for its durability and waterproof properties. You can also use a high-strength construction adhesive, but make sure it’s suitable for bonding plastic.
* Plywood or Sturdy Cardboard (for the base): This will provide a solid foundation for your basket. The size will depend on how large you want your basket to be. I suggest starting with a circle or square around 18-24 inches in diameter.
* Wire Mesh or Chicken Wire (optional, for reinforcement): If you want extra strength, especially for a larger basket, wire mesh is a great addition.
* Gloves: Protect your hands from the adhesive. Trust me, you’ll thank me later.
* Mixing Sticks and Containers: For mixing the epoxy resin. Use disposable ones for easy cleanup.
* Clamps or Heavy Objects: To hold the bottle caps in place while the adhesive dries.
* Sandpaper (optional): To smooth any rough edges on the base.
* Measuring Tape or Ruler: For accurate measurements.
* Pencil or Marker: For marking guidelines.
* Safety Glasses: Protect your eyes from splashes of adhesive.
* Well-Ventilated Workspace: Epoxy fumes can be strong, so work in a well-ventilated area or wear a respirator.
* Sealer (optional): A clear sealant can protect the finished basket and make it easier to clean.
Preparing the Bottle Caps:
This is probably the most time-consuming part, but it’s essential for a good result.
1. Cleaning: Wash all the bottle caps thoroughly with soap and water. Remove any dirt, grime, or sticky residue. Let them dry completely. This ensures proper adhesion.
2. Sorting (Optional): If you want a specific color pattern, sort the bottle caps by color. This will make the construction process easier. I personally love the random, colorful look, but feel free to get creative!
3. Flattening (Optional): Some people prefer to flatten the bottle caps for a smoother surface. You can do this with a hammer and a flat surface, but be careful not to damage them. I usually skip this step for a more textured look.
Building the Base:
The base is the foundation of your entire laundry basket, so take your time and make sure it’s sturdy.
1. Cut the Base: Using your plywood or sturdy cardboard, cut out the desired shape for the base. I recommend a circle or a square. Use a saw for plywood or a utility knife for cardboard.
2. Sand the Edges (Optional): If you’re using plywood, sand the edges to remove any splinters or rough spots. This will make it safer to handle.
3. Reinforce (Optional): If you’re using cardboard, you can reinforce it with extra layers of cardboard glued together. This will make it more durable. You can also use the wire mesh here, attaching it to the base with staples or glue.
Constructing the Walls:
This is where the magic happens! We’ll be building the walls of the laundry basket, bottle cap by bottle cap.
1. First Layer: Apply a generous amount of adhesive to the edge of the base. Start placing the bottle caps around the perimeter, with the open side facing inwards. Make sure they are tightly packed together. This first layer is crucial for establishing a strong foundation. Use clamps or heavy objects to hold the bottle caps in place while the adhesive dries. Let it dry completely according to the adhesive manufacturer’s instructions (usually 24 hours).
2. Subsequent Layers: Once the first layer is dry, apply another layer of adhesive on top of the first layer of bottle caps. Continue placing bottle caps, staggering them slightly to create a brick-like pattern. This will add strength and stability to the walls. Again, make sure the bottle caps are tightly packed together.
3. Maintaining Shape: As you build the walls, you may need to use clamps or supports to maintain the desired shape. You can use cardboard tubes or other cylindrical objects to help keep the walls straight.
4. Wire Mesh Reinforcement (Optional): If you’re using wire mesh, you can incorporate it into the walls as you build them. Simply wrap the wire mesh around the bottle caps and secure it with adhesive. This will provide extra strength and prevent the walls from collapsing.
5. Height: Continue adding layers of bottle caps until you reach the desired height for your laundry basket. Remember to let each layer dry completely before adding the next. I usually aim for a height of around 18-24 inches.
6. Top Edge: For the top edge, you can either continue the same pattern or create a decorative border. You can use different colored bottle caps or arrange them in a specific pattern. I like to use a row of bottle caps with the open side facing outwards for a finished look.
Adding Handles (Optional):
Handles make it easier to carry your laundry basket. Here are a few options:
1. Rope Handles: Drill two holes on opposite sides of the basket near the top. Thread a length of rope through each hole and tie a knot on the inside to secure it. You can use different types of rope, such as nautical rope or braided rope.
2. Bottle Cap Handles: Create handles by gluing together a series of bottle caps to form a strip. Attach the strips to the sides of the basket with adhesive. This creates a unique and cohesive look.
3. Metal Handles: Purchase metal handles from a hardware store and attach them to the sides of the basket with screws or bolts. Make sure the screws or bolts are long enough to go through the bottle caps and into the base.
Finishing Touches:
Almost there! These final steps will ensure your laundry basket is durable and looks its best.
1. Sealing (Optional): Apply a clear sealant to the entire basket to protect it from moisture and dirt. This will also make it easier to clean. Use a brush or spray-on sealant and follow the manufacturer’s instructions.
2. Cleaning Up: Remove any excess adhesive or sealant. Use a damp cloth to wipe down the basket.
3. Inspection: Carefully inspect the basket for any loose bottle caps. Re-glue them if necessary.
4. Curing Time: Allow the adhesive and sealant to fully cure before using the basket. This usually takes 24-48 hours.
Tips and Tricks:
Here are a few extra tips to help you along the way:
* Collect Bottle Caps from Friends and Family: Ask your friends and family to save their bottle caps for you. You’ll be surprised how quickly you can accumulate a large collection.
* Use Different Sizes of Bottle Caps: Using different sizes of bottle caps can add visual interest to your basket.
* Experiment with Colors: Don’t be afraid to experiment with different color combinations. You can create a rainbow effect, a monochromatic look, or a specific pattern.
* Work in Small Sections: It’s easier to work in small sections and let each section dry completely before moving on to the next. This will prevent the bottle caps from shifting or falling off.
* Be Patient: This project takes time and patience. Don’t get discouraged if it takes longer than you expected. The end result will be worth it!
* Consider the Weight: Remember that bottle caps are heavy. A large laundry basket made entirely of bottle caps can be quite heavy, especially when full of laundry. Consider adding wheels to the bottom for easier mobility.
* Safety First: Always wear gloves and safety glasses when working with adhesive. Work in a well-ventilated area to avoid inhaling fumes.
Alternative Uses:
While this guide focuses on a laundry basket, the same technique can be used to create other items, such as:
* Storage Bins: Perfect for organizing toys, books, or craft supplies.

Conclusion
So, there you have it! Transforming discarded bottle caps into a functional and surprisingly stylish laundry basket is more than just a craft project; it’s a statement. It’s a statement about sustainability, about resourcefulness, and about the beauty that can be found in the unexpected. This DIY laundry basket project is a testament to the fact that creativity knows no bounds and that even the most humble materials can be repurposed into something truly remarkable.
Why is this DIY trick a must-try? Because it’s not just about saving money (though that’s certainly a perk!). It’s about actively participating in reducing waste and giving new life to materials that would otherwise end up in landfills. It’s about creating something unique and personal for your home, a conversation starter that reflects your values and your ingenuity. And let’s be honest, who wouldn’t want to show off a laundry basket made entirely of bottle caps? It’s a guaranteed head-turner!
Beyond the environmental and aesthetic benefits, this project offers a fantastic opportunity to unleash your creativity. Feel free to experiment with different color combinations and patterns. You could create a mosaic design, arrange the caps in a gradient, or even spell out words or initials. Consider using different sizes of bottle caps for added texture and visual interest. For a more robust basket, you might reinforce the structure with wire mesh or a sturdy frame. You could even line the inside of the basket with fabric to protect delicate items.
Don’t be afraid to personalize your creation! Add embellishments like beads, buttons, or even small toys to the bottle caps. Paint them with vibrant colors or use metallic finishes for a touch of glamour. The possibilities are truly endless.
We understand that embarking on a project like this can seem daunting at first, but we assure you that the process is incredibly rewarding. The satisfaction of seeing your vision come to life, of transforming trash into treasure, is an experience that’s hard to beat. And remember, even if your first attempt isn’t perfect, that’s okay! Every mistake is a learning opportunity, and every bottle cap you collect brings you one step closer to your finished masterpiece.
We wholeheartedly encourage you to give this DIY laundry basket project a try. Gather your bottle caps, unleash your inner artist, and create a functional and beautiful piece of art for your home. And most importantly, don’t forget to share your experience with us! We’d love to see your creations and hear about your tips and tricks. Post photos of your finished laundry basket on social media using the hashtag #BottleCapBasketDIY and tag us so we can admire your handiwork. Let’s inspire others to embrace sustainability and creativity, one bottle cap at a time! This **DIY laundry basket** is a fun and eco-friendly project that you won’t regret starting.
FAQ
How many bottle caps do I need to make a laundry basket?
The number of bottle caps required will depend entirely on the size of the laundry basket you intend to create. A smaller basket, suitable for delicates or a single person, will obviously require fewer caps than a large family-sized basket. As a general estimate, you might need anywhere from 500 to 1500 bottle caps for a standard-sized laundry basket. It’s always better to overestimate and have extra caps on hand than to run short mid-project. We recommend starting with a rough estimate based on the dimensions you have in mind and then collecting more as needed. Remember to factor in the overlap between caps when calculating.
What’s the best way to clean the bottle caps before using them?
Cleaning the bottle caps is a crucial step to ensure a hygienic and aesthetically pleasing final product. The best method is to soak them in warm, soapy water for at least 30 minutes. Use a mild dish soap and a scrub brush to remove any dirt, grime, or sticky residue. For stubborn stains or rust, you can try using a solution of vinegar and water. After scrubbing, rinse the caps thoroughly with clean water and allow them to air dry completely before starting your project. Make sure they are completely dry to prevent any mold or mildew growth later on.
What type of adhesive is best for attaching the bottle caps?
Choosing the right adhesive is essential for the durability and longevity of your DIY laundry basket. We recommend using a strong, waterproof adhesive that is suitable for bonding metal to metal or metal to plastic, depending on the material of your base (if you’re using one). Construction adhesive or epoxy resin are excellent choices. Hot glue can also be used, but it may not be as durable in the long run, especially if the basket will be exposed to moisture or heavy use. Always follow the manufacturer’s instructions for the adhesive you choose and allow it to cure completely before using the basket. Test a small area first to ensure the adhesive bonds well with your bottle caps.
How can I make the laundry basket more sturdy?
While the bottle caps themselves can provide a surprising amount of structural integrity, there are several ways to enhance the sturdiness of your DIY laundry basket. One option is to create a frame using wire mesh or a sturdy plastic container. Attach the bottle caps to the frame using adhesive or wire. Another approach is to reinforce the seams between the bottle caps with extra adhesive or by overlapping the caps more extensively. You can also consider adding a base to the basket, made from plywood or a similar material, to provide additional support. For larger baskets, internal supports or dividers can also help to prevent sagging.
Can I paint or decorate the bottle caps?
Absolutely! Painting or decorating the bottle caps is a fantastic way to personalize your DIY laundry basket and add a unique touch. You can use acrylic paints, spray paints, or even permanent markers to create different designs and patterns. Before painting, make sure the bottle caps are clean and dry. You may also want to apply a primer to help the paint adhere better. After painting, consider sealing the caps with a clear coat to protect the paint from chipping or fading. Get creative with your designs! You can create mosaic patterns, geometric shapes, or even paint individual caps with different colors to create a rainbow effect.
How do I prevent the bottle caps from scratching clothes?
To prevent the bottle caps from scratching or snagging your clothes, it’s essential to smooth out any sharp edges or rough surfaces. You can use sandpaper or a file to gently smooth the edges of the bottle caps before attaching them to the basket. Another option is to line the inside of the basket with fabric. This will create a soft barrier between the bottle caps and your clothes. You can use any type of fabric you like, such as cotton, linen, or felt. Simply cut the fabric to size and attach it to the inside of the basket using adhesive or by sewing it in place.
What if I don’t have enough bottle caps? Where can I get more?
Collecting enough bottle caps for a laundry basket can take time, but there are several ways to speed up the process. Start by asking friends, family, and neighbors to save their bottle caps for you. You can also contact local bars, restaurants, and recycling centers to see if they are willing to donate bottle caps. Online marketplaces and craft stores may also sell bottle caps in bulk. Another option is to supplement your collection with bottle caps made from other materials, such as plastic or metal. Just make sure they are similar in size and shape to your existing bottle caps.
How long will this project take to complete?
The time required to complete this DIY laundry basket project will vary depending on several factors, including the size of the basket, the number of bottle caps you have, and your level of experience with crafting. Collecting the bottle caps can take several weeks or even months. Cleaning and preparing the caps can take a few hours. Assembling the basket itself can take anywhere from a few hours to a few days, depending on the complexity of the design and the type of adhesive you use. Be patient and enjoy the process! This is a project that is best approached with a relaxed and creative mindset.


Leave a Comment