

DIY Onion Bottle Garden: Ever dreamt of having a miniature garden thriving right on your windowsill, bursting with fresh herbs and vibrant greens, even if you’re short on space? I know I have! Well, get ready to turn that dream into reality with this incredibly simple and rewarding DIY project. We’re diving into the wonderful world of creating your very own onion bottle garden!
Bottle gardens, in their essence, are a modern take on the Victorian terrarium, a fascinating trend that swept through homes in the 19th century. Back then, they were a symbol of scientific curiosity and a way to bring the outdoors in. Today, we’re repurposing that concept with a sustainable twist, using readily available plastic bottles to create a self-contained ecosystem perfect for growing onions and other small plants.
Why an onion bottle garden, you ask? Because let’s face it, who doesn’t love fresh onions? And sometimes, buying a whole bag means half of them end up forgotten in the crisper drawer. This DIY trick not only helps you reduce food waste by regrowing those onion scraps, but it also provides a constant supply of fresh greens for salads, soups, and garnishes. Plus, it’s a fantastic way to introduce kids to the magic of gardening and the importance of sustainability. So, grab your empty plastic bottle, a few onion scraps, and let’s get started on this fun and fulfilling DIY Onion Bottle Garden project! I promise, you’ll be amazed at how easy and rewarding it is.
DIY Onion Bottle Garden: Sprouting Green from Recycled Plastic
Hey there, fellow plant enthusiasts! Ever thought about turning your kitchen scraps into a mini-garden? I’m going to walk you through creating a super cool onion bottle garden. It’s a fantastic way to recycle plastic bottles, grow fresh green onions right in your kitchen, and add a touch of green to your space. Plus, it’s incredibly easy and satisfying!
What You’ll Need: The Gardener’s Toolkit
Before we dive in, let’s gather our supplies. This project is all about using what you have, so feel free to get creative with substitutions!
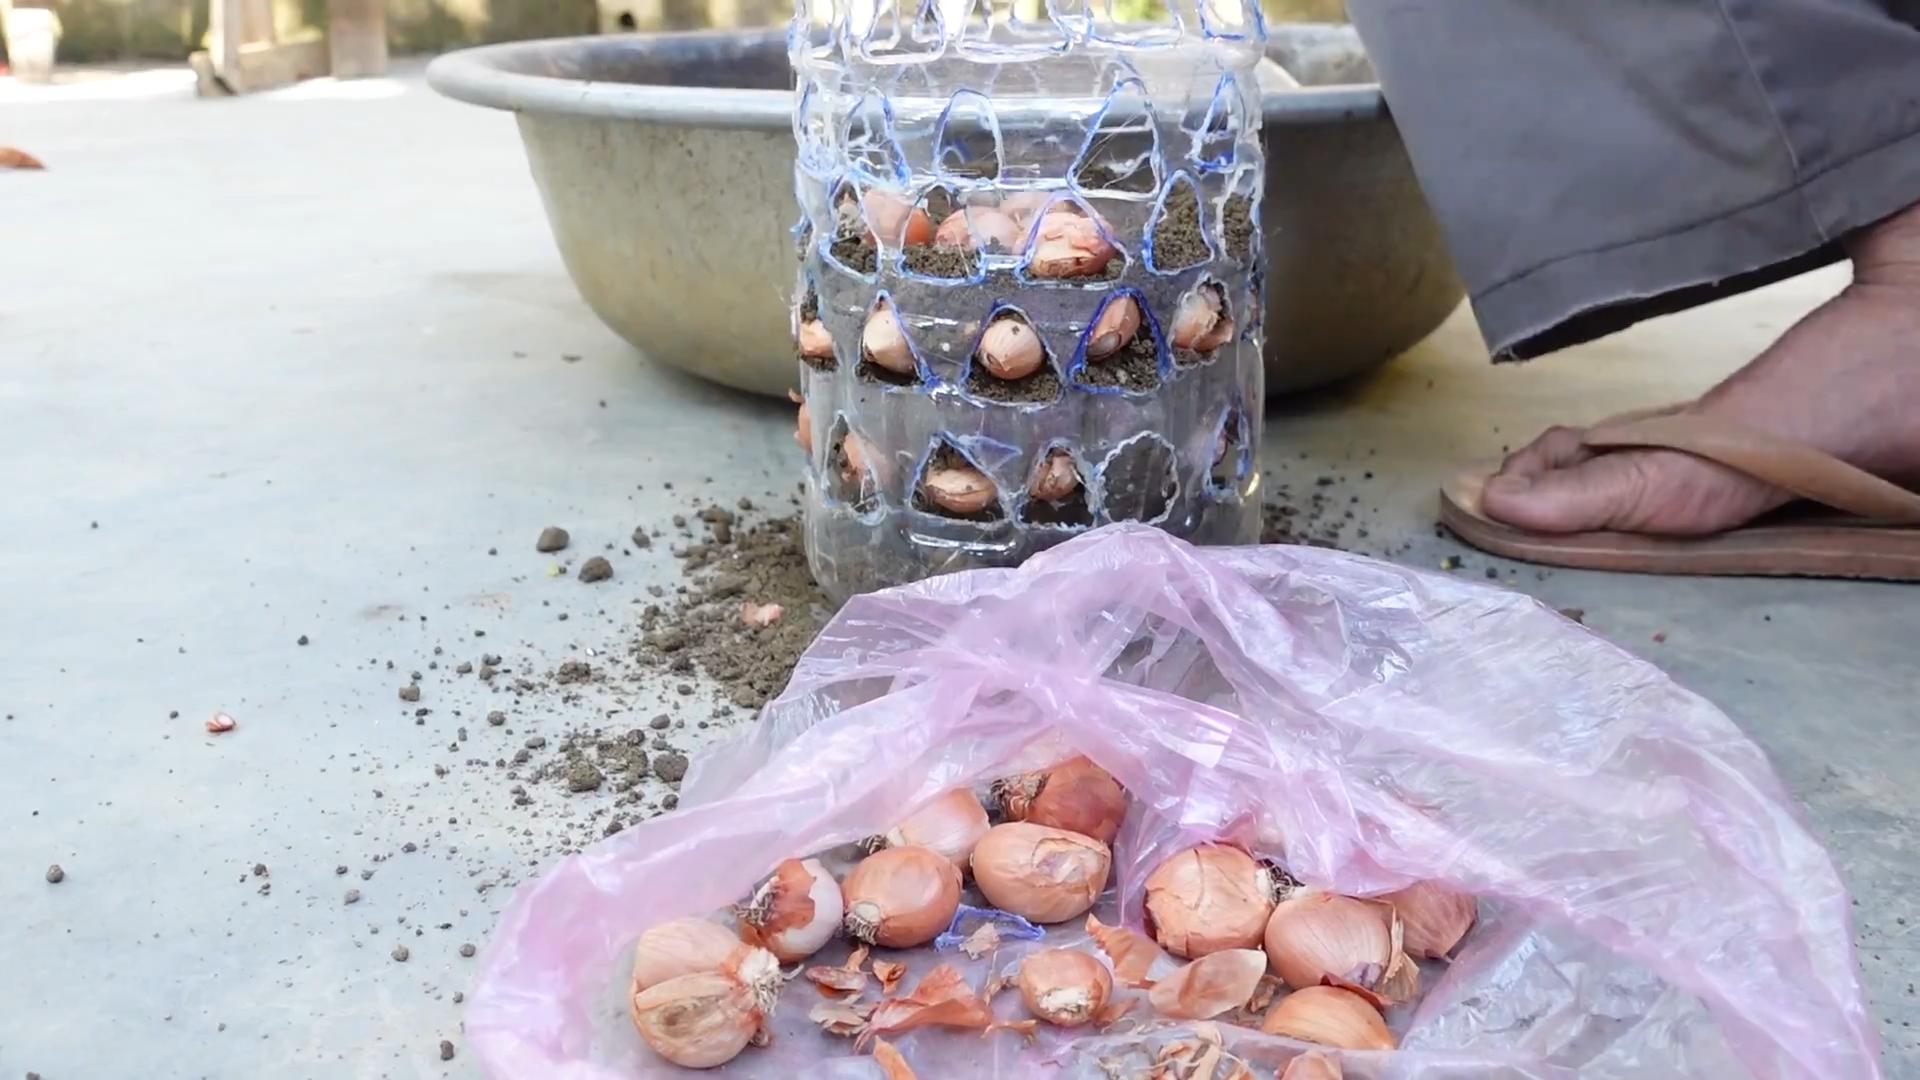
* Plastic Bottle: A 2-liter soda bottle or any similar-sized plastic bottle will work perfectly. Make sure it’s clean and dry.
* Onions: We’re using onions that have already started to sprout. Those forgotten onions in your pantry with little green shoots are perfect! You can also use onions that haven’t sprouted yet, but it will take longer to see results.
* Potting Soil: Regular potting soil is ideal. It provides the necessary nutrients for your onions to thrive.
* Gravel or Small Stones: This is for drainage. We’ll put a layer at the bottom of the bottle to prevent waterlogging.
* Scissors or Utility Knife: For cutting the plastic bottle. Be careful!
* Water: To keep our onions happy and hydrated.
* Optional: Decorative Elements: Paint, markers, twine, or anything else you want to use to personalize your bottle garden.
* Gloves: To keep your hands clean.
Step-by-Step Guide: Building Your Onion Paradise
Okay, let’s get our hands dirty (or not, if you’re wearing gloves!). I’ll guide you through each step to create your own onion bottle garden.
1. Prepare the Bottle:
* Carefully cut the plastic bottle in half horizontally. You can use scissors or a utility knife. I prefer a utility knife for a cleaner cut, but be extra cautious.
* The bottom half of the bottle will be our planter, and the top half will act as a funnel and humidity dome (optional).
* Clean the cut edges if needed to remove any sharp pieces of plastic.
2. Create Drainage:
* Pour a layer of gravel or small stones into the bottom of the bottle. This layer should be about 1-2 inches thick.
* The gravel will help prevent the soil from becoming waterlogged, which can rot the onion bulbs.
3. Add the Soil:
* Fill the bottom half of the bottle with potting soil, leaving about an inch or two of space at the top.
* Gently press down on the soil to compact it slightly.
* Make sure the soil is evenly distributed.
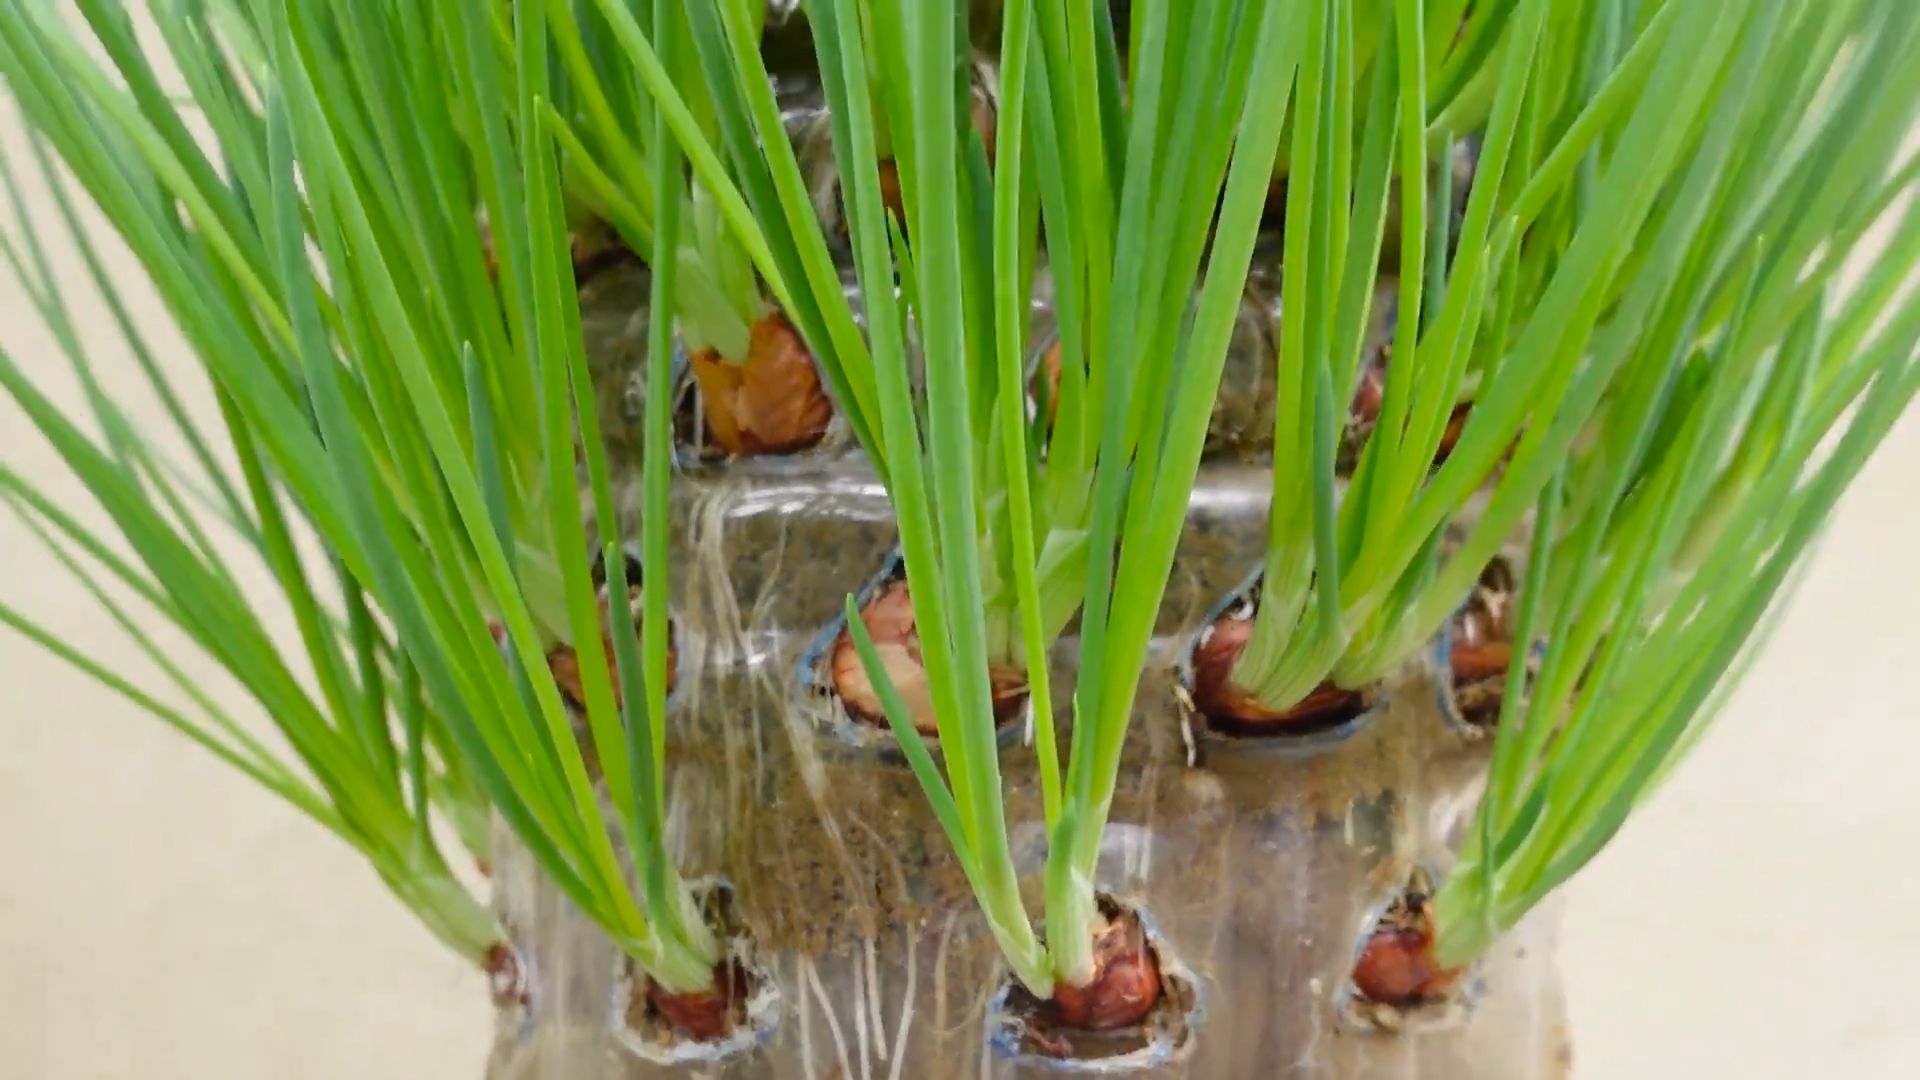
4. Plant the Onions:
* This is the fun part! Take your sprouted onions and gently nestle them into the soil.
* If your onions have long roots, you can trim them slightly before planting.
* Space the onions about 1-2 inches apart.
* Make sure the green shoots are pointing upwards.
* Cover the onion bulbs with soil, leaving the green shoots exposed.
5. Water Thoroughly:
* Water the soil thoroughly until it’s moist but not soggy.
* You should see water draining out of the bottom of the bottle (into the gravel layer).
* This helps settle the soil and provides the onions with the initial moisture they need.
6. Optional: Create a Humidity Dome:
* If you want to create a more humid environment for your onions, you can use the top half of the bottle as a dome.
* Simply invert the top half of the bottle and place it over the bottom half, creating a mini-greenhouse effect.
* This is especially helpful if you live in a dry climate.
* Remove the dome for a few hours each day to allow for ventilation and prevent mold growth.
7. Find the Perfect Spot:
* Place your onion bottle garden in a sunny location. A windowsill is ideal.
* Onions need plenty of sunlight to grow properly.
* If you don’t have a sunny windowsill, you can use a grow light.
8. Water Regularly:
* Water your onions regularly, keeping the soil moist but not soggy.
* Check the soil moisture by sticking your finger into the soil. If it feels dry, it’s time to water.
* Avoid overwatering, as this can lead to root rot.
9. Harvest Your Greens:
* Once the green shoots have grown to a reasonable size (a few inches), you can start harvesting them.
* Simply snip off the green shoots with scissors.
* The onions will continue to produce new shoots, so you can harvest them repeatedly.
* Use your fresh green onions in salads, soups, stir-fries, or any other dish that calls for them.
10. Enjoy Your Creation:
* That’s it! You’ve successfully created your own onion bottle garden.
* Enjoy the fresh green onions and the satisfaction of growing your own food.
* Don’t forget to admire your handiwork!
Troubleshooting Tips: Keeping Your Onions Happy
Sometimes, things don’t go exactly as planned. Here are a few common issues you might encounter and how to fix them:
* Yellowing Leaves: This could be a sign of overwatering or underwatering. Check the soil moisture and adjust your watering accordingly. It could also mean they need more sunlight.
* Slow Growth: Make sure your onions are getting enough sunlight. If they’re not, try moving them to a sunnier location or using a grow light. Also, ensure the soil is nutrient-rich. You might consider adding a diluted liquid fertilizer every few weeks.
* Mold Growth: This is usually caused by too much humidity and not enough ventilation. Remove the humidity dome for longer periods of time to allow for better airflow. You can also try adding a small fan to circulate the air.
* Rotting Bulbs: This is a sign of overwatering. Make sure the soil is well-draining and avoid watering too frequently. If the bulbs are already rotting, it’s best to remove them to prevent the rot from spreading to the other onions.
Adding a Personal Touch: Decorating Your Bottle Garden
Now that you’ve got the basics down, let’s talk about making your onion bottle garden truly unique! This is where your creativity can shine.
* Paint the Bottle: Use acrylic paints to decorate the outside of the bottle. You can paint patterns, landscapes, or anything else that inspires you.
* Wrap with Twine or Yarn: Wrap the bottle with twine or yarn for a rustic look. You can use hot glue to secure the twine in place.
* Add Labels: Create labels for your onions using decorative paper or tags. You can write the name of the onion variety or a fun message.
* Use Decorative Stones or Glass Beads: Add a layer of decorative stones or glass beads on top of the soil for a pop of color.
* Create a Miniature Scene: Add small figurines or other decorative elements to create a miniature scene in your bottle garden.
Beyond Onions: Expanding Your Bottle Garden Horizons
Once you’ve mastered the onion bottle garden, why stop there? You can use the same technique to grow other herbs and vegetables!
* Garlic: Plant garlic cloves in the same way you plant onions.
* Lettuce: Start lettuce seeds in your bottle garden for a continuous supply of fresh greens.
* Herbs: Grow herbs like basil, mint, or parsley in your bottle garden.
* Sprouts: Use your bottle garden to sprout seeds like alfalfa or broccoli sprouts.
Why I Love This Project: The Benefits of Bottle Gardening
I’m a huge fan of this project for so many reasons! Here’s why I think you’ll love it too:
* Recycling: It’s a great way to recycle plastic bottles and reduce waste.
* Sustainability: It promotes sustainable living by growing your own food.
* Fresh Produce: You’ll have access to fresh, homegrown green onions right in your kitchen.
* Space-Saving: It’s perfect for small spaces, like apartments or balconies.
* Educational: It’s a fun and educational project for kids and adults alike.
* Therapeutic: Gardening is known to be therapeutic and stress-relieving.
* Cost-Effective: It’s a budget-friendly way to grow your own food.
So, there you have it! Your complete guide to creating your very own onion bottle garden. I hope you
Conclusion
So, there you have it! Transforming a humble onion into a thriving bottle garden is more than just a fun project; it’s a miniature ecosystem you can create with your own two hands. This DIY onion bottle garden offers a unique blend of sustainability, creativity, and horticultural delight, making it a must-try for anyone looking to add a touch of green to their indoor space.
Why is this a must-try? Because it’s incredibly accessible. You likely already have most, if not all, of the materials needed. It’s also a fantastic way to teach children about plant life cycles, resourcefulness, and the beauty of nature. Beyond the educational aspect, it’s simply a beautiful and calming addition to any room. Watching the onion sprout and grow within its glass enclosure is a rewarding experience that connects you to the natural world, even in the heart of the city.
But the fun doesn’t stop there! Feel free to experiment with different types of onions. Red onions, shallots, or even garlic cloves can be used to create unique variations. Consider adding small pebbles or activated charcoal to the bottom of the bottle to improve drainage and filtration. You can also introduce tiny figurines or decorative elements to create a miniature landscape within your bottle garden. Think fairy gardens, zen gardens, or even a miniature farm scene!
For a more advanced project, you could try incorporating other small plants alongside the onion. Succulents, mosses, or air plants can create a visually stunning and self-sustaining ecosystem. Just be sure to research the specific needs of each plant to ensure they thrive together. Remember to choose plants that prefer similar light and moisture conditions.
The possibilities are truly endless! This DIY onion bottle garden is a blank canvas for your creativity. It’s a chance to express your personal style and create a unique piece of living art.
We wholeheartedly encourage you to give this DIY trick a try. It’s a simple, affordable, and incredibly rewarding project that will bring joy and a touch of nature into your home. Don’t be afraid to experiment, get creative, and most importantly, have fun!
Once you’ve created your own onion bottle garden, we’d love to see it! Share your photos and experiences with us on social media using [Your Hashtag Here]. We can’t wait to see your creations and hear about your journey into the world of miniature gardening. Let’s inspire each other and spread the joy of this simple yet magical DIY project. Happy gardening!
Frequently Asked Questions (FAQ)
What kind of onion is best for a bottle garden?
While any onion can technically be used, we recommend using a regular yellow or white onion for your first attempt. These varieties tend to sprout readily and are readily available. Red onions also work well and add a pop of color. Shallots and even garlic cloves can be used, but they may have slightly different growth patterns and require a bit more attention. The key is to choose an onion that is firm, healthy, and free from any signs of rot or mold. Smaller onions are generally easier to fit into bottles with narrower openings.
How much light does my onion bottle garden need?
Onions, like most plants, need light to grow. Place your bottle garden in a location that receives bright, indirect sunlight. Avoid direct sunlight, especially during the hottest part of the day, as this can scorch the leaves and overheat the bottle. A windowsill facing east or west is usually ideal. If you don’t have access to natural light, you can supplement with a grow light. Position the grow light a few inches above the bottle garden and leave it on for 12-14 hours per day.
How often should I water my onion bottle garden?
The beauty of a bottle garden is that it’s relatively self-sustaining. However, you’ll still need to monitor the moisture levels. Water sparingly, only when the soil appears dry to the touch. Overwatering can lead to rot and fungal growth. A good rule of thumb is to add a small amount of water (a tablespoon or two) every week or two, depending on the humidity and temperature of your environment. The goal is to keep the soil slightly moist, not soggy. If you notice condensation forming on the inside of the bottle, it means the humidity is high and you may need to water less frequently.
My onion is starting to rot. What should I do?
Rot is usually caused by overwatering or poor drainage. If you notice signs of rot, such as a foul odor or mushy spots on the onion, take immediate action. Remove the onion from the bottle and carefully trim away any affected areas. Rinse the remaining healthy portion of the onion with clean water and replant it in fresh, well-draining soil. Make sure the bottle has adequate drainage holes or add a layer of pebbles to the bottom to improve drainage. Reduce the frequency of watering and ensure the bottle garden is in a well-ventilated area.
Can I add fertilizer to my onion bottle garden?
Generally, fertilizer is not necessary for an onion bottle garden, especially in the early stages of growth. The onion itself contains enough nutrients to sustain its initial growth. However, if you plan to keep the bottle garden for an extended period or if you’ve added other plants, you may consider adding a very diluted liquid fertilizer every few months. Use a balanced fertilizer specifically formulated for houseplants and dilute it to half the recommended strength. Over-fertilizing can harm the plants and disrupt the delicate ecosystem within the bottle.
How long will my onion bottle garden last?
The lifespan of your onion bottle garden depends on several factors, including the type of onion, the growing conditions, and your care. With proper care, your onion can continue to grow for several weeks or even months. Eventually, the onion will exhaust its nutrient reserves and the leaves may start to yellow and die back. At this point, you can either replace the onion with a fresh one or compost the old one and start a new bottle garden.
Can I eat the greens that grow from my onion?
Yes, the green shoots that grow from your onion are perfectly edible and can be used in salads, soups, or as a garnish. They have a mild onion flavor and add a fresh, vibrant touch to any dish. Just be sure to wash them thoroughly before eating. However, keep in mind that the onion itself will eventually become depleted of nutrients, so the greens may not be as flavorful or nutritious as those from a commercially grown onion.
What if I don’t have a bottle? Can I use something else?
While a glass bottle is the most common and visually appealing container for an onion bottle garden, you can certainly use other alternatives. A clear plastic container, such as a recycled soda bottle or a plastic food container, will work just as well. Just make sure the container is clean and has adequate drainage holes. You can also use a glass jar or even a small terracotta pot. The key is to choose a container that is transparent or translucent so that the onion receives enough light.
My onion is growing mold. What should I do?
Mold growth is often a sign of excessive moisture and poor ventilation. If you notice mold on the onion or in the soil, take the following steps:
* Remove the onion from the bottle and gently wipe away any mold with a clean cloth.
* Replace the soil with fresh, well-draining soil.
* Ensure the bottle has adequate drainage holes.
* Improve ventilation by leaving the bottle open for a few hours each day.
* Reduce the frequency of watering.
* Consider adding a small amount of activated charcoal to the soil to help absorb excess moisture and prevent mold growth.
Can I use this method to grow other vegetables?
While the onion bottle garden is a fun and easy project, it’s not suitable for growing most other vegetables to maturity. The bottle provides a limited amount of space and nutrients, which is sufficient for growing onion greens but not for producing full-sized vegetables. However, you can use this method to sprout seeds or start seedlings of other vegetables, such as herbs, lettuce, or tomatoes. Once the seedlings have developed a few leaves, you can transplant them into larger pots or into your garden.


Leave a Comment