

DIY Origami Divider Box: Unleash your inner artist and declutter your life with this surprisingly simple and elegant craft! Have you ever looked at your desk, overflowing with pens, paperclips, and random bits and bobs, and wished for a stylish and functional solution? I know I have! That’s where the magic of origami comes in.
Origami, the ancient Japanese art of paper folding, has been captivating hearts and minds for centuries. Originally used for ceremonial purposes, it evolved into a beautiful form of artistic expression. Now, we’re taking this time-honored tradition and giving it a practical twist.
This isn’t just about folding paper; it’s about creating a personalized storage solution that reflects your unique style. Forget those boring plastic organizers! With this DIY Origami Divider Box, you can transform ordinary paper into a stunning and functional piece of art. Imagine the satisfaction of crafting something beautiful with your own hands, while simultaneously organizing your workspace or dresser drawers.
In today’s fast-paced world, we all crave a little bit of calm and order. This project offers a mindful escape from the digital chaos, allowing you to focus on the present moment and create something tangible. Plus, it’s a fantastic way to reduce waste by repurposing paper you already have. So, grab your favorite paper, and let’s embark on this creative journey together! I’m excited to show you how easy it is to make your own beautiful and practical origami divider box.
DIY Origami Divider Box: Organize Your Life with Paper!
Hey there, fellow crafters! Are you tired of messy drawers and cluttered desks? I know I am! That’s why I’m super excited to share this awesome DIY project with you: an origami divider box! It’s a fantastic way to organize small items like jewelry, office supplies, or even makeup. Plus, it’s surprisingly easy to make, and you only need paper! Let’s get started!
What You’ll Need
Before we dive in, let’s gather our supplies. The beauty of this project is its simplicity – you probably already have everything you need!
* **Paper:** This is the most important ingredient! I recommend using sturdy paper like cardstock or scrapbook paper for a more durable box. You’ll need two square sheets of paper for each box you want to make. The size of the squares will determine the size of your finished box. I usually use 12×12 inch paper for a decent-sized box, but feel free to experiment! Different colors and patterns can add a fun, personalized touch.
* **Ruler:** A ruler will help you make precise folds, which are crucial for a neat and professional-looking box.
* **Pencil:** For marking fold lines. Don’t worry, we’ll be erasing them later!
* **Eraser:** To remove those pencil marks and keep your box looking clean.
* **Scissors (Optional):** You might need scissors to trim any excess paper or to adjust the size of your squares if needed.
* **Bone Folder (Optional):** A bone folder isn’t essential, but it can help you create crisp, sharp folds. If you don’t have one, you can use the edge of a ruler or a credit card.
Making the Box Base
Okay, let’s start with the base of our origami divider box. This is where the magic happens!
1. **Prepare Your Paper:** Take one of your square sheets of paper. Make sure it’s perfectly square – this will ensure your box comes together correctly. If it’s not quite square, use your ruler and scissors to trim it.
2. **Fold in Half Diagonally (Both Ways):**
* Fold the paper in half diagonally, bringing one corner to the opposite corner. Make a sharp crease.
* Unfold the paper.
* Repeat the process, folding the other two corners together diagonally. Make another sharp crease.
* You should now have two diagonal creases that intersect in the center of the square.
3. **Fold in Half (Both Ways):**
* Fold the paper in half horizontally, bringing the top edge to the bottom edge. Crease well.
* Unfold the paper.
* Fold the paper in half vertically, bringing the left edge to the right edge. Crease well.
* Now you should have a grid of creases dividing your paper into smaller squares.
4. **Collapse into a Square:** This is where it gets a little tricky, but don’t worry, I’ll walk you through it.
* Bring the top and bottom edges of the paper towards the center crease.
* As you do this, the sides will naturally fold inwards along the diagonal creases.
* You should end up with a smaller square, with the open edges facing down.
5. **Fold the Top Layer to the Center Line (All Four Sides):**
* Take the top layer of the top flap and fold it down to the center line of the square. Crease well.
* Repeat this process for the bottom flap, folding it up to the center line. Crease well.
* Flip the square over and repeat the process on the other side. You should now have four flaps folded towards the center.
6. **Unfold the Last Folds:** Unfold all the folds you just made in step 5. You should see the crease lines you created.
7. **Open the Top and Bottom Flaps:** Open the top and bottom flaps of the square. You’ll notice that the sides are still folded inwards.
8. **Fold the Corners Inwards:** Fold the top two corners of the top flap inwards, aligning them with the center crease. Crease well. Repeat this process for the bottom flap.
9. Repeat on the Other Side: Flip the square over and repeat steps 7 and 8 on the other side.
10. **Shape the Box:** Now, carefully start to shape the box. Gently push the sides outwards, using the creases as guides. You should see the box base starting to form.
11. **Reinforce the Creases:** Go over all the creases again with your fingers or a bone folder to make them sharp and defined. This will help the box hold its shape.
Making the Divider
Now that we have the base, let’s create the divider! This is what will separate your items and keep everything organized.
1. **Prepare Your Second Sheet of Paper:** Take your second square sheet of paper.
2. **Repeat Steps 2-4 from the Box Base Instructions:** Follow the same folding instructions as you did for the box base, up to the point where you have collapsed the paper into a smaller square. This means folding diagonally both ways, folding in half both ways, and then collapsing the paper into a square.
3. **Fold the Top Layer to the Center Line (All Four Sides):**
* Take the top layer of the top flap and fold it down to the center line of the square. Crease well.
* Repeat this process for the bottom flap, folding it up to the center line. Crease well.
* Flip the square over and repeat the process on the other side. You should now have four flaps folded towards the center.
4. **Fold in Half Again (All Four Sides):**
* Take the top layer of the top flap and fold it down to the center line *again*. Crease well.
* Repeat this process for the bottom flap, folding it up to the center line *again*. Crease well.
* Flip the square over and repeat the process on the other side. You should now have four flaps folded towards the center, twice. This will make the divider sturdier.
5. **Unfold the Last Folds:** Unfold all the folds you just made in step 4. You should see the crease lines you created.
6. **Open the Top and Bottom Flaps:** Open the top and bottom flaps of the square. You’ll notice that the sides are still folded inwards.
7. **Fold the Corners Inwards:** Fold the top two corners of the top flap inwards, aligning them with the center crease. Crease well. Repeat this process for the bottom flap.
8. Repeat on the Other Side: Flip the square over and repeat steps 6 and 7 on the other side.
9. **Shape the Divider:** Now, carefully start to shape the divider. Gently push the sides outwards, using the creases as guides. You should see the divider starting to form. It will look similar to the box base, but slightly smaller and more compact.
10. **Reinforce the Creases:** Go over all the creases again with your fingers or a bone folder to make them sharp and defined. This will help the divider hold its shape.
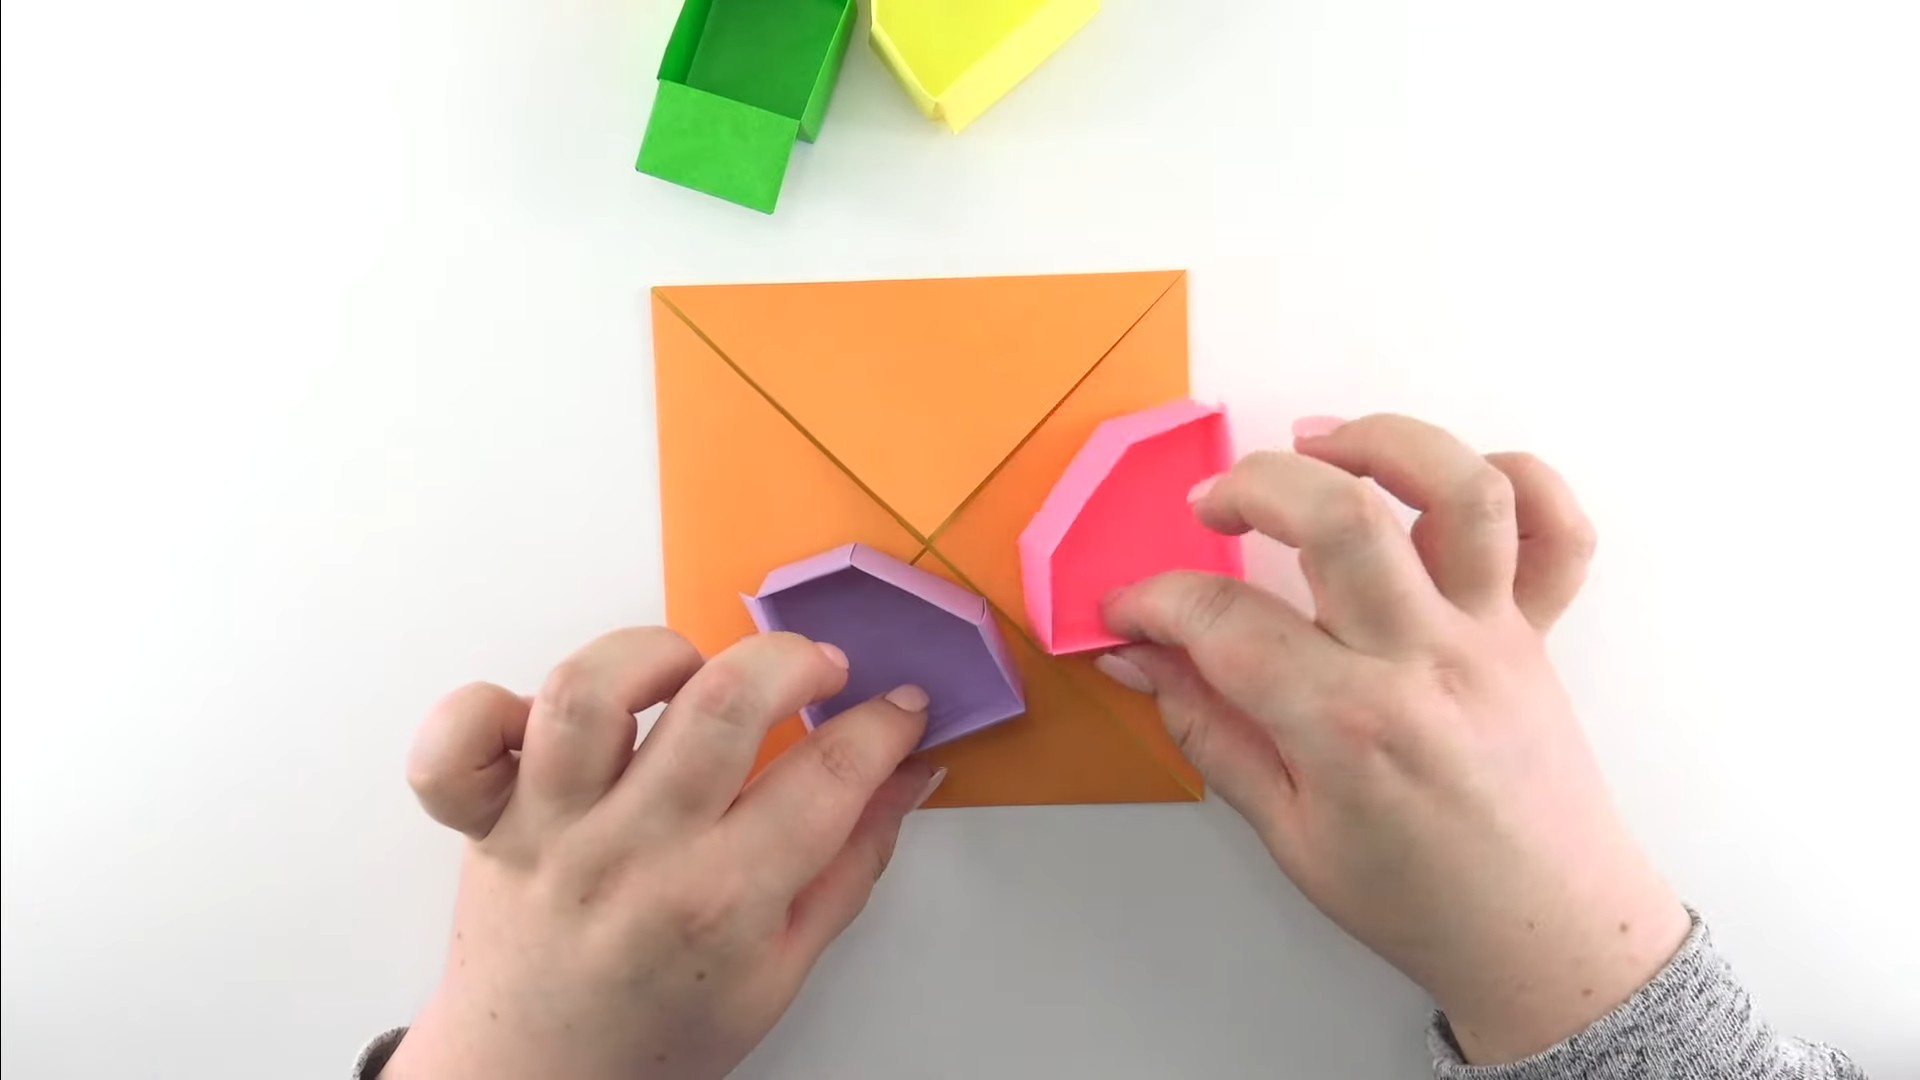
Assembling the Box
We’re almost there! Now it’s time to put everything together and create our organized masterpiece.
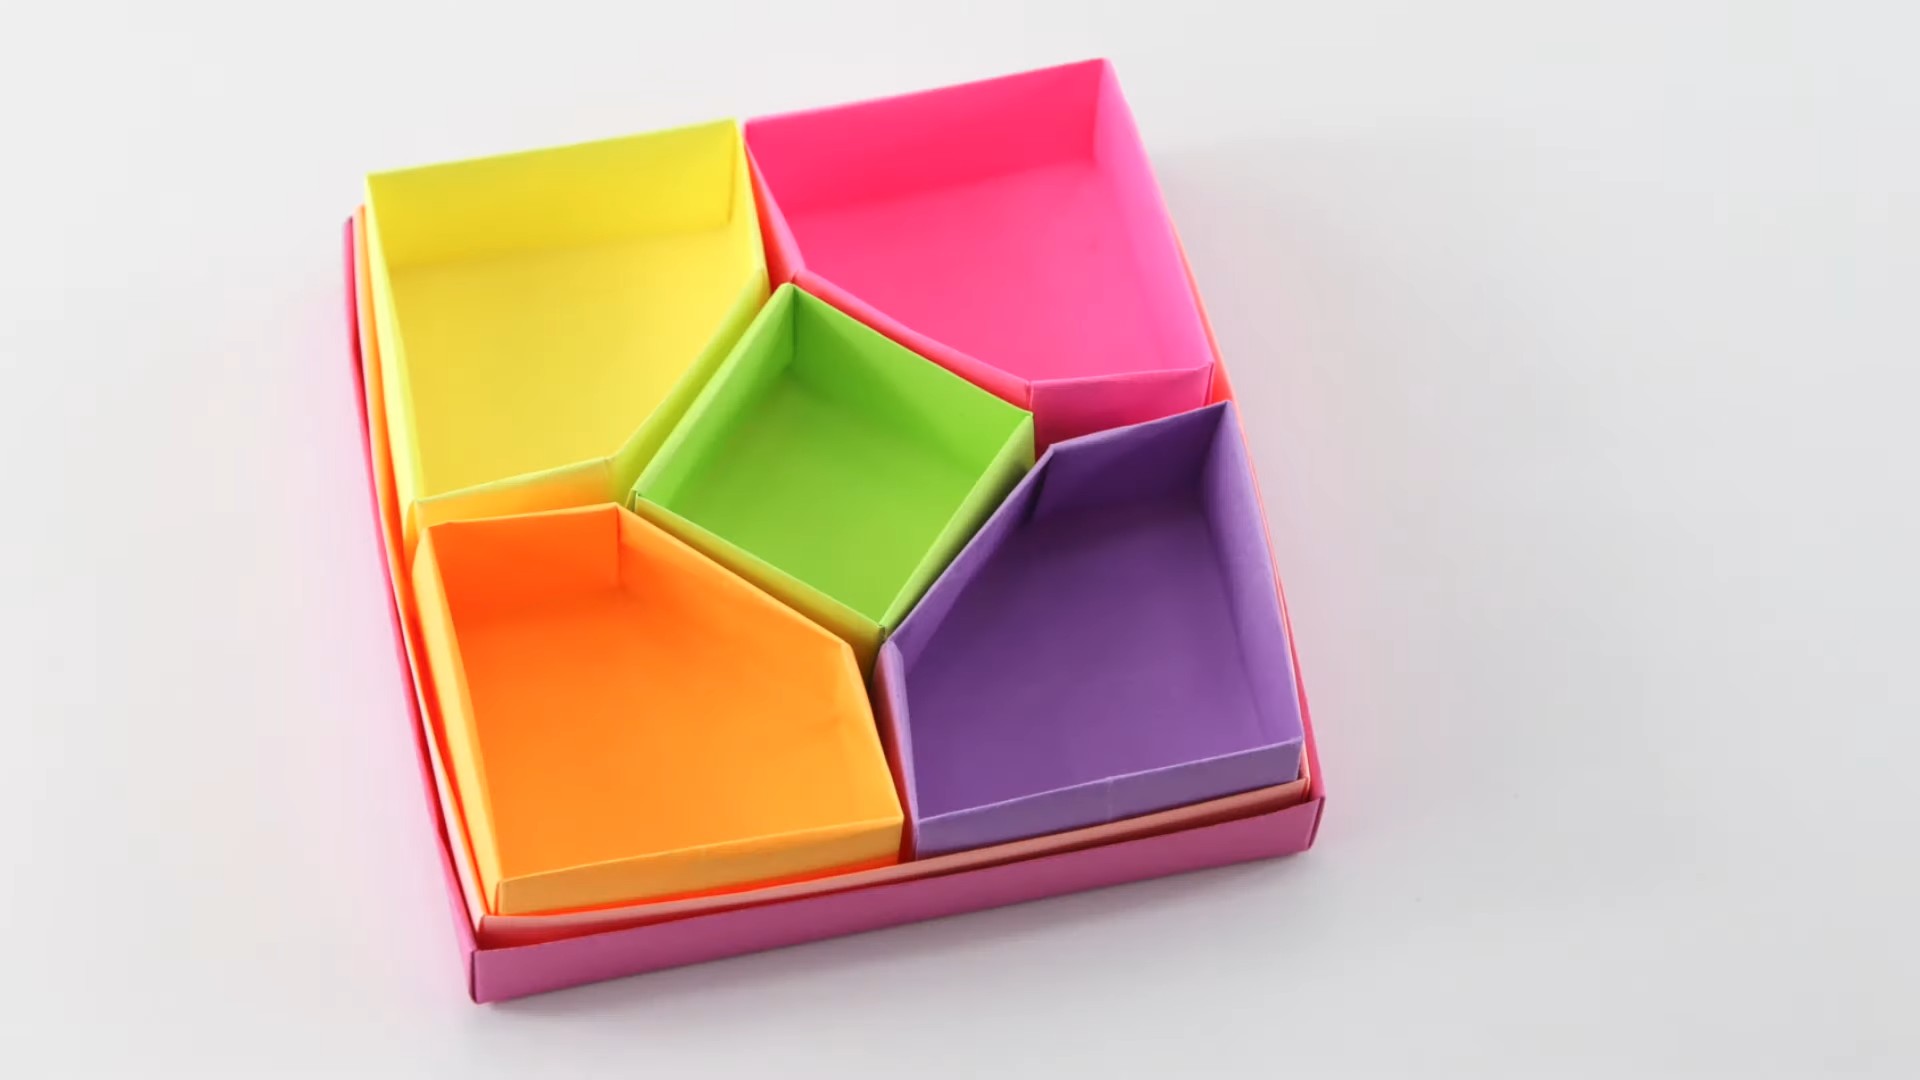
1. **Place the Divider Inside the Base:** Carefully slide the divider into the box base. The divider should fit snugly inside the base, creating four separate compartments.
2. **Adjust the Divider:** Adjust the position of the divider to ensure that it’s centered and that the compartments are evenly sized.
3. **Admire Your Work:** That’s it! You’ve successfully created an origami divider box! Now you can fill it with your small items and enjoy the organized bliss.
Tips and Tricks
* Experiment with Paper: Try using different types of paper to see what works best for you. Thicker paper will create a sturdier box, while thinner paper will be easier to fold.
* Get Creative with Colors and Patterns: Use colorful paper or patterned paper to add a personal touch to your box.
* Make Different Sizes: Experiment with different sizes of paper to create boxes of different sizes. This is great for organizing different types of items.
* Use a Bone Folder: A bone folder will help you create crisp, sharp folds, which will make your box look more professional.
* Practice Makes Perfect: Don’t be discouraged if your first box isn’t perfect. Keep practicing, and you’ll get better with each attempt.
* Glue (Optional): For added durability, you can use a small amount of glue to secure the flaps of the box and divider. This is especially helpful if you’re using thinner paper.
Ideas for Using Your Origami Divider Box
* Jewelry Organizer: Keep your earrings, rings, and necklaces neatly separated.
Conclusion
So, there you have it! This DIY Origami Divider Box isn’t just a fun craft project; it’s a surprisingly practical and elegant solution for decluttering your drawers, organizing your workspace, or even creating unique gift packaging. Forget those flimsy, mass-produced plastic dividers that crack and break after a few uses. This method offers a customizable, eco-friendly, and aesthetically pleasing alternative that you can tailor to your exact needs.
Why is this a must-try? Because it’s simple, cost-effective, and incredibly satisfying. The satisfaction of transforming a flat sheet of paper into a functional and beautiful container is unmatched. Plus, you’re reducing waste by repurposing paper and avoiding the purchase of new plastic organizers. It’s a win-win!
Variations and Suggestions:
Don’t be afraid to experiment with different types of paper. Cardstock will provide a sturdier box, perfect for heavier items. Decorative paper, patterned origami paper, or even repurposed wrapping paper can add a touch of personality and flair. Consider using different colors for each divider to create a visually appealing and easily identifiable system.
For larger drawers or items, simply scale up the size of your starting paper. Just remember to maintain the square shape for optimal results. You can also adjust the height of the dividers by modifying the initial folds. Deeper folds will result in taller dividers, while shallower folds will create shorter ones.
Think beyond drawers! These origami boxes can be used to organize craft supplies, jewelry, makeup, office supplies, or even small toys. They also make charming and personalized gift boxes for small items like candies, soaps, or jewelry. Imagine presenting a handmade gift in a beautifully crafted origami box – it adds an extra layer of thoughtfulness and care.
We truly believe that this DIY Origami Divider Box is a game-changer for anyone looking to get organized in a stylish and sustainable way. It’s a project that’s accessible to all skill levels, from beginner origami enthusiasts to seasoned crafters. The possibilities are endless, and the results are always rewarding.
Now it’s your turn! We encourage you to give this DIY trick a try. Gather your paper, follow the simple instructions, and create your own custom origami divider boxes. We’re confident that you’ll be amazed at how easy and effective this method is.
Don’t forget to share your creations with us! We’d love to see your unique variations and how you’re using your origami boxes to organize your life. Post photos of your finished projects on social media using [Your Hashtag Here] and tag us [Your Social Media Handle Here]. We can’t wait to see what you come up with! Let’s spread the joy of origami organization together!
Frequently Asked Questions (FAQ)
What kind of paper is best for making origami divider boxes?
The best type of paper depends on the intended use of your divider box. For lightweight items like jewelry or small office supplies, standard origami paper or printer paper works well. However, for heavier items or for boxes that need to withstand more wear and tear, cardstock is a much better choice. Cardstock provides more structure and durability. You can also experiment with decorative paper, scrapbook paper, or even repurposed wrapping paper to add a personal touch. Just make sure the paper is relatively easy to fold and doesn’t tear easily. Avoid very thin or brittle paper.
How do I determine the right size of paper to use?
The size of the paper you need depends on the size of the drawer or container you want to organize and the desired height of the dividers. A good starting point is to measure the inside dimensions of your drawer. Then, experiment with different sizes of square paper until you find one that creates dividers that fit comfortably within the drawer and provide the level of organization you need. Remember that the larger the paper, the larger the resulting box. It’s always a good idea to make a test box with scrap paper before committing to your final paper choice.
Can I use patterned or colored paper?
Absolutely! Using patterned or colored paper is a great way to personalize your origami divider boxes and add a touch of style to your organization. Consider coordinating the colors with the items you’re organizing or the overall decor of your room. You can even use different colors for each divider to create a visually appealing and easily identifiable system. Just be mindful that some patterned papers may be thicker or more difficult to fold than plain paper.
How do I make the dividers taller or shorter?
The height of the dividers is determined by the depth of the initial folds you make. Deeper folds will result in taller dividers, while shallower folds will create shorter ones. Experiment with different fold depths to achieve the desired height. It’s helpful to make a few test boxes with scrap paper to get a feel for how the fold depth affects the final height of the divider.
What if my origami box doesn’t stay together?
If your origami box is falling apart, it’s likely due to one of a few reasons. First, make sure you’re making crisp, precise folds. Sloppy folds can weaken the structure of the box. Second, ensure that you’re tucking the flaps securely into the pockets. If the flaps are loose, the box will be unstable. You can also use a small amount of glue or double-sided tape to reinforce the corners and edges of the box, especially if you’re using a thinner paper.
How can I make the boxes more durable?
To make your origami divider boxes more durable, start by using a heavier paper like cardstock. You can also reinforce the corners and edges of the box with glue or double-sided tape. For added protection, consider lining the inside of the box with a piece of felt or fabric. This will help prevent the box from tearing or scratching.
Can I use these boxes for organizing liquids or food?
While origami divider boxes are great for organizing many items, they are not suitable for storing liquids or food directly. Paper is not waterproof or food-safe, and liquids can damage the paper and cause the box to fall apart. If you need to organize liquids or food, consider using plastic containers or bags inside the origami boxes.
How do I clean my origami divider boxes?
To clean your origami divider boxes, gently wipe them down with a dry cloth. Avoid using water or cleaning solutions, as these can damage the paper. For stubborn stains, you can try using a slightly damp cloth, but be sure to dry the box thoroughly afterward.
Where can I find inspiration for different origami divider box designs?
There are many online resources where you can find inspiration for different origami divider box designs. Websites like YouTube, Pinterest, and origami websites offer tutorials and diagrams for various origami projects. You can also find inspiration in books and magazines dedicated to origami. Experiment with different folds and techniques to create your own unique designs.
Is this project suitable for children?
This project can be suitable for children, depending on their age and skill level. Younger children may need assistance with the folding process, while older children may be able to complete the project independently. Origami is a great way to develop fine motor skills, spatial reasoning, and problem-solving abilities. Be sure to supervise children when they are using scissors or glue.
Leave a Comment