

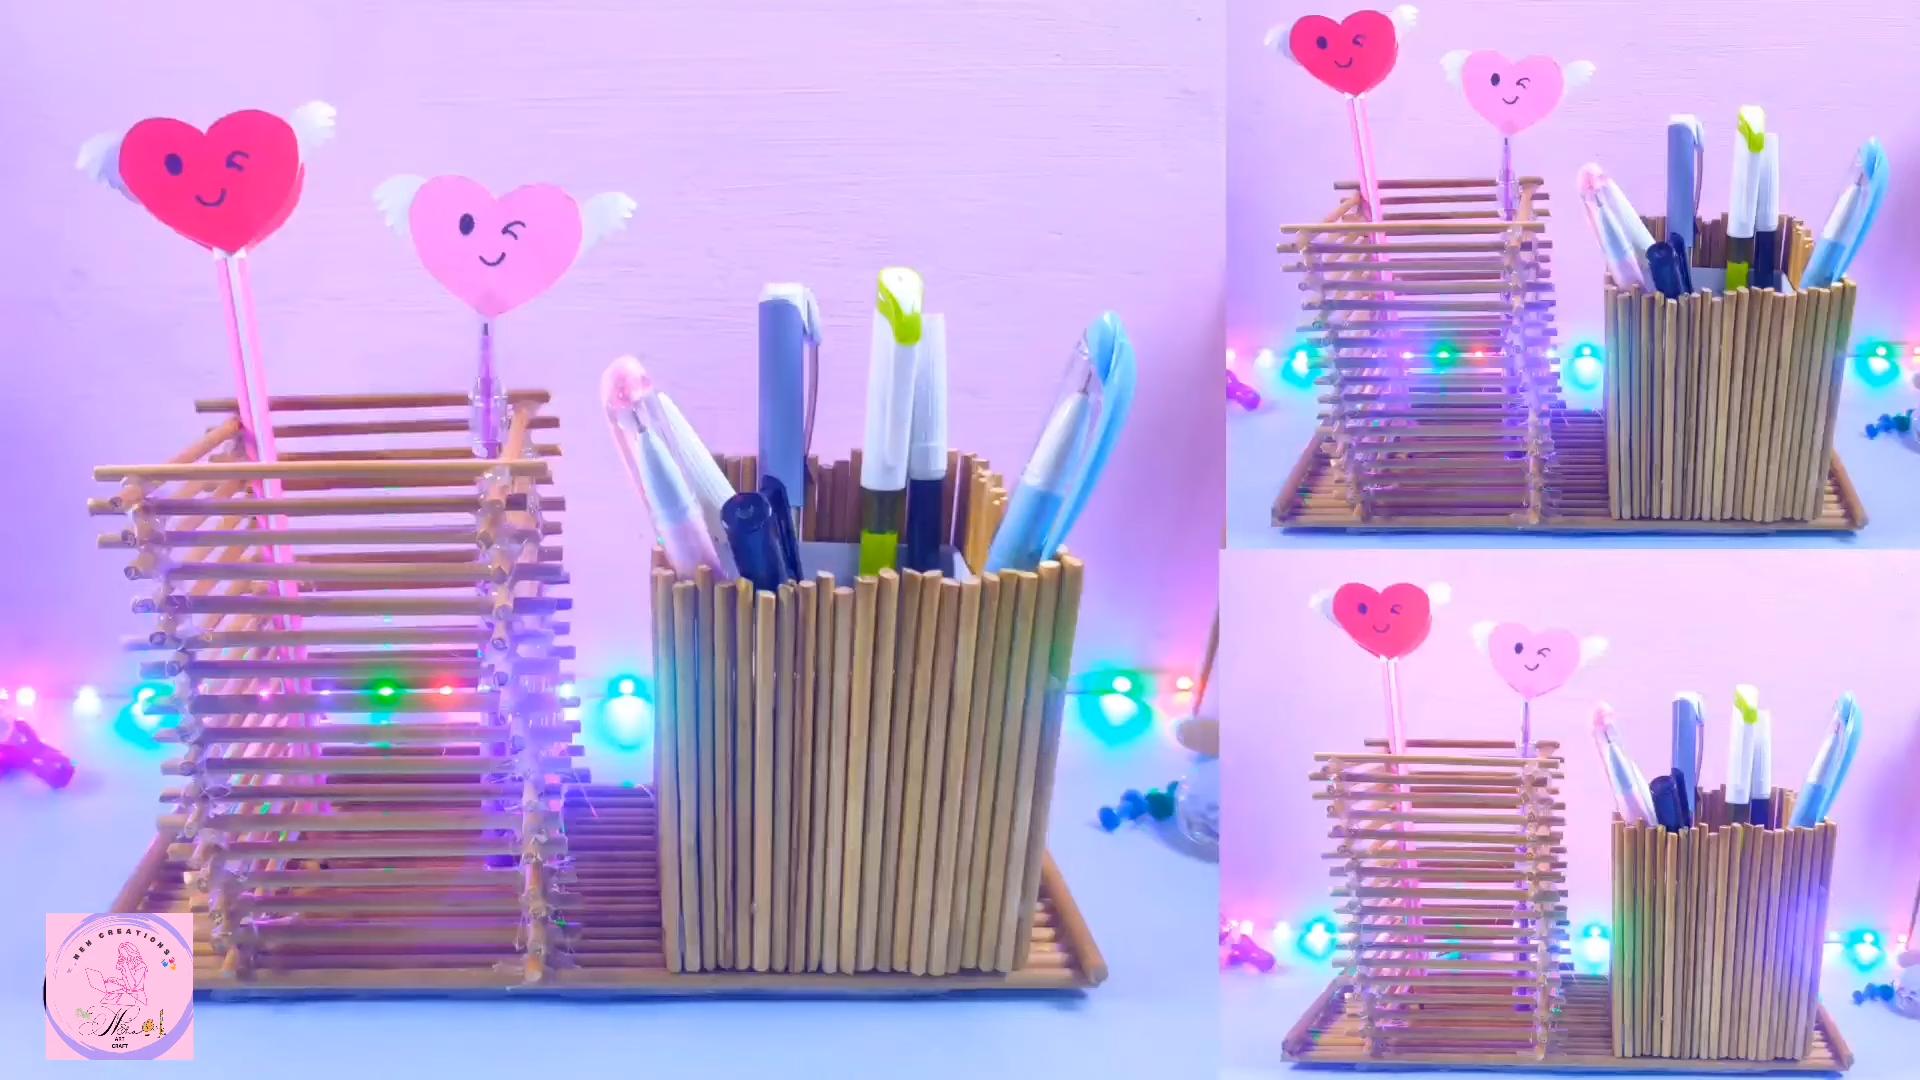
DIY Pen Holder: Tired of your desk looking like a stationery explosion? I know the feeling! Pens scattered everywhere, pencils playing hide-and-seek, and highlighters staging a colorful rebellion. It’s a common problem, and that’s why I’m so excited to share some super easy and creative DIY pen holder ideas that will not only declutter your workspace but also add a personal touch to your home or office.
Humans have been organizing their writing tools for centuries, from simple clay pots in ancient civilizations to ornate pen rests in royal courts. While the materials and styles have evolved, the need for a designated spot for our pens remains constant. But why spend a fortune on store-bought organizers when you can create something unique and functional yourself?
This article is packed with simple, budget-friendly DIY pen holder projects that anyone can tackle. Whether you’re a seasoned crafter or a complete beginner, you’ll find inspiration and step-by-step instructions to transform ordinary items into stylish and practical pen holders. Imagine turning old tin cans, mason jars, or even cardboard tubes into personalized desk organizers. Not only will you be reducing waste and saving money, but you’ll also be adding a touch of your personality to your workspace. Let’s get crafting and create some amazing DIY pen holders together!
DIY Upcycled Denim Pen Holder: A Stylish and Sustainable Desk Organizer
Hey there, fellow crafters! Are you drowning in pens, pencils, and markers? Do you have a pair of old jeans you’re about to toss? Well, hold on! I’m going to show you how to transform that denim into a super cool and functional pen holder. This project is not only a great way to declutter your desk but also a fantastic way to give old clothes a new life. Plus, it’s surprisingly easy! Let’s get started!
Materials You’ll Need:
* An old pair of jeans (the thicker the denim, the sturdier the holder)
* A sturdy can or jar (soup cans, coffee cans, or even a mason jar work great!)
* Scissors or a rotary cutter
* Fabric glue or a hot glue gun (I prefer fabric glue for a cleaner look, but hot glue is faster)
* Ruler or measuring tape
* Pencil or fabric marker
* Optional: Embellishments like buttons, patches, ribbon, or paint
Preparing Your Denim:
Before we dive into the construction, let’s get our denim ready. This step is crucial for a neat and professional-looking pen holder.
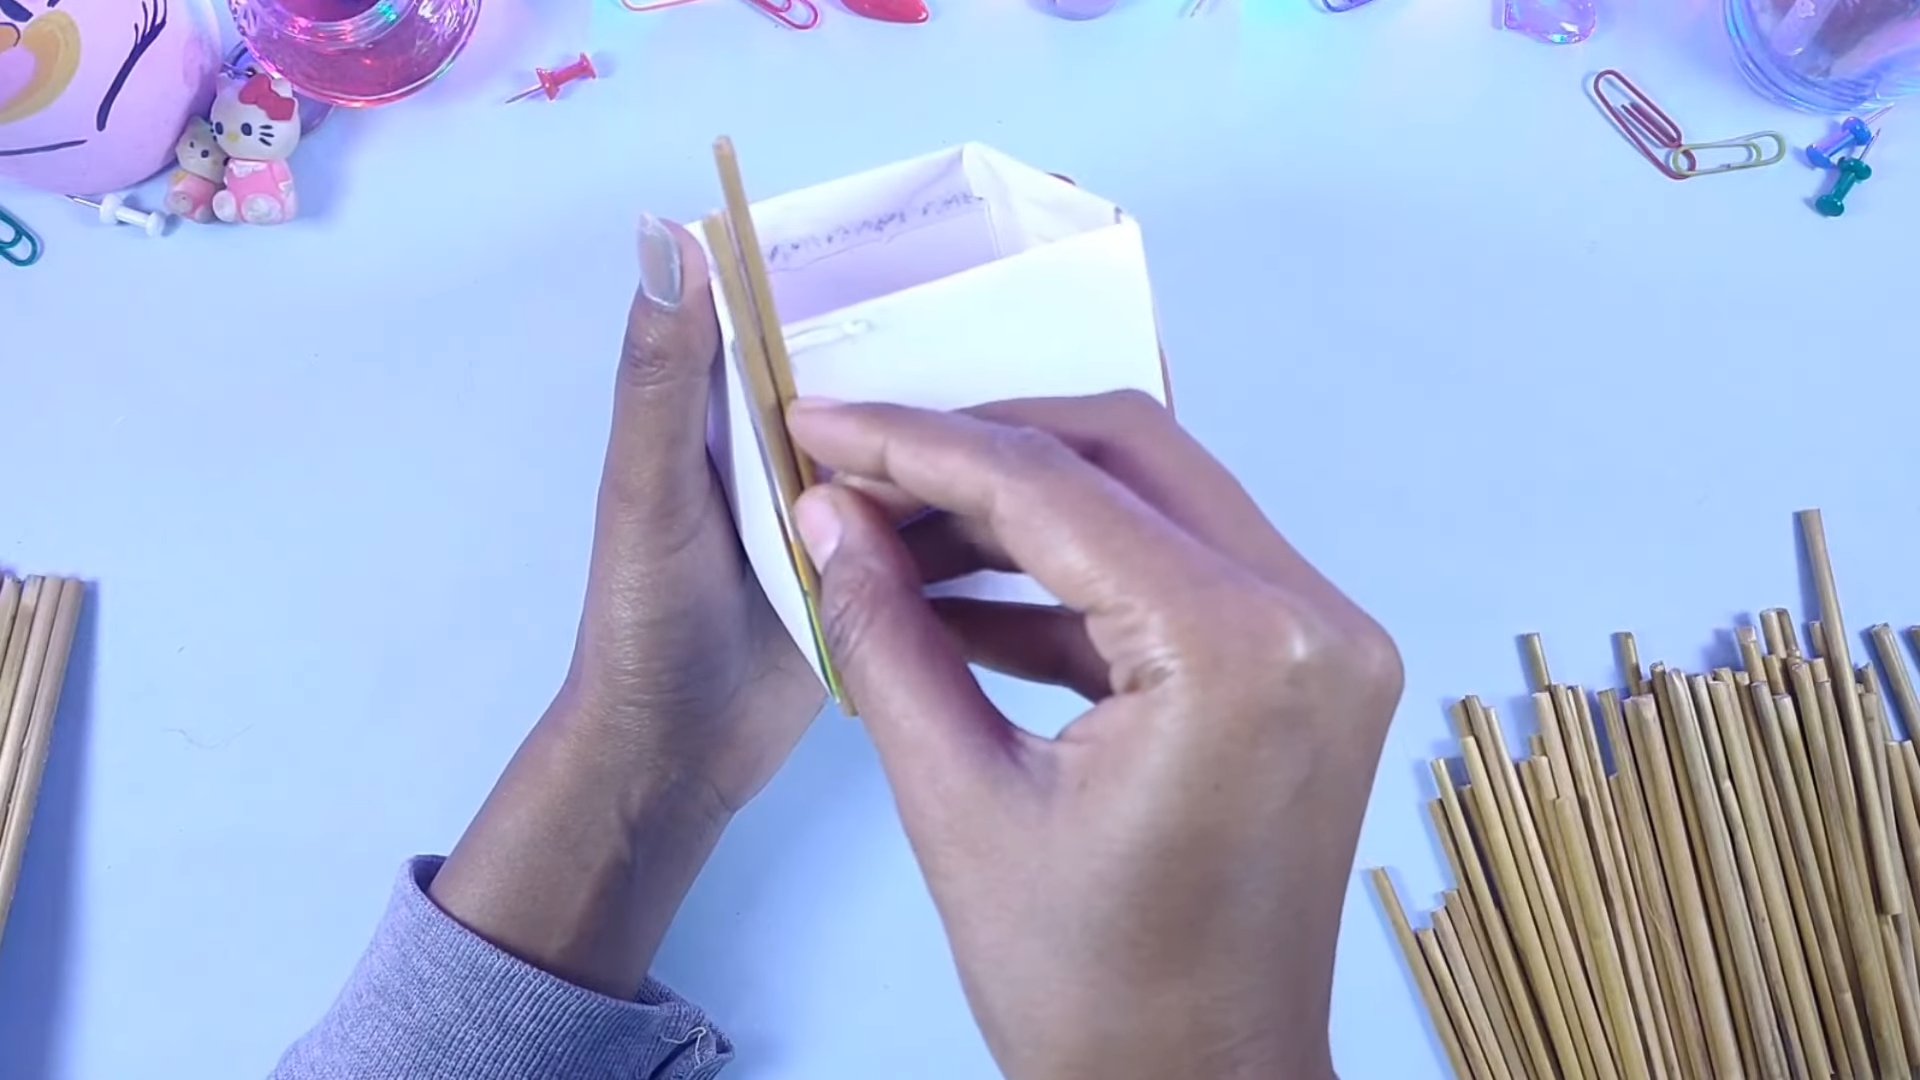
1. Cut the Jean Leg: Lay your jeans flat and decide which part of the leg you want to use. I usually go for the area below the knee, as it tends to be less worn. Using your scissors or rotary cutter, carefully cut off the leg of the jeans. Make sure the cut is straight and even.
2. Measure the Can/Jar Height: Grab the can or jar you’ll be using as the base. Measure its height with your ruler or measuring tape. Add about 2 inches to this measurement. This extra denim will allow us to fold over the top and bottom edges for a clean finish. For example, if your can is 4 inches tall, you’ll need a denim piece that’s 6 inches tall.
3. Cut the Denim to Size: Now, measure the circumference of your can or jar. Add about 1 inch to this measurement for overlap. This overlap will be where we glue the denim together to form a cylinder. For instance, if your can’s circumference is 10 inches, you’ll need a denim piece that’s 11 inches wide.
4. Cut the Denim Rectangle: Using the measurements you just calculated, cut a rectangular piece of denim from the jean leg. Make sure the edges are straight and even. This will be the main body of your pen holder. I like to use a rotary cutter and a cutting mat for this step to ensure precise cuts.
5. Iron the Denim (Optional): If your denim is wrinkled, give it a quick iron. This will make it easier to work with and ensure a smoother finish.
Assembling the Pen Holder:
Now for the fun part! Let’s put everything together and create our awesome denim pen holder.
1. Apply Glue to the Edge: Lay your denim rectangle flat, wrong side up. Apply a thin line of fabric glue (or hot glue) along one of the longer edges (the 11-inch side in our example).
2. Form the Cylinder: Carefully bring the opposite long edge of the denim rectangle over and align it with the glued edge. Press firmly to create a seam. Hold it in place for a few seconds until the glue sets. You should now have a denim cylinder.
3. Fold Over the Top Edge: Fold over about 1 inch of the denim cylinder’s top edge to the inside. Press it down firmly and glue it in place. This creates a clean and finished top edge.
4. Fold Over the Bottom Edge: Repeat the previous step for the bottom edge of the denim cylinder. Fold over about 1 inch of denim to the inside, press firmly, and glue it in place. This gives the pen holder a neat and durable bottom edge.
5. Insert the Can/Jar: Carefully slide the can or jar into the denim cylinder. Make sure it fits snugly. If it’s too loose, you might need to add a bit more glue to the seam.
6. Glue the Denim to the Can/Jar: Now, we need to secure the denim to the can or jar. Apply a generous amount of fabric glue (or hot glue) to the inside of the denim cylinder, especially along the top and bottom edges. Press the denim firmly against the can or jar, ensuring there are no gaps or wrinkles.
7. Let it Dry: Allow the glue to dry completely. This usually takes a few hours for fabric glue and less for hot glue. Be patient! This step is crucial for a durable pen holder.
Embellishing Your Pen Holder (Optional):
This is where you can really let your creativity shine! Here are some ideas for embellishing your denim pen holder:
1. Buttons: Glue buttons of various sizes and colors onto the denim. You can create patterns or simply scatter them randomly.
2. Patches: Iron-on or sew-on patches are a great way to add personality to your pen holder. Choose patches that reflect your interests or hobbies.
3. Ribbon: Wrap ribbon around the pen holder and glue it in place. You can use different colors and textures of ribbon for a unique look.
4. Paint: Use fabric paint to create designs on the denim. Stencils can be helpful for creating intricate patterns.
5. Embroidery: If you’re skilled in embroidery, you can add beautiful stitched details to your pen holder.
6. Denim Scraps: Use leftover denim scraps to create appliques or other decorative elements.
7. Lace: Glue lace around the top or bottom edge of the pen holder for a touch of elegance.
Tips and Tricks:
* Choose the Right Glue: Fabric glue is generally more durable and creates a cleaner look than hot glue, but hot glue is faster and easier to use. Experiment to see which one you prefer.
* Use a Thimble: If you’re sewing on embellishments, use a thimble to protect your fingers.
* Protect Your Work Surface: When using glue or paint, protect your work surface with newspaper or a drop cloth.
* Get Creative with Embellishments: Don’t be afraid to experiment with different embellishments and techniques. The possibilities are endless!
* Consider the Size: Think about the size of the pens and pencils you’ll be storing in the holder when choosing your can or jar.
* Reinforce the Bottom: For added stability, you can glue a piece of cardboard to the bottom of the can or jar before inserting it into the denim cylinder.
* Personalize It: Add your initials or a favorite quote to make the pen holder truly your own.
* Upcycle Other Materials: You can also use other materials like old t-shirts or sweaters to create a pen holder.
* Make a Set: Create a set of pen holders in different sizes and styles to organize your entire desk.
* Gift It: This DIY pen holder makes a thoughtful and personalized gift for friends and family.
Troubleshooting:
* Denim is too thick: If your denim is too thick to fold over easily, you can trim the excess fabric before gluing it down.
* Glue isn’t holding: Make sure you’re using a strong enough glue and that you’re applying enough pressure while it dries.
* Can/Jar is too loose: Add more glue to the seam of the denim cylinder to make it tighter. You can also add a layer of felt or fabric to the inside of the denim cylinder for a snugger fit.
* Edges are fraying: Apply a small amount of fabric glue to the edges to prevent fraying. You can also use a fray check product.
* Uneven Edges: If your edges are uneven, trim them with scissors or a rotary cutter after the glue has dried.
Alternative Ideas:
* Denim Pocket Pen Holder: Instead of covering the entire can, cut out a denim pocket from your jeans and glue it to the front of the can. This creates a smaller, more minimalist pen holder.
* Hanging Pen Holder: Add a loop of ribbon or twine to the top of the pen holder so you can hang it on a hook or wall.
* Multi-Compartment Pen Holder: Use multiple cans or jars of different sizes and glue them together to create a multi-compartment pen holder. Cover the entire structure with denim for a cohesive look.
* Denim and Burlap Pen Holder: Combine denim with burlap for a rustic and textured look. Glue burlap strips around the denim cylinder for added visual interest.
* Denim and Lace Pen Holder: Add delicate lace trim to the denim for a feminine and elegant touch.
I hope you enjoyed this DIY project! It’s a fun and easy way to upcycle old denim and create a stylish and functional desk
Conclusion
So, there you have it! Transforming everyday items into functional and stylish organizers is not only incredibly satisfying but also a fantastic way to declutter and personalize your workspace. This DIY pen holder project is more than just a craft; it’s a statement about resourcefulness, creativity, and adding a personal touch to your surroundings.
Why is this DIY pen holder a must-try? Because it’s simple, affordable, and endlessly customizable. Forget those generic, mass-produced desk organizers. With just a few readily available materials and a little imagination, you can create a pen holder that perfectly reflects your style and meets your specific needs. It’s a fantastic way to upcycle materials that might otherwise end up in the trash, contributing to a more sustainable lifestyle. Plus, the sense of accomplishment you’ll feel after completing this project is truly rewarding.
But the fun doesn’t stop there! Feel free to experiment with different materials and embellishments. Try using colorful duct tape for a vibrant, modern look. Wrap your pen holder in twine or yarn for a rustic, cozy feel. Add beads, buttons, or even small mosaic tiles for a touch of elegance. You could even paint it with chalkboard paint and label each section for different types of pens and pencils.
Consider variations in size and shape as well. Stack multiple cans or jars of varying heights to create a multi-tiered organizer. Use a larger container, like an old coffee can, to hold larger items like rulers and scissors. Get creative with the base too! Instead of leaving it plain, glue on felt pads to protect your desk surface or add a decorative wooden base for a more polished look.
This DIY pen holder project is also a wonderful activity to do with kids. It’s a fun and engaging way to teach them about recycling, creativity, and the value of making things with their own hands. Let them choose their own materials and decorations, and watch their imaginations soar!
Ultimately, this DIY pen holder is a testament to the power of simple creativity. It’s a practical and stylish solution for organizing your pens and pencils, and it’s a fun and rewarding project that anyone can do.
We wholeheartedly encourage you to give this DIY pen holder a try. It’s a fantastic way to add a personal touch to your workspace, declutter your desk, and unleash your inner artist. And most importantly, we want to hear about your experience! Share your creations with us on social media using #DIYPenHolderMagic. We can’t wait to see what you come up with! Let’s inspire each other with our creative DIY pen holder projects and transform our workspaces into havens of organization and inspiration.
Frequently Asked Questions (FAQ)
What kind of materials can I use for this DIY pen holder?
The beauty of this project lies in its versatility! You can use a wide range of materials, making it a great way to upcycle items you already have at home. Some popular choices include:
* Tin cans: Cleaned and with the labels removed, tin cans are a sturdy and readily available option.
* Glass jars: Mason jars, pasta sauce jars, or even old candle jars can be transformed into stylish pen holders.
* Cardboard tubes: Toilet paper rolls or paper towel rolls are perfect for smaller pen holders. You can group them together for a larger organizer.
* Plastic containers: Yogurt containers, margarine tubs, or even plastic bottles can be repurposed.
* Wooden blocks: Small wooden blocks can be glued together to create a unique and rustic pen holder.
Remember to choose materials that are clean, dry, and safe to handle.
How do I decorate my DIY pen holder?
The decoration options are endless! Let your creativity run wild and personalize your pen holder to match your style. Here are some ideas:
* Paint: Acrylic paint, spray paint, or even chalkboard paint can be used to add color and personality.
* Fabric: Wrap your pen holder in fabric scraps, felt, or even old t-shirts for a textured look.
* Paper: Use decorative paper, scrapbook paper, or even wrapping paper to cover your pen holder.
* Twine or yarn: Wrap your pen holder in twine or yarn for a rustic and cozy feel.
* Beads, buttons, and embellishments: Add beads, buttons, sequins, or other embellishments for a touch of sparkle and glamour.
* Washi tape: Washi tape is a quick and easy way to add color and patterns to your pen holder.
* Stickers: Use stickers to personalize your pen holder with your favorite characters, designs, or quotes.
How do I make sure my DIY pen holder is stable?
Stability is key to a functional pen holder. Here are some tips to ensure your creation is sturdy:
* Use a strong adhesive: Choose a glue that is appropriate for the materials you are using. Hot glue, craft glue, or epoxy are all good options.
* Add weight to the base: Place small stones, sand, or even pennies at the bottom of your pen holder to add weight and prevent it from tipping over.
* Use a sturdy base: Glue your pen holder to a piece of cardboard, wood, or even a ceramic tile for added stability.
* Group multiple containers together: If you are using multiple containers, glue them together to create a single, more stable unit.
Is this DIY pen holder project suitable for kids?
Yes, this project is a great activity for kids! However, adult supervision is recommended, especially when using sharp tools or hot glue. Choose age-appropriate materials and decorations, and let them express their creativity. This is a fantastic way to teach them about recycling, crafting, and the joy of making something with their own hands.
How do I clean my DIY pen holder?
The cleaning method will depend on the materials you used to create your pen holder. For most materials, a damp cloth will suffice. Avoid using harsh chemicals or abrasive cleaners, as they may damage the decorations. If you used fabric or yarn, you may be able to spot clean it with a mild detergent.
Can I use this DIY pen holder for other things besides pens and pencils?
Absolutely! This DIY organizer is incredibly versatile and can be used to store a variety of items, such as:
* Makeup brushes
* Paintbrushes
* Scissors
* Rulers
* Craft supplies
* Small tools
* Even plants! (Just add some drainage holes if needed)
Get creative and use your DIY pen holder to organize whatever you need to keep tidy and within reach.
What if I don’t have all the materials listed?
Don’t worry! The beauty of this project is that you can adapt it to whatever materials you have on hand. Get creative and think outside the box. Use what you have and don’t be afraid to experiment. The most important thing is to have fun and create something that you love.
Where can I find inspiration for my DIY pen holder?
The internet is a treasure trove of inspiration! Browse Pinterest, Instagram, and other social media platforms for ideas. Look at different styles, colors, and materials to find something that inspires you. Don’t be afraid to put your own spin on things and create something truly unique.
How long will this DIY pen holder last?
The lifespan of your DIY pen holder will depend on the materials you used and how well you care for it. With proper care, it should last for a long time. Choose durable materials and use a strong adhesive to ensure that your pen holder is built to last.


Leave a Comment