

DIY Reed Diffuser: Transform your home into a fragrant oasis with this simple and rewarding project! Have you ever walked into a space and been instantly captivated by its inviting aroma? That’s the magic of a well-placed diffuser, and now you can create that ambiance yourself, tailored perfectly to your personal preferences.
The concept of scenting spaces dates back centuries, with ancient civilizations using fragrant oils and herbs for religious ceremonies and to create pleasant environments. Think of the Egyptians burning incense or the Romans scattering flower petals – the desire to enhance our surroundings with beautiful scents is deeply ingrained in human history.
But why spend a fortune on store-bought diffusers when you can easily craft your own? This DIY Reed Diffuser project is not only cost-effective but also allows you to control every aspect of the fragrance, from the essential oils you choose to the aesthetic of the diffuser itself. Plus, it’s a fantastic way to reduce waste by repurposing glass containers you already have at home. I’m excited to share this easy guide with you, so you can create a personalized and delightful atmosphere in your home!
DIY Reed Diffuser: Freshen Your Home Naturally!
Hey there, fragrance fanatics! Are you tired of those store-bought air fresheners packed with chemicals? Do you crave a subtle, long-lasting scent that’s both eco-friendly and budget-friendly? Well, you’ve come to the right place! I’m going to walk you through creating your very own reed diffuser. Trust me, it’s easier than you think, and the results are amazing. Plus, you get to customize the scent to perfectly match your mood and style. Let’s get started!
What You’ll Need: The Supply List
Before we dive in, let’s gather our supplies. Don’t worry, most of these are readily available at craft stores, online, or even in your own pantry!
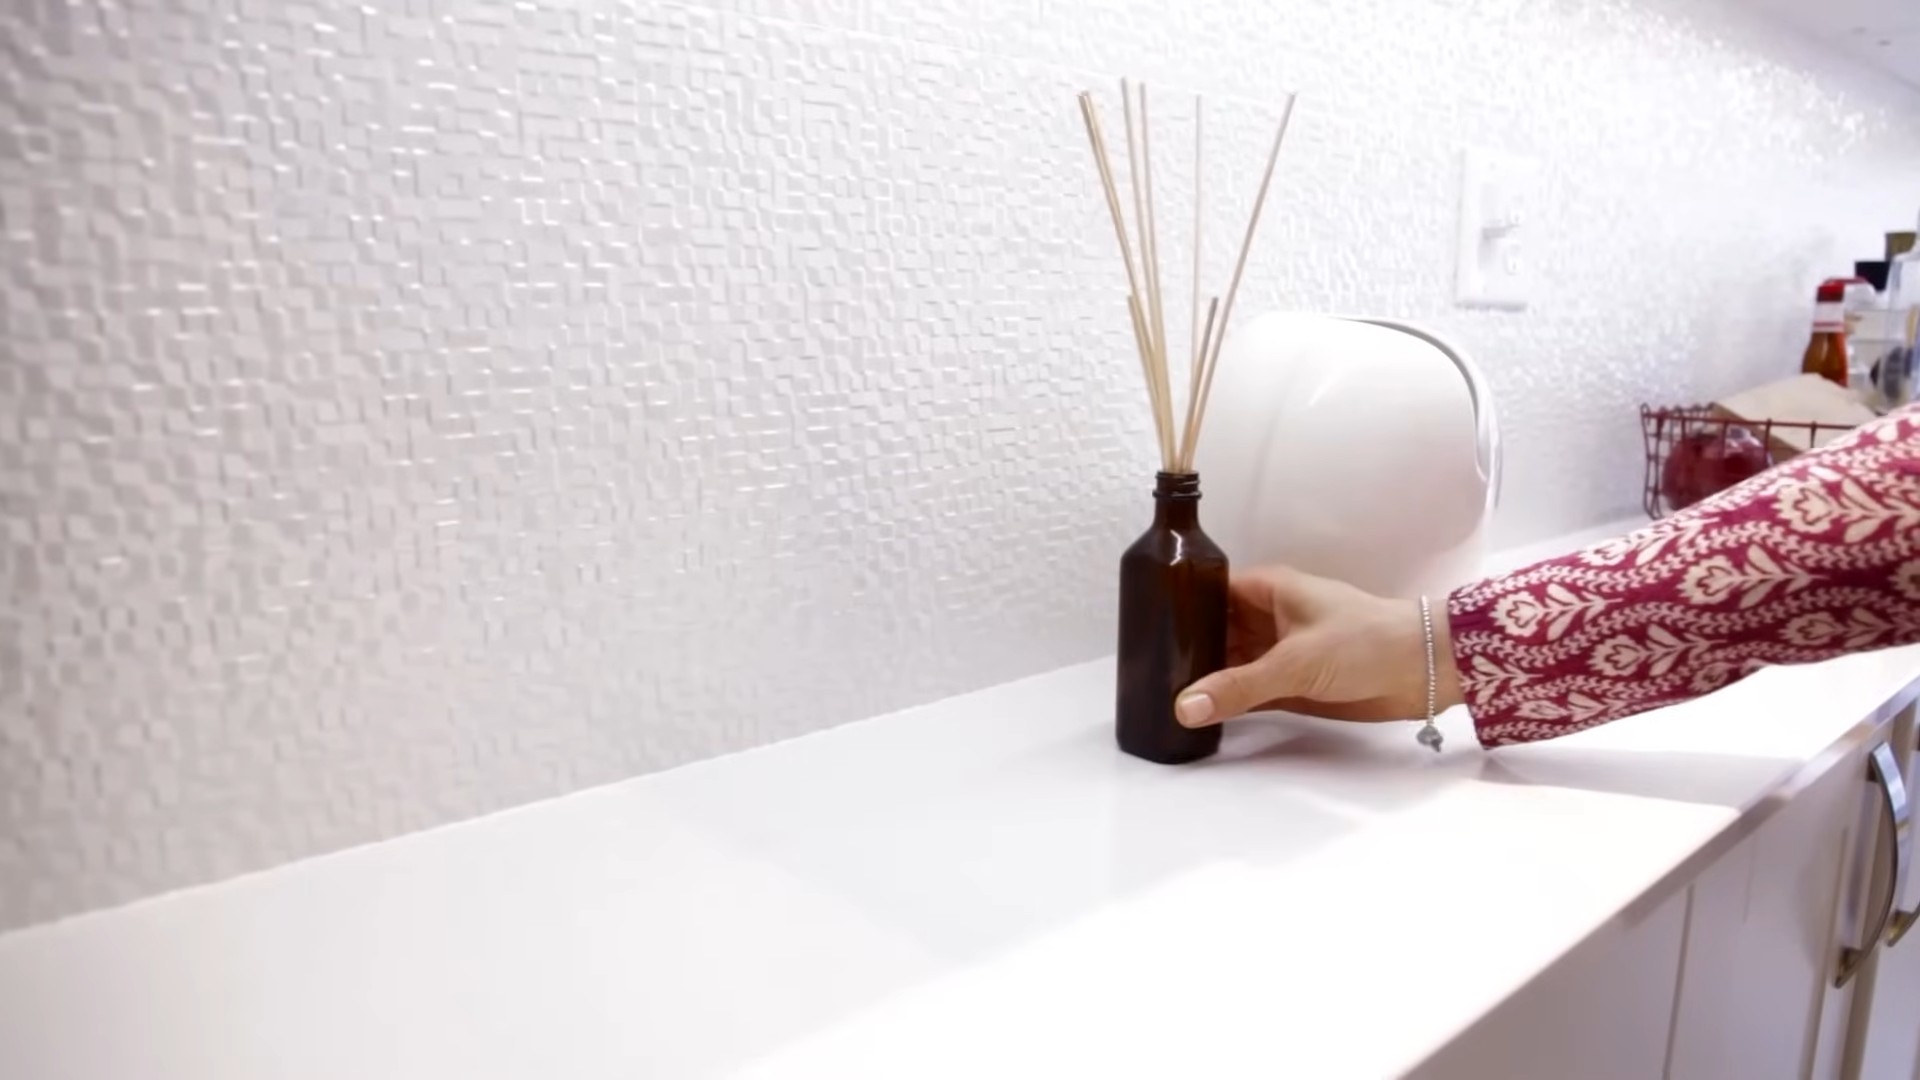
* A Glass Container: This is where your fragrant mixture will live. I personally love using small mason jars, recycled glass bottles (think wine or juice bottles – just make sure they’re thoroughly cleaned!), or even decorative vases. The key is to choose something with a narrow opening to minimize evaporation.
* Reed Diffuser Reeds: These are the magic wands that draw the fragrance up and release it into the air. You can find these online or at craft stores. Rattan reeds are the most common and work great. The length of the reeds should be significantly longer than the height of your container. 10-12 reeds is a good starting point.
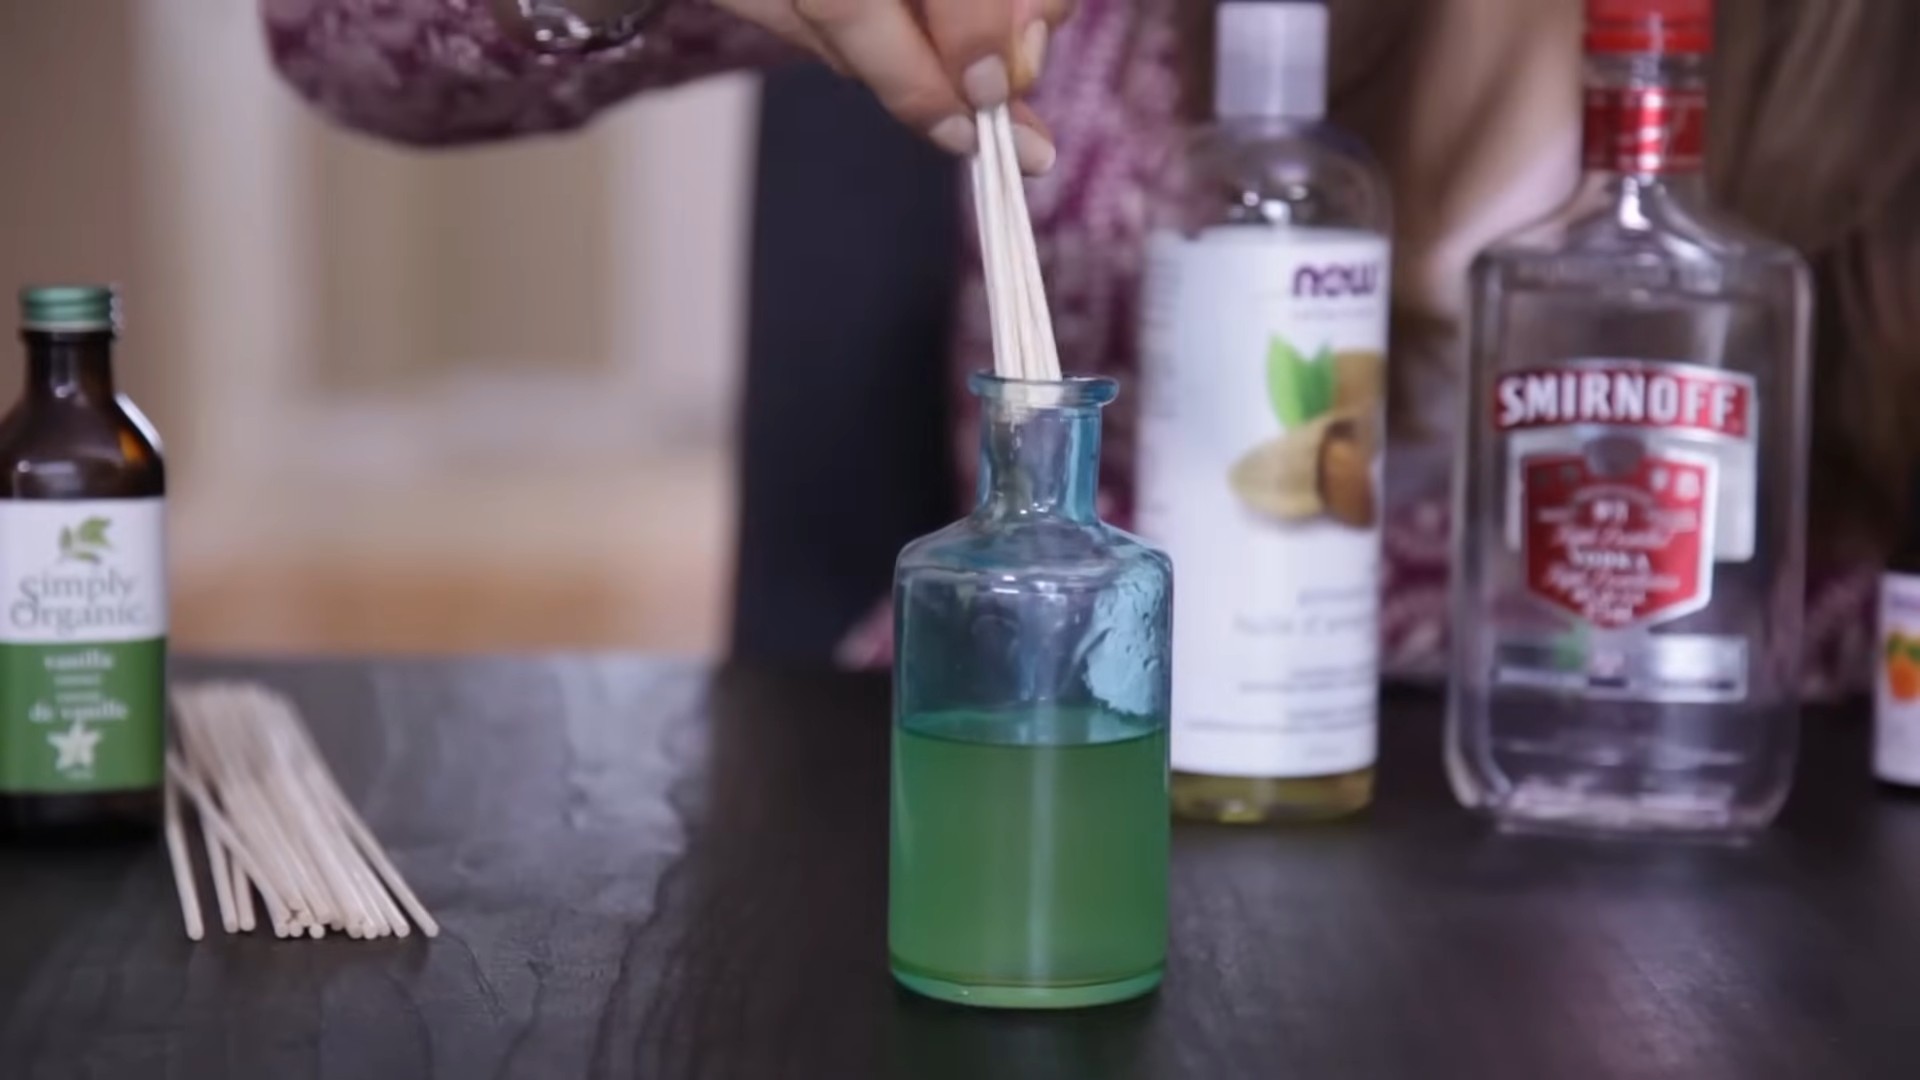
* Carrier Oil: This is the base of your diffuser liquid. It helps to dilute the essential oils and allows them to travel up the reeds. Fractionated coconut oil is my absolute favorite because it’s odorless, colorless, and has a long shelf life. Sweet almond oil, safflower oil, or even mineral oil can also work, but be aware that they might have a slight scent of their own.
* Essential Oils: This is where you get to unleash your creativity! Choose your favorite essential oils or create a custom blend. Lavender, eucalyptus, lemon, peppermint, and tea tree are popular choices, but the possibilities are endless. Just make sure you’re using 100% pure essential oils for the best scent and therapeutic benefits.
* Optional: A Small Amount of Alcohol (Vodka or Rubbing Alcohol): This helps the essential oils and carrier oil bind together and thins the mixture, allowing it to travel up the reeds more easily. Don’t worry, you won’t smell the alcohol!
* Measuring Spoons or Cups: For accurate measurements.
* Funnel (Optional): Makes pouring the mixture into the container easier and less messy.
* Gloves (Optional): To protect your hands from the essential oils, especially if you have sensitive skin.
Mixing Your Fragrant Potion: Step-by-Step Instructions
Alright, now for the fun part! Let’s mix up our diffuser blend.
1. Prepare Your Container: Make sure your glass container is clean and dry. Any residue or moisture could affect the scent and longevity of your diffuser.
2. Add the Carrier Oil: Pour your chosen carrier oil into the container. The amount you’ll need depends on the size of your container. A good rule of thumb is to fill the container about ¾ full. For a small mason jar (around 4 ounces), you’ll need about 3 ounces of carrier oil.
3. Incorporate the Essential Oils: This is where your personal scent profile comes to life! Add your essential oils to the carrier oil. A good starting point is to use a 15-20% concentration of essential oils. This means for every ounce of carrier oil, you’ll add about 90-120 drops of essential oil. So, for our 3-ounce mason jar example, you’d add around 270-360 drops of essential oil.
* Experiment with Blends: Don’t be afraid to experiment with different essential oil combinations! Here are a few of my favorite blends to get you started:
* Relaxing Lavender & Chamomile: 150 drops Lavender + 120 drops Chamomile
* Invigorating Citrus Burst: 120 drops Lemon + 90 drops Orange + 60 drops Grapefruit
* Eucalyptus & Peppermint for Congestion: 180 drops Eucalyptus + 90 drops Peppermint
* Cozy Vanilla & Cinnamon: 150 drops Vanilla + 120 drops Cinnamon (use cinnamon sparingly as it can be overpowering)
4. Add the Alcohol (Optional): If you’re using alcohol, add a small amount to the mixture. I usually add about a tablespoon (0.5 ounces) for every 3 ounces of carrier oil. This helps the oils blend together and travel up the reeds more efficiently.
5. Mix Thoroughly: Gently stir the mixture with a clean spoon or skewer to ensure the essential oils are evenly distributed throughout the carrier oil.
Setting Up Your Diffuser: The Final Touches
Now that our fragrant mixture is ready, let’s set up our diffuser!
1. Insert the Reeds: Place the reed diffuser reeds into the container, making sure they are submerged in the oil mixture.
2. Flip the Reeds: After a few hours (or even overnight), flip the reeds so that the dry ends are now submerged in the oil. This will saturate the reeds and start the diffusion process.
3. Placement is Key: Place your reed diffuser in a well-ventilated area where the scent can circulate freely. Avoid placing it in direct sunlight or near heat sources, as this can cause the oil to evaporate more quickly.
4. Maintain Your Diffuser: To keep your diffuser working its best, flip the reeds every week or two. This will refresh the scent and prevent the reeds from becoming clogged. You may also need to add more oil mixture as it evaporates over time.
Troubleshooting and Tips for Success
Even with the best instructions, sometimes things don’t go exactly as planned. Here are a few troubleshooting tips and extra pointers to help you create the perfect reed diffuser:
* Not Enough Scent? If you’re not getting enough scent, try adding more essential oils to the mixture. You can also try using more reeds or placing the diffuser in a smaller room. Make sure the reeds are fully saturated with the oil mixture.
* Too Much Scent? If the scent is too strong, remove some of the reeds or dilute the mixture with more carrier oil. You can also try moving the diffuser to a larger room.
* Reeds Not Working? If the reeds aren’t drawing up the oil, they may be clogged. Try replacing them with new reeds. Also, make sure you’re using the correct type of reeds (rattan reeds are generally the best).
* Oil Evaporating Too Quickly? If the oil is evaporating too quickly, try using a container with a narrower opening. Avoid placing the diffuser in direct sunlight or near heat sources. You can also try using a heavier carrier oil, such as sweet almond oil.
* Cleaning Up: If you spill any of the oil mixture, clean it up immediately with a damp cloth. The oil can stain surfaces if left to sit.
* Safety First: Keep your reed diffuser out of reach of children and pets. Essential oils can be harmful if ingested.
* Reed Selection: The quality of the reeds matters. Cheaper reeds might not wick the oil as effectively. Invest in good quality rattan reeds for the best results.
* Container Shape: While aesthetics are important, consider the functionality of your container. A taller, narrower container will help slow down evaporation compared to a wide, shallow one.
* Sunlight Sensitivity: Some essential oils, particularly citrus oils, are photosensitive. This means they can cause skin irritation if you’re exposed to sunlight after applying them to your skin. Be mindful of this when handling essential oils and avoid getting them on your skin.
* Allergy Awareness: Be mindful of any allergies you or your household members may have when choosing essential oils. If you’re unsure, it’s always best to test a small amount of the oil in a well-ventilated area before using it in your diffuser.
* Recycle and Reuse: Don’t throw away your old diffuser reeds! You can often revive them by soaking them in hot water and letting them dry completely. You can also use them as kindling for a fireplace or campfire.
* Personalize Your Presentation: Add a ribbon, a tag, or some decorative stones to your diffuser to make it even more special. This is a great way to personalize your diffuser and make it a thoughtful gift.
Beyond the Basics: Advanced Diffuser Techniques
Want to take your reed diffuser game to the next level? Here are a few advanced techniques to try:
* Layering Scents: Experiment with layering different essential oil blends to create a more complex and nuanced scent profile. Start with a base note (such as sandalwood or vanilla), then add a middle note (such as lavender or rose),
Conclusion
So, there you have it! Creating your own DIY reed diffuser is not only incredibly simple and cost-effective, but it also allows you to completely customize the fragrance experience in your home. Forget those generic, mass-produced air fresheners filled with questionable chemicals. With just a few readily available ingredients and a touch of creativity, you can craft a personalized aroma that perfectly reflects your style and preferences.
Why is this DIY trick a must-try? Because it empowers you to take control of your home’s ambiance. You get to choose the exact essential oils that resonate with you, creating a calming sanctuary, an energizing workspace, or a welcoming entryway – all with a scent that’s uniquely yours. Plus, it’s a fantastic way to reduce waste by repurposing old bottles and avoiding single-use plastic air fresheners. Think of the satisfaction of knowing you’ve created something beautiful and functional with your own two hands!
Beyond the basic recipe, the possibilities are endless. Experiment with different carrier oils like safflower or sweet almond oil for a slightly different scent throw. Add a few drops of vodka or rubbing alcohol to help the essential oils disperse more effectively. Get creative with your container – a vintage glass bottle, a repurposed ceramic vase, or even a simple mason jar can all work beautifully. Consider adding dried flowers, decorative stones, or even a few drops of natural food coloring to enhance the visual appeal of your diffuser.
For a more invigorating scent, try a blend of citrus oils like lemon, grapefruit, and orange. For a relaxing and calming atmosphere, lavender, chamomile, and sandalwood are excellent choices. If you’re looking for something more grounding and earthy, consider using cedarwood, patchouli, and vetiver. Don’t be afraid to experiment and find the perfect combination that suits your mood and the season.
We wholeheartedly encourage you to give this DIY reed diffuser project a try. It’s a fun, rewarding, and surprisingly simple way to elevate your home’s atmosphere. And the best part? You’ll be creating a healthier, more sustainable, and infinitely more personalized fragrance experience.
Once you’ve created your masterpiece, we’d love to hear about it! Share your experiences, your favorite scent combinations, and any tips or tricks you’ve discovered in the comments below. Let’s inspire each other to create beautifully scented and sustainable homes! We can’t wait to see what you create!
Frequently Asked Questions (FAQ)
What exactly is a reed diffuser and how does it work?
A reed diffuser is a passive fragrance delivery system that utilizes reeds to draw scented oil from a container and release it into the air. The reeds, typically made of rattan, have porous channels that allow the oil to travel upwards through capillary action. As the oil reaches the top of the reeds, it evaporates, dispersing the fragrance into the surrounding environment. It’s a simple, flameless, and continuous way to scent a room.
What type of reeds should I use for my DIY reed diffuser?
Rattan reeds are the most commonly used and recommended type of reeds for reed diffusers. They have excellent wicking properties, allowing the fragrance oil to travel efficiently. Avoid using bamboo skewers or other types of wood, as they may not absorb the oil properly and can become moldy. You can purchase rattan reeds online or at craft stores. The ideal length is typically between 10 and 12 inches, but you can trim them to fit your container.
What kind of carrier oil is best for a DIY reed diffuser?
Several carrier oils can be used, but some are better than others. Fractionated coconut oil is a popular choice because it’s odorless, colorless, and has a long shelf life. Sweet almond oil is another good option, but it has a slightly nutty scent that may affect the overall fragrance. Safflower oil is also a viable option, being light and relatively odorless. Avoid using heavy oils like olive oil or vegetable oil, as they may clog the reeds and prevent proper diffusion. Mineral oil is another option, but it is petroleum-based and less desirable for those seeking natural alternatives.
How much essential oil should I use in my DIY reed diffuser blend?
A good starting point is to use a 15-20% concentration of essential oils in your carrier oil. This means that for every 100ml of carrier oil, you would add 15-20ml of essential oils. You can adjust the concentration based on your personal preference and the strength of the essential oils you are using. Some essential oils are more potent than others, so you may need to experiment to find the perfect balance. Always start with a lower concentration and add more essential oils if needed.
How often should I flip the reeds in my DIY reed diffuser?
Flipping the reeds helps to refresh the scent and maintain a consistent fragrance throw. It’s generally recommended to flip the reeds every 1-2 weeks, or whenever you notice the scent fading. When flipping the reeds, be careful not to spill any oil. It’s a good idea to do this over a sink or on a protected surface.
How long will my DIY reed diffuser last?
The lifespan of your DIY reed diffuser will depend on several factors, including the size of the container, the concentration of essential oils, the type of carrier oil, and the ambient temperature. Generally, a 100ml diffuser should last for approximately 2-3 months. You can extend the lifespan by using a smaller container, using a higher concentration of essential oils, and keeping the diffuser away from direct sunlight and heat sources.
Can I reuse the reeds in my DIY reed diffuser?
It’s generally not recommended to reuse the reeds, as they can become clogged with oil and lose their wicking ability. Over time, the reeds can also become saturated with the fragrance, making it difficult to switch to a different scent. It’s best to replace the reeds whenever you refill the diffuser with fresh oil.
What safety precautions should I take when making and using a DIY reed diffuser?
Always handle essential oils with care, as they can be irritating to the skin and eyes. Avoid direct contact with skin and never ingest essential oils. Keep the diffuser out of reach of children and pets. If you spill any oil, clean it up immediately to prevent staining or damage to surfaces. Be mindful of the flammability of the carrier oil and essential oils, and keep the diffuser away from open flames and heat sources.
My DIY reed diffuser doesn’t seem to be diffusing much scent. What could be the problem?
Several factors could contribute to a weak scent throw. First, ensure that you are using high-quality essential oils and a sufficient concentration. Second, check the reeds to make sure they are not clogged or saturated. If they are, replace them with fresh reeds. Third, consider the location of the diffuser. If it’s placed in a drafty area or near a heat source, the oil may evaporate too quickly. Try moving it to a more stable location. Finally, make sure the room is not too large for the size of the diffuser. A larger room may require a larger diffuser or multiple diffusers.
Can I use fragrance oils instead of essential oils in my DIY reed diffuser?
While you can use fragrance oils, essential oils are generally preferred for their natural and therapeutic properties. Fragrance oils are synthetic and may contain chemicals that are not as beneficial or desirable. If you choose to use fragrance oils, make sure they are specifically designed for reed diffusers and are compatible with the carrier oil you are using. Be aware that fragrance oils may not have the same scent throw or longevity as essential oils.
Leave a Comment