

DIY Rope Basket with Handles: Ever feel like your home is drowning in clutter, and you’re desperately searching for stylish storage solutions that won’t break the bank? I know I have! That’s why I’m so excited to share this fantastic DIY project with you – creating your very own rope basket with handles.
Basket weaving, in general, has a rich history, dating back thousands of years. From ancient Egyptians using woven baskets for carrying goods to indigenous cultures crafting intricate designs for ceremonial purposes, baskets have always been essential and beautiful. While our modern take might not be quite as ancient, it certainly carries that same spirit of resourcefulness and creativity.
But why a rope basket with handles, you ask? Well, beyond their undeniable charm, these baskets are incredibly versatile. They’re perfect for storing blankets, toys, laundry, or even potted plants. The handles make them easy to move around, and the rustic rope adds a touch of warmth and texture to any room. Plus, learning how to make a DIY Rope Basket with Handles is a super satisfying project that anyone can tackle, regardless of their crafting experience. I’ll guide you through each step, making it a fun and rewarding experience. So, let’s ditch the boring plastic bins and embrace the beauty and functionality of handmade storage!
DIY Rope Basket with Handles: A Step-by-Step Guide
Hey there, fellow crafters! I’m so excited to share this super fun and surprisingly easy DIY project with you: a gorgeous rope basket with handles! These baskets are not only stylish but also incredibly practical for organizing everything from blankets and toys to plants and magazines. Plus, making your own is way more affordable than buying one from a store. Let’s get started!
Materials You’ll Need
Before we dive in, let’s gather all the necessary supplies. Trust me, having everything ready beforehand will make the process much smoother.
* Rope: This is the star of the show! I recommend using cotton rope, as it’s soft, easy to work with, and gives a lovely natural look. The thickness is up to you, but I find that a 1/4 inch to 1/2 inch rope works well. For a medium-sized basket (around 12 inches in diameter and 10 inches tall), you’ll need about 100-150 feet of rope. It’s always better to have a little extra than not enough!
* Hot Glue Gun and Glue Sticks: A high-temperature glue gun is essential for securely bonding the rope together. Make sure you have plenty of glue sticks on hand – you’ll be surprised how quickly you go through them!
* Scissors or Utility Knife: For cutting the rope. A sharp pair of scissors or a utility knife will do the trick.
* Measuring Tape or Ruler: To ensure your basket is the size you want.
* Two Leather Straps (for Handles): You can buy these pre-cut from a craft store or repurpose old belts. Aim for straps that are about 1 inch wide and 12-15 inches long.
* Rivets or Heavy-Duty Thread and Needle: To attach the leather straps to the basket. Rivets are easier and more durable, but sewing is a perfectly viable option if you don’t have a rivet gun.
* Awl or Leather Punch (if using Rivets): To create holes in the leather straps and rope for the rivets.
* Hammer (if using Rivets): To set the rivets.
* Optional: Fabric Liner: If you want to add a lining to your basket, you’ll need fabric, scissors, and a sewing machine or needle and thread.
* Optional: Clamps: These can be helpful for holding the rope in place while the glue dries, especially in the beginning.
Creating the Base
This is where the magic begins! We’ll start by forming the solid base of our basket.
1. Form the Center Coil: Take the end of your rope and coil it tightly into a small circle, about 1 inch in diameter. Apply a generous amount of hot glue between the rope coils to secure them together. This will be the very center of your basket base.
2. Continue Coiling and Gluing: Keep coiling the rope around the center circle, adding hot glue to the side of the existing coil as you go. Press the new coil firmly against the previous one to ensure a strong bond. I like to apply a bead of glue about an inch long, press the rope down for a few seconds until it cools slightly, and then move on to the next inch.
3. Maintain a Flat Surface: As you coil, make sure the base remains flat. If it starts to buckle or curve upwards, gently flatten it with your hands. You can also use a heavy object, like a book, to weigh it down while the glue dries.
4. Increase the Base Size: Continue coiling and gluing until the base reaches your desired diameter. For a medium-sized basket, I usually aim for a base that’s around 8-10 inches in diameter. Remember to keep the coils tight and the surface flat.
5. Finishing the Base: Once the base is the right size, carefully cut the rope at an angle to create a smooth transition. Apply a final dab of hot glue to secure the end of the rope to the base.
Building the Walls
Now that we have a solid base, it’s time to start building the walls of our basket. This is where the basket starts to take shape!
1. Transition to Upward Coiling: Instead of continuing to coil the rope flat on the base, start angling it slightly upwards. This will create the walls of the basket. Apply hot glue to the top edge of the base and press the rope against it, angling it upwards as you go.
2. Maintain the Angle: As you continue coiling, maintain a consistent angle to create even walls. The steeper the angle, the more tapered your basket will be. I prefer a slightly tapered shape, but you can make the walls straight if you prefer.
3. Continue Coiling and Gluing: Keep coiling and gluing the rope, working your way up the walls of the basket. Apply hot glue to the side of the previous coil and press the new coil firmly against it.
4. Check for Stability: Periodically check the stability of the walls. If they seem wobbly or unstable, you can add extra glue to reinforce them. Clamps can be helpful here to hold the rope in place while the glue dries.
5. Reach Desired Height: Continue coiling until the basket reaches your desired height. For a medium-sized basket, I usually aim for a height of around 10-12 inches.
6. Finishing the Top Edge: When you reach the desired height, carefully cut the rope at an angle to create a smooth finish. Apply a final dab of hot glue to secure the end of the rope to the basket. You can also tuck the end of the rope under the previous coil for a cleaner look.
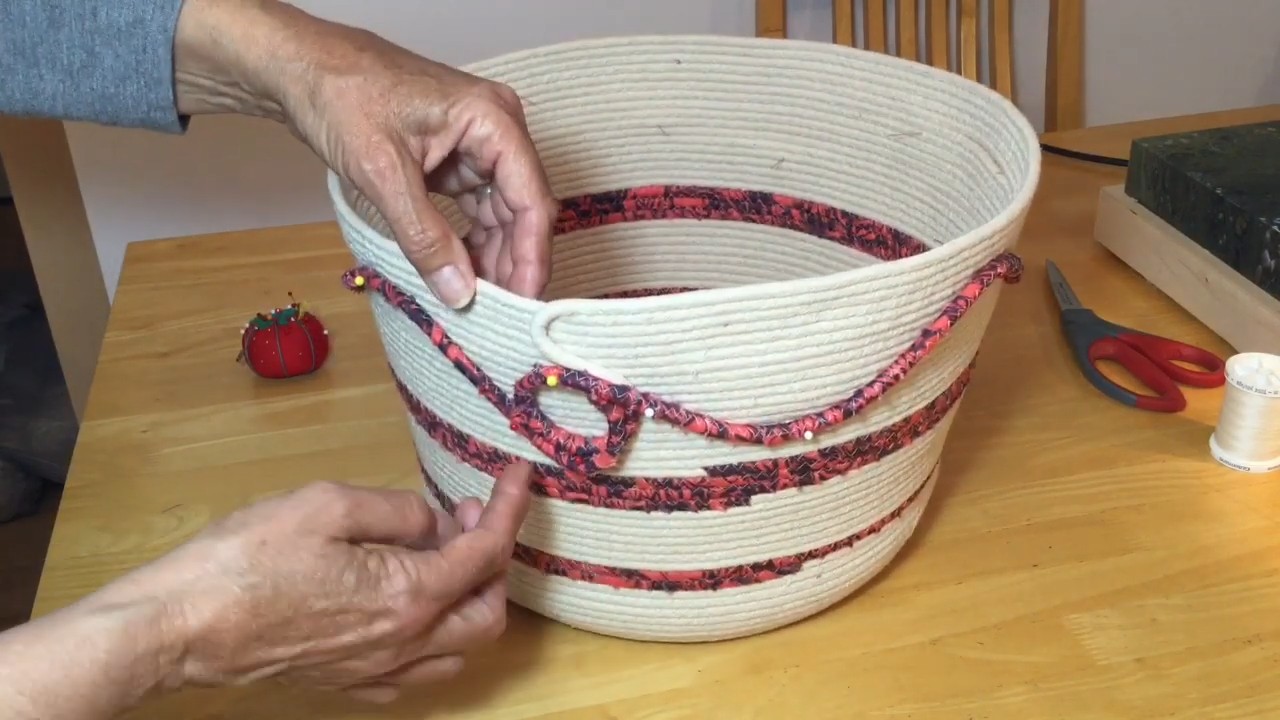
Adding the Handles
Handles are not only functional but also add a stylish touch to our rope basket.
1. Determine Handle Placement: Decide where you want to position the handles on the basket. I usually place them on opposite sides, evenly spaced apart.
2. Prepare the Leather Straps: If your leather straps are too long, trim them to the desired length.
3. Create Holes for Rivets (if using Rivets): Using an awl or leather punch, create two holes in each end of the leather straps. The holes should be large enough to accommodate the rivets.
4. Position the Straps: Place the leather straps against the basket, aligning the holes with the rope.
5. Attach the Straps with Rivets (if using Rivets): Insert the rivets through the holes in the leather straps and the rope. Use a hammer to set the rivets securely.
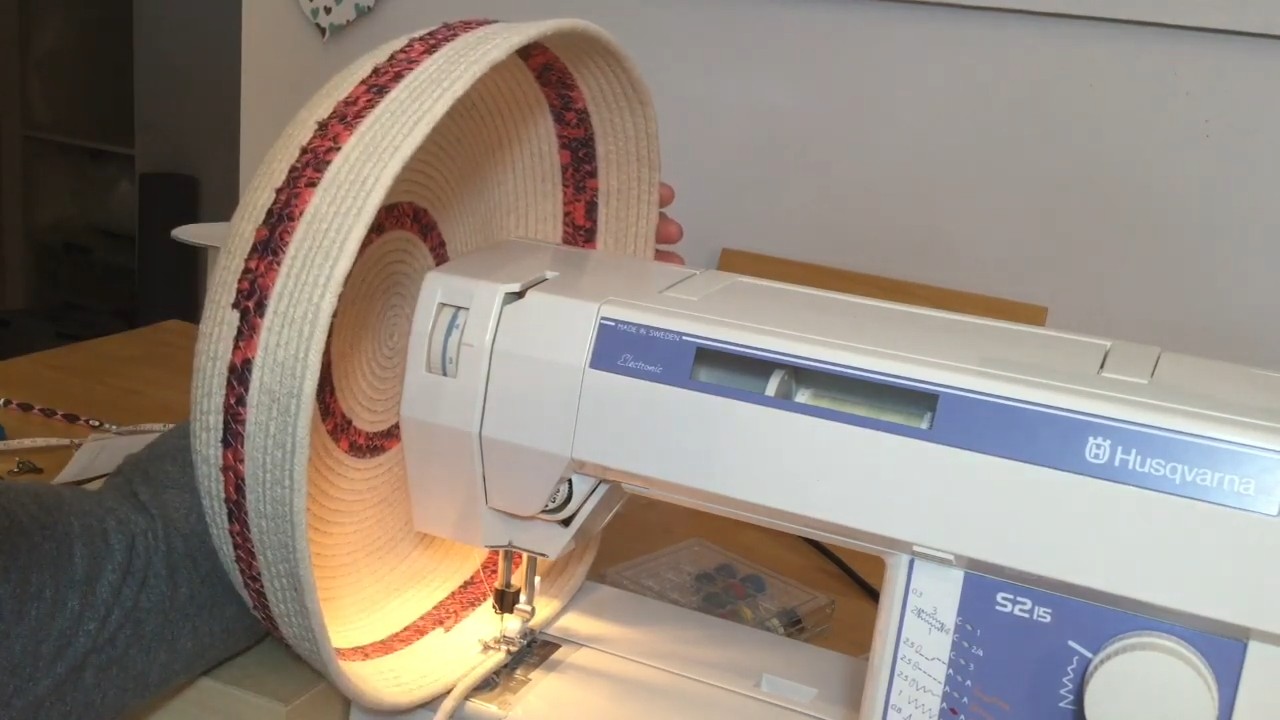
6. Attach the Straps by Sewing (if sewing): Thread a heavy-duty needle with strong thread. Sew the leather straps to the basket, using a tight and secure stitch. Reinforce the stitching by going over it several times.
7. Test the Handles: Once the handles are attached, test them to make sure they are secure. Gently pull on the handles to ensure they are firmly attached to the basket.
Adding a Fabric Liner (Optional)
A fabric liner can add a pop of color and protect the inside of your basket.
1. Measure the Basket: Measure the inside of the basket to determine the size of the fabric liner. You’ll need to measure the diameter of the base and the height of the walls.
2. Cut the Fabric: Cut the fabric according to your measurements, adding extra seam allowance. You’ll need a circle for the base and a rectangle for the walls.
3. Sew the Liner: Sew the rectangle into a cylinder, then sew the circle to the bottom of the cylinder.
4. Insert the Liner: Place the fabric liner inside the basket, folding the top edge over the rim. You can secure the liner to the basket with hot glue or hand-stitching.
Final Touches
Now that our rope basket is complete, let’s add a few final touches to make it extra special.
1. Trim Any Loose Ends: Check the basket for any loose ends of rope or glue strings and trim them off.
2. Clean Up: Remove any excess glue from the basket.
3. Admire Your Work: Step back and admire your beautiful handmade rope basket!
Tips and Tricks
Here are a few extra tips and tricks to help you create the perfect rope basket:
* Use a Lazy Susan: Placing the base of the basket on a lazy susan while you’re coiling can make it easier to rotate and work on.
* Protect Your Fingers: Hot glue can be hot! Use a silicone finger protector or wear gloves to avoid burns.
* Experiment with Colors: You can use different colors of rope to create a unique and personalized basket.
* Add Embellishments: Embellish your basket with tassels, beads, or other decorative elements.
* Practice Makes Perfect: Don’t be discouraged if your first basket
Conclusion
So, there you have it! Crafting your own DIY rope basket with handles isn’t just a fun afternoon project; it’s a gateway to personalized home décor, sustainable living, and a serious sense of accomplishment. We’ve walked you through the steps, highlighting the simplicity and adaptability of this fantastic DIY project.
Why is this a must-try? Because store-bought baskets, while convenient, often lack the character and unique charm that a handmade item brings to your space. Plus, you have complete control over the size, shape, and color palette, ensuring your basket perfectly complements your existing décor. Imagine a beautifully coiled rope basket gracing your living room, holding blankets and throws, or a smaller version organizing your bathroom essentials. The possibilities are truly endless.
But the benefits extend beyond aesthetics. By creating your own rope basket, you’re actively participating in a more sustainable lifestyle. You can repurpose old rope, twine, or even fabric scraps to create something beautiful and functional, reducing waste and minimizing your environmental impact. That’s a win-win in our book!
Looking for variations? Consider using different types of rope for varying textures and visual interest. Jute rope offers a rustic, natural look, while cotton rope provides a softer, more refined feel. You can also experiment with adding color by dyeing the rope before you begin or incorporating colorful fabric strips into the coiling process. Think about adding embellishments like beads, buttons, or leather accents to personalize your basket even further. For a sturdier base, consider using a pre-cut wooden circle or a piece of thick cardboard. And don’t forget the handles! Leather straps, rope loops, or even repurposed belts can add a unique touch and make your basket easy to carry.
This DIY rope basket project is more than just a craft; it’s an opportunity to express your creativity, enhance your home, and embrace a more sustainable lifestyle.
We wholeheartedly encourage you to give this DIY rope basket with handles a try. Don’t be intimidated if you’ve never tackled a similar project before. The steps are straightforward, and the results are incredibly rewarding. Remember to take your time, be patient, and most importantly, have fun!
Once you’ve completed your masterpiece, we’d love to see it! Share your creations with us on social media using [Your Social Media Hashtag] and tell us about your experience. What materials did you use? What challenges did you overcome? What unique touches did you add? We can’t wait to see your personalized DIY rope baskets and hear your stories. Happy crafting!
Frequently Asked Questions (FAQ)
What kind of rope is best for making a rope basket?
The best type of rope for your DIY rope basket depends on the look and feel you’re going for. Jute rope is a popular choice for its rustic, natural texture and affordability. It’s readily available at most craft stores and hardware stores. Cotton rope is another excellent option, offering a softer, more refined look and feel. It’s also easier to dye if you want to add color to your basket. Manila rope is a strong and durable option, ideal for larger baskets that need to hold heavier items. Synthetic ropes, like nylon or polypropylene, are also possibilities, but they may not have the same natural aesthetic as jute or cotton. Consider the overall style you want to achieve and the intended use of the basket when selecting your rope.
How do I attach the handles to my rope basket?
There are several ways to attach handles to your DIY rope basket, depending on the type of handles you’re using. For rope handles, you can simply thread the rope through the sides of the basket and tie a secure knot on the inside. Reinforce the knot with glue for added durability. For leather handles, you can use rivets, screws, or even strong glue to attach them to the basket. Make sure the attachment points are evenly spaced and strong enough to support the weight of the basket when it’s full. Consider using metal rings or grommets to reinforce the holes where the handles are attached, preventing the rope from fraying or tearing over time.
How do I make the base of the rope basket sturdy?
A sturdy base is crucial for a functional and long-lasting rope basket. You can achieve this in several ways. One option is to create a tightly coiled base using the same rope as the rest of the basket, ensuring each coil is securely glued to the previous one. Another option is to use a pre-cut wooden circle or a piece of thick cardboard as the base. Simply glue the rope around the perimeter of the base, working your way up to create the sides of the basket. For added stability, you can also reinforce the base with a layer of fabric or felt on the inside.
Can I use hot glue for this project?
Yes, hot glue is a commonly used adhesive for DIY rope basket projects. It’s readily available, easy to use, and provides a strong bond. However, it’s important to use a high-temperature hot glue gun and high-quality glue sticks for the best results. Apply the glue generously to ensure a secure bond between the rope coils. Be careful when working with hot glue, as it can cause burns. Consider wearing gloves to protect your hands. While hot glue is a good option, other adhesives like fabric glue or even a strong craft glue can also be used, depending on the type of rope and the desired level of durability.
How do I clean my rope basket?
Cleaning your rope basket depends on the type of rope used and the nature of the stain. For jute or cotton rope baskets, you can spot clean them with a damp cloth and mild detergent. Avoid soaking the entire basket in water, as this can cause the rope to shrink or lose its shape. For more stubborn stains, you can try using a soft brush to gently scrub the affected area. Allow the basket to air dry completely before using it again. For synthetic rope baskets, you can often wipe them down with a damp cloth or even hose them off with water. Always check the manufacturer’s instructions for specific cleaning recommendations.
What if my rope basket starts to unravel?
If your rope basket starts to unravel, don’t panic! You can easily fix it with a little bit of glue and patience. Identify the point where the unraveling is occurring and apply a generous amount of glue to the surrounding coils. Press the loose rope back into place and hold it until the glue dries completely. For added security, you can also use a needle and thread to stitch the rope together in the affected area. Preventative measures, such as using high-quality glue and reinforcing the ends of the rope, can help minimize the risk of unraveling in the first place.
Can I dye the rope for my basket?
Absolutely! Dyeing the rope is a great way to personalize your DIY rope basket and match it to your existing décor. Natural fibers like cotton and jute are the easiest to dye. You can use fabric dye, natural dyes (like coffee or tea), or even food coloring to achieve your desired color. Follow the dye manufacturer’s instructions carefully, and be sure to test the dye on a small piece of rope first to ensure you’re happy with the color. Allow the rope to dry completely before using it to create your basket. Remember that dyeing the rope may slightly alter its texture and flexibility.
How much rope do I need for a basket?
The amount of rope you need depends on the size of the basket you want to make. A small basket (e.g., 6 inches in diameter and 4 inches tall) might require around 50-75 feet of rope, while a larger basket (e.g., 12 inches in diameter and 8 inches tall) could require 150-200 feet or more. It’s always better to overestimate than underestimate, as you can always use the extra rope for another project. Before you start, measure the diameter and height of the desired basket and use online calculators or consult crafting resources to estimate the amount of rope needed.

Leave a Comment