

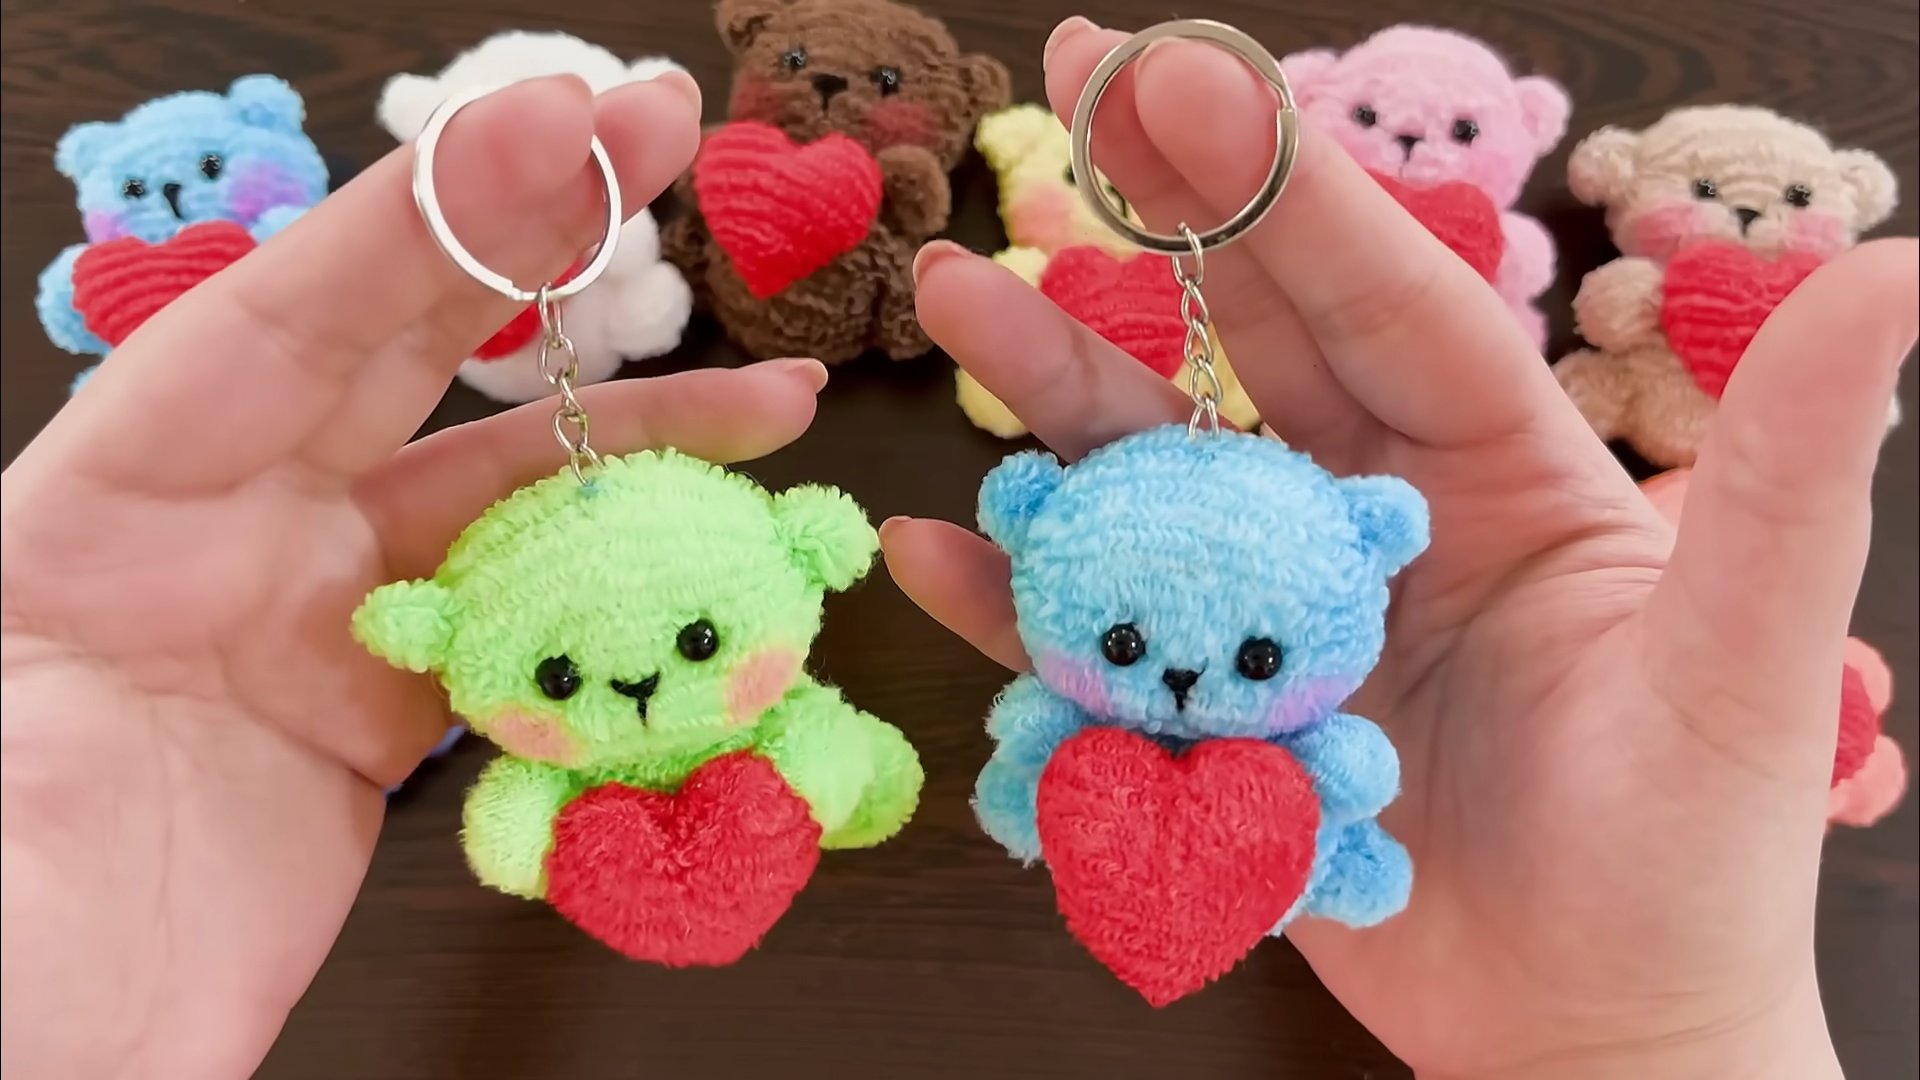
DIY Teddy Bear Keychain: Who doesn’t love a cute, cuddly companion? But what if you could carry that adorable feeling with you wherever you go? I’m so excited to share a super fun and easy DIY project that will let you do just that! We’re diving into the world of crafting to create your very own DIY Teddy Bear Keychain!
Keychains have been around for ages, evolving from simple ways to keep keys organized to personalized statements of style. Think about it – from ancient Roman key rings to the elaborate fobs of the Victorian era, keychains have always been a little piece of personal history we carry with us. Now, we’re adding a touch of handmade charm to that tradition!
In today’s fast-paced world, adding a personal touch to everyday items can bring a little joy and a sense of calm. That’s why this DIY Teddy Bear Keychain is the perfect project. It’s a fantastic way to express your creativity, upcycle old materials, and create a unique accessory that reflects your personality. Plus, it makes an adorable gift for friends and family! Imagine the smiles you’ll bring with a handmade teddy bear keychain. So, grab your supplies, and let’s get crafting!
DIY Adorable Teddy Bear Keychain: A Step-by-Step Guide
Hey there, fellow crafters! Ever wanted a super cute, personalized keychain that screams “you”? Well, look no further! Today, I’m going to walk you through creating your very own adorable teddy bear keychain. It’s a fun project, perfect for using up scraps of fabric, and makes a fantastic gift for friends and family (or, you know, a little treat for yourself!).
What You’ll Need
Before we dive in, let’s gather our supplies. Don’t worry, you probably already have most of these lying around!
* **Fabric Scraps:** Felt is ideal because it doesn’t fray easily, but cotton, fleece, or even repurposed denim will work. Choose colors that make you happy! I like to use a combination of a main color for the body and contrasting colors for the ears and details.
* **Keychain Ring and Chain:** You can find these at most craft stores or online. Make sure the ring is sturdy enough to hold your bear.
* **Stuffing:** Polyester fiberfill is the classic choice, but you can also use cotton balls, fabric scraps (cut into tiny pieces), or even rice (though be mindful of moisture if you live in a humid climate).
* **Embroidery Floss or Thread:** Choose colors that coordinate with your fabric. I usually go for a slightly darker shade for outlining and details.
* **Needle:** A sharp needle with a large enough eye to thread your embroidery floss or thread.
* **Scissors:** Fabric scissors are best for clean cuts, but regular scissors will do in a pinch.
* **Pencil or Fabric Marker:** For tracing your pattern onto the fabric. A fabric marker is preferable as it won’t leave permanent marks.
* **Pins:** To hold the fabric pieces together while you sew.
* **Teddy Bear Pattern:** I’ll provide a simple pattern below, but feel free to get creative and design your own!
* **Optional:** Beads, buttons, ribbons, or other embellishments to personalize your bear.
* **Optional:** Hot glue gun (for attaching small details quickly, but sewing is more secure).
The Teddy Bear Pattern
Here’s a basic teddy bear pattern you can use. Feel free to adjust the size and shape to your liking! You’ll need to cut out two body pieces, four ear pieces (two for each ear), and optionally, small circles for the eyes and a small oval for the nose.
(Imagine a simple drawing here: A teddy bear body shape, two ear shapes, two small circles for eyes, and a small oval for the nose.)
**Body:** A rounded shape, slightly wider at the bottom than the top.
**Ears:** Small, rounded semi-circles.
**Eyes:** Small circles.
**Nose:** Small oval.
Step-by-Step Instructions
Alright, let’s get crafting!
1. Preparing the Pattern and Fabric
1. **Print or Draw Your Pattern:** If you’re using my pattern, print it out. If you’re designing your own, draw it on a piece of paper. Remember to keep the size appropriate for a keychain! I usually aim for a bear that’s about 3-4 inches tall.
2. **Cut Out the Pattern Pieces:** Carefully cut out all the pattern pieces.
3. **Trace the Pattern onto the Fabric:** Place the body pattern piece on your chosen fabric and trace around it with a pencil or fabric marker. Repeat this to create two identical body pieces. Remember to flip the pattern piece over for the second body piece so you have a mirror image. This ensures that when you sew them together, the right sides of the fabric will be facing each other.
4. **Trace the Ear Pieces:** Trace the ear pattern piece onto your chosen fabric four times.
5. **Trace the Eye and Nose Pieces (Optional):** If you’re using fabric for the eyes and nose, trace those pattern pieces onto the appropriate fabric.
6. **Cut Out the Fabric Pieces:** Carefully cut out all the fabric pieces you traced. Try to cut just inside the traced line for a cleaner edge.
2. Assembling the Ears
1. **Pair Up the Ear Pieces:** Take two ear pieces and place them right sides together.
2. **Sew the Ear Pieces Together:** Using a running stitch or a blanket stitch (I prefer blanket stitch for a more decorative look), sew around the curved edge of the ear, leaving the straight edge open.
3. **Repeat for the Second Ear:** Repeat the process with the remaining two ear pieces.
4. **Turn the Ears Right Side Out:** Carefully turn both ears right side out. You can use a pencil or chopstick to gently push out the seams.
5. **Flatten the Ears:** Press the ears flat with your fingers.
3. Attaching the Ears and Facial Features
1. **Position the Ears:** Pin the ears to the right side of one of the body pieces. Position them where you want them to be on the top of the bear’s head.
2. **Sew the Ears in Place:** Using a few small stitches, securely sew the ears to the body piece.
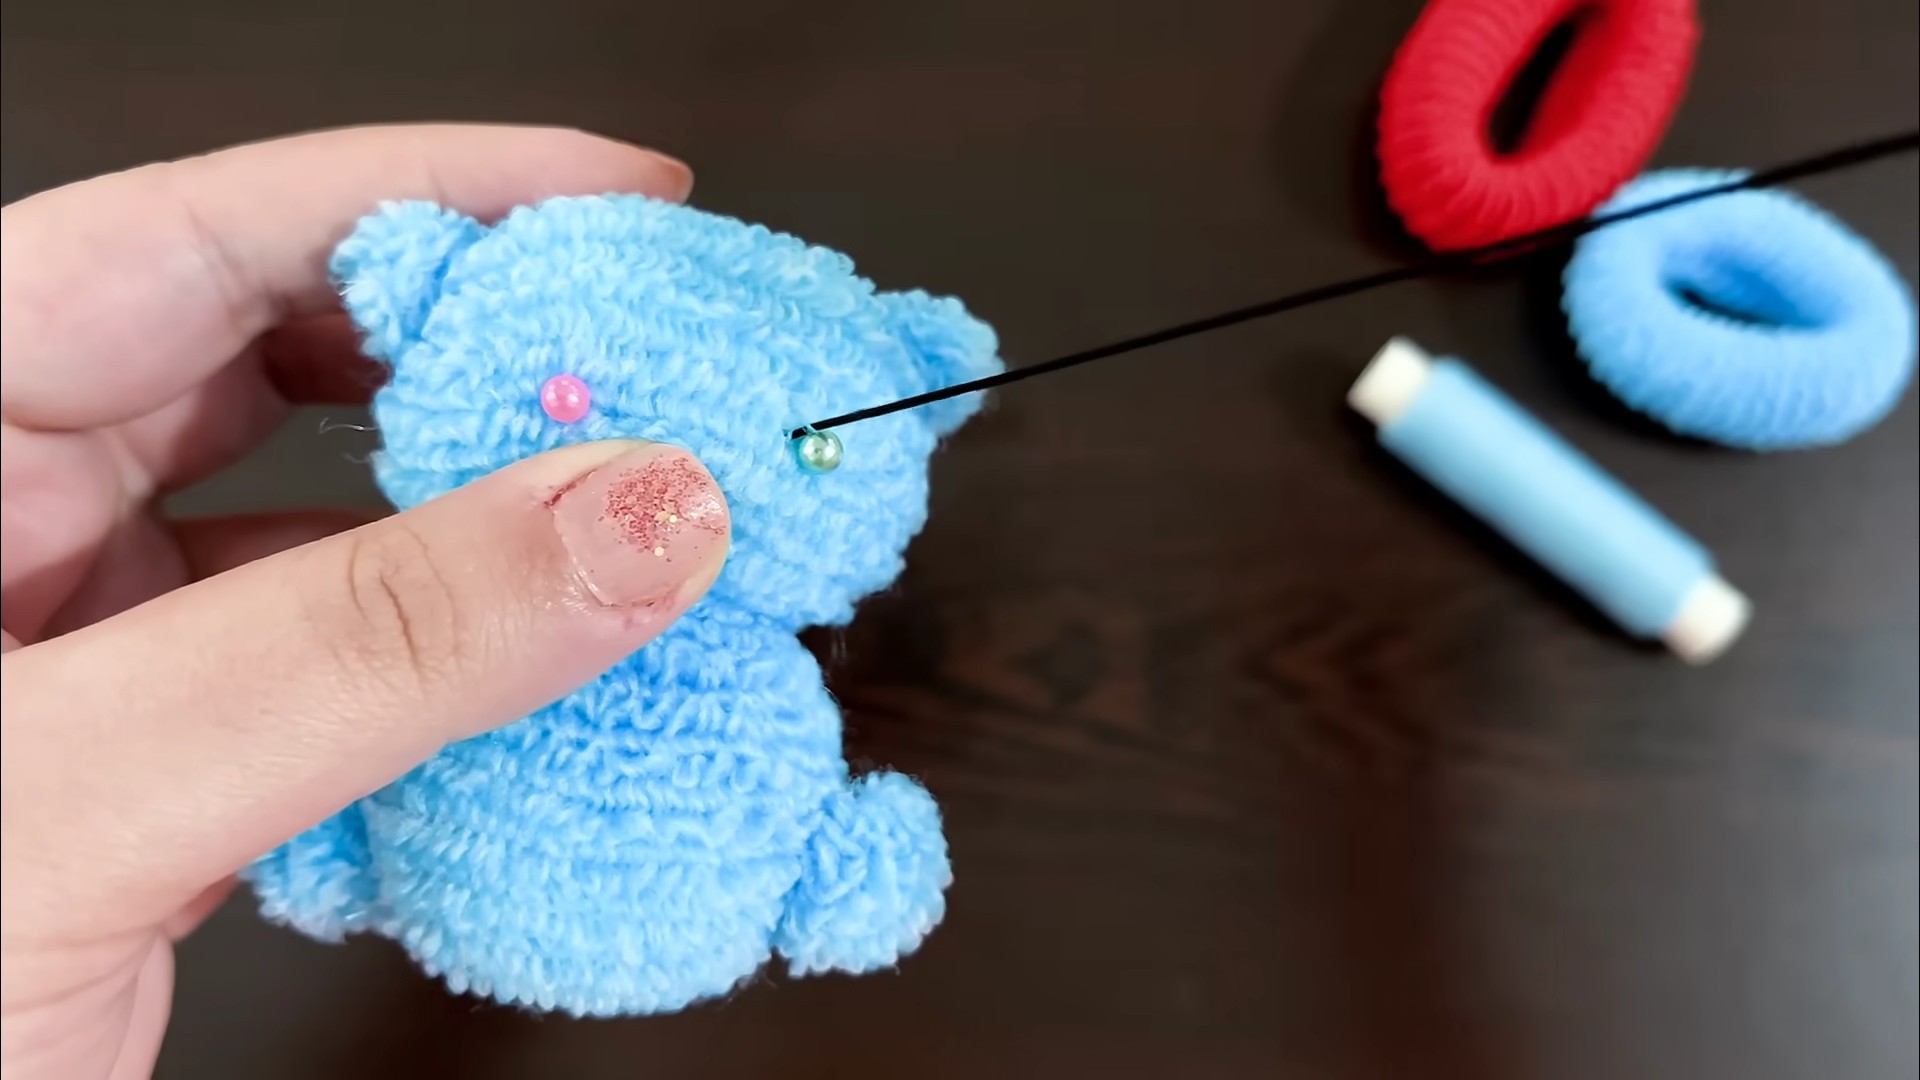
3. **Attach the Eyes (Optional):** If you’re using fabric eyes, pin them to the body piece where you want them to be. You can also use beads or buttons for eyes. Sew them securely in place.
4. **Attach the Nose (Optional):** If you’re using fabric for the nose, pin it to the body piece and sew it in place. You can also embroider the nose using embroidery floss. I like to use a satin stitch for a smooth, filled-in look.
5. **Embroider the Mouth (Optional):** Using embroidery floss, embroider a small mouth below the nose. A simple back stitch or stem stitch works well. You can also skip this step if you prefer a simpler look.
4. Sewing the Body Together
1. **Place the Body Pieces Together:** Place the two body pieces right sides together, with the ears and facial features sandwiched in between.
2. **Pin the Pieces Together:** Pin the body pieces together around the edges, making sure the ears are securely held in place.
3. **Sew Around the Edges:** Using a running stitch or a blanket stitch, sew around the edges of the body, leaving a small opening (about 1-2 inches) at the bottom for stuffing. Remember to backstitch at the beginning and end of your stitching to secure the seam.
4. **Clip the Curves:** Carefully clip the curves around the body, especially around the arms and legs. This will help the fabric lie flat when you turn it right side out. Be careful not to cut through the stitching!
5. Stuffing the Teddy Bear
1. **Turn the Body Right Side Out:** Carefully turn the teddy bear body right side out through the opening you left at the bottom. Use a pencil or chopstick to gently push out the seams and corners.
2. **Stuff the Body:** Start stuffing the body with your chosen stuffing material. Use small pieces of stuffing and gradually fill the body, making sure to get into all the corners and crevices. Don’t overstuff it, or the seams might burst. You want it to be firm but still soft and cuddly.
3. **Stuff the Ears:** Add a little bit of stuffing to the ears to give them some shape.
6. Closing the Opening
1. **Fold in the Edges:** Fold the raw edges of the opening inwards, creating a clean edge.
2. **Pin the Opening Closed:** Pin the folded edges together to hold them in place.
3. **Sew the Opening Closed:** Using a ladder stitch or a slip stitch, sew the opening closed. These stitches are invisible, creating a seamless finish.
7. Attaching the Keychain
1. **Choose a Placement:** Decide where you want to attach the keychain ring. I usually attach it to the top of the bear’s head, between the ears.
2. **Attach the Keychain Ring:** Using a needle and thread, securely sew the keychain ring to the chosen spot. Make sure the stitches are strong and secure, as this is what will hold the keychain together. You can also use a small piece of ribbon or fabric loop to attach the ring for added security.
3. **Reinforce the Attachment:** For extra security, you can add a drop of hot glue to the base of the keychain ring where it’s attached to the fabric.
8. Adding Embellishments (Optional)
1. **Get Creative!:** Now’s the time to personalize your teddy bear keychain! You can add beads, buttons, ribbons, or any other embellishments you like.
2. **Attach the Embellishments:** Use a needle and thread or hot glue to attach the embellishments to the bear.
Tips and Tricks
* Practice your stitches: Before starting on your teddy bear, practice your chosen stitches on a scrap piece of fabric. This will help you get a feel for the stitch and ensure that your seams are neat and even.
* Use a thimble: If you’re using a thick
Conclusion
So, there you have it! Crafting your own DIY teddy bear keychain isn’t just a fun afternoon project; it’s a gateway to personalized style, heartfelt gifting, and a delightful way to reduce textile waste. Forget mass-produced trinkets – this is about imbuing a little piece of yourself into something adorable and functional.
Why is this DIY teddy bear keychain a must-try? Because it’s more than just a keychain. It’s a statement. It’s a conversation starter. It’s a tangible representation of your creativity. It’s a way to recycle old fabrics and give them a new life. And, let’s be honest, who can resist the charm of a miniature teddy bear dangling from their keys or bag?
But the best part? The possibilities are endless! Feel free to experiment with different fabrics. Imagine a keychain made from a cherished baby blanket, a favorite old t-shirt, or even scraps of luxurious velvet. You could add tiny embellishments like beads, sequins, or embroidered details to truly personalize your creation. Consider using different colored threads for the stitching to create a contrasting effect.
For a more rustic look, try using burlap or linen. For a touch of whimsy, incorporate patterned fabrics or even felt appliques. If you’re feeling ambitious, you could even create a whole family of teddy bear keychains, each with its own unique personality and style. Think about adding small accessories like tiny hats, scarves, or even miniature backpacks to your teddy bears.
And don’t limit yourself to just teddy bears! Once you’ve mastered the basic technique, you can adapt it to create other animal keychains, like bunnies, cats, or even your own custom creature. The only limit is your imagination.
Beyond personalizing your own accessories, these DIY teddy bear keychains make incredibly thoughtful and heartfelt gifts. Imagine the joy on a child’s face when they receive a keychain made with love, or the sentimental value of a keychain crafted from a piece of fabric that holds special memories. They’re perfect for birthdays, holidays, or just because.
We wholeheartedly encourage you to give this DIY teddy bear keychain project a try. It’s a rewarding experience that will not only result in a charming accessory but also unleash your inner artist. Don’t be afraid to experiment, get creative, and most importantly, have fun!
Once you’ve created your masterpiece, we’d love to see it! Share your creations with us on social media using #DIYTeddyBearKeychain and tell us about your experience. What fabrics did you use? What embellishments did you add? What challenges did you overcome? We’re eager to see your unique interpretations and learn from your creative process. Let’s build a community of DIY enthusiasts and inspire each other with our handmade treasures. So grab your needle and thread, unleash your creativity, and let’s get crafting!
FAQ
What kind of fabric is best for making a DIY teddy bear keychain?
The best fabric for your DIY teddy bear keychain depends on the look and feel you’re going for. Felt is a popular choice because it’s easy to work with, doesn’t fray easily, and comes in a wide variety of colors. Cotton fabric is another good option, especially if you want to use patterned fabrics. Fleece is soft and cuddly, making it ideal for a plush teddy bear. You can also repurpose old clothing items like t-shirts, sweaters, or even denim for a more sustainable and unique keychain. Just be sure to choose a fabric that’s durable enough to withstand everyday wear and tear.
How do I stuff the teddy bear keychain?
Polyester fiberfill is the most common and readily available stuffing material. It’s lightweight, washable, and hypoallergenic. You can also use cotton balls, fabric scraps, or even rice for a heavier, more textured feel. When stuffing, start with the limbs and head, and gradually fill the body. Use a chopstick or pencil to push the stuffing into the corners and crevices. Be careful not to overstuff, as this can distort the shape of the teddy bear. Aim for a firm but not overly rigid feel.
What kind of thread should I use?
A strong and durable thread is essential for ensuring that your teddy bear keychain holds up well. Cotton embroidery floss is a good choice for hand-sewing, as it’s strong and comes in a wide range of colors. Polyester thread is even stronger and more resistant to wear and tear. If you’re using a sewing machine, be sure to use a thread that’s compatible with your machine. Choose a thread color that complements or contrasts with your fabric, depending on the look you want to achieve.
How do I attach the keychain to the teddy bear?
There are several ways to attach the keychain to your teddy bear. The most common method is to sew a small loop of ribbon or fabric to the top of the teddy bear’s head and then attach a keychain ring to the loop. You can also use a metal eyelet or grommet for a more secure attachment. Another option is to sew the keychain ring directly onto the teddy bear’s head, but this may not be as durable. Be sure to use a strong thread and reinforce the attachment point with multiple stitches.
Can I wash my DIY teddy bear keychain?
Whether or not you can wash your teddy bear keychain depends on the materials you used. If you used washable fabrics and stuffing, you can hand-wash it gently with mild soap and water. Avoid using harsh detergents or bleach. Rinse thoroughly and allow it to air dry completely. If you used delicate fabrics or embellishments, it’s best to spot-clean only. To prevent your keychain from getting dirty in the first place, consider storing it in a clean pouch or bag when not in use.
What if I don’t have a sewing machine?
No problem! This DIY teddy bear keychain project can easily be completed by hand. Hand-sewing is a relaxing and meditative activity, and it allows you to have more control over the stitching. Use a running stitch or a back stitch for a strong and secure seam. Be sure to knot the thread securely at the beginning and end of each seam.
How can I make my teddy bear keychain more unique?
There are endless ways to personalize your teddy bear keychain and make it truly one-of-a-kind. Consider adding embellishments like beads, sequins, buttons, or embroidered details. You can also use fabric paint or markers to add designs or patterns to the fabric. Experiment with different fabric combinations and textures. Add a tiny hat, scarf, or other accessories to your teddy bear. You can even create a miniature outfit for your teddy bear using scraps of fabric. The possibilities are endless!
Where can I find inspiration for my DIY teddy bear keychain?
The internet is a treasure trove of inspiration for DIY projects. Browse Pinterest, Instagram, and other social media platforms for ideas and tutorials. Look at pictures of teddy bears and other stuffed animals for inspiration. Visit craft stores and fabric shops to see the latest trends and materials. Don’t be afraid to experiment and try new things. The most important thing is to have fun and let your creativity shine!

Leave a Comment