

DIY Towel Slippers Tutorial: Who doesn’t love the feeling of freshly laundered towels? Now, imagine that comfort enveloping your feet! In this tutorial, I’m going to show you how to transform those old, forgotten towels into cozy, custom-fit slippers. Forget spending a fortune on store-bought slippers that never quite feel right. This is a budget-friendly, eco-conscious way to pamper your feet and give those tired towels a new lease on life.
The concept of repurposing textiles has been around for centuries, born out of necessity and resourcefulness. From quilting scraps to mending clothes, our ancestors understood the value of making the most of what they had. This DIY Towel Slippers Tutorial taps into that same spirit, offering a modern twist on a time-honored tradition.
Let’s face it, we all have those towels lurking in the linen closet – the ones that are a little too worn for guests but still perfectly usable. Instead of tossing them, why not turn them into something practical and comfortable? This project is perfect for beginners, requiring minimal sewing skills and readily available materials. Plus, imagine the satisfaction of saying, “I made these myself!” So, grab your sewing kit and let’s get started on creating your own luxurious, homemade towel slippers. Your feet will thank you!
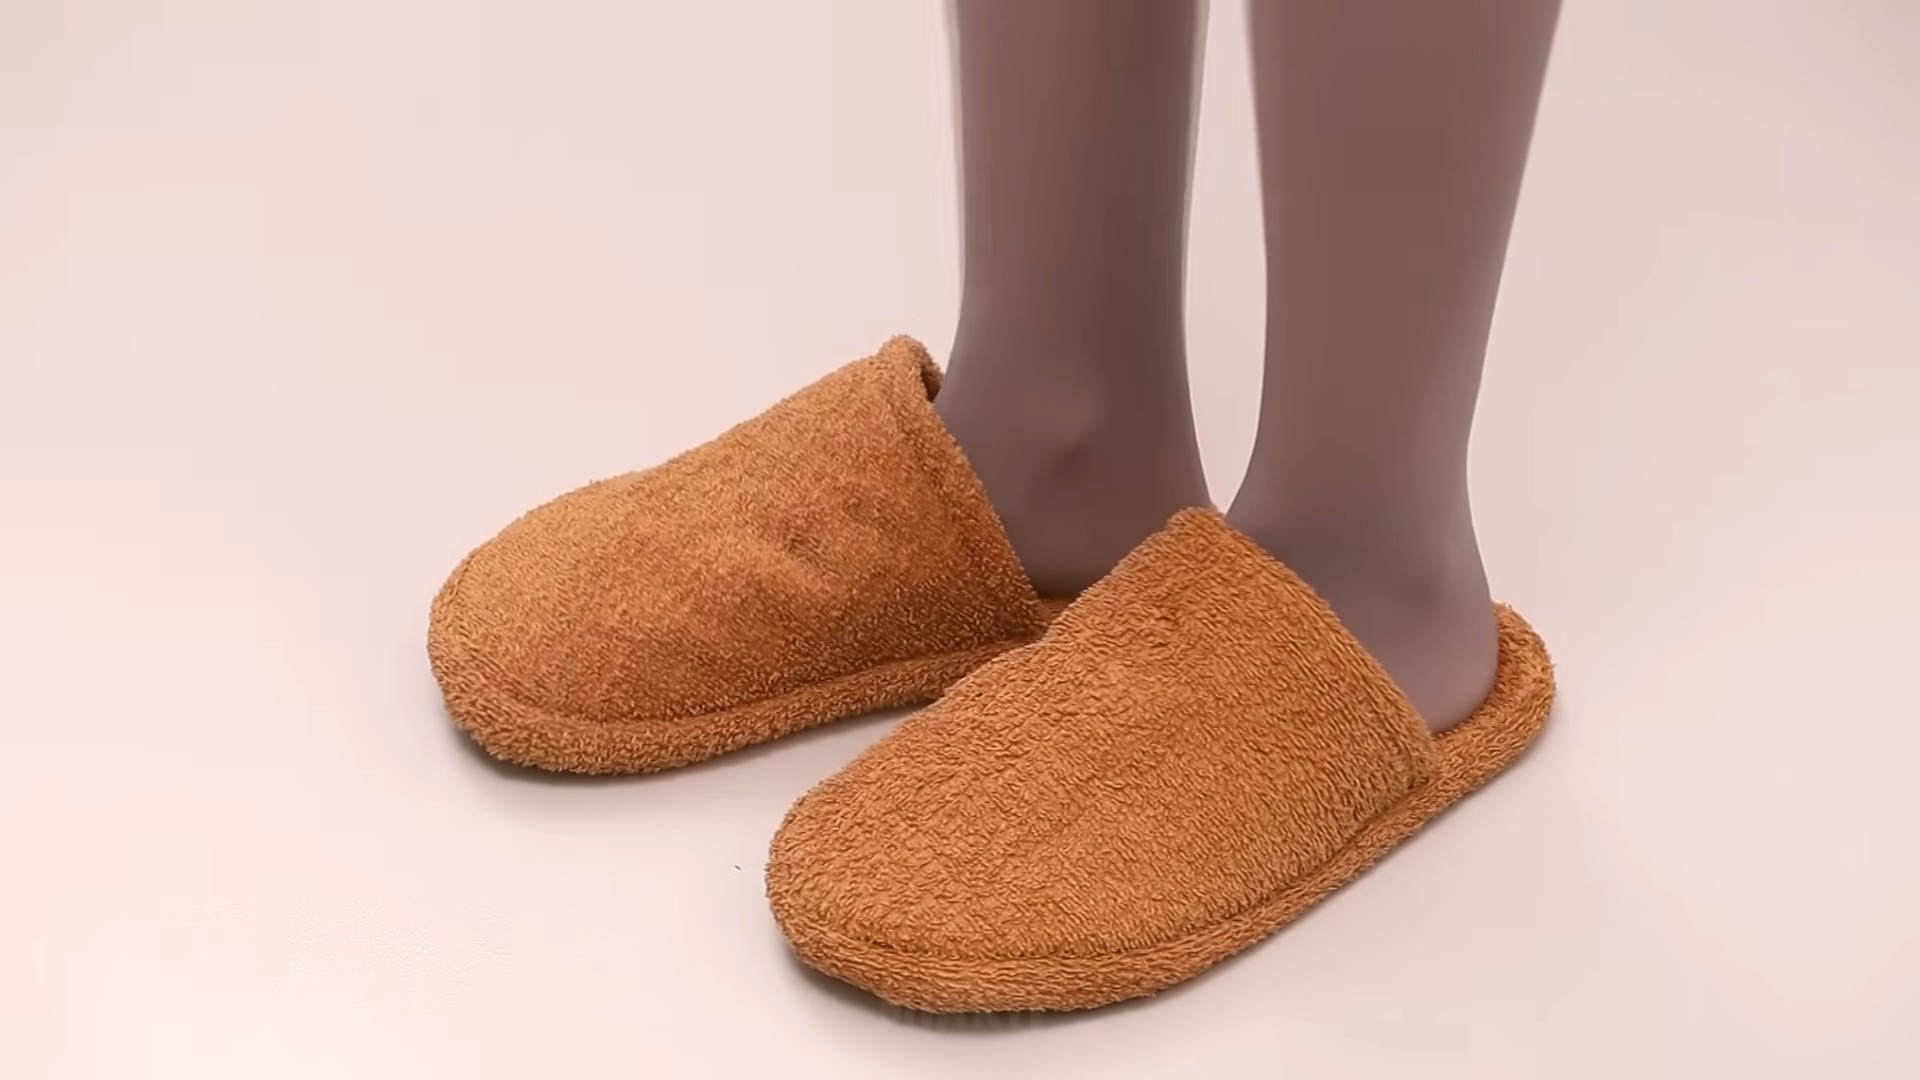
DIY Towel Slippers: Pamper Your Feet with Comfort!
Hey there, fellow DIY enthusiasts! Are you tired of cold floors greeting your feet every morning? Or maybe you just want a cozy and eco-friendly alternative to store-bought slippers? Well, you’ve come to the right place! Today, I’m going to walk you through creating your very own super comfy towel slippers. This project is perfect for using up old towels, adding a touch of spa-like luxury to your home, and it’s surprisingly easy! Let’s get started!
What You’ll Need: The Supply List
Before we dive in, let’s gather our supplies. Here’s what you’ll need to make your towel slippers:
* Old Towels: The thicker, the better! Bath towels work great, but even hand towels can be used for smaller sizes. You’ll need enough fabric to cut out two soles and two upper pieces.
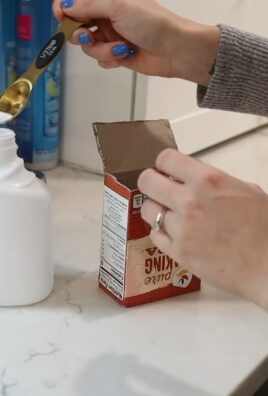
* Cardboard or Thick Felt: This will form the inner sole of your slippers, providing structure and support. Cereal boxes work in a pinch!
* Scissors: A good pair of fabric scissors is essential for clean cuts.
* Sewing Machine (Optional): While you can hand-sew these slippers, a sewing machine will make the process much faster and more durable.
* Needle and Thread: If you’re hand-sewing, choose a strong thread that matches your towel color.
* Pins: These will hold the fabric pieces together while you sew.
* Pencil or Fabric Marker: For tracing your foot and marking cutting lines.
* Measuring Tape or Ruler: To ensure accurate measurements.
* Non-Slip Fabric or Material (Optional): For the bottom of the slippers to prevent slipping. You can use rubber shelf liner, fabric paint, or even hot glue.
* Embellishments (Optional): Buttons, ribbons, lace, or anything else you want to use to personalize your slippers!
Creating the Pattern: Your Foot’s Blueprint
This is a crucial step, so take your time and be precise! We’re going to create a pattern based on the size and shape of your feet.
1. Trace Your Foot: Place a piece of paper (or cardboard) on a flat surface. Stand on the paper and carefully trace around your foot with a pencil or marker. Make sure to keep the pencil perpendicular to the paper for an accurate outline.
2. Add Seam Allowance: Around the tracing, add a seam allowance of about 1/2 inch (1.25 cm). This extra space will allow for sewing the pieces together without making the slippers too small.
3. Cut Out the Sole Pattern: Cut out the sole pattern along the outer line (including the seam allowance). This will be your template for cutting the towel and cardboard soles.
4. Design the Upper Piece Pattern: Now, let’s create the pattern for the upper part of the slipper. This is the part that will cover the top of your foot. You can customize the shape to your liking. Here are a few options:
* Simple Rectangle: A rectangular piece that covers the top of your foot. This is the easiest option. Measure the width of your foot at the widest point and add about 2 inches (5 cm) for overlap. Measure from the base of your toes to about halfway up your foot (or however far you want the slipper to cover) and add about 2 inches (5 cm) for seam allowance and folding over.
* Rounded Top: A rectangle with rounded corners for a more stylish look. Follow the same measurements as above, but round off the corners of the rectangle.
* Shaped Upper: Get creative! You can design a more elaborate shape, like a curved or pointed top. Just make sure it covers your foot comfortably and allows for enough seam allowance.
5. Cut Out the Upper Piece Pattern: Once you’re happy with your upper piece pattern, cut it out.
Cutting the Fabric: Time to Get Snipping!
Now that we have our patterns, it’s time to cut the fabric.
1. Cut the Towel Soles: Place the sole pattern on top of your folded towel (folded in half to cut two soles at once). Pin the pattern to the towel to prevent it from shifting. Carefully cut around the pattern, making sure to cut through both layers of the towel. You should now have two towel soles.
2. Cut the Cardboard/Felt Soles: Place the sole pattern on top of your cardboard or felt. Pin the pattern in place and cut out two soles. These will provide support and structure to the slippers.
3. Cut the Towel Upper Pieces: Place the upper piece pattern on top of your folded towel (again, folded in half). Pin the pattern in place and cut out two upper pieces.
Assembling the Slippers: Putting it All Together
This is where the magic happens! We’ll start by assembling the sole and then attach the upper piece.
Preparing the Soles
1. Layer the Soles: Place one cardboard/felt sole on a flat surface. Place one towel sole on top of the cardboard/felt sole, with the right side (the side you want to be visible) facing up.
2. Basting Stitch (Optional): If you’re using a sewing machine, you can baste stitch (a long, loose stitch) around the edge of the towel sole to secure it to the cardboard/felt sole. This will prevent the layers from shifting while you sew. If you’re hand-sewing, you can skip this step and just pin the layers together.
Attaching the Upper Piece
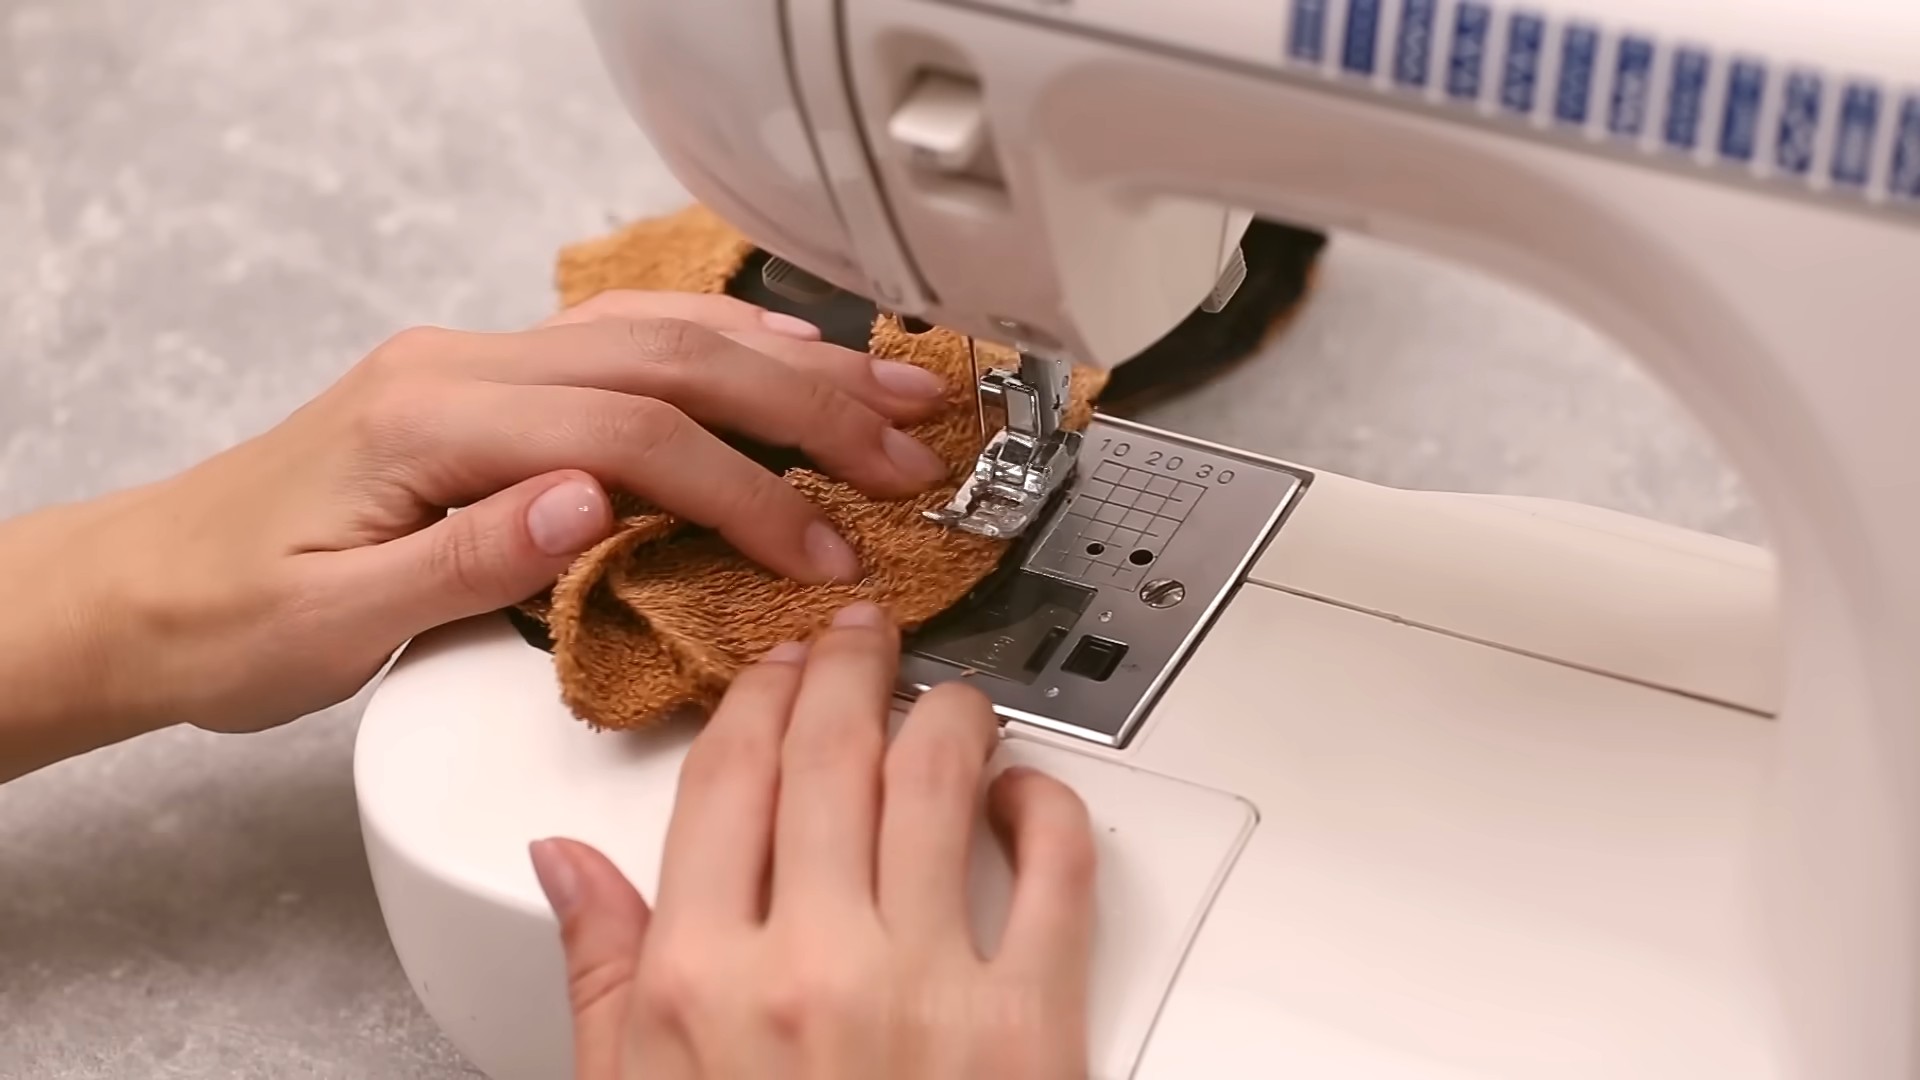
1. Position the Upper Piece: Place the upper piece on top of the towel sole, aligning the bottom edge of the upper piece with the front edge of the sole. The right side of the upper piece should be facing up.
2. Pin in Place: Pin the upper piece to the sole, starting at the center and working your way outwards. Make sure the upper piece is evenly distributed and covers the top of your foot comfortably.
3. Sew the Upper Piece to the Sole: Using a sewing machine or hand-sewing, sew the upper piece to the sole. Use a sturdy stitch, such as a straight stitch or a backstitch. Sew all the way around the bottom edge of the upper piece, securing it firmly to the sole.
4. Repeat for the Other Slipper: Repeat steps 1-3 for the other slipper.
Finishing Touches: Adding the Details
Now that the basic slippers are assembled, let’s add some finishing touches to make them even more comfortable and stylish.
1. Turn Under the Edges (Optional): If you want a cleaner look, you can turn under the raw edges of the upper piece and sew them down. This will prevent fraying and give the slippers a more polished appearance.
2. Add Non-Slip Material: To prevent slipping, apply non-slip material to the bottom of the slippers. You can use rubber shelf liner, fabric paint, or hot glue.
* Rubber Shelf Liner: Cut pieces of rubber shelf liner to fit the bottom of the slippers. Attach them using fabric glue or by sewing them on.
* Fabric Paint: Apply dots or lines of fabric paint to the bottom of the slippers. Let the paint dry completely before wearing the slippers.
* Hot Glue: Apply dots or lines of hot glue to the bottom of the slippers. Be careful not to use too much glue, as it can make the slippers stiff.
3. Embellish (Optional): Now’s the time to get creative and personalize your slippers! You can add buttons, ribbons, lace, or any other embellishments you like.
* Buttons: Sew buttons onto the upper piece for a decorative touch.
* Ribbons: Tie ribbons around the upper piece or sew them along the edges.
* Lace: Sew lace trim around the edges of the upper piece or the sole.
Tips and Tricks: Making Your Slippers Perfect
Here are a few extra tips and tricks to help you create the best towel slippers possible:
* Use Different Towels: Experiment with different types of towels to find the perfect level of comfort and thickness.
* Add Padding: For extra cushioning, add a layer of batting or fleece between the towel sole and the cardboard/felt sole.
* Adjust the Size: If your slippers are too big or too small, adjust the pattern accordingly.
* Reinforce the Seams: For added durability, reinforce the seams with a double stitch or by using a zigzag stitch.
* Washable Slippers: If you want to be able to wash your slippers, use washable materials and avoid using cardboard for the soles. You can use thick felt instead.
* Gift Idea: These towel slippers make a wonderful and thoughtful gift!
And there you have it! Your very own pair of cozy
Conclusion
So, there you have it! Transforming old towels into cozy, custom-fit slippers is not only incredibly satisfying but also a fantastic way to reduce waste and embrace a more sustainable lifestyle. This DIY towel slippers project is a win-win: you get comfortable, personalized footwear, and you give those forgotten towels a new lease on life.
But why is this DIY trick a must-try? Beyond the obvious benefits of comfort and cost-effectiveness, it’s about the sheer joy of creation. There’s something deeply rewarding about taking something old and transforming it into something new and useful. Plus, the customization options are endless!
Think beyond the basic design. Want extra warmth? Add a layer of fleece or flannel lining. Prefer a more secure fit? Incorporate elastic around the ankle. Feeling crafty? Embellish your slippers with embroidery, buttons, or fabric paint. You could even use different colored towels for a patchwork effect or add non-slip grips to the soles for added safety on slick floors. Consider using a thicker, more absorbent towel for slippers perfect for stepping out of the shower, or a thinner, lighter towel for warmer weather.
The possibilities are truly limited only by your imagination. This project is also a fantastic activity to do with kids, teaching them valuable sewing skills and the importance of resourcefulness. Imagine the pride they’ll feel wearing slippers they made themselves!
Don’t be intimidated if you’re new to sewing. This project is beginner-friendly, and there are plenty of online resources available to guide you through the process. Even if your first attempt isn’t perfect, don’t give up! Each pair of slippers you make will be better than the last.
We wholeheartedly encourage you to give this DIY towel slippers tutorial a try. It’s a fun, rewarding, and eco-friendly project that you’ll be proud to show off. And most importantly, don’t forget to share your creations with us! We’d love to see your unique designs and hear about your experience. Post photos of your finished slippers on social media using #DIYTowelSlippers and tag us so we can admire your handiwork. Let’s inspire others to embrace the joy of DIY and create a more sustainable world, one cozy slipper at a time. We are confident that you will find this project to be a delightful and practical addition to your crafting repertoire. Happy crafting!
Frequently Asked Questions (FAQs)
What kind of towels are best for making DIY towel slippers?
The best towels for this project are those that are absorbent and relatively thick. Old bath towels are ideal, as they offer a good balance of comfort and durability. However, you can also use hand towels or even beach towels, depending on the desired size and thickness of your slippers. Avoid using towels that are too thin or worn, as they may not provide enough support or cushioning. Consider the pile of the towel as well; a higher pile will result in a softer, more luxurious slipper. Experiment with different types of towels to find what works best for you and your desired level of comfort. Remember to pre-wash the towels before starting your project to prevent shrinkage after the slippers are made.
How do I determine the right size for my DIY towel slippers?
To ensure a comfortable fit, measure your foot length and width. Add about half an inch to an inch to allow for seam allowance and wiggle room. You can then use this measurement to create a paper pattern for your slippers. Alternatively, you can trace your foot onto a piece of paper, adding the extra allowance, and use that as your template. Remember to account for the thickness of the towel when determining the size. If you plan to wear socks with your slippers, measure your foot while wearing socks to ensure a proper fit. It’s always better to err on the side of slightly larger slippers, as you can always add extra stitching or padding to make them fit more snugly.
What if I don’t have a sewing machine? Can I still make these slippers?
Absolutely! While a sewing machine can speed up the process, these DIY towel slippers can easily be made by hand. Use a sturdy needle and thread, and take your time with each stitch. A backstitch or running stitch is recommended for durability. Hand-sewing may take longer, but it allows for greater control and precision, especially when working with thicker fabrics like towels. Consider using a thimble to protect your fingers while sewing. There are many online tutorials available that demonstrate hand-sewing techniques specifically for fabric projects. Don’t be discouraged if you don’t have a sewing machine; hand-sewing can be a relaxing and rewarding way to create your own cozy slippers.
How can I make my DIY towel slippers more durable?
To increase the durability of your towel slippers, consider reinforcing the seams with multiple rows of stitching. You can also add a layer of interfacing or canvas to the soles for extra support and protection. Using a heavier-duty thread, such as upholstery thread, can also help to prevent seams from unraveling. For the soles, consider adding a layer of non-slip material, such as rubber or silicone, to prevent slipping and wear and tear. Regularly inspect your slippers for any signs of wear and tear, and repair them promptly to extend their lifespan. Proper care, such as avoiding wearing them outdoors or in wet conditions, can also help to prolong their durability.
How do I clean my DIY towel slippers?
The best way to clean your DIY towel slippers depends on the type of towel used and any embellishments you’ve added. In general, you can machine wash them on a gentle cycle with cold water. Use a mild detergent and avoid using bleach, as it can damage the fabric. Tumble dry on low heat or air dry to prevent shrinkage. If your slippers have delicate embellishments, such as embroidery or buttons, hand-washing is recommended. Gently spot clean any stains with a mild soap and water solution. Avoid soaking the slippers for extended periods, as this can weaken the seams. Regularly washing your slippers will help to keep them fresh and hygienic.
Can I add non-slip soles to my DIY towel slippers?
Yes, adding non-slip soles is a great way to improve the safety and durability of your DIY towel slippers. You can purchase non-slip fabric or rubber sheets from most craft stores. Cut the material to the shape of your slipper soles and attach it using fabric glue or by sewing it on. Alternatively, you can use puffy paint or silicone sealant to create a non-slip pattern on the soles. Allow the paint or sealant to dry completely before wearing the slippers. Regularly check the non-slip soles for wear and tear, and reapply or replace them as needed. This simple addition can significantly reduce the risk of slipping, especially on hard floors.
What are some creative variations I can try with this DIY towel slippers project?
The possibilities are endless! You could try using different colored towels for a patchwork effect, adding decorative stitching or embroidery, or embellishing your slippers with buttons, beads, or ribbons. Consider adding a layer of fleece or flannel lining for extra warmth and comfort. You could also experiment with different shapes and sizes, such as making open-toe slippers or slippers with ankle straps. For a more luxurious feel, use a high-quality towel, such as Egyptian cotton or bamboo. Get creative and personalize your slippers to reflect your own unique style and preferences. Don’t be afraid to experiment and try new techniques; the only limit is your imagination!

Leave a Comment