

Easy Bell Pepper Gardening – ever dreamt of strolling into your backyard and plucking a vibrant, juicy bell pepper straight from the vine? I know I have! There’s something incredibly satisfying about growing your own food, and bell peppers are surprisingly easy to cultivate, even if you’re a complete beginner. Forget those expensive, often bland, supermarket peppers. With a few simple tricks and a little know-how, you can be enjoying homegrown goodness in no time.
Bell peppers have a rich history, originating in South America and spreading throughout the world thanks to explorers. They’ve been a staple in various cuisines for centuries, adding color and flavor to dishes from stir-fries to salads. But beyond their culinary appeal, growing your own bell peppers offers a connection to nature and a sense of accomplishment that’s hard to beat.
In today’s world, where we’re increasingly conscious of where our food comes from, learning easy bell pepper gardening techniques is more important than ever. Store-bought produce can be laden with pesticides and travel long distances, impacting both our health and the environment. By growing your own, you have complete control over what goes into your food, ensuring a healthier and more sustainable lifestyle. Plus, who doesn’t love the taste of a freshly picked, sun-ripened bell pepper? Let’s dive into some simple DIY tricks that will have you harvesting a bountiful crop in no time!
Growing Bell Peppers: A Beginner-Friendly DIY Guide
Hey there, fellow gardening enthusiasts! I’m so excited to share my tried-and-true method for growing bell peppers. It’s easier than you might think, and nothing beats the taste of a fresh, homegrown pepper. Let’s dive in!
Choosing Your Bell Pepper Variety
Before we get our hands dirty, let’s talk peppers! There are tons of bell pepper varieties out there, each with its own unique characteristics. Here’s a quick rundown to help you choose:
* **Color:** Red, yellow, orange, green, purple, even chocolate! The color affects the sweetness, with red and orange being the sweetest.
* **Size:** From mini snack peppers to jumbo stuffers, pick a size that suits your needs.
* **Disease Resistance:** Look for varieties that are resistant to common pepper diseases in your area. This will save you a lot of headaches later on.
* **Days to Maturity:** This tells you how long it takes from planting to harvest. Choose varieties with shorter maturity times if you live in a cooler climate with a shorter growing season.
Some popular and reliable choices include:
* California Wonder (classic green bell pepper)
* Yolo Wonder (another great green option)
* Golden Bell (sweet yellow pepper)
* Jupiter (large, blocky red pepper)
I personally love growing a mix of colors for a vibrant harvest!
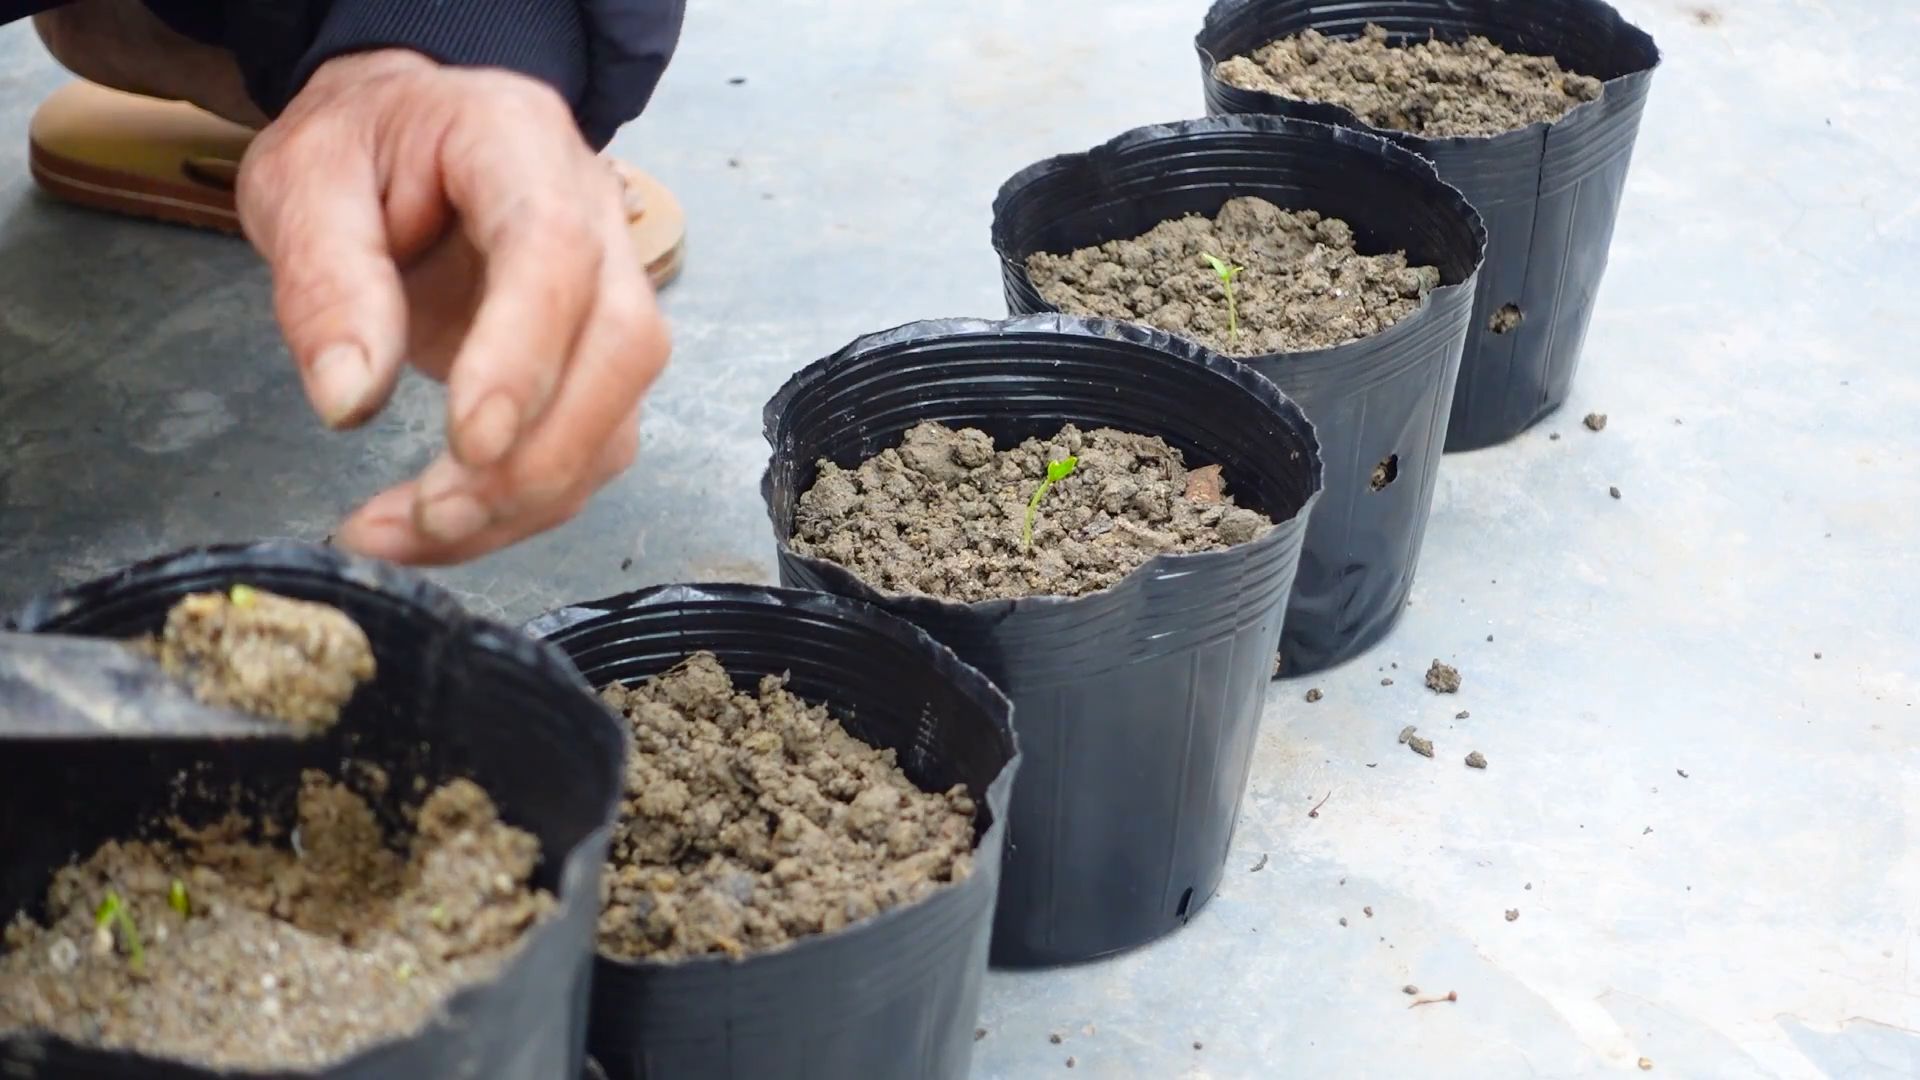
Starting from Seed vs. Buying Seedlings
You have two main options: starting your bell peppers from seed or buying seedlings from a nursery.
* **Starting from Seed:** This gives you more control over the variety and can be more cost-effective. However, it requires more time and effort, as you need to start the seeds indoors 6-8 weeks before the last expected frost.
* **Buying Seedlings:** This is the easier option, especially for beginners. You’ll save time and effort, but you’ll have fewer variety choices.
I’ve done both, and honestly, buying seedlings is a great way to start if you’re new to gardening. But if you’re feeling adventurous, starting from seed is a rewarding experience!
Preparing Your Soil
Bell peppers need well-drained, fertile soil to thrive. Here’s how to get your soil ready:
* **Soil Testing:** Ideally, get your soil tested to determine its pH and nutrient levels. Bell peppers prefer a slightly acidic soil with a pH of 6.0-6.8.
* **Amendments:** Amend your soil with plenty of organic matter, such as compost, aged manure, or peat moss. This will improve drainage, aeration, and nutrient content.
* **Fertilizer:** Incorporate a slow-release fertilizer formulated for vegetables into the soil. Follow the instructions on the fertilizer package.
I like to add a generous amount of compost to my garden beds before planting. It really makes a difference!
Planting Your Bell Peppers
Now for the fun part: planting!
1. **Timing:** Wait until the danger of frost has passed and the soil has warmed up to at least 60°F (15°C). Bell peppers are sensitive to cold temperatures.
2. **Spacing:** Space your bell pepper plants 18-24 inches apart in rows that are 24-36 inches apart. This gives them enough room to grow and allows for good air circulation.
3. **Planting Depth:** Dig a hole that is slightly larger than the root ball of your seedling. Gently remove the seedling from its container and loosen the roots. Place the seedling in the hole, making sure the top of the root ball is level with the soil surface.
4. **Watering:** Water thoroughly after planting. This will help settle the soil around the roots and get your plants off to a good start.
5. **Mulching:** Apply a layer of mulch around your plants. Mulch helps retain moisture, suppress weeds, and regulate soil temperature. I like to use straw or shredded bark.
Caring for Your Bell Peppers
Once your bell peppers are planted, they need regular care to thrive.
1. **Watering:** Water deeply and regularly, especially during hot, dry weather. Bell peppers need consistent moisture to produce plump, juicy fruits. Aim for about 1 inch of water per week.
2. **Fertilizing:** Fertilize your bell peppers every 2-3 weeks with a balanced fertilizer. You can also use a liquid fertilizer diluted according to the package instructions.
3. **Weeding:** Keep your garden bed free of weeds. Weeds compete with your bell peppers for water and nutrients.
4. **Pest Control:** Keep an eye out for common pepper pests, such as aphids, flea beetles, and pepper hornworms. Handpick pests off your plants or use an insecticidal soap or neem oil.
5. **Support:** As your bell pepper plants grow, they may need support to prevent them from falling over. You can use stakes, cages, or trellises. I find that cages work best for me.
6. **Pruning:** Pruning isn’t strictly necessary, but it can help improve air circulation and encourage fruit production. Remove any suckers (small shoots that grow from the base of the plant) and any yellowing or diseased leaves.
Dealing with Common Problems
Even with the best care, you may encounter some problems while growing bell peppers. Here are a few common issues and how to deal with them:
* **Blossom-End Rot:** This is a common problem caused by calcium deficiency. The bottom of the pepper turns brown and leathery. To prevent blossom-end rot, make sure your soil has adequate calcium and water your plants consistently. You can also add calcium to the soil by using bone meal or crushed eggshells.
* **Sunscald:** This occurs when peppers are exposed to too much direct sunlight. The peppers develop white or yellow patches on the side facing the sun. To prevent sunscald, provide some shade for your plants during the hottest part of the day.
* **Pests and Diseases:** As mentioned earlier, keep an eye out for pests and diseases. Treat them promptly to prevent them from spreading.
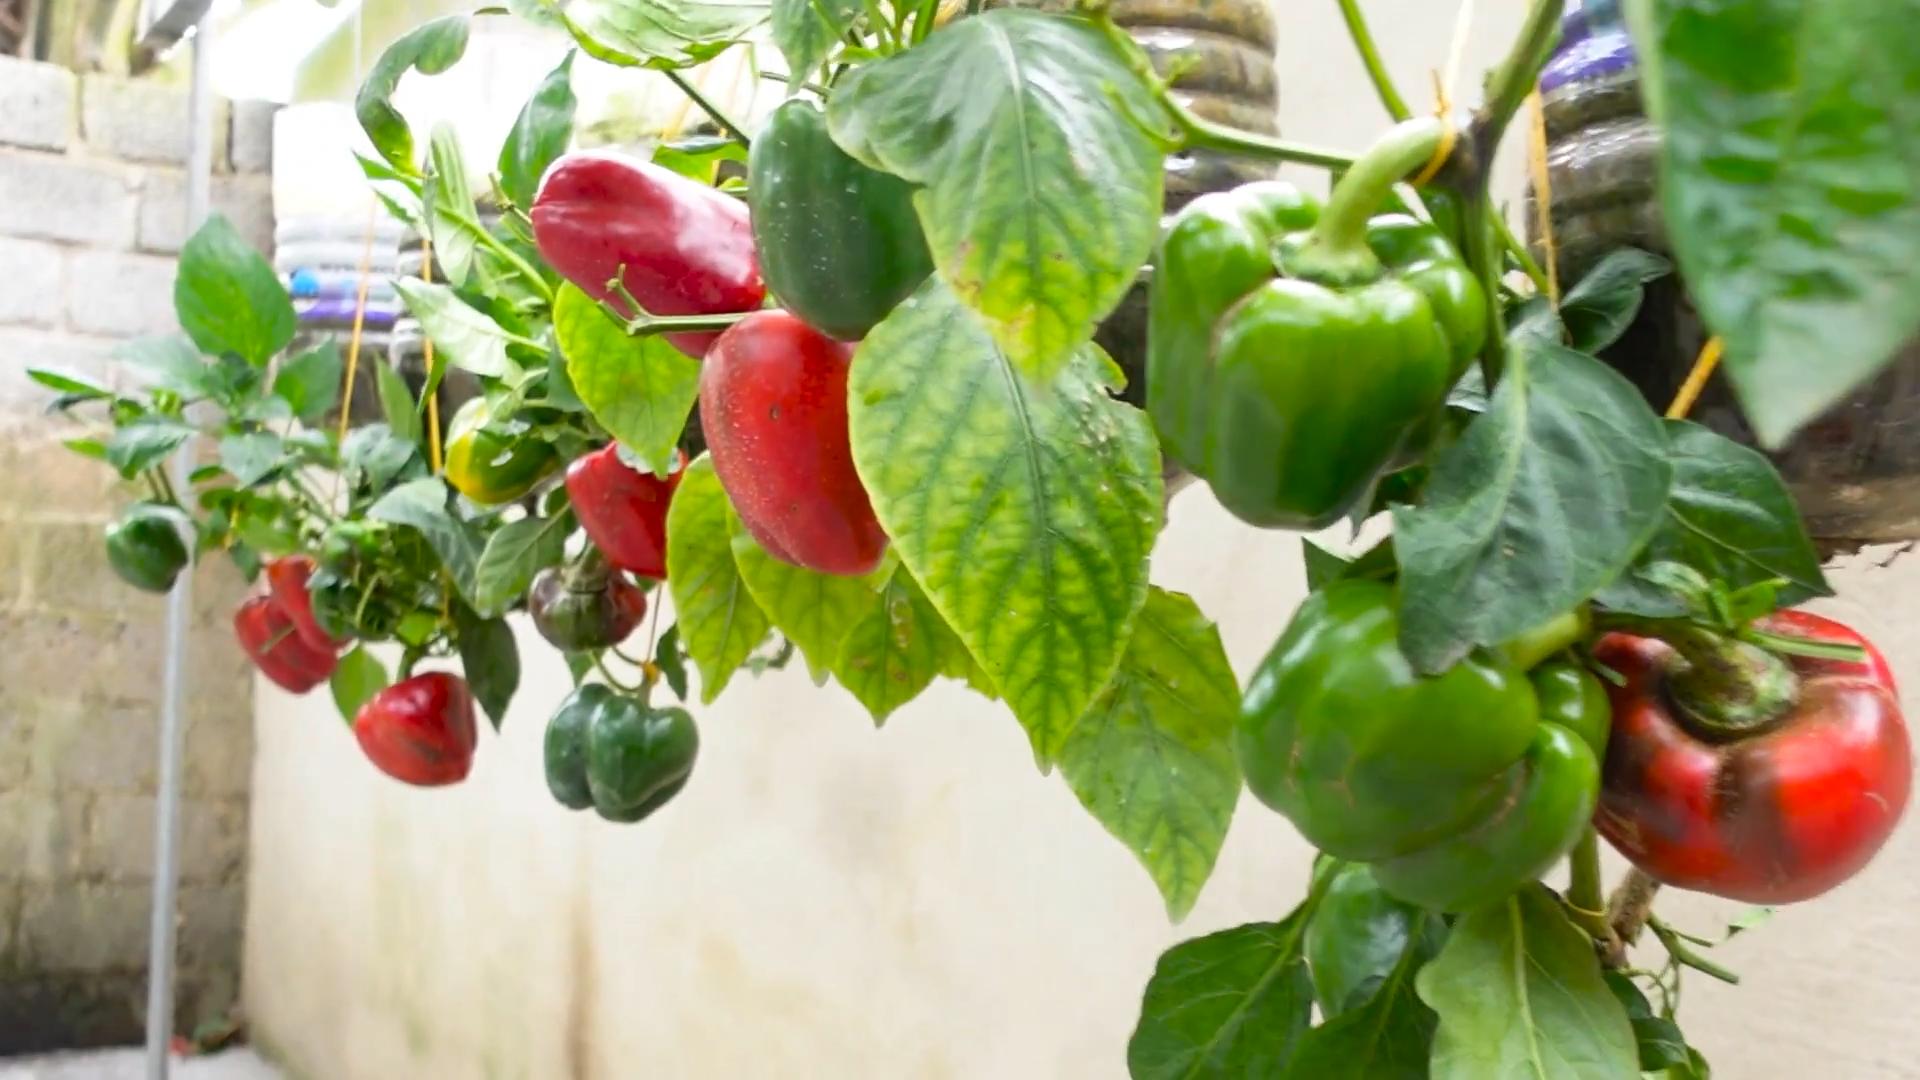
Harvesting Your Bell Peppers
The moment we’ve all been waiting for: harvesting!
1. **Timing:** Bell peppers are ready to harvest when they are fully colored and firm to the touch. The time to harvest depends on the variety and your personal preference. Green bell peppers can be harvested when they are still green, but they will be sweeter if you let them ripen to their mature color.
2. **Harvesting Method:** Use a sharp knife or pruning shears to cut the pepper from the plant. Leave a small piece of stem attached to the pepper.
3. **Storage:** Store your harvested bell peppers in the refrigerator for up to 2 weeks.
Enjoying Your Harvest
Now that you’ve harvested your bell peppers, it’s time to enjoy them! There are endless ways to use them:
* **Fresh:** Eat them raw in salads, sandwiches, or as a snack.
* **Cooked:** Grill, roast, sauté, or stir-fry them.
* **Stuffed:** Stuff them with rice, meat, or vegetables.
* **Pickled:** Pickle them for a tangy treat.
* **Frozen:** Freeze them for later use.
I love adding bell peppers to my omelets, fajitas, and homemade pizzas. They’re so versatile!
Extra Tips for Success
Here are a few extra tips to help you grow the best bell peppers ever:
* **Choose a sunny location:** Bell peppers need at least 6-8 hours of sunlight per day.
* **Rotate your crops:** Don’t plant bell peppers in the same spot year after year. This can help prevent soilborne diseases.
* **Water deeply but infrequently:** This encourages deep root growth.
* **Pinch off the first few blossoms:** This will encourage the plant to focus on vegetative growth, resulting in a larger, more productive plant.
* Be patient! Bell peppers can take a while to mature, but the wait is worth it.
Growing bell peppers is a rewarding experience that anyone can enjoy. With a little bit of planning and effort, you can have a bountiful harvest of delicious, homegrown peppers. Happy gardening!
Conclusion
So, there you have it! Mastering easy bell pepper gardening doesn’t require a green thumb or a sprawling garden. With a little patience, the right techniques, and this simple DIY trick, you can cultivate a vibrant harvest of crisp, colorful bell peppers right in your own backyard, balcony, or even windowsill.
Why is this DIY approach a must-try? Because it empowers you to take control of your food source, reduce your reliance on store-bought produce (often laden with pesticides), and experience the unparalleled satisfaction of nurturing something from seed to table. Imagine the pride you’ll feel serving a salad featuring bell peppers you grew yourself, knowing exactly where they came from and how they were cared for.
Beyond the pure joy of gardening, this method is incredibly cost-effective. Starting from seed or using cuttings from existing plants significantly reduces the expense compared to buying seedlings from a nursery. Plus, you can tailor the growing conditions to your specific climate and preferences, ensuring optimal results.
Ready to take your bell pepper game to the next level? Consider these variations and suggestions:
* Experiment with different varieties: Don’t limit yourself to just green bell peppers! Explore the rainbow of colors – red, yellow, orange, and even purple – each offering a unique flavor profile and visual appeal.
* Companion planting: Enhance your bell pepper’s growth by planting beneficial companions nearby. Basil, marigolds, and carrots are excellent choices that deter pests and improve soil health.
* Vertical gardening: If space is limited, embrace vertical gardening techniques. Use trellises, hanging baskets, or stacked planters to maximize your growing area and create a stunning visual display.
* Hot pepper infusion: For those who like a little heat, consider planting a few hot peppers alongside your bell peppers. While they won’t cross-pollinate and make your bell peppers spicy, the presence of capsaicin (the compound that makes peppers hot) in the air can sometimes deter pests.
* Seed Saving: Once you have a successful harvest, save the seeds from your best bell peppers for future planting. This allows you to cultivate varieties that are perfectly adapted to your local environment.
We are confident that this DIY trick will transform your bell pepper gardening experience. It’s simple, effective, and incredibly rewarding. Now, it’s your turn to get your hands dirty! We encourage you to try this method and share your results with us. Post pictures of your thriving bell pepper plants, share your tips and tricks, and let us know what worked best for you. Together, we can create a community of passionate gardeners who are dedicated to growing their own delicious and healthy food. Happy gardening!
Frequently Asked Questions (FAQs)
Q: How long does it take to grow bell peppers from seed?
A: Growing bell peppers from seed typically takes between 60 to 90 days from transplanting seedlings outdoors to harvesting mature peppers. Starting seeds indoors 6-8 weeks before the last expected frost can give you a head start. The exact time frame depends on the variety of bell pepper, the growing conditions (temperature, sunlight, soil quality), and the overall care provided.
Q: What kind of soil is best for bell peppers?
A: Bell peppers thrive in well-draining, loamy soil that is rich in organic matter. The ideal soil pH should be between 6.0 and 7.0. Before planting, amend your soil with compost, aged manure, or other organic materials to improve drainage, fertility, and water retention. Avoid heavy clay soils, as they can become waterlogged and hinder root growth.
Q: How often should I water my bell pepper plants?
A: Bell peppers need consistent moisture, especially during hot weather. Water deeply and regularly, aiming to keep the soil consistently moist but not waterlogged. A good rule of thumb is to water when the top inch of soil feels dry to the touch. Mulching around the plants can help retain moisture and suppress weeds. During periods of heavy rain, reduce watering to prevent overwatering.
Q: What are some common pests and diseases that affect bell peppers?
A: Common pests that attack bell peppers include aphids, flea beetles, spider mites, and pepper weevils. Diseases that can affect bell peppers include blossom-end rot, fungal leaf spots, and viral diseases. Regularly inspect your plants for signs of pests or diseases. Use organic pest control methods, such as insecticidal soap or neem oil, to manage infestations. Ensure good air circulation and avoid overhead watering to prevent fungal diseases. Blossom-end rot is often caused by calcium deficiency, so amend your soil with calcium-rich amendments if needed.
Q: How much sunlight do bell peppers need?
A: Bell peppers require at least 6-8 hours of direct sunlight per day to thrive. Choose a sunny location in your garden or on your balcony where your plants will receive ample sunlight. If you are growing bell peppers indoors, use grow lights to supplement natural sunlight. Insufficient sunlight can result in stunted growth, poor fruit production, and pale-colored peppers.
Q: How do I prevent blossom-end rot in bell peppers?
A: Blossom-end rot is a common problem in bell peppers caused by calcium deficiency. To prevent it, ensure your soil is rich in calcium by amending it with bone meal or crushed eggshells before planting. Maintain consistent soil moisture, as fluctuations in watering can hinder calcium uptake. Avoid over-fertilizing with nitrogen, as it can interfere with calcium absorption. If you notice blossom-end rot developing, consider using a calcium foliar spray to provide a quick boost of calcium to the plants.
Q: When is the best time to harvest bell peppers?
A: Bell peppers can be harvested at any stage of maturity, depending on your preference. Green bell peppers are typically harvested when they are firm, smooth, and have reached a good size. Colored bell peppers (red, yellow, orange) are harvested when they have fully ripened and developed their characteristic color. Use pruning shears or a sharp knife to cut the peppers from the plant, leaving a short stem attached. Regular harvesting encourages the plant to produce more peppers.
Q: Can I grow bell peppers in containers?
A: Yes, bell peppers can be successfully grown in containers. Choose a container that is at least 12 inches in diameter and has good drainage holes. Use a high-quality potting mix that is well-draining and rich in organic matter. Provide adequate sunlight, water, and fertilizer. Container-grown bell peppers may require more frequent watering and fertilization than those grown in the ground. Consider using a stake or trellis to support the plants as they grow.
Q: How do I fertilize my bell pepper plants?
A: Bell peppers benefit from regular fertilization. Before planting, amend your soil with compost or aged manure. During the growing season, fertilize every 2-3 weeks with a balanced fertilizer that is specifically formulated for vegetables. Avoid over-fertilizing with nitrogen, as it can promote leafy growth at the expense of fruit production. Follow the instructions on the fertilizer package carefully. You can also use organic fertilizers, such as fish emulsion or seaweed extract.
Q: Can I save seeds from my bell peppers for future planting?
A: Yes, you can save seeds from your bell peppers for future planting. Choose fully ripe, healthy peppers from your best-performing plants. Cut the pepper open and remove the seeds. Rinse the seeds thoroughly and spread them out on a paper towel to dry completely. Store the dried seeds in an airtight container in a cool, dark, and dry place. Properly stored bell pepper seeds can remain viable for several years.
Leave a Comment