

Grout Cleaning with Toothbrush: Are you tired of staring at dingy, discolored grout lines that seem impossible to clean? I know I was! It felt like no matter how much I scrubbed, those stubborn stains just wouldn’t budge. But what if I told you the secret to sparkling grout was hiding right in your bathroom – your trusty toothbrush?
Grout, that porous material between your tiles, has been a staple in homes for centuries, dating back to ancient Roman times. While it provides essential structural support and a clean aesthetic, it’s also a magnet for dirt, grime, and mildew. Over time, this buildup can make your beautiful tiles look dull and uninviting.
Let’s face it, nobody enjoys spending hours on their hands and knees scrubbing grout. That’s why I’m so excited to share this simple, yet incredibly effective, DIY trick. Using a toothbrush for grout cleaning with toothbrush allows you to target those hard-to-reach areas with precision, lifting away dirt and grime without harsh chemicals or expensive equipment. It’s a game-changer for anyone looking to restore the beauty of their tiled surfaces. So, grab your old toothbrush, and let’s get started on this easy and affordable grout cleaning adventure!
DIY Grout Cleaning with a Toothbrush: A Sparkling Solution!
Okay, let’s face it: grout. It’s the bane of every homeowner’s existence. That once-pristine white (or whatever color you chose!) lines between your tiles slowly morph into a dingy, discolored mess. And while there are tons of fancy grout cleaners out there, sometimes the simplest solutions are the best. Today, I’m going to show you how to tackle that grimy grout with a trusty toothbrush and some common household ingredients. Get ready to say goodbye to that stubborn dirt and hello to sparkling clean grout!
Why a Toothbrush?
You might be thinking, “A toothbrush? Really?” Yes, really! Here’s why it’s my go-to grout cleaning tool:
* Precision Cleaning: The small head and bristles allow you to target the grout lines specifically, without damaging the surrounding tiles.
* Effective Scrubbing: The bristles are firm enough to dislodge dirt and grime, but gentle enough to avoid scratching.
* Cost-Effective: You probably have an old toothbrush lying around already! No need to buy expensive specialized tools.
* Ergonomic: It’s easy to hold and maneuver, making the cleaning process less of a chore.
What You’ll Need
Before we dive in, let’s gather our supplies. This is a pretty low-key project, so you probably have most of these items already:
* Old Toothbrush: An old toothbrush is perfect for this task. Don’t use your current toothbrush, unless you’re planning on replacing it afterward!
* Cleaning Solution: I’ll give you a few options below, so choose the one that best suits your needs and preferences.
* Spray Bottle (Optional): If you’re using a liquid cleaning solution, a spray bottle can make application easier.
* Clean Cloth or Sponge: For wiping away the cleaning solution and loosened dirt.
* Warm Water: For rinsing.
* Gloves (Optional): If you have sensitive skin, gloves are a good idea, especially when using stronger cleaning solutions.
* Eye Protection (Optional): If you’re concerned about splashes, especially when working on vertical surfaces, eye protection is a good precaution.
Choosing Your Cleaning Solution
Now, let’s talk cleaning solutions. I’m a big fan of using natural and readily available ingredients whenever possible. Here are a few of my favorite options:
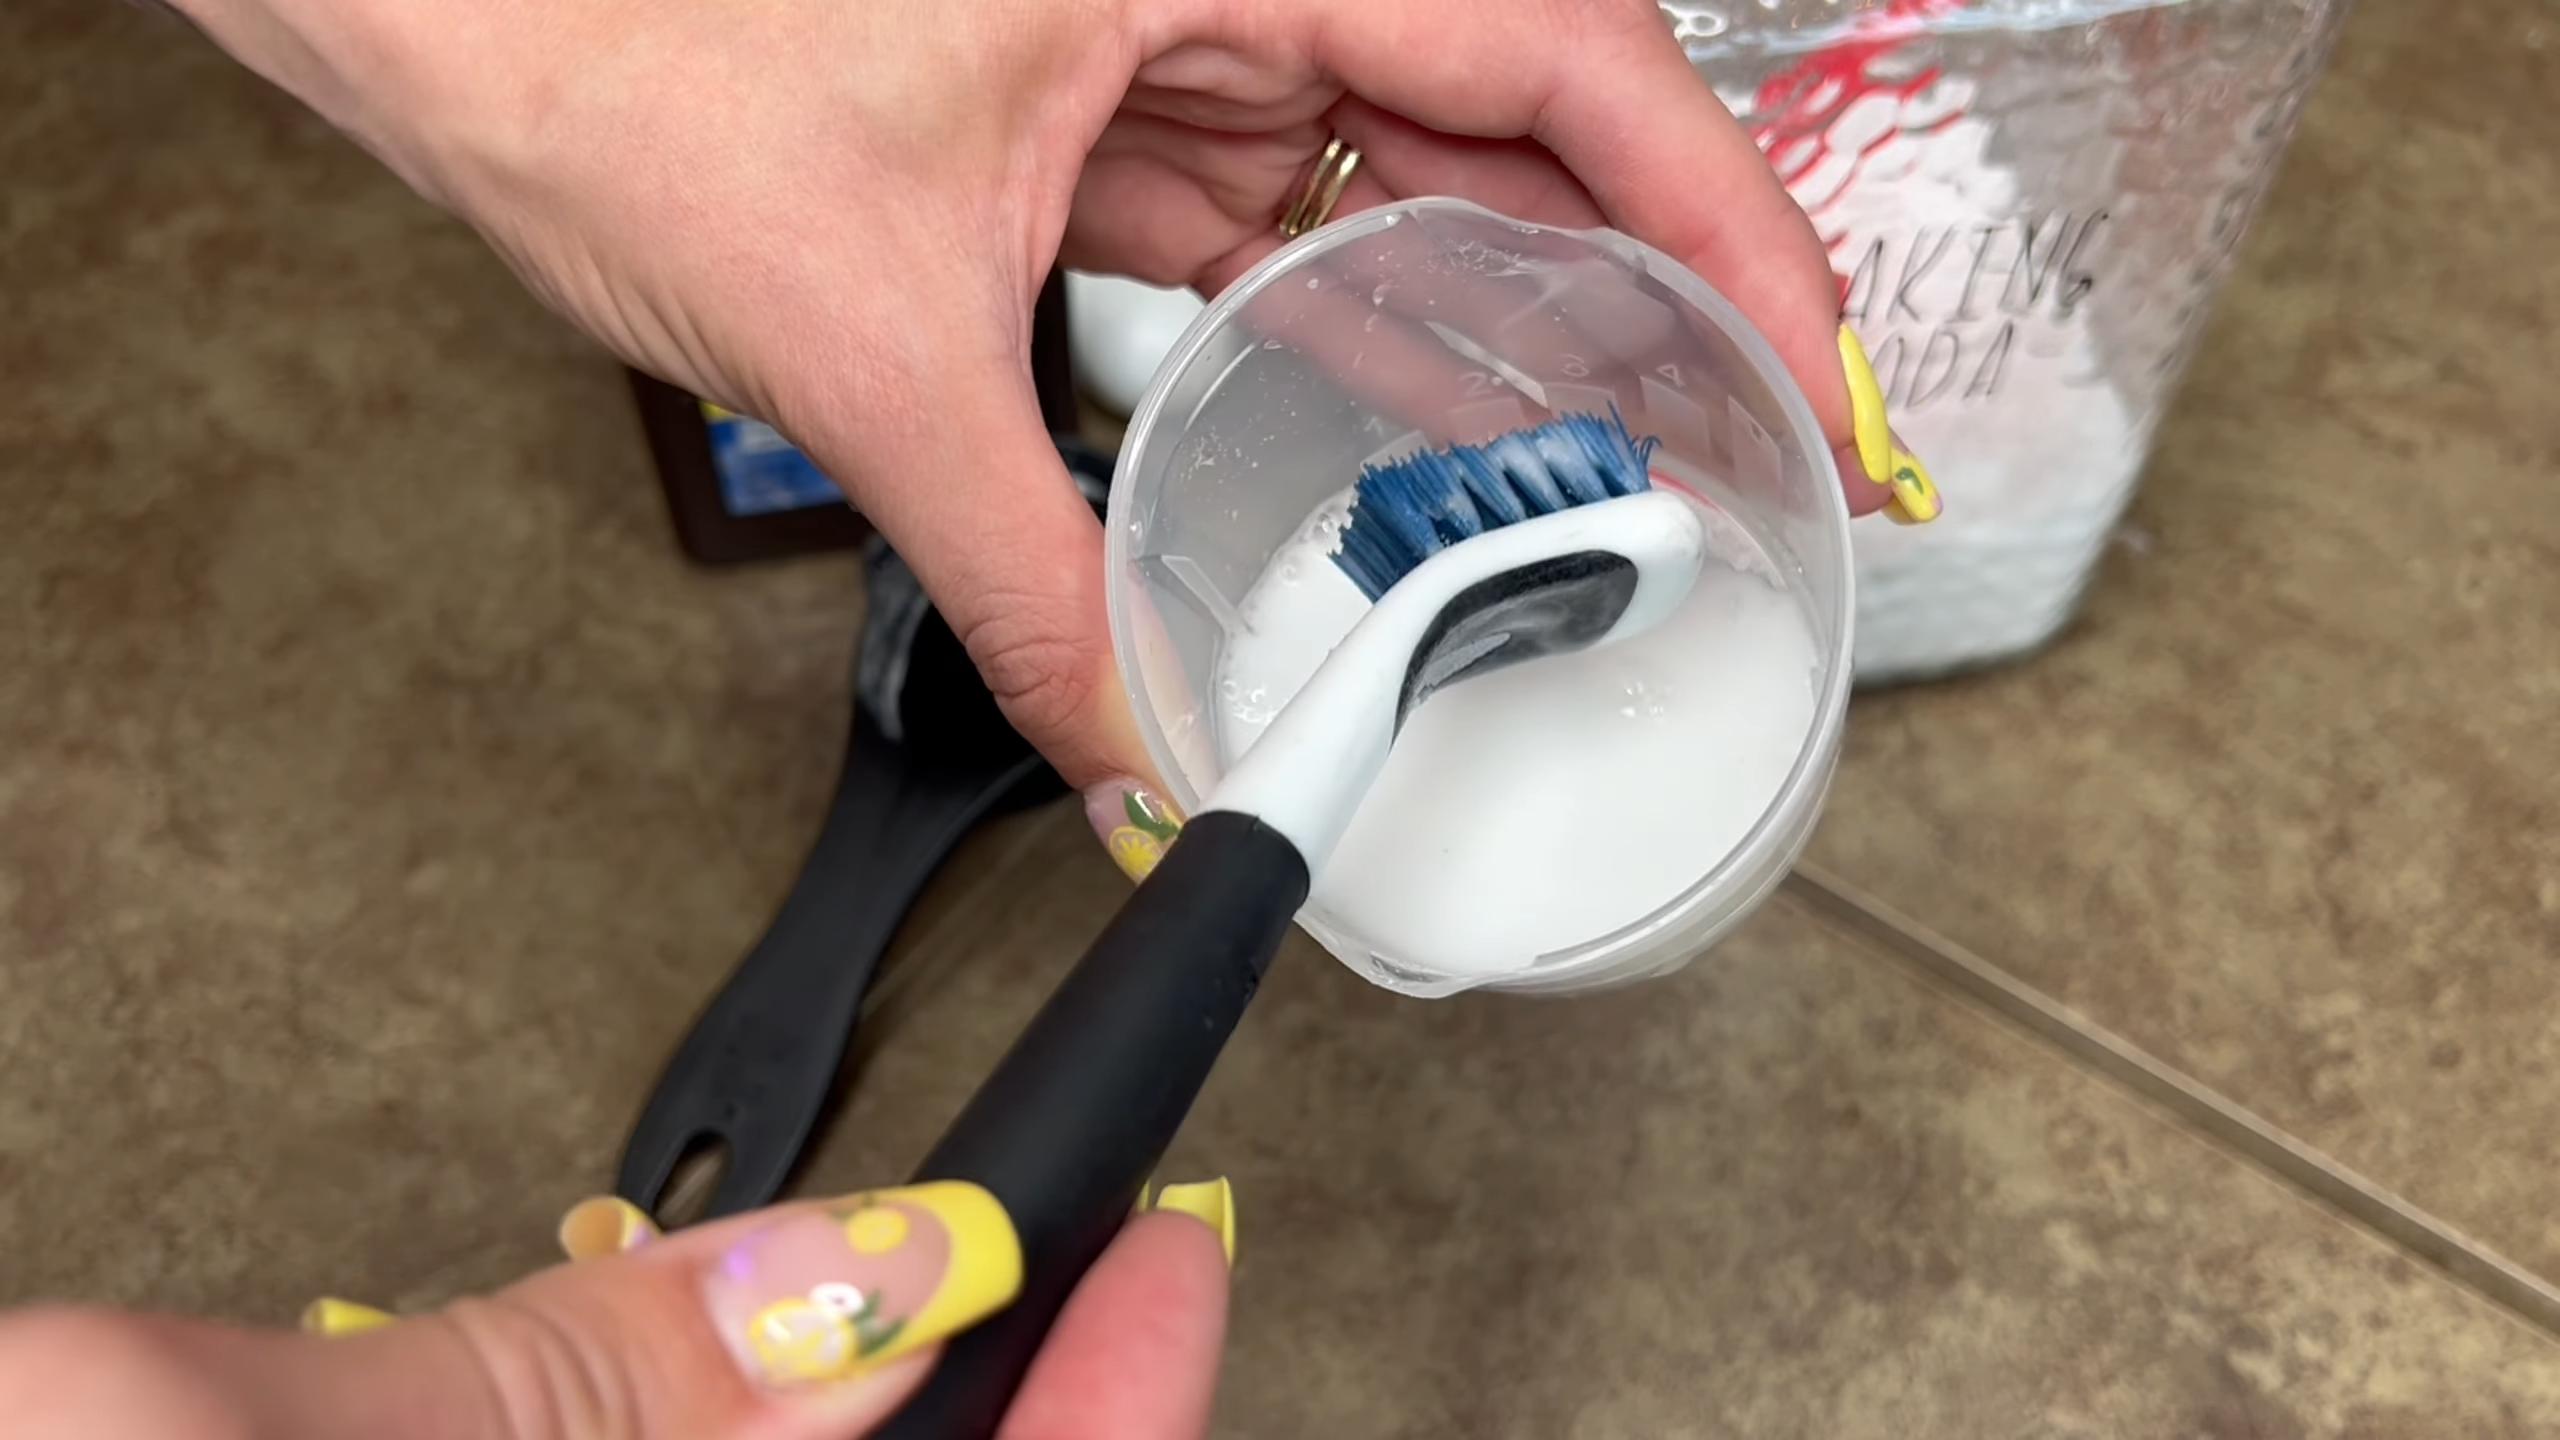
* Baking Soda Paste: This is a classic for a reason! Baking soda is a mild abrasive that helps to scrub away dirt and grime. Mix baking soda with a little water to form a paste.
* Vinegar and Baking Soda: This dynamic duo creates a fizzing action that helps to loosen stubborn stains. Be careful when using this method on colored grout, as vinegar can sometimes cause fading.
* Hydrogen Peroxide: A mild bleaching agent that can help to brighten grout. Use a 3% solution (the kind you find at the drugstore).
* Dish Soap and Water: For light cleaning, a simple solution of dish soap and water can be surprisingly effective.
* Commercial Grout Cleaner: If you’re dealing with really tough stains, you might need to resort to a commercial grout cleaner. Be sure to follow the manufacturer’s instructions carefully and test it in an inconspicuous area first.
Step-by-Step Grout Cleaning Guide
Alright, let’s get down to business! Here’s my step-by-step guide to cleaning grout with a toothbrush:
1. Prepare the Area: Before you start cleaning, sweep or vacuum the area to remove any loose dirt or debris. This will prevent you from just pushing the dirt around while you’re scrubbing.
2. Apply the Cleaning Solution: Now, it’s time to apply your chosen cleaning solution.
* Baking Soda Paste: Apply the paste directly to the grout lines. You can use your fingers or a small spatula to spread it evenly.
* Vinegar and Baking Soda: Sprinkle baking soda onto the grout lines, then spray with vinegar. Let it fizz for a few minutes.
* Hydrogen Peroxide: Pour or spray hydrogen peroxide directly onto the grout lines.
* Dish Soap and Water: Apply the solution to the grout lines using a spray bottle or a sponge.
* Commercial Grout Cleaner: Follow the manufacturer’s instructions for application.
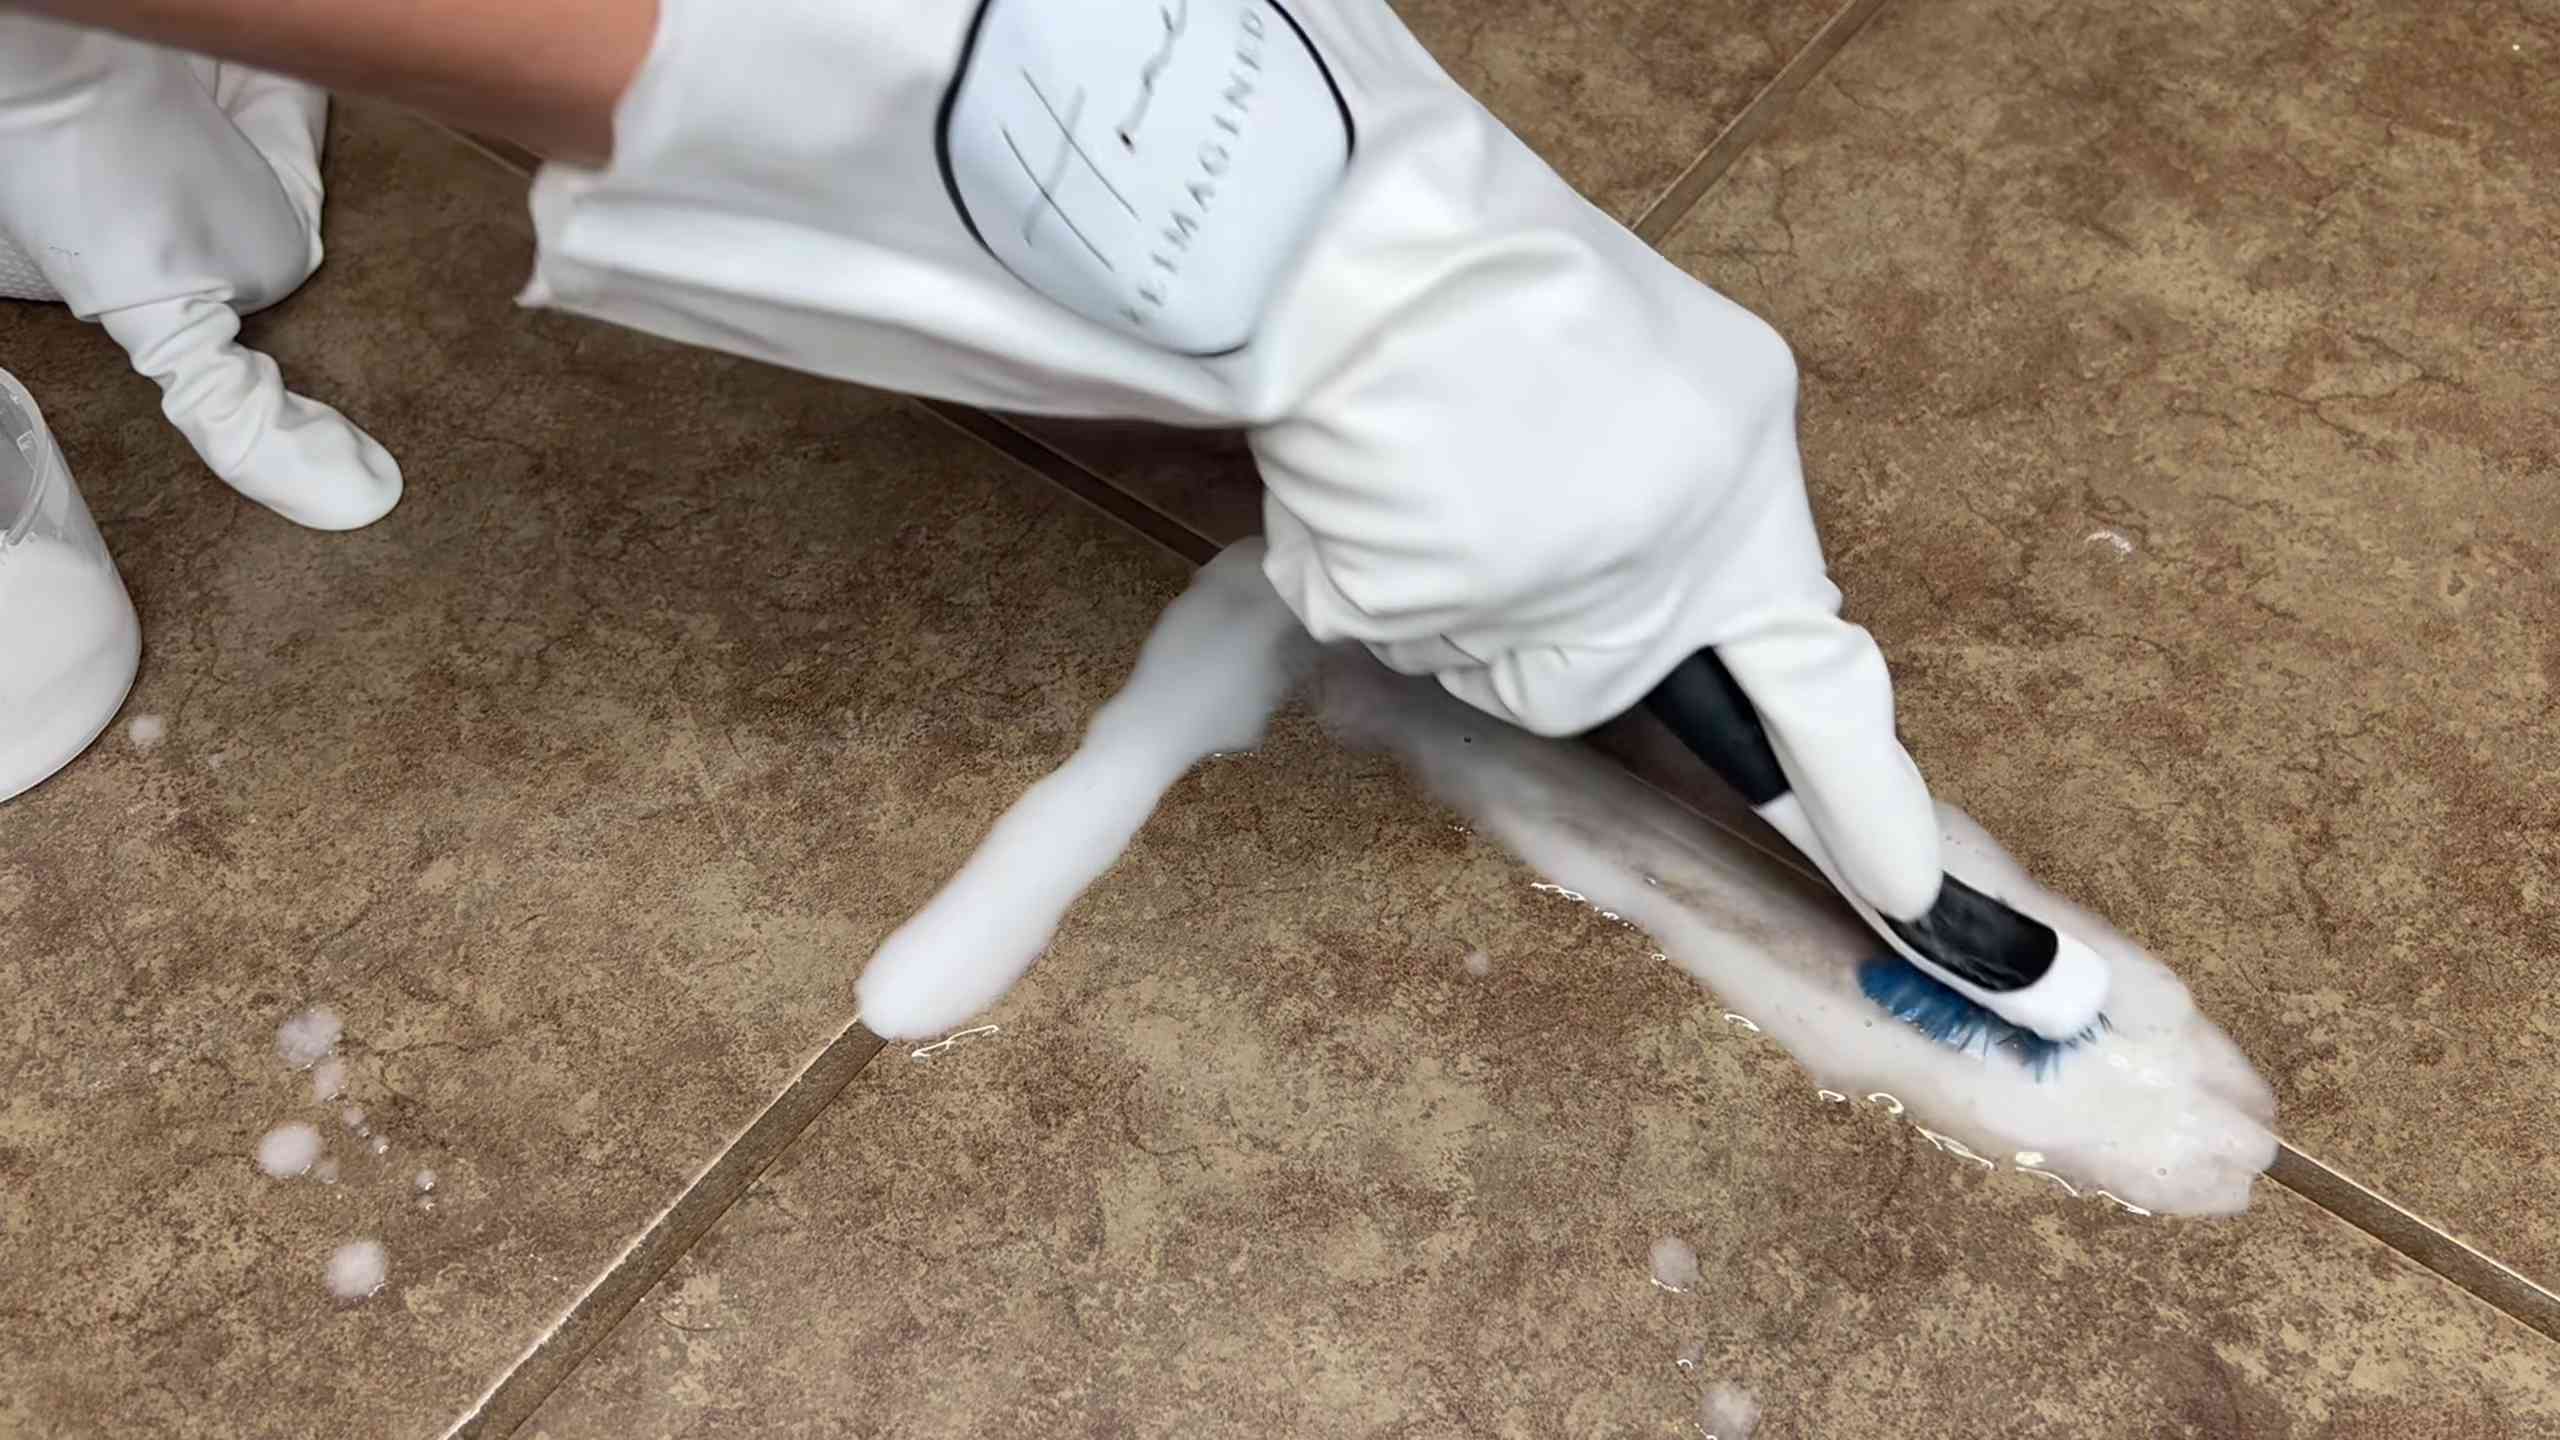
3. Scrub, Scrub, Scrub! This is where the toothbrush comes in. Using firm, circular motions, scrub the grout lines with the toothbrush. Pay extra attention to areas with heavy staining or discoloration. Don’t be afraid to put some elbow grease into it!
4. Let it Sit (Optional): For tougher stains, let the cleaning solution sit on the grout for a few minutes before scrubbing. This will give it time to penetrate the dirt and grime. I usually wait around 5-10 minutes.
5. Rinse Thoroughly: Once you’ve finished scrubbing, rinse the area thoroughly with warm water. You can use a clean cloth or sponge to wipe away the cleaning solution and loosened dirt. Make sure to remove all traces of the cleaning solution, as residue can attract dirt and grime.
6. Dry the Area: After rinsing, dry the area with a clean towel. This will help to prevent water spots and mildew growth.
7. Repeat if Necessary: If the grout is still stained or discolored, repeat the process. You might need to use a stronger cleaning solution or scrub for a longer period of time.
Dealing with Stubborn Stains
Sometimes, you’ll encounter grout stains that just won’t budge. Here are a few tips for dealing with those stubborn spots:
* Make a Poultice: For really tough stains, try making a poultice. Mix baking soda with hydrogen peroxide to form a thick paste. Apply the paste to the stained area and cover it with plastic wrap. Let it sit overnight, then scrub and rinse in the morning.
* Steam Cleaning: A steam cleaner can be a powerful tool for cleaning grout. The hot steam helps to loosen dirt and grime, making it easier to scrub away.
* Grout Whitening Pens: If all else fails, you can try using a grout whitening pen. These pens contain a special paint that covers up stains and discoloration. They’re a quick and easy way to freshen up your grout, but they’re not a permanent solution.
* Re-grouting: In extreme cases, you might need to re-grout the area. This is a more involved process, but it will give you a completely fresh start.
Preventing Future Grout Stains
Once you’ve cleaned your grout, you’ll want to keep it looking its best. Here are a few tips for preventing future grout stains:
* Seal Your Grout: Sealing your grout will help to protect it from stains and moisture. Apply a grout sealer according to the manufacturer’s instructions.
* Wipe Up Spills Immediately: The sooner you wipe up spills, the less likely they are to stain your grout.
* Ventilate Your Bathroom: Proper ventilation will help to prevent mildew growth in your bathroom. Run the exhaust fan during and after showers.
* Clean Regularly: Regular cleaning will help to prevent dirt and grime from building up in your grout. A quick wipe-down with a damp cloth or sponge is usually all it takes.
A Few Extra Tips and Tricks
* Test in an Inconspicuous Area: Before using any cleaning solution, test it in an inconspicuous area to make sure it doesn’t damage the tile or grout.
* Use a Stiff-Bristled Brush: If you don’t have a toothbrush, you can use a stiff-bristled brush instead. Just be careful not to scratch the tile.
* Work in Small Sections: Working in small sections will help you to stay organized and ensure that you’re cleaning each area thoroughly.
* Be Patient: Cleaning grout can be a time-consuming process, so be patient and don’t give up! The results are worth it.
* Consider Color Sealing: Color sealing not only seals the grout but also adds a uniform color, hiding existing stains and preventing future discoloration. This is a great option if you’re unhappy with the current color of your grout or if you want a more consistent look.
Safety First!
While most of the cleaning solutions I’ve mentioned are relatively safe, it’s always a good idea to take precautions:
* Wear Gloves: Protect your hands from harsh chemicals and potential irritants by wearing gloves.
* Ventilate the Area: Ensure good ventilation by opening windows or running a fan, especially when using stronger cleaning solutions.
* Avoid Mixing Chemicals: Never mix different cleaning solutions together, as this can create dangerous fumes.
* Keep Out of Reach of Children and Pets: Store cleaning solutions out of reach of children and
Conclusion
So, there you have it! Ditching the harsh chemicals and embracing the humble toothbrush for grout cleaning is not just a trend; it’s a game-changer for a sparkling clean home. We’ve explored how this simple, readily available tool can effectively tackle grime and discoloration, bringing your tiled surfaces back to life.
Why is this DIY grout cleaning trick a must-try? Firstly, it’s incredibly cost-effective. You’re likely already replacing your toothbrush regularly, so repurposing the old one is practically free! Secondly, it’s eco-friendly. By avoiding harsh chemical cleaners, you’re reducing your exposure to potentially harmful substances and minimizing your environmental impact. Thirdly, it’s surprisingly effective. The small bristles of a toothbrush are perfectly designed to get into those narrow grout lines, scrubbing away dirt and mildew that larger tools often miss.
But the best part? It’s adaptable! Feel free to experiment with different cleaning solutions. While baking soda paste and vinegar are classic combinations, you can also try a mixture of dish soap and warm water for lighter cleaning tasks. For stubborn stains, consider adding a few drops of tea tree oil or lemon juice for their natural disinfecting and brightening properties. Remember to always test your chosen solution in an inconspicuous area first to ensure it doesn’t damage your grout or tiles.
Don’t be afraid to get creative! Consider using different types of toothbrushes for different areas. A toothbrush with firmer bristles might be better for heavily soiled grout, while a softer-bristled brush could be gentler on more delicate tiles. You can even use an electric toothbrush with a small brush head for a more powerful cleaning action, just be sure to use it on a low setting to avoid damaging the grout.
We’re confident that once you try this simple yet effective method for grout cleaning, you’ll be amazed by the results. It’s a satisfying and rewarding way to maintain the beauty of your tiled surfaces without resorting to harsh chemicals or expensive professional services.
So, grab that old toothbrush, mix up your favorite cleaning solution, and get scrubbing! We encourage you to try this DIY grout cleaning trick and share your experiences with us. Let us know what cleaning solutions worked best for you, any variations you tried, and the before-and-after transformations you achieved. Your feedback will not only inspire others but also help us refine and improve this method for everyone. Share your photos and tips in the comments below – we can’t wait to see your sparkling clean grout!
Frequently Asked Questions (FAQs)
What kind of toothbrush is best for grout cleaning?
The best toothbrush for grout cleaning is typically one with medium to firm bristles. The firmer bristles provide more scrubbing power to dislodge dirt and grime from the grout lines. However, if you have delicate tiles, you might want to opt for a toothbrush with softer bristles to avoid scratching the surface. An old toothbrush that you’re about to replace is perfect for this task, as it’s already served its primary purpose and is now being repurposed for cleaning. Consider the size of the toothbrush head as well. A smaller head can be more effective at reaching tight corners and narrow grout lines. Electric toothbrushes with small, interchangeable heads can also be used, but be sure to use a low setting to prevent damage.
What cleaning solutions can I use with a toothbrush for grout cleaning?
There are several effective cleaning solutions you can use with a toothbrush for grout cleaning, depending on the severity of the grime and the type of grout you have. Here are a few popular options:
* **Baking Soda Paste:** Mix baking soda with a small amount of water to form a thick paste. Apply the paste to the grout lines and let it sit for a few minutes before scrubbing with the toothbrush. Baking soda is a mild abrasive that helps to lift dirt and stains.
* **Vinegar and Water Solution:** Mix equal parts white vinegar and water in a spray bottle. Spray the solution onto the grout lines and let it sit for a few minutes before scrubbing. Vinegar is a natural disinfectant and can help to dissolve mineral deposits. Be cautious when using vinegar on colored grout, as it may cause fading over time.
* **Dish Soap and Warm Water:** For lighter cleaning tasks, a simple solution of dish soap and warm water can be effective. Apply the solution to the grout lines and scrub with the toothbrush. Rinse thoroughly with clean water.
* **Baking Soda and Vinegar:** For tougher stains, you can combine baking soda and vinegar. Sprinkle baking soda onto the grout lines, then spray with vinegar. The mixture will fizz, which helps to loosen dirt and grime. Let it sit for a few minutes before scrubbing. Be sure to ventilate the area well when using this combination.
* **Hydrogen Peroxide:** Hydrogen peroxide is a mild bleaching agent that can help to brighten grout. Apply hydrogen peroxide directly to the grout lines and let it sit for a few minutes before scrubbing.
* **Commercial Grout Cleaners:** If you prefer to use a commercial grout cleaner, be sure to choose one that is specifically designed for your type of grout and tiles. Follow the manufacturer’s instructions carefully.
Always test any cleaning solution in an inconspicuous area first to ensure it doesn’t damage your grout or tiles.
How often should I clean my grout with a toothbrush?
The frequency of grout cleaning depends on several factors, including the location of the tiled surface, the amount of traffic it receives, and your personal preferences. In general, it’s a good idea to clean your grout at least once a month to prevent the buildup of dirt, grime, and mildew. High-traffic areas, such as kitchen floors and bathroom showers, may require more frequent cleaning, perhaps every two weeks. If you notice stains or discoloration, it’s best to address them promptly to prevent them from becoming more difficult to remove. Regular cleaning will not only keep your grout looking its best but also help to prevent the growth of mold and mildew, which can be harmful to your health.
Can I use an electric toothbrush for grout cleaning?
Yes, you can use an electric toothbrush for grout cleaning, but with caution. Electric toothbrushes can provide more scrubbing power than manual toothbrushes, which can be helpful for removing stubborn stains. However, it’s important to use a low setting to avoid damaging the grout or tiles. Choose an electric toothbrush with a small, interchangeable brush head that can easily reach into the grout lines. Test the toothbrush in an inconspicuous area first to ensure it doesn’t scratch or damage the surface. Avoid applying too much pressure, as this can also damage the grout. An electric toothbrush can be a convenient and effective tool for grout cleaning, but it’s important to use it carefully and responsibly.
What safety precautions should I take when cleaning grout with a toothbrush?
When cleaning grout with a toothbrush, it’s important to take certain safety precautions to protect yourself and your surfaces. Here are a few key considerations:
* **Ventilation:** Ensure the area is well-ventilated, especially when using cleaning solutions that produce fumes, such as vinegar or bleach. Open windows and doors to allow for fresh air circulation.
* **Gloves:** Wear rubber gloves to protect your hands from harsh chemicals and prevent skin irritation.
* **Eye Protection:** Wear safety glasses or goggles to protect your eyes from splashes and splatters.
* **Test Cleaning Solutions:** Always test any cleaning solution in an inconspicuous area first to ensure it doesn’t damage your grout or tiles.
* **Avoid Mixing Chemicals:** Never mix different cleaning chemicals together, as this can create dangerous fumes.
* **Rinse Thoroughly:** After cleaning, rinse the area thoroughly with clean water to remove any residue from the cleaning solution.
* **Keep Out of Reach of Children and Pets:** Store cleaning solutions out of reach of children and pets.
* **Proper Disposal:** Dispose of used cleaning solutions and materials properly, following the manufacturer’s instructions.
By following these safety precautions, you can minimize the risks associated with grout cleaning and ensure a safe and effective cleaning experience.


Leave a Comment