

Grow Abundant Backyard Tomatoes – imagine biting into a juicy, sun-ripened tomato, bursting with flavor, that you nurtured from a tiny seed right in your own backyard! Sounds idyllic, doesn’t it? For generations, cultivating tomatoes has been a cherished tradition, connecting us to the earth and providing a taste of summer’s bounty. From the ancient Aztecs who first domesticated these “love apples” to Italian Nonnas guarding their secret sauce recipes, tomatoes hold a special place in our hearts and kitchens.
But let’s be honest, sometimes getting those picture-perfect, abundant harvests feels more like a dream than a reality. Pests, diseases, and unpredictable weather can throw a wrench in even the most dedicated gardener’s plans. That’s where these DIY tricks and hacks come in! I’m here to share simple, effective, and often overlooked techniques that will help you grow abundant backyard tomatoes, regardless of your experience level.
Whether you’re a seasoned green thumb or just starting out, these tips will empower you to overcome common challenges and unlock the secrets to a thriving tomato patch. Forget expensive fertilizers and complicated routines – we’re focusing on practical, budget-friendly solutions that yield impressive results. Get ready to transform your backyard into a tomato paradise!
Grow Abundant Backyard Tomatoes: My Foolproof Guide
Hey there, fellow tomato enthusiast! I’m so excited to share my secrets for growing the juiciest, most abundant tomatoes right in your own backyard. Forget those bland, store-bought tomatoes – we’re talking about sun-ripened, bursting-with-flavor goodness that will elevate your salads, sauces, and sandwiches to a whole new level. This isn’t just about planting a seed and hoping for the best; it’s about understanding the needs of your tomato plants and giving them the TLC they deserve. So, grab your gardening gloves, and let’s get started!
Choosing the Right Tomato Variety
Before you even think about digging in the dirt, you need to pick the right tomato variety for your climate and preferences. There are two main types of tomatoes: determinate and indeterminate.
* **Determinate Tomatoes:** These are bush-type tomatoes that grow to a certain size and then stop. They produce most of their fruit all at once, making them ideal for canning or making large batches of sauce. Think Roma or Celebrity varieties.
* **Indeterminate Tomatoes:** These are vining tomatoes that keep growing and producing fruit throughout the season. They require staking or caging and are perfect for enjoying fresh tomatoes all summer long. Popular choices include Beefsteak, Cherry, and Heirloom varieties.
Consider your space, your climate, and what you plan to do with your tomatoes when choosing your variety. I personally love growing a mix of both determinate and indeterminate varieties to have a continuous supply of tomatoes for different purposes.
Preparing Your Tomato Planting Site
Tomatoes are sun-loving plants, so you’ll need to choose a spot that gets at least 6-8 hours of direct sunlight per day. The soil is also crucial. Tomatoes thrive in well-drained, fertile soil with a slightly acidic pH (around 6.0-6.8).
* **Soil Testing:** I highly recommend getting your soil tested before planting. You can purchase a soil testing kit at your local garden center or send a sample to your local agricultural extension office. This will tell you the pH of your soil and what nutrients it may be lacking.
* **Soil Amendment:** Based on your soil test results, you’ll need to amend your soil accordingly. If your soil is too acidic, you can add lime to raise the pH. If it’s too alkaline, you can add sulfur to lower the pH. To improve drainage and fertility, I always add plenty of compost and well-rotted manure to my tomato planting site.
* **Raised Beds:** If you have poor soil or drainage, consider planting your tomatoes in raised beds. Raised beds provide excellent drainage and allow you to control the soil quality.
Starting Your Tomato Plants
You can either start your tomato plants from seed indoors or purchase seedlings from a local nursery. Starting from seed gives you more control over the varieties you grow, but it requires more time and effort.
* **Starting from Seed:** Start your tomato seeds indoors 6-8 weeks before the last expected frost. Use a seed starting mix and sow the seeds about ¼ inch deep in small pots or trays. Keep the soil moist and warm (around 70-75°F) until the seeds germinate. Once the seedlings emerge, provide them with plenty of light.
* **Hardening Off:** Before transplanting your seedlings outdoors, you’ll need to harden them off. This means gradually exposing them to outdoor conditions over a period of 1-2 weeks. Start by placing them in a sheltered spot for a few hours each day, gradually increasing the amount of time they spend outdoors.
* **Purchasing Seedlings:** If you’re purchasing seedlings from a nursery, choose plants that are healthy and stocky with dark green leaves. Avoid plants that are leggy, yellowed, or have signs of disease.
Planting Your Tomato Plants
Once the danger of frost has passed and your soil has warmed up, it’s time to plant your tomato plants outdoors.
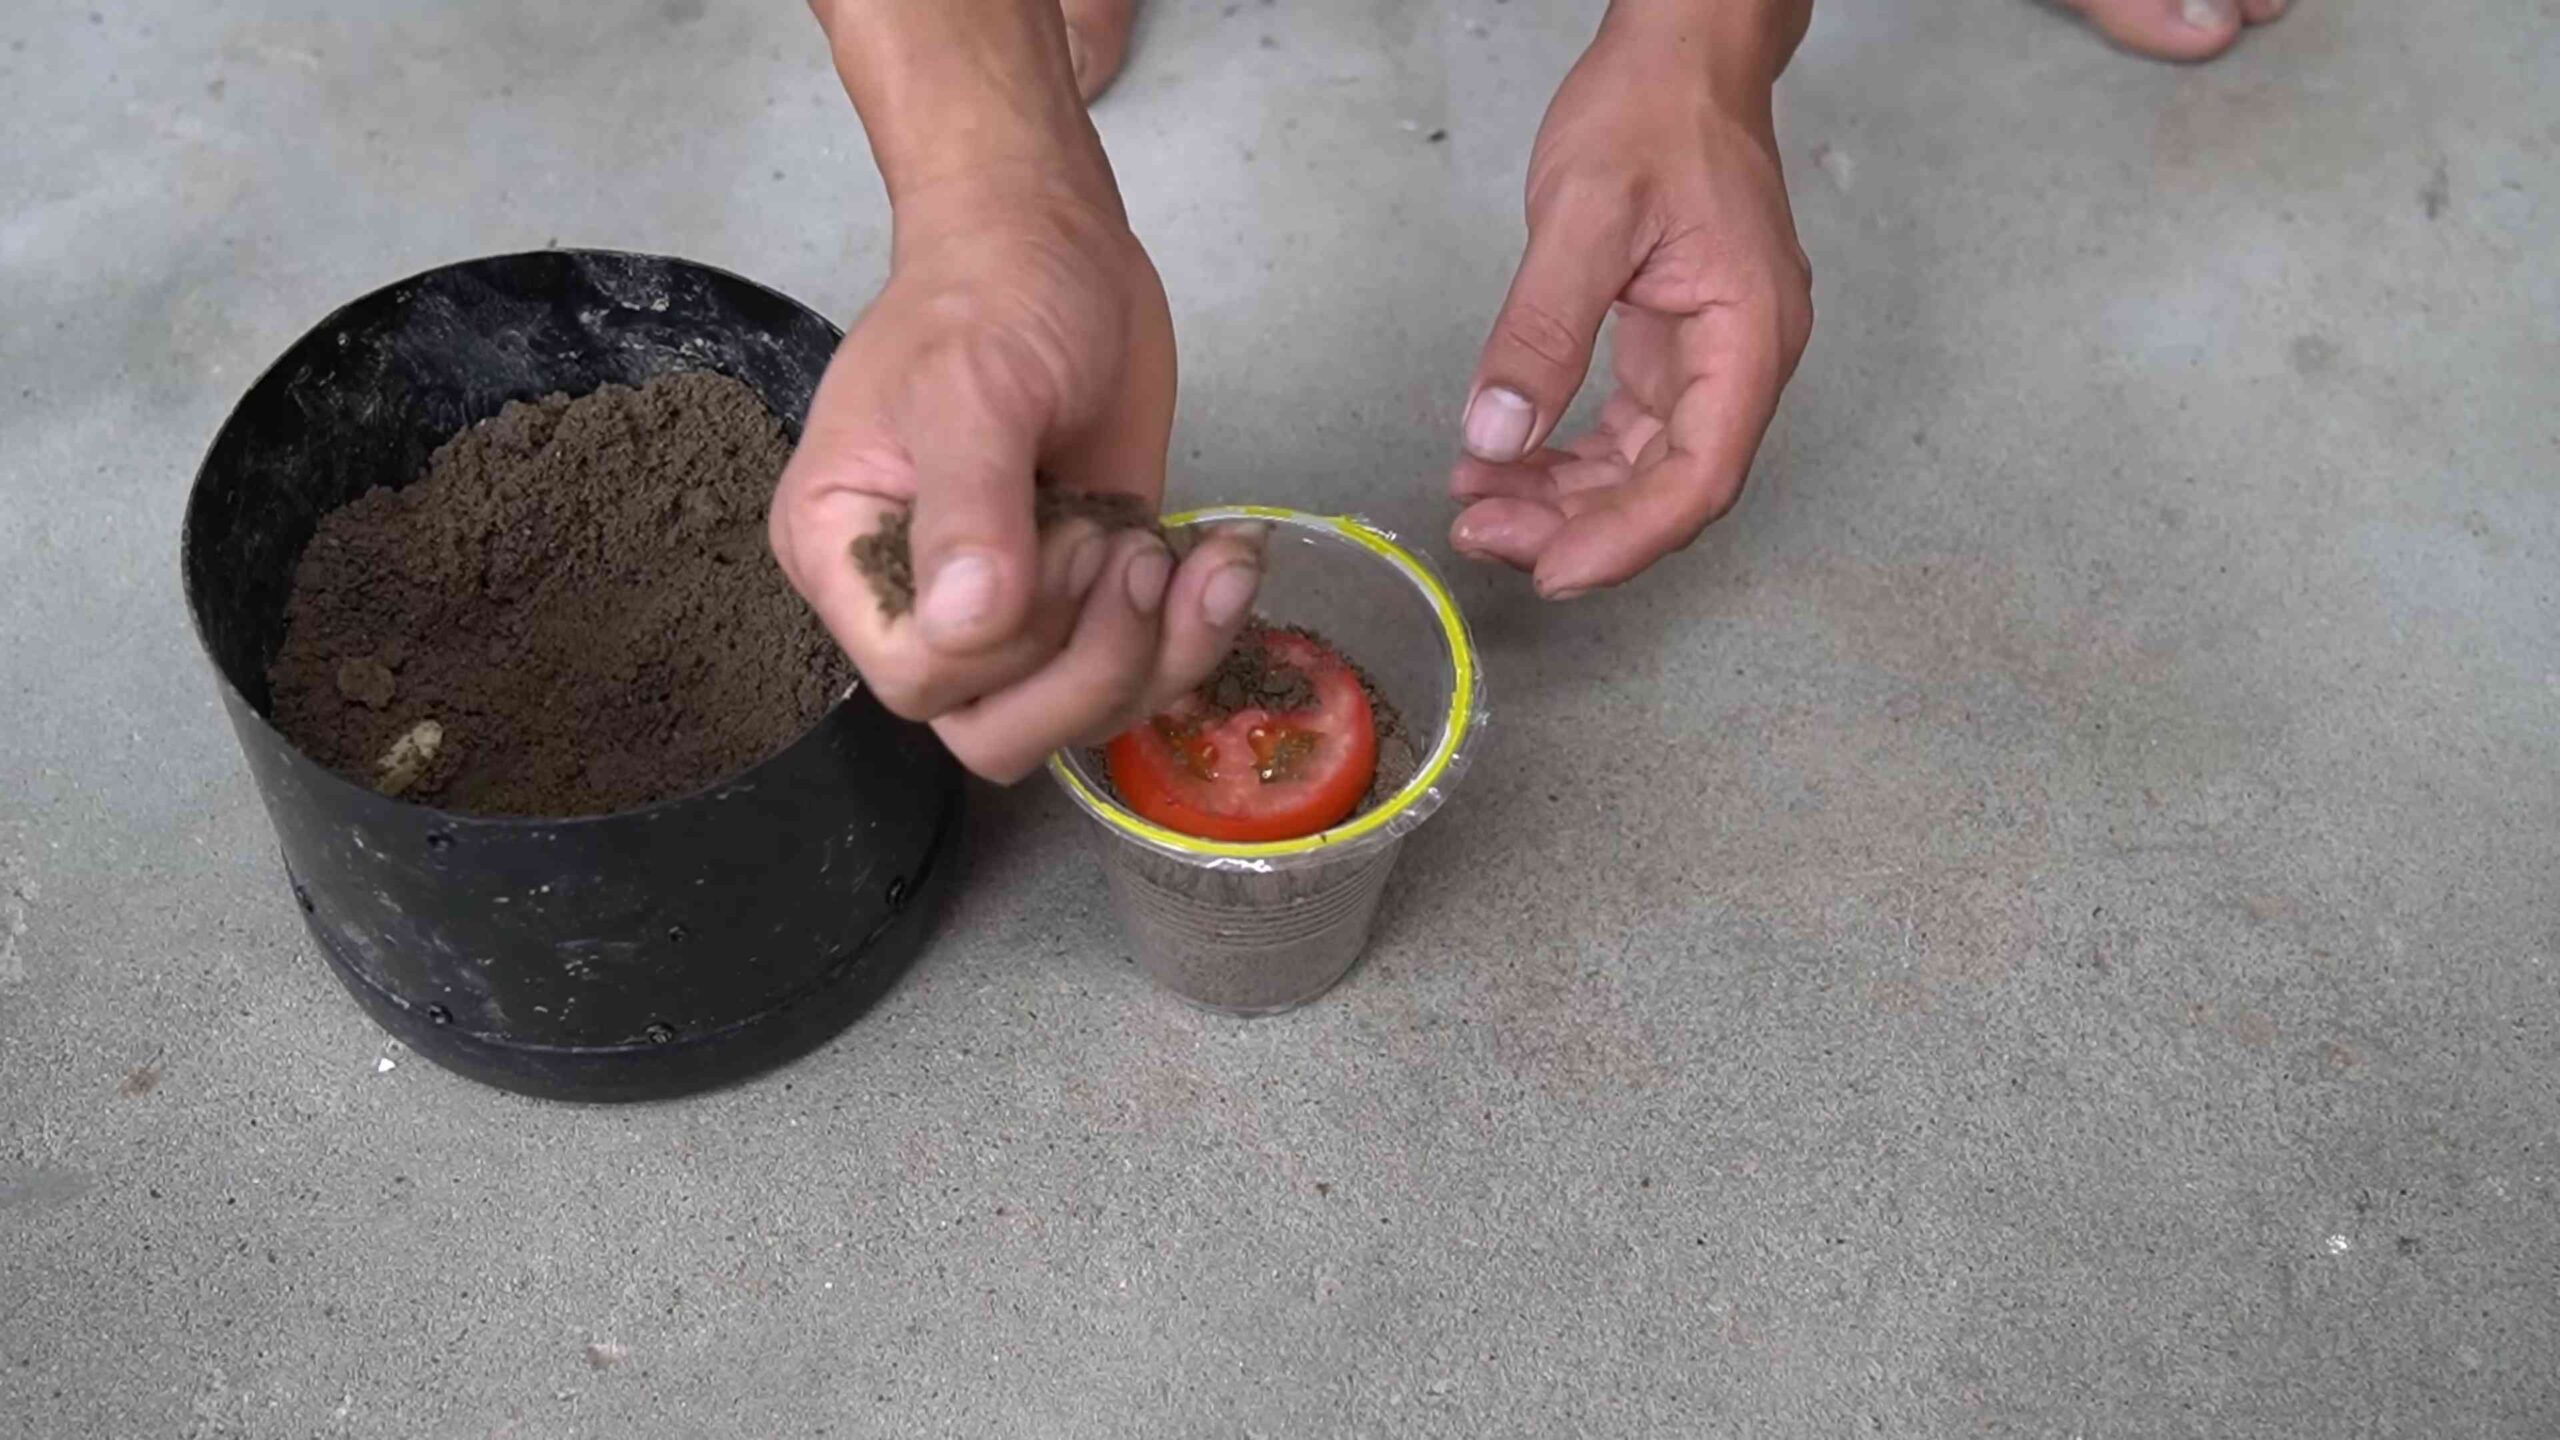
1. **Dig a Hole:** Dig a hole that is deep enough to bury the bottom two-thirds of the tomato plant’s stem. This may seem counterintuitive, but tomatoes have the amazing ability to grow roots along their stems, which will result in a stronger, healthier plant.
2. **Amend the Hole:** Add a handful of compost and a tablespoon of bone meal to the bottom of the hole. Bone meal is a great source of phosphorus, which promotes strong root growth.
3. **Plant the Tomato:** Gently remove the tomato plant from its container and place it in the hole. Backfill the hole with soil, gently firming it around the plant.
4. **Water Thoroughly:** Water the tomato plant thoroughly after planting.
5. **Mulch:** Apply a layer of mulch around the tomato plant to help retain moisture, suppress weeds, and regulate soil temperature. I like to use straw or shredded leaves.
6. **Staking or Caging:** If you’re growing indeterminate tomato varieties, you’ll need to provide them with support. You can use stakes, cages, or trellises. I prefer using cages because they provide more support and allow the plant to grow naturally.
Caring for Your Tomato Plants
Once your tomato plants are in the ground, it’s important to provide them with the care they need to thrive.
* **Watering:** Tomatoes need consistent watering, especially during hot, dry weather. Water deeply and regularly, aiming to keep the soil consistently moist but not waterlogged. I usually water my tomato plants every 2-3 days, depending on the weather.
* **Fertilizing:** Tomatoes are heavy feeders, so you’ll need to fertilize them regularly. Use a balanced fertilizer that is specifically formulated for tomatoes. I like to use a liquid fertilizer every 2-3 weeks.
* **Pruning:** Pruning your tomato plants can help improve air circulation, reduce disease, and encourage fruit production. For indeterminate varieties, you’ll want to remove the suckers that grow between the main stem and the branches. These suckers will eventually produce their own stems and fruit, but they will also compete with the main plant for resources.
* **Pest and Disease Control:** Tomatoes are susceptible to a variety of pests and diseases. Regularly inspect your plants for signs of problems and take action promptly. Some common tomato pests include aphids, tomato hornworms, and whiteflies. Common tomato diseases include early blight, late blight, and blossom end rot. I prefer to use organic pest and disease control methods whenever possible. Neem oil is a great option for controlling many common tomato pests.
Dealing with Blossom End Rot
Blossom end rot is a common problem that affects tomatoes, especially during hot, dry weather. It’s caused by a calcium deficiency in the developing fruit. The bottom of the tomato will develop a dark, leathery spot.
* **Prevention:** The best way to prevent blossom end rot is to ensure that your soil has adequate calcium and that your plants are watered consistently. You can add lime to your soil to increase the calcium level.
* **Treatment:** If you notice blossom end rot on your tomatoes, you can try spraying the plants with a calcium chloride solution. You can also remove the affected tomatoes to encourage the plant to produce healthy fruit.
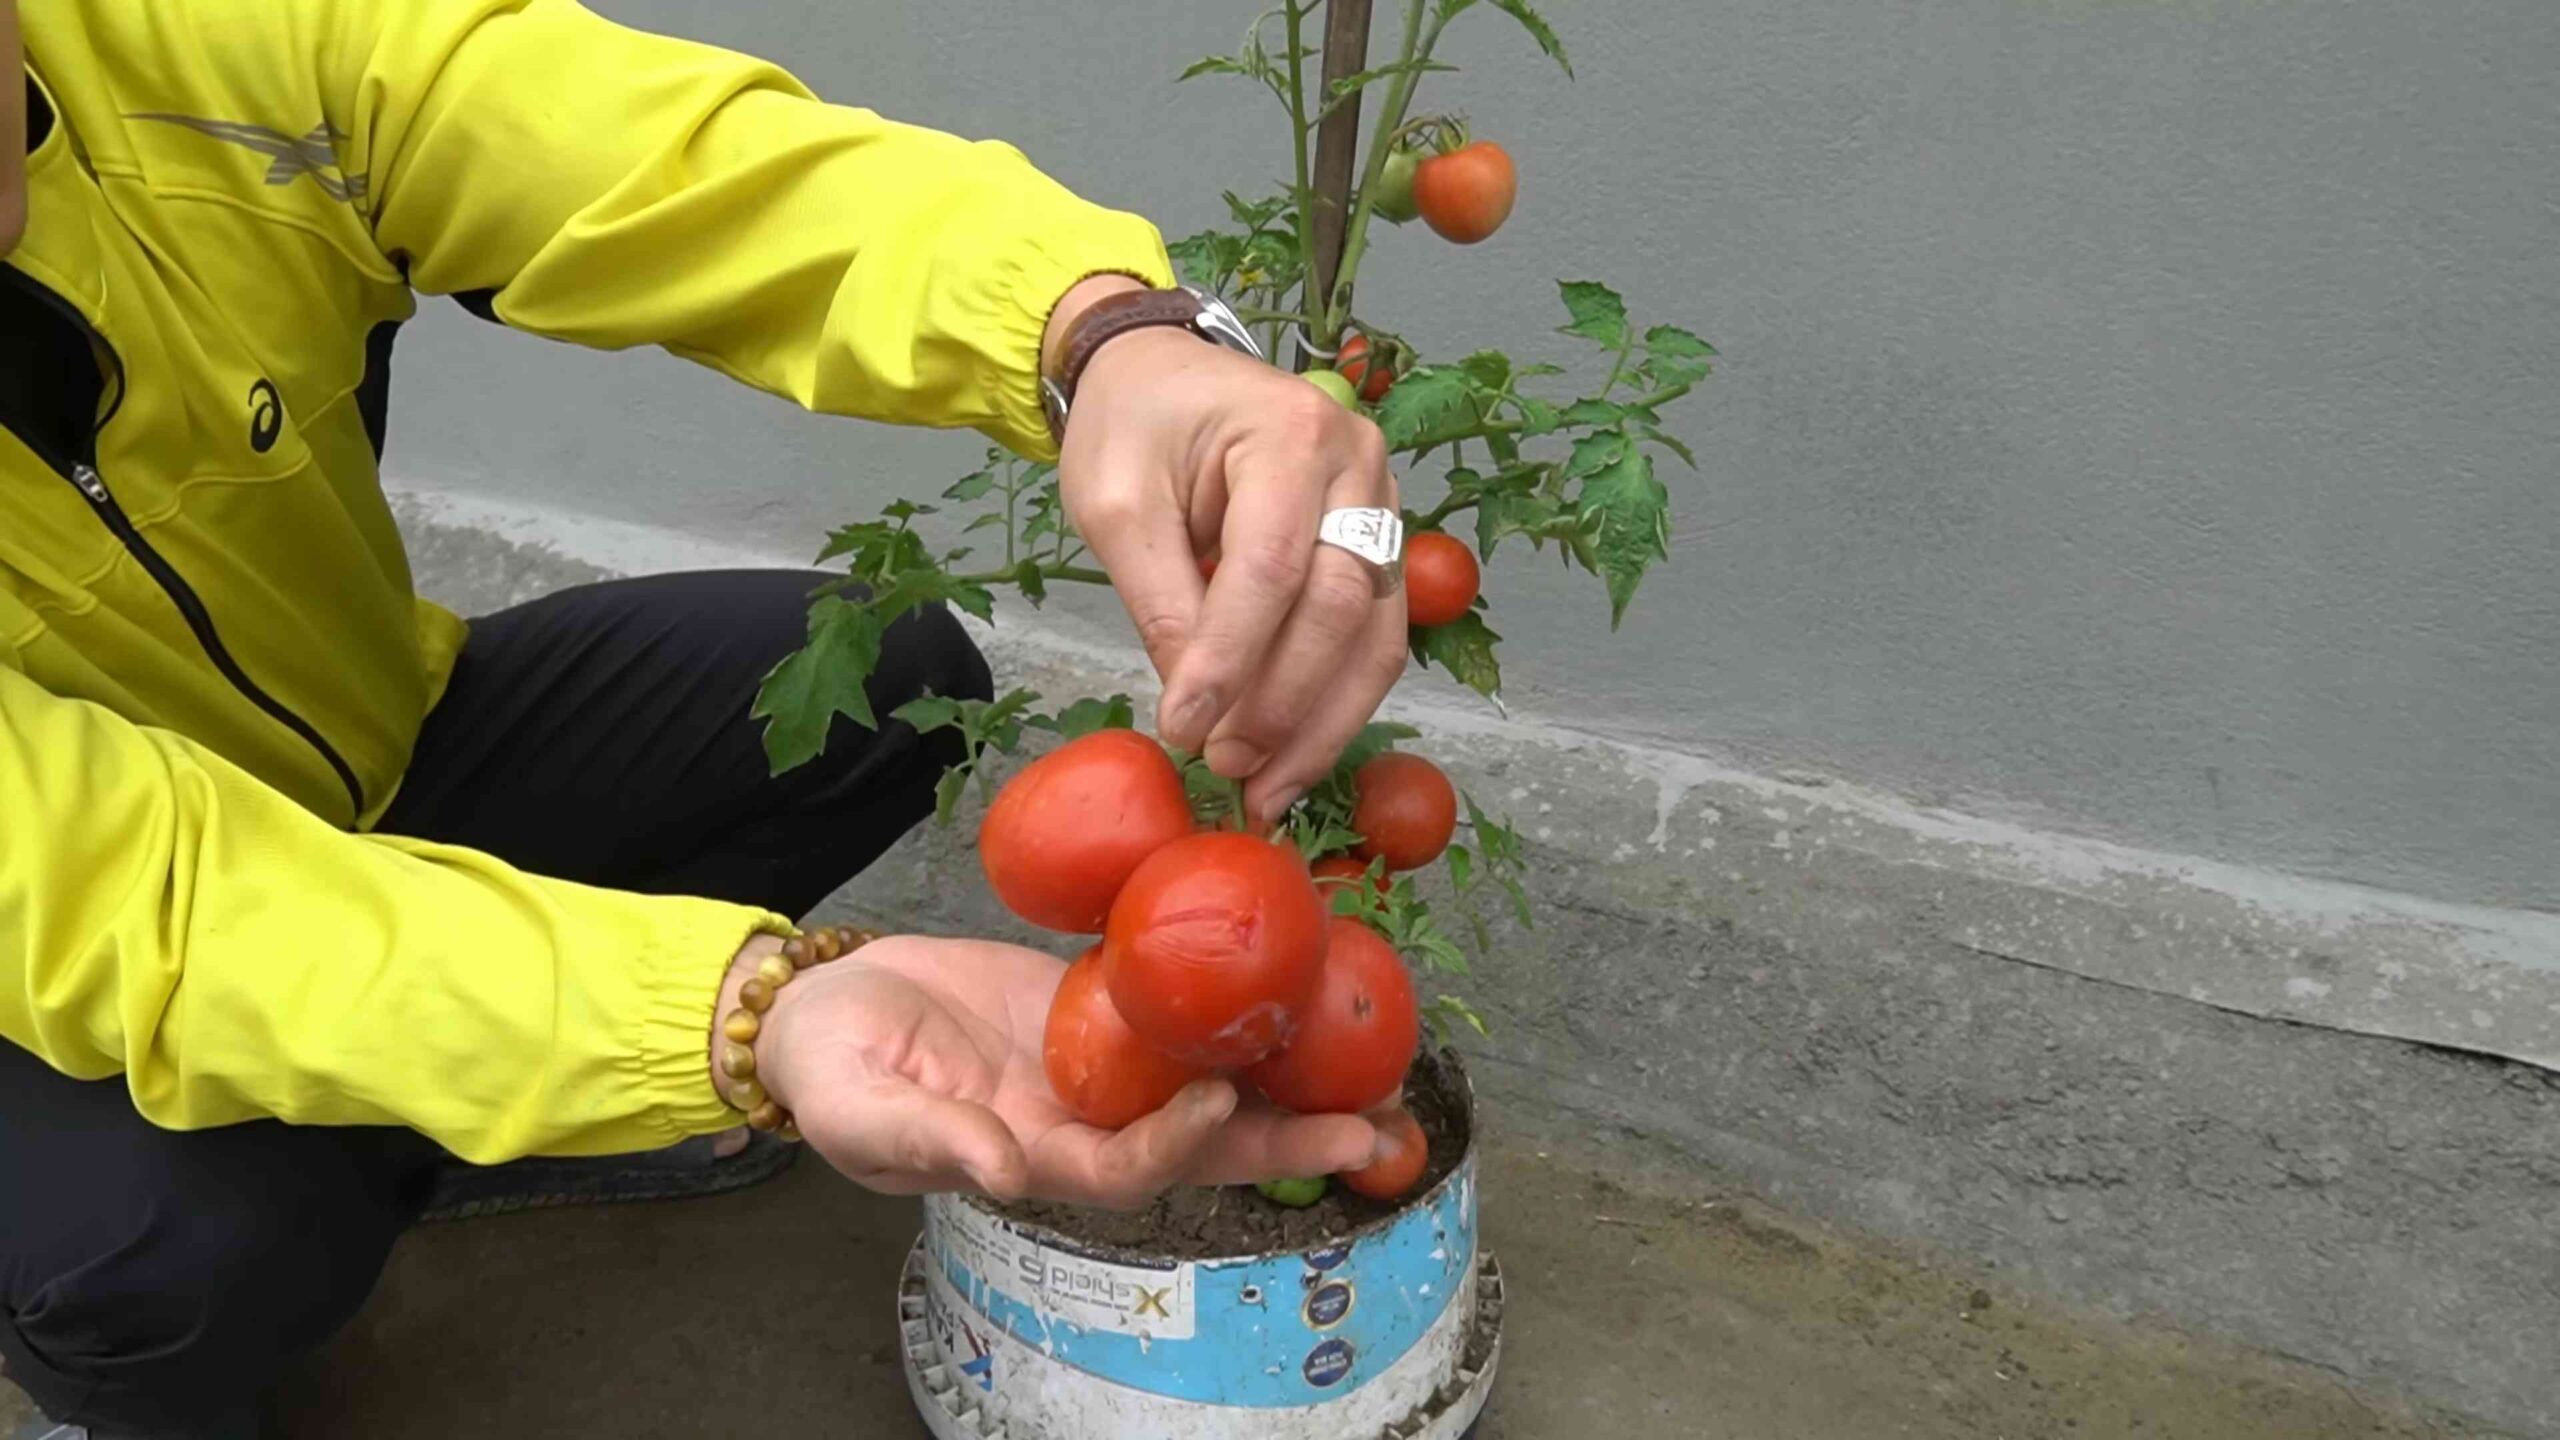
Harvesting Your Tomatoes
The moment you’ve been waiting for! Harvesting your tomatoes is the most rewarding part of growing them.
* **Ripeness:** Tomatoes are ripe when they are fully colored and slightly soft to the touch. The color will depend on the variety you’re growing.
* **Harvesting:** Gently twist the tomato off the vine. Avoid pulling on the tomato, as this can damage the plant.
* **Storage:** Store your tomatoes at room temperature. Refrigerating them can affect their flavor and texture.
Enjoying Your Homegrown Tomatoes
Now that you’ve harvested your delicious homegrown tomatoes, it’s time to enjoy them! There are endless ways to use them.
* **Fresh:** Slice them up and add them to salads, sandwiches, or burgers.
* **Sauce:** Make your own homemade tomato sauce.
* **Canning:** Preserve your tomatoes for later use by canning them.
* **Roasting:** Roast them with herbs and garlic for a flavorful side dish.
Growing your own tomatoes is a rewarding experience that will provide you with delicious, fresh produce all summer long. With a little bit of care and attention, you can grow an abundant crop of tomatoes that will be the envy of your neighbors. Happy gardening!
Conclusion
So, there you have it! Growing abundant backyard tomatoes doesn’t have to be a pipe dream. By implementing this simple yet effective DIY trick, you’re setting yourself up for a season overflowing with juicy, flavorful tomatoes that will be the envy of the neighborhood. This isn’t just about saving a few dollars; it’s about taking control of your food source, understanding the magic of nature, and experiencing the unparalleled satisfaction of harvesting something you nurtured from seed (or seedling!) to table.
This method, focusing on deep planting and strategic nutrient delivery, addresses the core needs of tomato plants: strong root development and consistent feeding. Remember, a healthy root system is the foundation for a productive plant. By burying a significant portion of the stem, you’re encouraging the formation of adventitious roots, which dramatically increases the plant’s ability to absorb water and nutrients. The added boost of slow-release fertilizer ensures that your tomatoes have a steady supply of the essential elements they need to thrive throughout the growing season.
But don’t just take our word for it! The beauty of this DIY trick is its adaptability. Feel free to experiment with different types of slow-release fertilizers to find what works best for your soil and climate. Consider adding a handful of bone meal to the planting hole for an extra dose of phosphorus, which promotes strong root growth and abundant flowering. You can also try incorporating compost tea into your watering routine for a natural and gentle way to nourish your plants.
Variations to Consider:
* Epsom Salts: Some gardeners swear by adding a tablespoon of Epsom salts to the planting hole to provide magnesium, which can help prevent blossom-end rot.
* Mycorrhizae: Inoculating the roots with mycorrhizae fungi can enhance nutrient uptake and improve overall plant health.
* Companion Planting: Plant basil, marigolds, or other companion plants near your tomatoes to deter pests and attract beneficial insects.
This DIY trick is more than just a recipe for success; it’s an invitation to connect with your garden and learn from your experiences. Every garden is unique, and what works for one person may not work for another. The key is to observe your plants, pay attention to their needs, and adjust your approach accordingly.
We are confident that this method will significantly improve your tomato yields. Imagine the possibilities: homemade tomato sauce, fresh salsa, BLTs bursting with flavor, and sharing your bounty with friends and family. The taste of homegrown tomatoes is simply unmatched, and this DIY trick makes it easier than ever to achieve that deliciousness.
So, grab your gardening gloves, gather your supplies, and get ready to grow the best tomatoes you’ve ever tasted! Don’t forget to document your progress and share your results with us. We’d love to hear about your experiences, see your photos, and learn from your successes (and even your challenges!). Let’s create a community of thriving tomato growers, all thanks to this simple, effective, and rewarding DIY trick. Happy gardening!
Frequently Asked Questions (FAQ)
What type of slow-release fertilizer should I use?
The best type of slow-release fertilizer for your tomatoes depends on your soil and climate. A balanced fertilizer with an NPK ratio of 10-10-10 or 14-14-14 is a good starting point. Look for a fertilizer specifically formulated for tomatoes or vegetables. Organic options like composted manure or bone meal are also excellent choices. Consider getting a soil test to determine any specific nutrient deficiencies and choose a fertilizer accordingly. Remember to follow the manufacturer’s instructions for application rates.
How deep should I bury the tomato plant?
You should bury approximately two-thirds of the tomato plant’s stem. Remove the lower leaves from the stem before planting, as these will rot if buried. The buried portion of the stem will develop into a robust root system, providing the plant with a stronger foundation and increased access to nutrients and water. Don’t worry about burying too much of the stem; tomatoes are incredibly resilient and will thrive with this deep planting method.
What if I don’t have slow-release fertilizer? Can I use something else?
While slow-release fertilizer is ideal for providing a consistent supply of nutrients, you can use other alternatives. Compost is an excellent option, providing both nutrients and beneficial microbes to the soil. You can also use a liquid fertilizer, such as fish emulsion or seaweed extract, applied regularly throughout the growing season. Just be sure to dilute the liquid fertilizer according to the manufacturer’s instructions to avoid burning the roots.
My tomato plants are already established. Can I still use this trick?
While it’s best to implement this trick at planting time, you can still benefit from it with established plants. Gently dig around the base of the plant and add a small amount of slow-release fertilizer to the soil. Be careful not to damage the roots. You can also mulch around the plant with compost to provide additional nutrients. While you won’t be able to bury the stem as deeply, the added nutrients will still help boost growth and fruit production.
How often should I water my tomato plants?
Watering frequency depends on your climate, soil type, and the size of your plants. Generally, tomato plants need about 1-2 inches of water per week. Water deeply and infrequently, allowing the soil to dry out slightly between waterings. Avoid overhead watering, as this can promote fungal diseases. Use a soaker hose or drip irrigation to deliver water directly to the roots. Check the soil moisture regularly by sticking your finger into the soil a few inches deep. If the soil feels dry, it’s time to water.
What are some common tomato plant problems and how can I prevent them?
Common tomato plant problems include blossom-end rot, early blight, and tomato hornworms. Blossom-end rot is caused by calcium deficiency and can be prevented by adding calcium to the soil and ensuring consistent watering. Early blight is a fungal disease that can be prevented by providing good air circulation, avoiding overhead watering, and using a fungicide if necessary. Tomato hornworms are large caterpillars that can defoliate your plants. Handpick them off the plants or use Bacillus thuringiensis (Bt), a natural insecticide.
How long does it take for tomatoes to ripen?
The time it takes for tomatoes to ripen depends on the variety and the growing conditions. Generally, it takes about 60-85 days from transplanting to harvest. Look for tomatoes that are fully colored and slightly soft to the touch. Gently twist the tomato off the vine when it’s ripe. You can also ripen green tomatoes indoors by placing them in a paper bag with a banana or apple.
Can I use this trick for other plants besides tomatoes?
While this trick is particularly effective for tomatoes, it can also be beneficial for other plants in the nightshade family, such as peppers and eggplants. These plants also benefit from deep planting and a consistent supply of nutrients. However, be sure to research the specific needs of each plant before applying this trick.
What if my tomato plants are not producing fruit?
There are several reasons why your tomato plants may not be producing fruit. Common causes include lack of pollination, insufficient sunlight, and nutrient deficiencies. Ensure that your plants are getting at least 6-8 hours of sunlight per day. You can also hand-pollinate the flowers by gently shaking the plants or using a small brush to transfer pollen from one flower to another. Fertilize your plants regularly with a balanced fertilizer to provide the necessary nutrients.
How do I know if my soil is suitable for growing tomatoes?
The best way to determine if your soil is suitable for growing tomatoes is to get a soil test. This will tell you the pH level, nutrient content, and other important factors. Tomatoes prefer a slightly acidic soil with a pH of 6.0-6.8. If your soil is too acidic or alkaline, you can amend it with lime or sulfur, respectively. You can also improve the soil by adding compost or other organic matter. Well-draining soil is essential for growing healthy tomatoes.

Leave a Comment