

Grow Aloe Vera from Leaf: Unlock the Secrets to Effortless Propagation!
Have you ever admired the soothing properties of Aloe Vera and wished you could have an endless supply right at your fingertips? Well, you’re in luck! This DIY guide will reveal the surprisingly simple secrets to grow Aloe Vera from leaf cuttings, transforming you from a plant enthusiast to an Aloe Vera pro. Forget expensive store-bought plants; we’re diving into the world of propagation, a technique as old as gardening itself!
Aloe Vera has a rich history, dating back thousands of years. Ancient Egyptians revered it as the “plant of immortality,” using it for its medicinal and cosmetic benefits. From soothing sunburns to aiding digestion, this succulent has been a trusted remedy across cultures for centuries. But why rely on commercial products when you can cultivate your own natural pharmacy?
Let’s be honest, buying new Aloe Vera plants can get expensive, and sometimes, they just don’t thrive in their new environment. That’s where this DIY trick comes in. Learning how to grow Aloe Vera from leaf is not only cost-effective but also incredibly rewarding. Imagine the satisfaction of nurturing a new plant from a single leaf, knowing you’ve created something beautiful and beneficial with your own hands. Plus, you’ll have plenty of Aloe Vera to share with friends and family, spreading the healing power of this amazing plant. So, grab your gardening gloves, and let’s get started on this exciting journey of propagation!
Propagating Aloe Vera: A Step-by-Step Guide to Growing New Plants from a Single Leaf
Hey there, plant enthusiasts! Ever wondered if you could magically create more aloe vera plants from just a single leaf? Well, the truth is, it’s not exactly magic, but it’s pretty darn close! While propagating aloe vera from leaf cuttings isn’t always successful (it’s a bit trickier than pups), it’s definitely worth a try and a fun experiment. I’m going to walk you through the process, step-by-step, so you can give it your best shot. Let’s get started!
Understanding Aloe Vera Propagation
Before we dive in, it’s important to understand that aloe vera is most reliably propagated from “pups” or offsets that grow from the base of the mother plant. These pups already have roots and a higher chance of survival. However, propagating from a leaf is possible, although the success rate is lower. The leaf needs to callous over properly to prevent rot, and it needs to be encouraged to form roots.
Important Considerations:
* Leaf Selection: Choose a healthy, mature leaf from a well-established aloe vera plant. The thicker the leaf, the better.
* Sterilization: Always sterilize your cutting tools to prevent the spread of disease.
* Patience is Key: Rooting aloe vera from a leaf can take several weeks, or even months. Don’t give up too soon!
* Success Rate: Be prepared for the possibility that your leaf cutting might not root. It’s all part of the learning process!
Materials You’ll Need
To get started, gather these essential supplies:
* A healthy aloe vera plant
* A sharp, sterilized knife or scissors
* Rooting hormone powder (optional, but recommended)
* A small pot with drainage holes
* Well-draining potting mix (cactus or succulent mix is ideal)
* Watering can or spray bottle
* A warm, bright location (indirect sunlight)
Step-by-Step Instructions: Propagating Aloe Vera from a Leaf
Alright, let’s get our hands dirty! Follow these steps carefully to maximize your chances of success.
1. Selecting and Cutting the Leaf
This is a crucial first step. Choose wisely!
1. Identify a Mature Leaf: Look for a plump, healthy leaf that’s at least 4-6 inches long. Avoid leaves that are damaged, discolored, or showing signs of disease.
2. Sterilize Your Cutting Tool: Before making any cuts, sterilize your knife or scissors with rubbing alcohol or a diluted bleach solution. This will help prevent infection.
3. Make the Cut: Carefully cut the leaf from the base of the plant, as close to the stem as possible. Make a clean, straight cut.
4. Let the Cut End Callous: This is super important! Place the cut leaf in a dry, shaded area for 1-2 weeks. This allows the cut end to callous over, forming a protective barrier that prevents rot. You’ll know it’s ready when the cut end is dry and slightly hardened.
2. Preparing the Potting Mix and Pot
While the leaf is callousing, let’s get the pot ready.
1. Choose the Right Pot: Select a small pot (2-3 inches in diameter) with drainage holes. Good drainage is essential for preventing root rot.
2. Use Well-Draining Potting Mix: Aloe vera plants need well-draining soil to thrive. Use a cactus or succulent potting mix, or create your own by mixing regular potting soil with perlite or coarse sand.
3. Fill the Pot: Fill the pot with the potting mix, leaving about an inch of space at the top.
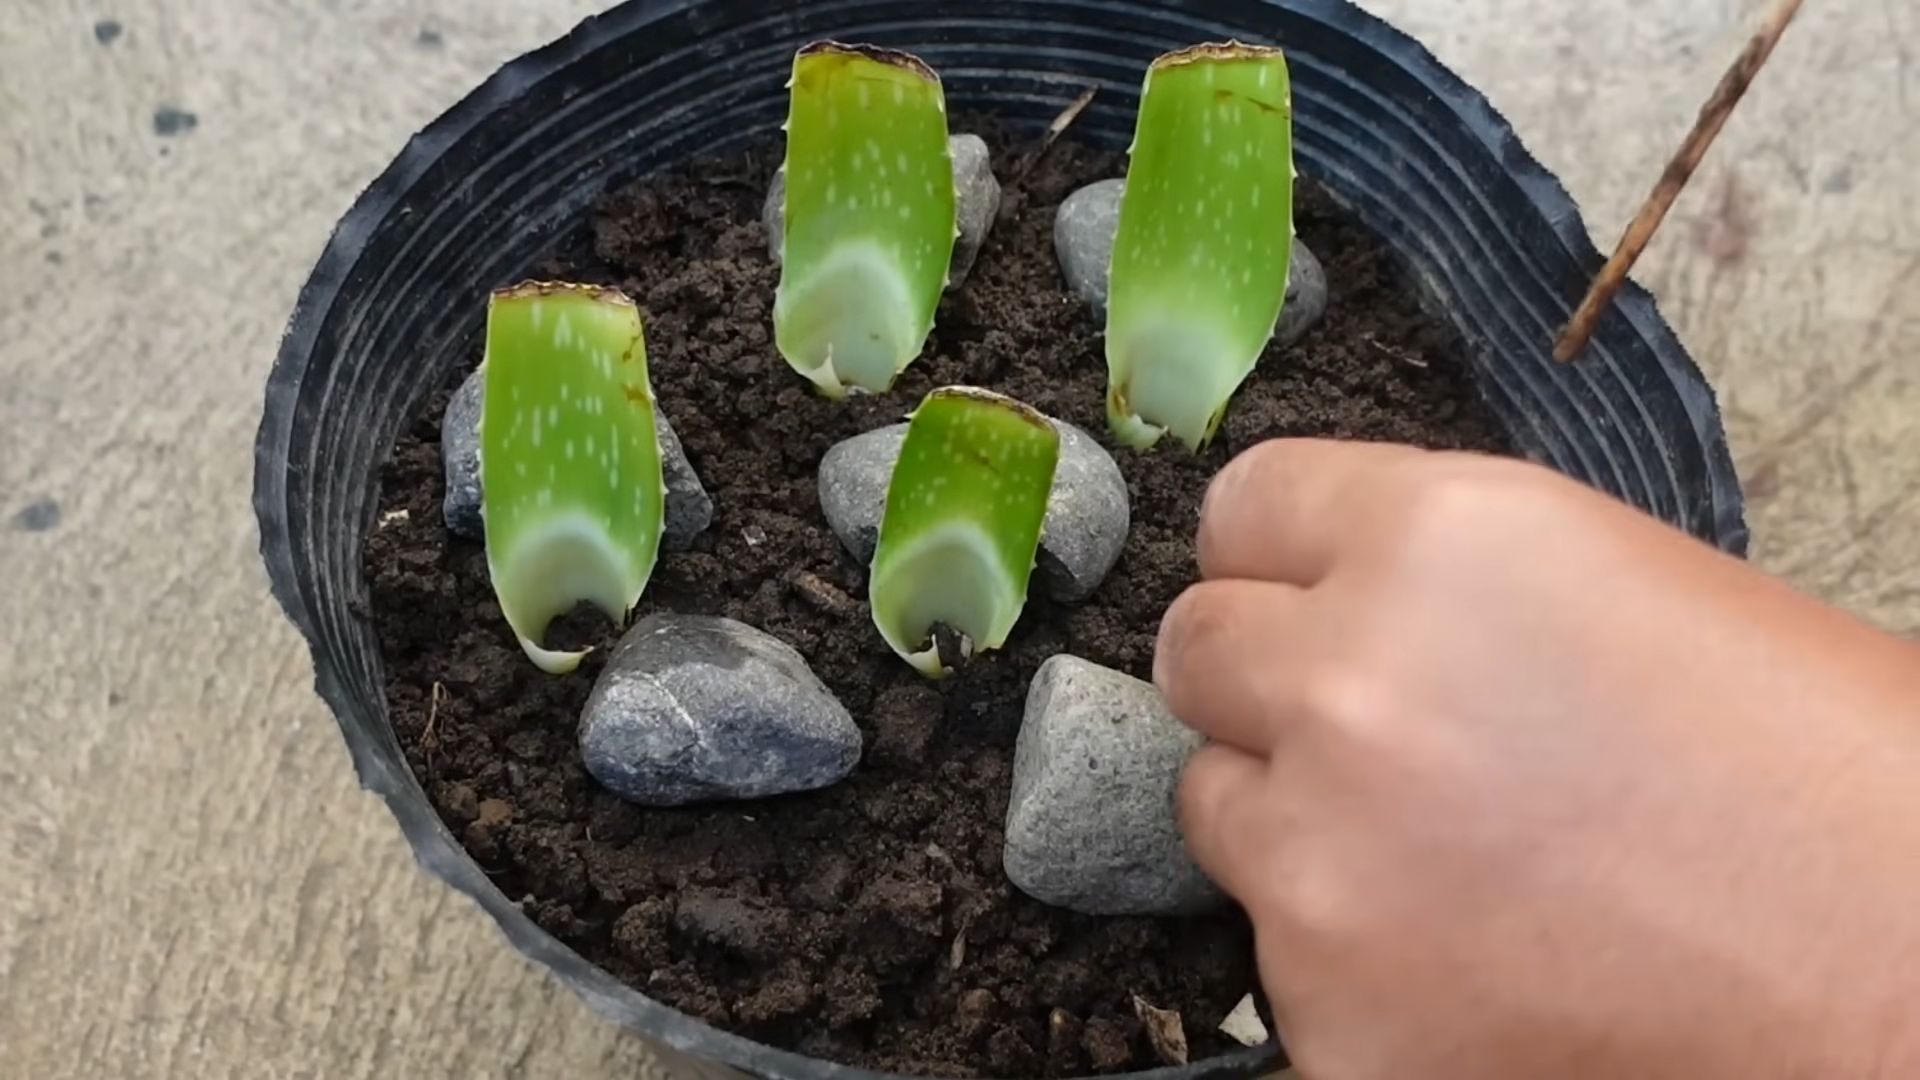
3. Planting the Calloused Leaf
Now for the exciting part – planting!
1. Apply Rooting Hormone (Optional): Dip the calloused end of the leaf into rooting hormone powder. This can help stimulate root growth, but it’s not essential.
2. Plant the Leaf: Insert the calloused end of the leaf into the potting mix, burying it about 1-2 inches deep. Make sure the leaf is standing upright.
3. Water Lightly: Water the potting mix lightly, just enough to moisten it. Avoid overwatering, as this can lead to rot.
4. Providing the Right Environment
Aloe vera needs the right conditions to thrive.
1. Place in Indirect Sunlight: Place the pot in a warm, bright location that receives indirect sunlight. Avoid direct sunlight, as this can scorch the leaf.
2. Maintain Warm Temperatures: Aloe vera plants prefer temperatures between 65-80°F (18-27°C).
3. Water Sparingly: Water the potting mix only when it’s completely dry. Overwatering is a common mistake that can lead to root rot.
4. Be Patient: Rooting aloe vera from a leaf can take several weeks, or even months. Don’t give up too soon! Check for root growth by gently tugging on the leaf. If you feel resistance, it means roots are starting to form.
5. Caring for Your New Aloe Vera Plant
Once your aloe vera plant has rooted, it’s time to provide ongoing care.
1. Watering: Water deeply but infrequently, allowing the soil to dry out completely between waterings.
2. Fertilizing: Fertilize your aloe vera plant sparingly, using a balanced liquid fertilizer diluted to half strength. Fertilize only during the growing season (spring and summer).
3. Repotting: Repot your aloe vera plant into a larger pot when it outgrows its current container.
4. Pest Control: Keep an eye out for pests such as mealybugs and scale. Treat infestations promptly with insecticidal soap or neem oil.
Troubleshooting Common Problems
Even with the best care, you might encounter some problems. Here’s how to troubleshoot them:
* Leaf Rotting: If the leaf starts to rot, it’s likely due to overwatering or poor drainage. Remove the rotting leaf and start again with a fresh leaf and well-draining potting mix.
* No Root Growth: If the leaf doesn’t root after several months, it might not be viable. Try again with a different leaf, or consider propagating from pups instead.
* Yellowing Leaves: Yellowing leaves can be a sign of overwatering, underwatering, or nutrient deficiency. Adjust your watering schedule and fertilize as needed.
* Brown Spots: Brown spots can be caused by sunburn or fungal infections. Move the plant to a location with indirect sunlight and treat any fungal infections with a fungicide.
Alternative Propagation Method: Using Aloe Vera Pups
As I mentioned earlier, propagating from pups is generally more successful than propagating from leaves. Here’s a quick overview of how to do it:
1. Identify Pups: Look for small plants (pups) growing from the base of the mother plant.
2. Separate the Pups: Gently separate the pups from the mother plant, making sure each pup has its own roots.
3. Plant the Pups: Plant the pups in individual pots with well-draining potting mix.
4. Care for the Pups: Water the pups lightly and place them in a warm, bright location with indirect sunlight.
Final Thoughts
While propagating aloe vera from a leaf can be a bit challenging, it’s a rewarding experience when it works. Remember to be patient, provide the right conditions, and don’t be afraid to experiment. And if all else fails, you can always try propagating from pups. Good luck, and happy gardening! I hope you’ll have a whole family of aloe vera plants in no time!

Conclusion
So, there you have it! Growing aloe vera from a single leaf might seem like a horticultural magic trick, but with patience and the right approach, it’s a surprisingly achievable and rewarding endeavor. We’ve walked through the steps, highlighted the potential pitfalls, and armed you with the knowledge to cultivate your own thriving aloe vera plants.
Why is this DIY trick a must-try? Beyond the sheer satisfaction of propagating your own plants, growing aloe vera offers a sustainable and cost-effective way to access this incredible succulent’s many benefits. Imagine having a readily available source of soothing gel for sunburns, minor cuts, and skin irritations, all thanks to your own green thumb. Plus, aloe vera plants are known for their air-purifying qualities, making them a welcome addition to any home.
But the benefits extend beyond the practical. The process of nurturing a new plant from a single leaf is a lesson in patience and observation. It connects you to the natural world in a tangible way, fostering a deeper appreciation for the life cycle of plants. It’s a project that can be enjoyed by gardeners of all skill levels, from seasoned pros to complete beginners.
Don’t be afraid to experiment! While we’ve outlined a specific method, there are variations you can explore. Some gardeners have success using rooting hormone to encourage faster root development. Others prefer to use a different type of potting mix, such as a blend of perlite and vermiculite, to improve drainage. You can also try different sizes of containers, depending on the size of your leaf cuttings.
Consider these variations to personalize your aloe vera propagation journey:
* Rooting Hormone Boost: Dip the cut end of your aloe vera leaf in rooting hormone powder before planting. This can help stimulate root growth and increase your chances of success.
* Potting Mix Experimentation: While a well-draining succulent mix is ideal, you can also try creating your own blend. Combine equal parts perlite, vermiculite, and coarse sand for excellent drainage and aeration.
* Container Customization: Start with smaller pots for individual leaf cuttings and gradually transplant them to larger containers as they grow. This allows the roots to establish themselves more effectively.
* Humidity Control: While aloe vera prefers dry conditions, providing a slightly humid environment during the initial rooting phase can be beneficial. You can achieve this by covering the pot with a plastic bag or placing it in a humidity dome, but be sure to ventilate it regularly to prevent mold growth.
Ultimately, the best way to learn is by doing. So, gather your supplies, select a healthy aloe vera leaf, and embark on this exciting propagation adventure. We’re confident that you’ll be amazed by the results.
We encourage you to try this DIY trick and share your experience with us! Post photos of your progress on social media using [Your Hashtag Here], or leave a comment below to let us know how it went. We’re eager to hear your tips, tricks, and any challenges you encountered along the way. Let’s build a community of aloe vera enthusiasts and learn from each other’s successes! Remember, mastering the art of growing aloe vera from leaf is not just about creating new plants; it’s about connecting with nature and enjoying the rewarding process of nurturing life. Happy growing!
Frequently Asked Questions (FAQ)
1. What type of aloe vera leaf is best for propagation?
The ideal leaf for propagation is a mature, healthy leaf from a well-established aloe vera plant. Look for leaves that are plump, firm, and free from any signs of damage or disease. Avoid using leaves that are too young or too old, as they may not have the necessary energy reserves to develop roots. The leaf should be at least 4-6 inches long for best results.
2. How long does it take for an aloe vera leaf to root?
Rooting time can vary depending on several factors, including the temperature, humidity, and the health of the leaf. Generally, it takes anywhere from 4 to 8 weeks for roots to begin to form. Be patient and avoid disturbing the leaf during this time. You can gently tug on the leaf after a few weeks to check for resistance, which indicates that roots are developing.
3. What kind of soil is best for growing aloe vera from a leaf?
Aloe vera requires well-draining soil to prevent root rot. A commercial succulent or cactus mix is an excellent choice. You can also create your own mix by combining equal parts potting soil, coarse sand, and perlite. Avoid using heavy, clay-based soils, as they retain too much moisture.
4. How often should I water the aloe vera leaf after planting?
Water sparingly, especially during the initial rooting phase. Overwatering is a common cause of failure when propagating aloe vera from leaves. Allow the soil to dry out completely between waterings. When you do water, do so thoroughly, ensuring that the excess water drains out of the pot. In general, watering once every 2-3 weeks is sufficient, but adjust the frequency based on the environmental conditions.
5. What is the best location for growing aloe vera from a leaf?
Aloe vera thrives in bright, indirect sunlight. Avoid placing the leaf in direct sunlight, as this can scorch the foliage. A location near an east- or west-facing window is ideal. If you don’t have access to natural light, you can supplement with a grow light. Once the plant has established roots, you can gradually acclimate it to more direct sunlight.
6. Can I use rooting hormone to help the aloe vera leaf root faster?
Yes, using rooting hormone can help stimulate root growth and increase your chances of success. Dip the cut end of the aloe vera leaf in rooting hormone powder before planting it in the soil. Follow the instructions on the rooting hormone package for proper application.
7. What are some common problems when growing aloe vera from a leaf, and how can I fix them?
* Root Rot: This is caused by overwatering. Ensure that the soil is well-draining and allow it to dry out completely between waterings. If you suspect root rot, remove the leaf from the pot, trim away any rotten roots, and replant it in fresh, dry soil.
* Leaf Rot: This can be caused by excessive humidity or moisture on the leaf. Ensure that the leaf is not sitting in water and that the environment is well-ventilated.
* Lack of Rooting: This can be due to several factors, including using an unhealthy leaf, improper soil, or insufficient light. Ensure that you are using a healthy leaf, well-draining soil, and providing adequate light. You can also try using rooting hormone to stimulate root growth.
* Sunburn: Direct sunlight can scorch the leaves. Provide bright, indirect sunlight and avoid placing the leaf in direct sunlight.
8. How do I know when the aloe vera plant is ready to be transplanted?
Once the aloe vera plant has developed a healthy root system and new growth is visible, it is ready to be transplanted into a larger pot. Gently remove the plant from its current container and inspect the roots. If the roots are circling the bottom of the pot, it’s definitely time to transplant. Choose a pot that is slightly larger than the current one and fill it with well-draining succulent mix.
9. Can I grow aloe vera from a leaf in water?
While it’s possible to root some succulents in water, aloe vera is generally more successful when propagated in soil. Water propagation can lead to root rot if not carefully monitored. If you choose to try water propagation, use distilled water and change it every few days. Once roots develop, transplant the leaf to a pot with well-draining soil.
10. How do I care for my new aloe vera plant after it has rooted?
Once your aloe vera plant has rooted and is growing well, continue to provide it with bright, indirect sunlight and water sparingly. Allow the soil to dry out completely between waterings. Fertilize the plant sparingly with a balanced liquid fertilizer diluted to half strength. Repot the plant as needed into a larger container. With proper care, your aloe vera plant will thrive for many years to come.
Leave a Comment