

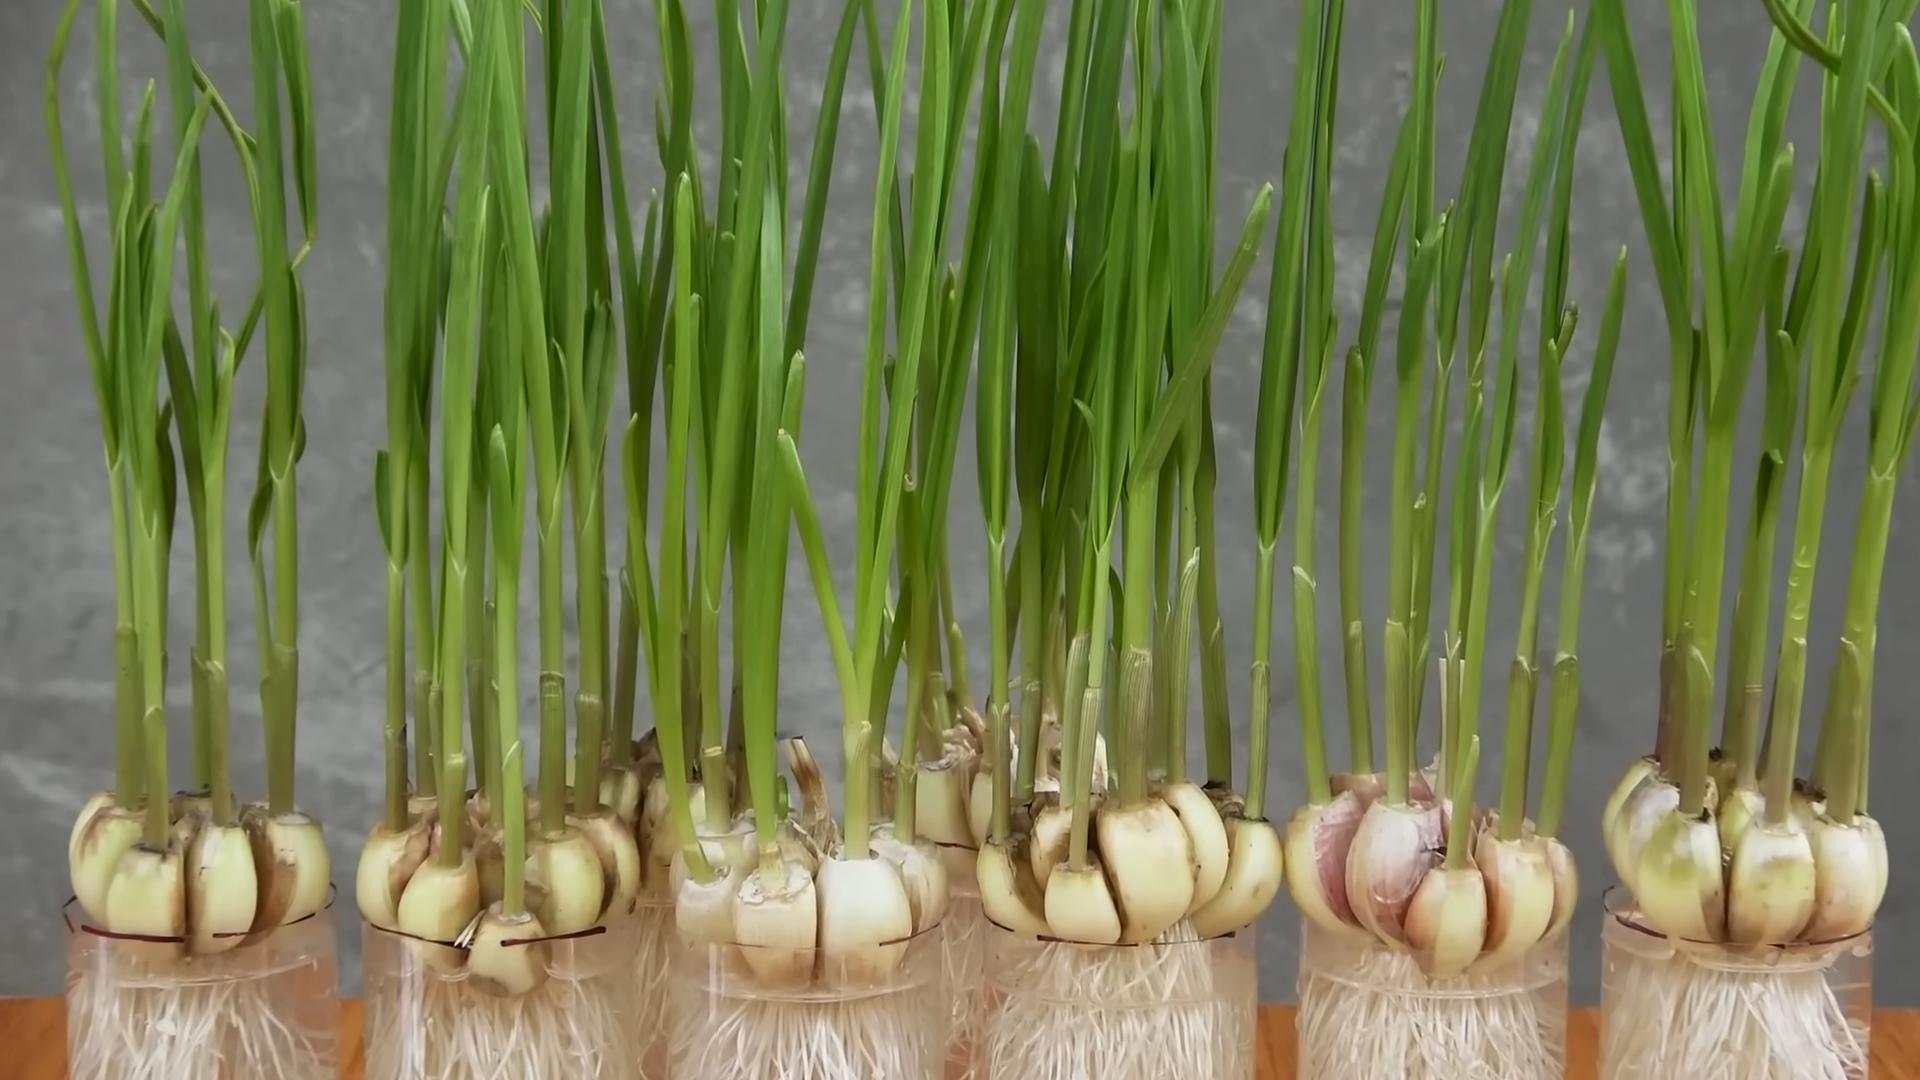
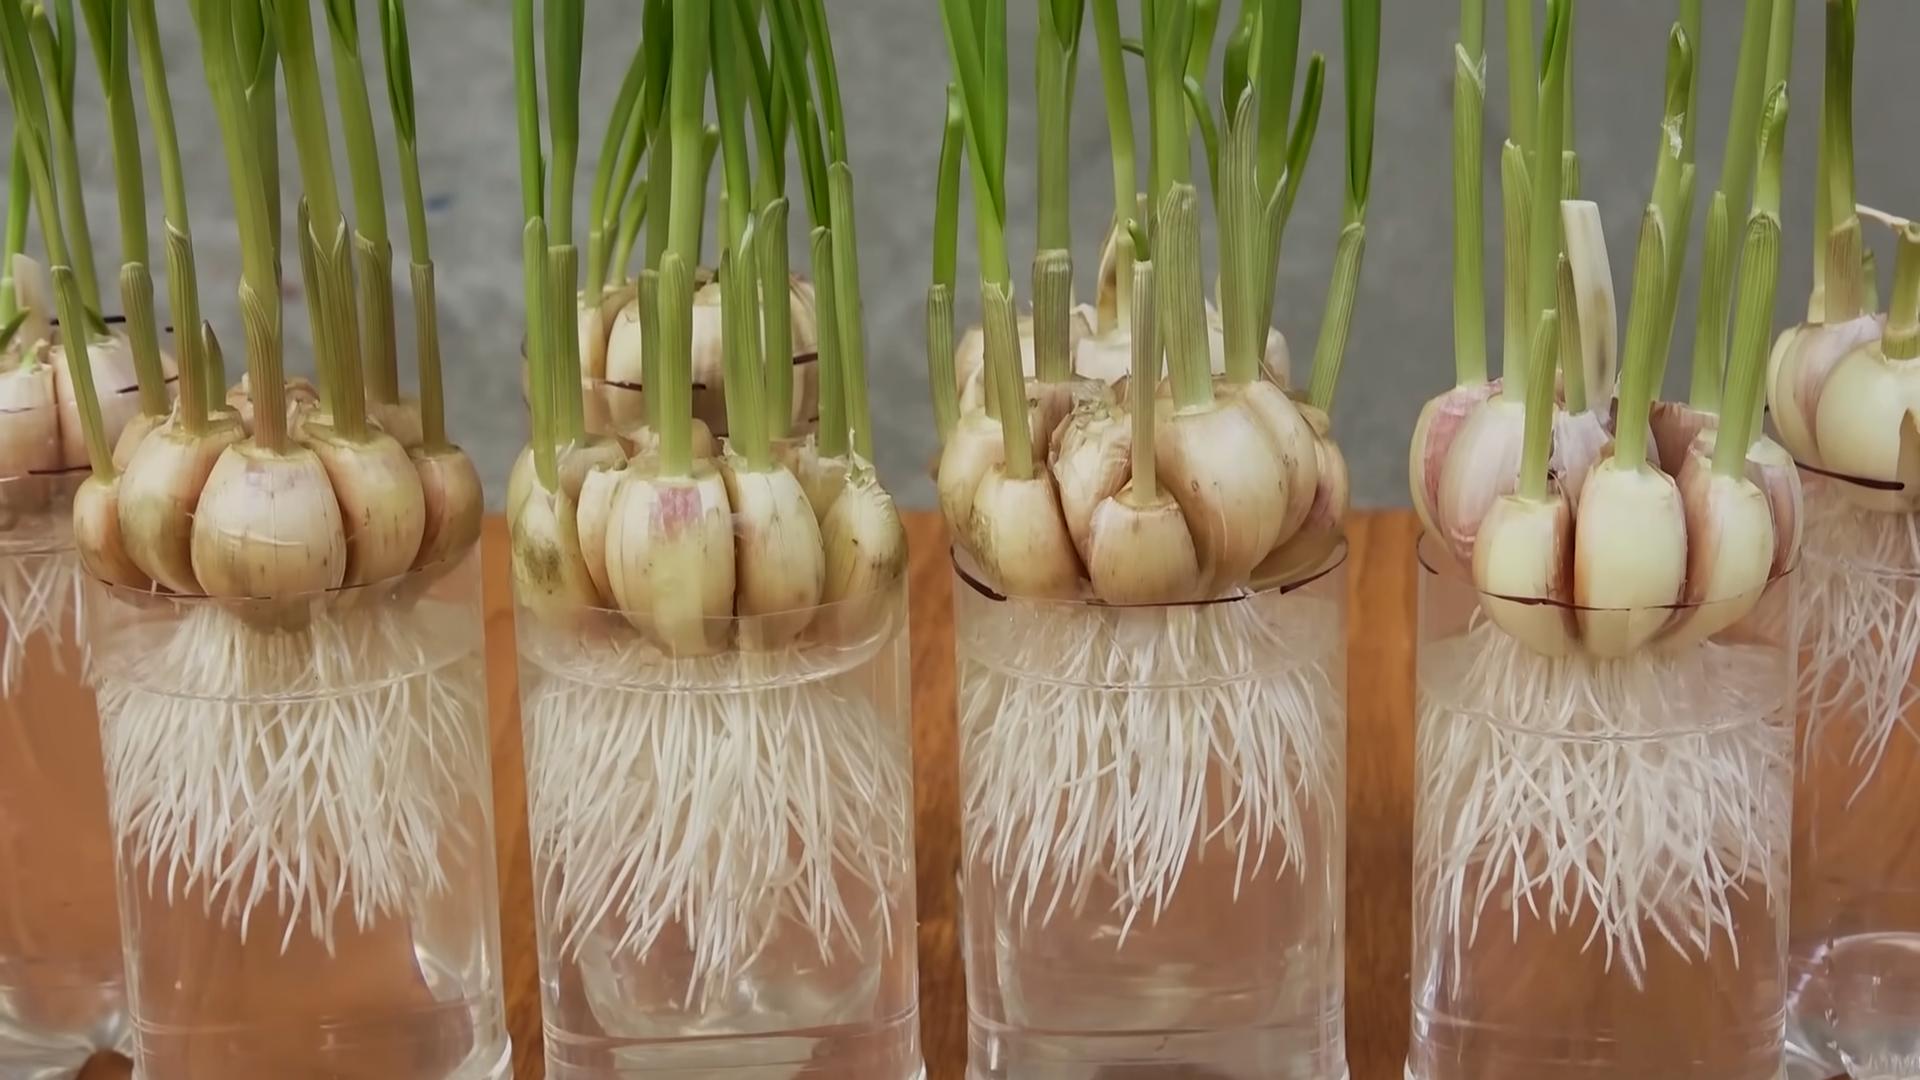
Grow Garlic in Plastic Bottles? Absolutely! Who knew transforming discarded plastic could unlock a bountiful harvest of pungent, flavorful garlic right on your windowsill? For centuries, garlic has been a culinary cornerstone and a medicinal marvel, revered across cultures from ancient Egypt to modern-day kitchens. But let’s face it, traditional gardening can be intimidating, especially if you’re short on space or time.
That’s where this ingenious DIY trick comes in. Imagine bypassing the need for a sprawling garden bed and instead, cultivating your own garlic cloves in repurposed plastic bottles. It’s not just eco-friendly; it’s incredibly practical! I’m going to show you how to grow garlic in plastic bottles, offering a simple, space-saving solution for anyone craving fresh, homegrown garlic. Whether you’re a seasoned gardener or a complete beginner, this method is surprisingly easy and rewarding. Get ready to turn trash into treasure and enjoy the satisfaction of harvesting your own delicious garlic, all thanks to a little DIY ingenuity!
Grow Garlic Indoors: A Simple DIY Bottle Garden
Hey there, fellow gardening enthusiasts! Ever thought about growing your own garlic indoors? It’s easier than you think, and you don’t need a fancy garden or a ton of space. All you need are some plastic bottles, soil, and of course, garlic! I’m going to walk you through how to create your own mini garlic garden using recycled plastic bottles. It’s a fun, eco-friendly project that will reward you with fresh garlic greens and eventually, maybe even some bulbs!
What You’ll Need
Before we dive in, let’s gather our supplies. This is a pretty low-cost project, which is always a bonus!
* Plastic Bottles: I recommend using 2-liter soda bottles or similar sizes. The number of bottles depends on how much garlic you want to grow. I usually start with 3-4 bottles. Make sure they are clean!
* Garlic Cloves: Choose organic garlic if possible. You can use garlic from the grocery store, but organic is less likely to be treated with chemicals that might inhibit growth. Look for firm, healthy cloves.
* Potting Soil: A good quality potting mix is essential for healthy growth. Avoid using garden soil, as it can be too dense and may contain pests or diseases.
* Scissors or a Utility Knife: For cutting the plastic bottles. Be careful!
* Drill or Nail: To create drainage holes.
* Watering Can or Spray Bottle: For watering your garlic.
* Optional: Pebbles or gravel for drainage.
* Optional: Labels and a marker to identify your garlic varieties.
Preparing the Bottles
This is where we transform those plastic bottles into mini-planters. It’s a simple process, but take your time and be careful when using sharp tools.
1. Clean the Bottles: Thoroughly wash the plastic bottles with soap and water to remove any residue. Rinse them well and let them dry completely. This helps prevent mold and bacteria growth.
2. Cut the Bottles: There are a couple of ways to do this, depending on the look you’re going for.
* Method 1: Horizontal Cut: Cut the bottle horizontally about 2/3 of the way up from the bottom. This creates a larger planting area. You can discard the top part, or you can invert it and use it as a funnel when watering.
* Method 2: Vertical Cut (Hanging Planter): Cut the bottle vertically, starting from the top and stopping a few inches from the bottom. Repeat this on the opposite side. Then, carefully bend the plastic outwards to create a wider opening. This method is great for hanging planters. You’ll need to punch holes near the top to thread string or wire through for hanging.
I usually go with the horizontal cut because it’s easier and provides more space for the garlic to grow.
3. Create Drainage Holes: This is crucial! Garlic doesn’t like soggy soil. Use a drill or a nail to create several drainage holes in the bottom of each bottle. If you’re using a nail, heat it up slightly with a lighter (carefully!) to make it easier to puncture the plastic.
4. Add Drainage Layer (Optional): To further improve drainage, you can add a layer of pebbles or gravel to the bottom of each bottle before adding the soil. This helps prevent the roots from sitting in water.
Planting the Garlic
Now for the fun part – planting the garlic! This is where you get to connect with nature and start the growing process.
1. Prepare the Garlic Cloves: Gently separate the garlic bulb into individual cloves. Leave the papery skin on each clove intact. This protects the clove and helps prevent it from drying out.
2. Fill the Bottles with Soil: Fill each bottle with potting soil, leaving about an inch of space at the top. Gently pat down the soil to remove any air pockets.
3. Plant the Cloves: Plant the garlic cloves pointy-side up, about 2-3 inches deep and 3-4 inches apart. This spacing allows the garlic to grow without being overcrowded.
4. Water Thoroughly: After planting, water the soil thoroughly until water drains out of the drainage holes. This helps settle the soil and encourages the garlic to start growing.
Caring for Your Garlic
Now that your garlic is planted, it’s important to provide the right care to ensure healthy growth.
1. Location: Place your bottle garden in a sunny location. Garlic needs at least 6 hours of sunlight per day. A south-facing window is ideal. If you don’t have enough natural light, you can supplement with a grow light.
2. Watering: Water your garlic regularly, but don’t overwater. The soil should be moist but not soggy. Check the soil moisture by sticking your finger into the soil. If the top inch feels dry, it’s time to water.
3. Fertilizing: Feed your garlic with a balanced liquid fertilizer every 2-3 weeks. Follow the instructions on the fertilizer packaging. This provides the garlic with the nutrients it needs to grow strong and healthy.
4. Pest Control: Keep an eye out for pests such as aphids or spider mites. If you notice any pests, you can try spraying them with a solution of soapy water. You can also purchase organic pest control products.
5. Harvesting Garlic Greens: You can start harvesting garlic greens (the shoots that grow from the cloves) in about 2-3 weeks. Simply snip off the greens with scissors. This won’t harm the garlic bulb and will actually encourage it to grow larger. The greens have a mild garlic flavor and can be used in salads, soups, and other dishes.
Harvesting Garlic Bulbs (Eventually!)
While you can primarily grow garlic for its greens indoors, you might eventually get some small bulbs. It takes longer indoors and the bulbs won’t be as large as those grown outdoors, but it’s still a rewarding experience.
1. When to Harvest: Garlic bulbs are typically ready to harvest when the leaves start to turn yellow and brown. This usually takes about 8-9 months.
2. How to Harvest: Gently dig around the base of the plant and lift the bulb out of the soil. Be careful not to damage the bulb.
3. Curing the Garlic: After harvesting, cure the garlic bulbs by hanging them in a cool, dry, and well-ventilated place for 2-3 weeks. This allows the bulbs to dry out and develop a stronger flavor.
Troubleshooting
Even with the best care, you might encounter some problems. Here are a few common issues and how to address them:
* Yellowing Leaves: This could be a sign of overwatering, underwatering, or nutrient deficiency. Check the soil moisture and adjust your watering schedule accordingly. If the soil is dry, water more frequently. If the soil is soggy, water less frequently. You can also try fertilizing your garlic with a balanced liquid fertilizer.
* Slow Growth: This could be due to insufficient sunlight or poor soil. Make sure your garlic is getting at least 6 hours of sunlight per day. You can also try transplanting your garlic into a larger container with fresh potting soil.
* Pests: As mentioned earlier, keep an eye out for pests such as aphids or spider mites. Spray them with a solution of soapy water or use organic pest control products.
Tips and Tricks
Here are a few extra tips to help you succeed with your indoor garlic garden:
* Rotate Your Bottles: To ensure even growth, rotate your bottles regularly so that all sides get equal exposure to sunlight.
* Use Different Varieties of Garlic: Experiment with different varieties of garlic to see which ones grow best indoors.
* Start with Healthy Cloves: Choose firm, healthy cloves that are free from blemishes or signs of disease.
* Don’t Overcrowd: Give your garlic enough space to grow by planting the cloves 3-4 inches apart.
* Be Patient: Growing garlic takes time and patience. Don’t get discouraged if you don’t see results immediately. Just keep providing the right care, and you’ll eventually be rewarded with fresh garlic greens and maybe even some bulbs!
I hope this guide has inspired you to try growing your own garlic indoors. It’s a fun, rewarding, and eco-friendly project that anyone can do. Happy gardening!
Conclusion
So, there you have it! Growing garlic in plastic bottles is not just a quirky gardening experiment; it’s a genuinely effective and rewarding way to cultivate your own fresh, flavorful garlic, even if you’re short on space or gardening experience. This method transforms discarded plastic bottles into miniature garlic farms, offering a sustainable and cost-effective alternative to traditional gardening.
Why is this DIY trick a must-try? Because it democratizes garlic cultivation. You don’t need a sprawling garden or specialized equipment. All you need are some plastic bottles, soil, water, and a few garlic cloves. It’s incredibly space-efficient, making it perfect for apartment dwellers, balcony gardeners, or anyone looking to maximize their yield in a limited area. Plus, it’s a fantastic way to recycle and reduce your environmental footprint. Imagine the satisfaction of harvesting plump, juicy garlic cloves that you nurtured from start to finish, all within the confines of a repurposed plastic bottle.
But the benefits extend beyond convenience and sustainability. Growing your own garlic allows you to control the entire process, ensuring that your garlic is free from harmful pesticides and herbicides. You’ll know exactly what went into your garlic, guaranteeing a healthier and more flavorful product. The taste difference between store-bought garlic and homegrown garlic is truly remarkable. Homegrown garlic boasts a richer, more complex flavor profile that will elevate your culinary creations to new heights.
Ready to take your garlic game to the next level?
Here are a few suggestions and variations to consider:
* Variety is the Spice of Life: Experiment with different garlic varieties to discover your favorite flavors. From the mild and sweet Artichoke garlic to the pungent and robust Rocambole garlic, there’s a variety to suit every palate.
* Vertical Gardening: Create a vertical garlic garden by stacking multiple plastic bottle planters on top of each other. This is an excellent way to maximize space and add a touch of greenery to your balcony or patio.
* Companion Planting: Consider planting companion herbs like chamomile or dill alongside your garlic. These herbs can help deter pests and improve the overall health of your garlic plants.
* Watering Wisely: Monitor the moisture levels in your plastic bottle planters carefully. Avoid overwatering, which can lead to root rot. Allow the soil to dry out slightly between waterings.
* Fertilizing for Success: Supplement your garlic plants with a balanced organic fertilizer every few weeks to promote healthy growth and abundant bulb development.
Don’t be intimidated by the prospect of growing your own garlic. This DIY method is surprisingly simple and straightforward. With a little patience and attention, you’ll be harvesting your own delicious garlic in no time.
We wholeheartedly encourage you to try this DIY trick and experience the joy of growing your own garlic in plastic bottles. It’s a rewarding and sustainable way to add fresh, flavorful garlic to your meals.
And most importantly, we want to hear about your experiences! Share your photos, tips, and stories with us in the comments below. Let us know what worked for you, what challenges you encountered, and what delicious dishes you created with your homegrown garlic. Together, we can inspire others to embrace the joys of DIY gardening and cultivate a more sustainable and flavorful future. Let’s get growing!
Frequently Asked Questions (FAQ)
What kind of plastic bottles are best for growing garlic?
Ideally, you should use sturdy, food-grade plastic bottles. Two-liter soda bottles or larger water bottles work well. Make sure the bottles are clean and free of any residue before using them. Avoid using bottles that have contained harsh chemicals, as these could contaminate the soil and affect the garlic. Clear or translucent bottles are preferable as they allow you to monitor the soil moisture levels.
How many garlic cloves can I plant in one plastic bottle?
The number of cloves you can plant depends on the size of the bottle. For a standard two-liter bottle, you can typically plant 3-4 cloves, spacing them evenly around the bottle. Ensure that each clove has enough room to develop without overcrowding. Overcrowding can lead to smaller bulbs and increased risk of disease.
What type of soil should I use for growing garlic in plastic bottles?
Use a well-draining potting mix that is rich in organic matter. A mix of compost, peat moss, and perlite is ideal. Avoid using garden soil, as it can be too heavy and compact, hindering drainage and root development. Good drainage is crucial for preventing root rot, a common problem with garlic.
How often should I water my garlic plants in plastic bottles?
Water your garlic plants when the top inch of soil feels dry to the touch. Avoid overwatering, as this can lead to root rot. The frequency of watering will depend on the climate and the drainage of your potting mix. In hotter weather, you may need to water more frequently. Ensure that the bottles have drainage holes to allow excess water to escape.
How much sunlight do garlic plants need when grown in plastic bottles?
Garlic plants need at least 6-8 hours of direct sunlight per day to thrive. Place your plastic bottle planters in a sunny location, such as a south-facing balcony or windowsill. If you don’t have enough natural sunlight, you can supplement with grow lights. Insufficient sunlight can result in weak growth and smaller bulbs.
When is the best time to plant garlic in plastic bottles?
The best time to plant garlic is in the fall, about 4-6 weeks before the first expected frost. This allows the garlic cloves to establish roots before winter. In warmer climates, you can plant garlic in late winter or early spring. The key is to provide a period of cold dormancy for the cloves to develop properly.
How long does it take to grow garlic in plastic bottles?
Garlic typically takes 6-9 months to mature, depending on the variety and growing conditions. You’ll know your garlic is ready to harvest when the leaves start to turn yellow and brown. At this point, the bulbs will be fully developed and ready to be enjoyed.
Can I grow garlic indoors in plastic bottles?
Yes, you can grow garlic indoors in plastic bottles, but you’ll need to provide adequate light. Place the bottles near a sunny window or use grow lights to supplement the natural light. Indoor-grown garlic may not produce bulbs as large as those grown outdoors, but you can still harvest the green shoots for a mild garlic flavor.
How do I harvest garlic grown in plastic bottles?
When the leaves start to turn yellow and brown, gently tip the plastic bottle and carefully remove the garlic bulb from the soil. Avoid pulling on the leaves, as this can damage the bulb. Brush off any excess soil and allow the bulbs to cure in a cool, dry place for a few weeks before storing.
How do I store garlic that I’ve grown in plastic bottles?
After curing, store your garlic in a cool, dry, and well-ventilated place. You can braid the leaves together and hang the garlic bulbs, or you can store them in a mesh bag or basket. Avoid storing garlic in the refrigerator, as this can cause it to sprout or become moldy. Properly stored garlic can last for several months.
What are some common problems when growing garlic in plastic bottles and how can I fix them?
Some common problems include root rot (caused by overwatering), pests (such as aphids or mites), and nutrient deficiencies. To prevent root rot, ensure good drainage and avoid overwatering. To control pests, use organic insecticides or insecticidal soap. To address nutrient deficiencies, supplement with a balanced organic fertilizer. Regularly inspect your plants for signs of problems and address them promptly.
Can I reuse the plastic bottles for growing garlic again?
Yes, you can reuse the plastic bottles for growing garlic again, but it’s important to clean them thoroughly before replanting. Wash the bottles with soap and water to remove any soil or debris. You can also disinfect them with a diluted bleach solution to kill any pathogens. Reusing plastic bottles is a sustainable way to reduce waste and continue enjoying your DIY garlic garden.

Leave a Comment