

Grow Mint at Home and unlock a world of fresh flavor and fragrant possibilities right outside your door! Have you ever dreamt of effortlessly snipping sprigs of vibrant mint for your mojitos, teas, or culinary creations? Well, dream no more! This isn’t just about planting a herb; it’s about embracing a centuries-old tradition. Mint, revered for its medicinal and aromatic properties, has been cultivated since ancient times, gracing gardens from the Mediterranean to Asia.
But let’s be honest, sometimes growing mint can feel like a battle against an unstoppable green force. It’s notorious for its enthusiastic spreading, often taking over entire garden beds if left unchecked. That’s where our DIY tricks and hacks come in!
I’m going to share some simple, yet effective, methods to grow mint at home, keeping it contained and thriving. Whether you’re a seasoned gardener or a complete beginner, these tips will empower you to enjoy a bountiful harvest of this versatile herb without the worry of it becoming a garden invader. Get ready to transform your space into a minty paradise!

Grow Mint at Home: A Beginner’s Guide to a Thriving Herb Garden
Hey there, fellow plant enthusiasts! Ever dreamt of having fresh, fragrant mint readily available for your mojitos, teas, or culinary creations? Well, you’ve come to the right place! Growing mint at home is surprisingly easy, even if you don’t have a green thumb. I’m going to walk you through everything you need to know to cultivate your own mint patch, from choosing the right variety to harvesting your bounty. Let’s get started!
Choosing Your Mint Variety
First things first, let’s talk about the different types of mint. There’s a whole world of mint flavors out there, and picking the right one is crucial for your enjoyment. Here are a few popular options:
* Peppermint: This is your classic mint flavor, perfect for teas and desserts. It has a strong, refreshing taste.
* Spearmint: A milder, sweeter mint often used in chewing gum and sauces. It’s also great for making mint jelly.
* Chocolate Mint: As the name suggests, this variety has a hint of chocolate flavor. It’s delicious in desserts and drinks.
* Apple Mint: A fruity, slightly sweet mint that’s wonderful in salads and fruit salads.
* Orange Mint: This mint has a citrusy aroma and flavor, making it a great addition to cocktails and teas.
I recommend starting with peppermint or spearmint, as they are generally the easiest to grow. Once you’ve mastered those, you can branch out and experiment with other varieties.
Gathering Your Supplies
Before we dive into the planting process, let’s make sure you have everything you need. Here’s a checklist:
* Mint Seeds or Cuttings: You can start mint from seeds, but it’s often easier and faster to use cuttings from an existing plant. You can usually find these at your local nursery or even from a friend who grows mint.
* Pot or Container: Mint is notorious for spreading, so I highly recommend growing it in a container to keep it under control. Choose a pot that’s at least 6 inches in diameter and has drainage holes.
* Potting Soil: Use a good-quality potting mix that’s well-draining. Avoid using garden soil, as it can be too heavy and compact.
* Watering Can or Hose: You’ll need a way to water your mint regularly.
* Optional: Fertilizer: While not essential, a balanced liquid fertilizer can help your mint grow stronger and healthier.
Planting Your Mint
Now for the fun part! Let’s get your mint planted and on its way to thriving.
Planting from Seeds
1. Prepare the Pot: Fill your pot with potting mix, leaving about an inch of space at the top.
2. Sow the Seeds: Sprinkle the mint seeds evenly over the surface of the soil. They are very small, so don’t overdo it.
3. Cover the Seeds: Lightly cover the seeds with a thin layer of potting mix.
4. Water Gently: Water the soil gently using a spray bottle or watering can with a rose attachment. You want to moisten the soil without disturbing the seeds.
5. Provide Light: Place the pot in a bright, sunny location. Mint needs at least 6 hours of sunlight per day.
6. Keep Moist: Keep the soil consistently moist, but not soggy. Water when the top inch of soil feels dry to the touch.
7. Wait for Germination: Mint seeds typically germinate in 10-14 days. Be patient!
Planting from Cuttings
This is my preferred method, as it’s much faster and more reliable.
1. Prepare the Cutting: Take a cutting from a healthy mint plant that’s about 4-6 inches long. Remove the leaves from the bottom inch of the stem.
2. Rooting in Water (Optional): You can root the cutting in water before planting it in soil. Place the cutting in a glass of water, making sure the leaves are above the water line. Change the water every few days. Roots should start to appear in about a week or two.
3. Prepare the Pot: Fill your pot with potting mix, leaving about an inch of space at the top.
4. Plant the Cutting: Make a small hole in the soil and gently insert the cutting. If you rooted the cutting in water, be careful not to damage the roots.
5. Water Gently: Water the soil gently to settle it around the cutting.
6. Provide Light: Place the pot in a bright, sunny location.
7. Keep Moist: Keep the soil consistently moist, but not soggy. Water when the top inch of soil feels dry to the touch.
Caring for Your Mint Plant
Once your mint is planted, it’s important to provide it with the right care to ensure it thrives.
* Watering: Mint likes consistently moist soil, but it doesn’t like to be waterlogged. Water when the top inch of soil feels dry to the touch. In hot weather, you may need to water it more frequently.
* Sunlight: Mint needs at least 6 hours of sunlight per day. If you’re growing it indoors, place it near a sunny window.
* Fertilizing: You can fertilize your mint every few weeks with a balanced liquid fertilizer. Follow the instructions on the fertilizer label.
* Pruning: Regular pruning is essential for keeping your mint plant healthy and productive. Pinch off the top leaves to encourage bushier growth. You can also remove any dead or yellowing leaves.
* Pest Control: Mint is generally pest-resistant, but it can occasionally be affected by aphids or spider mites. If you notice any pests, you can spray your plant with insecticidal soap.
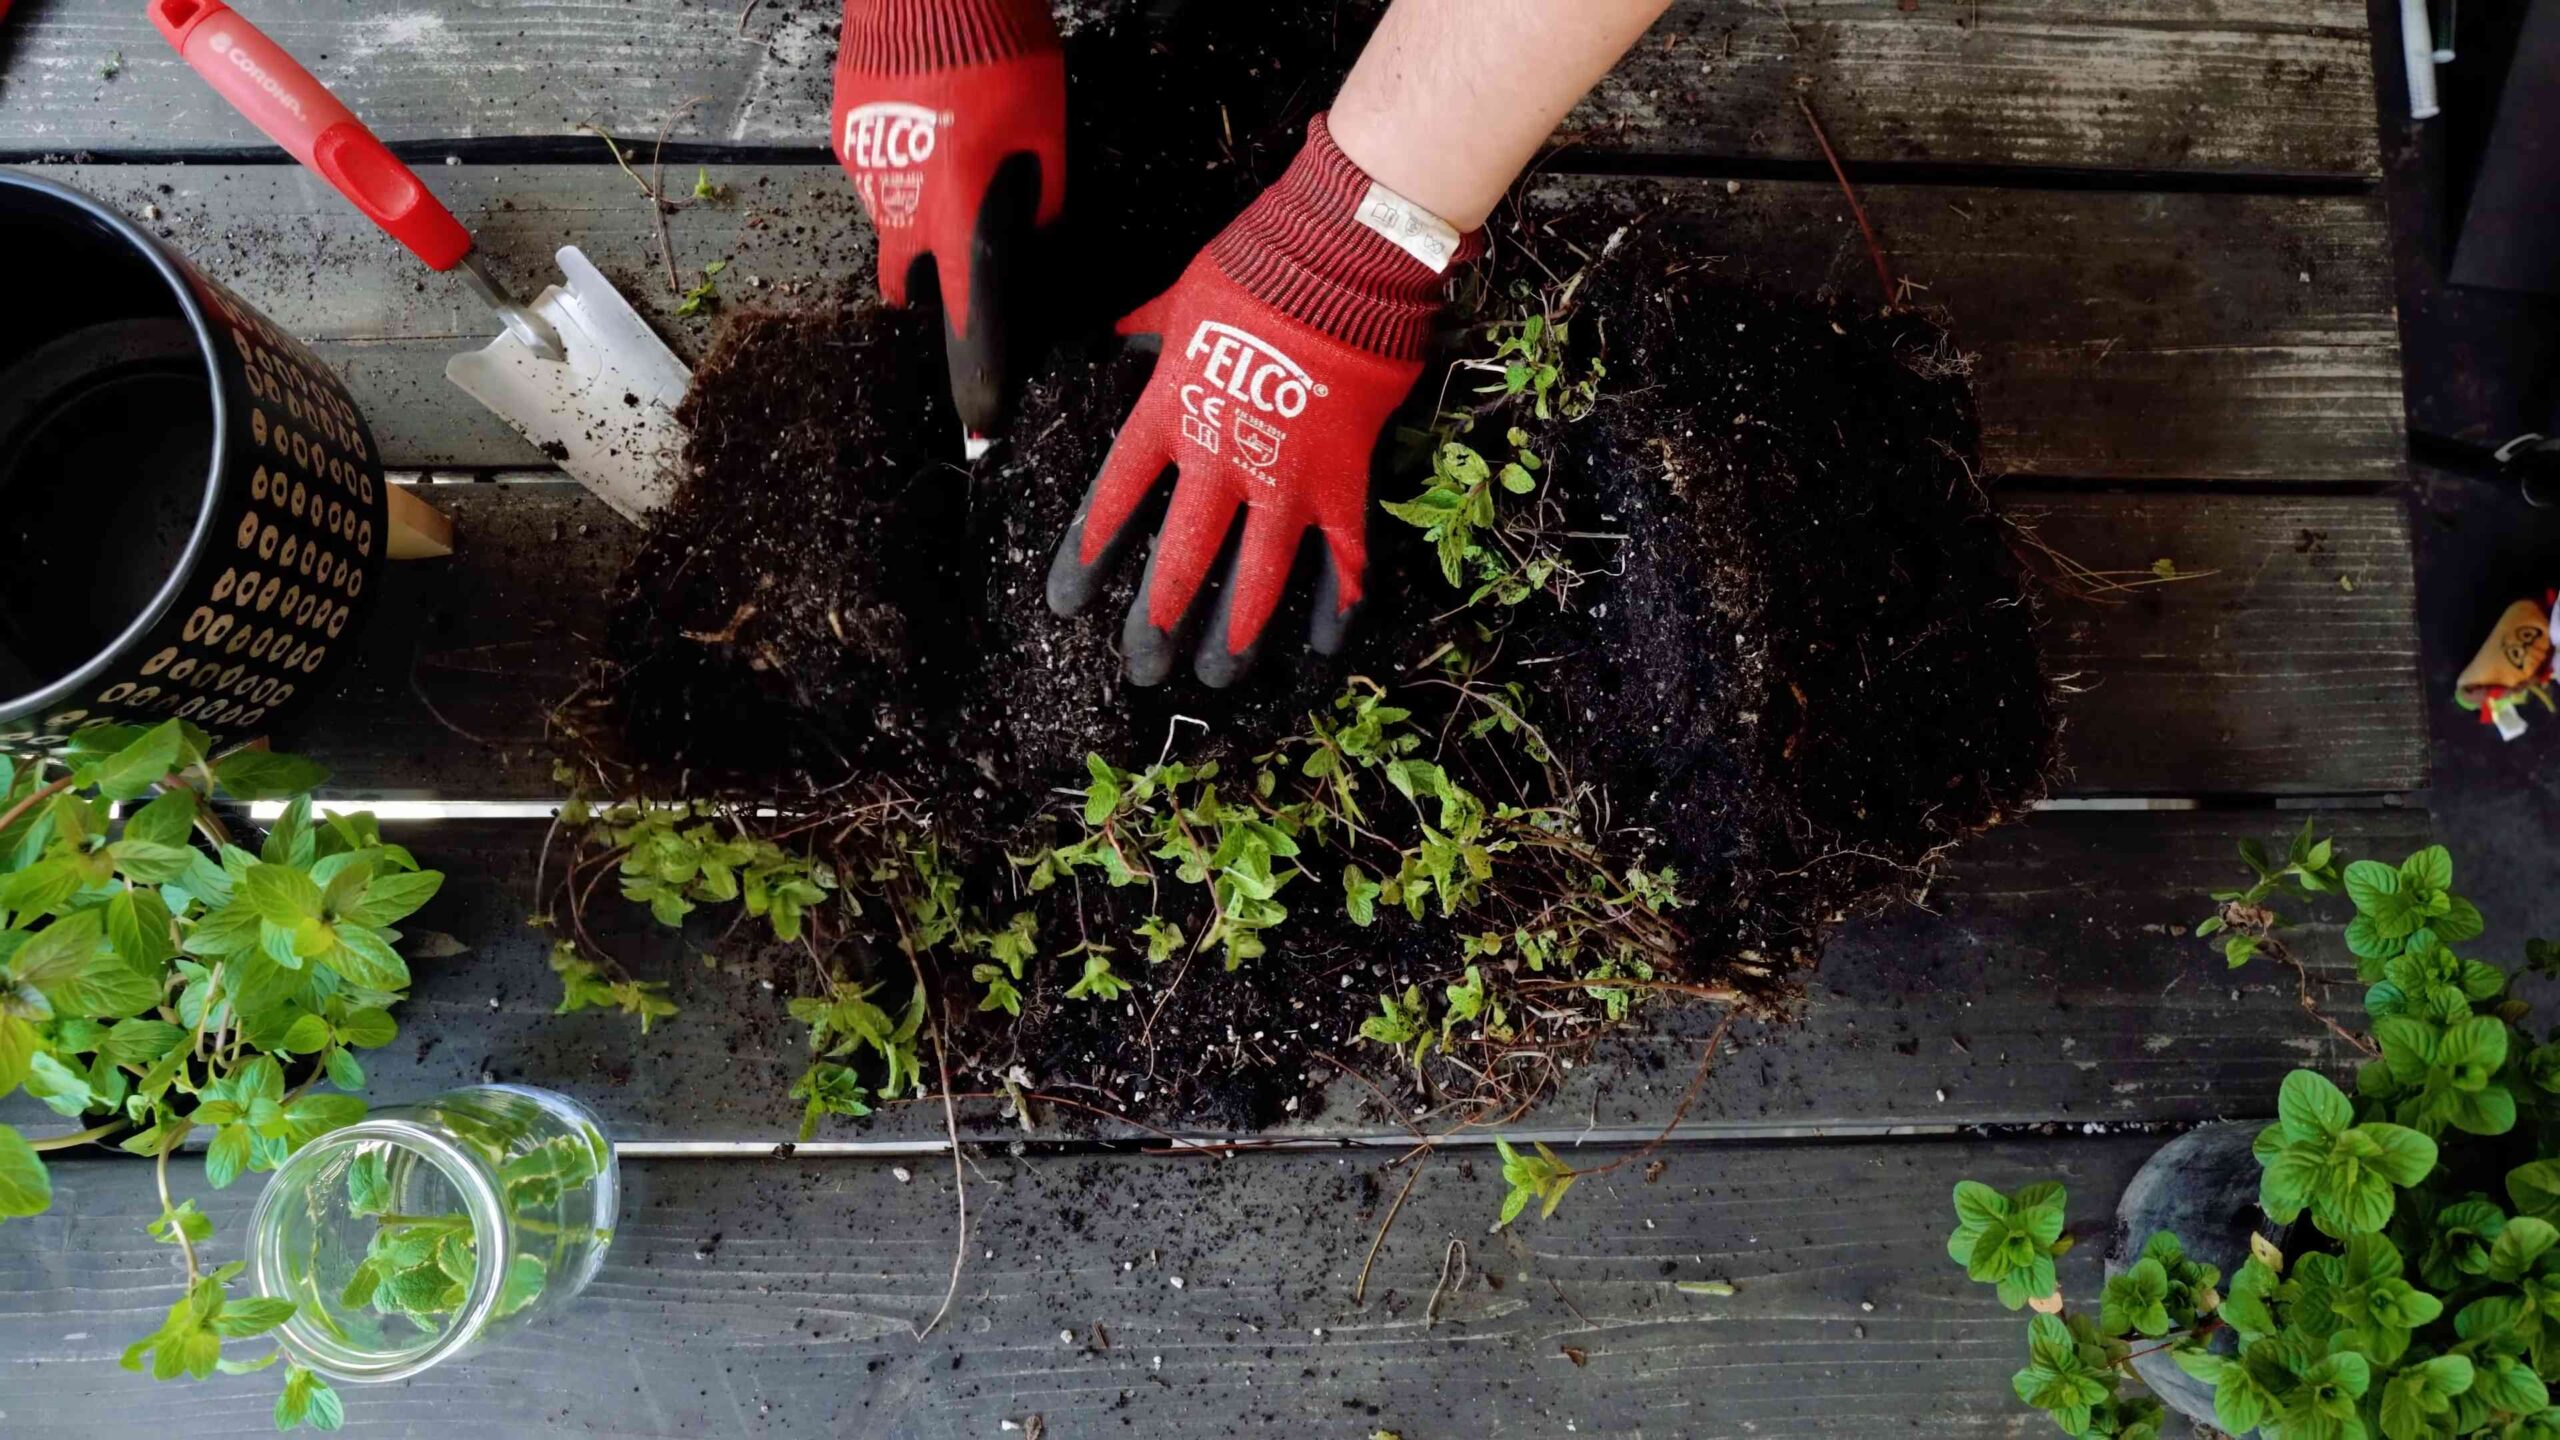
* Controlling Spread: As I mentioned earlier, mint is a vigorous grower and can quickly spread if left unchecked. If you’re growing it in a container, this isn’t a problem. However, if you’re growing it in the ground, you’ll need to take steps to contain it. You can do this by planting it in a sunken container or by installing a barrier around the planting area.
Harvesting Your Mint
Now for the best part – harvesting your fresh mint!
* When to Harvest: You can start harvesting mint as soon as the plant is a few inches tall. The best time to harvest is in the morning, after the dew has dried.
* How to Harvest: Use scissors or pruning shears to cut off the stems just above a leaf node. This will encourage the plant to produce new growth.
* How Much to Harvest: You can harvest up to one-third of the plant at a time without harming it.
* Using Your Mint: Fresh mint is best used immediately. You can add it to teas, cocktails, salads, desserts, and sauces.
* Storing Your Mint: If you can’t use your mint right away, you can store it in the refrigerator. Wrap the stems in a damp paper towel and place them in a plastic bag. Mint will typically last for about a week in the refrigerator. You can also dry mint for longer storage. To dry mint, hang the stems upside down in a cool, dry place until they are completely dry. Then, crumble the leaves and store them in an airtight container.
Troubleshooting Common Mint Problems
Even with the best care, you might encounter a few problems along the way. Here are some common issues and how to fix them:
* Yellowing Leaves: This can be caused by overwatering, underwatering, or nutrient deficiencies. Make sure you’re watering your mint properly and fertilizing it regularly.
* Leggy Growth: This is usually caused by insufficient sunlight. Move your mint to a brighter location.
* Pests: As mentioned earlier, mint can occasionally be affected by aphids or spider mites. Spray your plant with insecticidal soap.
* Root Rot: This is caused by overwatering and poor drainage. Make sure your pot has drainage holes and that you’re not overwatering your mint.
Propagating Your Mint
Once you have a thriving mint plant, you can easily propagate it to create more plants. This is a great way to expand your herb garden or share your mint with friends and family.
* Division: This is the easiest way to propagate mint. Simply dig up the plant and divide the root ball into several smaller clumps. Replant the clumps in separate pots.
* Cuttings: As described earlier, you can also propagate mint from cuttings.
* Layering: This is a simple method that involves bending a stem down to the ground and covering it with soil. The stem will eventually root, and you can then cut it from the parent plant.
Enjoying Your Homegrown Mint
Growing mint at home is a rewarding experience that allows
Conclusion
So, there you have it! Growing mint at home isn’t just a gardening project; it’s an investment in fresh flavor, aromatic bliss, and a touch of green therapy. We’ve walked you through the simple steps, debunked common myths, and armed you with the knowledge to cultivate your own thriving mint patch, whether you have a sprawling garden or a sunny windowsill.
Why is this DIY trick a must-try? Because store-bought mint, while convenient, often lacks the vibrant intensity and freshness of homegrown. Plus, think of the satisfaction of snipping off sprigs of your own mint to add to your mojitos, teas, salads, or desserts. It’s a small act of self-sufficiency that connects you to the natural world and elevates your culinary creations. And let’s not forget the cost savings! A single pot of mint from the store can cost as much as the supplies you need to start your own endless supply.
But the benefits extend beyond the culinary. Mint is a natural insect repellent, keeping pesky bugs away from your other plants. Its invigorating aroma can also boost your mood and reduce stress. Growing mint at home is a holistic experience that nourishes your body, mind, and soul.
Ready to take your mint game to the next level? Consider these variations:
* **Chocolate Mint:** For a decadent twist, try growing chocolate mint. Its leaves have a subtle chocolatey aroma and flavor, perfect for desserts and hot chocolate.
* **Spearmint vs. Peppermint:** Experiment with different varieties of mint to discover your favorite flavor profile. Spearmint is milder and sweeter, while peppermint has a sharper, more intense flavor.
* **Mint Tea Blend:** Create your own custom mint tea blend by combining different types of mint with other herbs like lemon balm or chamomile.
* **Vertical Gardening:** If you’re short on space, try growing mint in a vertical garden. This is a great way to maximize your growing area and add a touch of greenery to your balcony or patio.
* Hydroponic Mint: For the tech-savvy gardener, consider growing mint hydroponically. This method allows you to grow mint indoors year-round without soil.
Don’t be afraid to experiment and find what works best for you. The beauty of growing mint at home is that it’s a forgiving and rewarding process. Even if you make mistakes along the way, you’ll learn valuable lessons and end up with a delicious and versatile herb that you can enjoy for years to come.
We’re confident that you’ll love the experience of growing mint at home. It’s a simple, rewarding, and delicious way to connect with nature and elevate your culinary creations. So, grab your pots, soil, and mint cuttings, and get ready to embark on a green adventure!
We encourage you to try this DIY trick and share your experience with us. What varieties of mint are you growing? What are your favorite ways to use your homegrown mint? Share your tips, tricks, and photos in the comments below. We can’t wait to see what you create! Let’s cultivate a community of mint enthusiasts and spread the joy of homegrown flavor. Remember, the best mint is the mint you grow yourself!
Frequently Asked Questions (FAQ)
Why is my mint plant turning yellow?
Yellowing leaves on your mint plant can indicate several issues. Overwatering is a common culprit, as mint prefers well-drained soil. Ensure your pot has drainage holes and allow the soil to dry out slightly between waterings. Nutrient deficiencies can also cause yellowing. Try fertilizing your mint with a balanced liquid fertilizer diluted to half strength. Finally, check for pests like spider mites or aphids, which can suck the sap from the leaves and cause them to yellow. Treat any infestations with insecticidal soap or neem oil.
How often should I water my mint plant?
The frequency of watering depends on several factors, including the size of your pot, the type of soil, and the climate. As a general rule, water your mint plant when the top inch of soil feels dry to the touch. Avoid overwatering, as this can lead to root rot. In hot, dry weather, you may need to water your mint plant more frequently. In cooler, wetter weather, you may need to water it less often. A good way to check is to stick your finger into the soil to feel the moisture level.
My mint plant is growing leggy and sparse. What can I do?
Leggy and sparse growth is often a sign that your mint plant isn’t getting enough sunlight. Mint thrives in full sun, but it can tolerate partial shade. If your mint plant is growing indoors, make sure it’s placed near a sunny window. You can also supplement with artificial light if needed. Pruning your mint plant regularly can also encourage bushier growth. Simply pinch off the tips of the stems to promote branching.
How do I prevent mint from spreading aggressively in my garden?
Mint is notorious for its aggressive spreading habits. To prevent it from taking over your garden, it’s best to grow it in a container. You can also plant it in a raised bed or surround it with a barrier that extends at least 12 inches into the ground. Regularly prune your mint plant to keep it under control. If you notice any runners escaping from the container or barrier, remove them immediately.
Can I grow mint indoors year-round?
Yes, you can absolutely grow mint indoors year-round. Provide your mint plant with plenty of sunlight, well-drained soil, and regular watering. You may also need to supplement with artificial light during the winter months. Keep your mint plant away from drafts and extreme temperatures. With proper care, you can enjoy fresh mint all year long.
What are the best uses for homegrown mint?
The possibilities are endless! Fresh mint can be used in a variety of culinary applications, including teas, cocktails, salads, desserts, and sauces. It can also be used to make mint jelly, mint syrup, and mint-infused oils. Beyond the kitchen, mint can be used to make potpourri, bath products, and natural insect repellents. The refreshing aroma of mint can also help to boost your mood and reduce stress.
How do I harvest mint leaves?
Harvest mint leaves by snipping off the stems just above a leaf node. This will encourage the plant to branch out and produce more leaves. You can harvest mint leaves throughout the growing season. For the best flavor, harvest mint leaves in the morning after the dew has dried.
How do I store fresh mint leaves?
There are several ways to store fresh mint leaves. You can wrap them in a damp paper towel and store them in a plastic bag in the refrigerator. This will keep them fresh for up to a week. You can also freeze mint leaves by placing them in ice cube trays filled with water. Once frozen, transfer the mint ice cubes to a freezer bag. Alternatively, you can dry mint leaves by hanging them upside down in a cool, dry place. Once dried, store the mint leaves in an airtight container.
What kind of soil is best for growing mint?
Mint prefers well-drained soil that is rich in organic matter. A good potting mix for mint should contain a blend of peat moss, perlite, and vermiculite. You can also amend your soil with compost or other organic matter to improve its drainage and fertility. The ideal pH for mint is between 6.0 and 7.0.
Is mint safe for pets?
While mint is generally considered safe for pets in small quantities, it’s important to note that some varieties of mint, such as pennyroyal, can be toxic to animals. If you have pets, it’s best to keep your mint plants out of their reach. If you suspect that your pet has ingested a large amount of mint, contact your veterinarian immediately.


Leave a Comment