

Grow Pea Shoots Indoors: Craving fresh, vibrant greens but don’t have a sprawling garden or the patience for a long growing season? I get it! That’s where the magic of growing pea shoots indoors comes in. For centuries, cultures around the world have recognized the nutritional power and delicious flavor of young pea plants. From ancient Chinese medicine to modern culinary trends, pea shoots have consistently been valued for their health benefits and versatility.
But let’s be honest, sometimes life gets in the way of our gardening dreams. That’s why I’m so excited to share these simple, effective DIY tricks that will allow you to grow pea shoots indoors, regardless of your space or experience level. Imagine having a constant supply of tender, sweet pea shoots right at your fingertips, ready to add a burst of freshness to your salads, stir-fries, or even just as a healthy snack.
This isn’t just about convenience; it’s about taking control of your food source and enjoying the satisfaction of nurturing something from seed to table. Plus, it’s a fantastic way to add a touch of green to your home, especially during those dreary winter months. So, ditch the expensive grocery store greens and let’s dive into the wonderful world of indoor pea shoot cultivation! I’m going to show you how easy and rewarding it can be.
Grow Your Own Delicious Pea Shoots Indoors: A Beginner’s Guide
Hey there, fellow plant enthusiasts! Are you craving fresh, vibrant greens but don’t have a garden or the patience to wait for a full pea plant to mature? Well, I’ve got the perfect solution for you: growing pea shoots indoors! It’s incredibly easy, rewarding, and you’ll have a constant supply of these nutritious and tasty microgreens right at your fingertips. Trust me, once you start, you’ll be hooked!
What are Pea Shoots Anyway?
Pea shoots, also known as pea tendrils, are the young, tender leaves and stems of pea plants. They have a delicate, slightly sweet, and subtly pea-like flavor that’s absolutely delicious in salads, stir-fries, sandwiches, or even as a garnish. Plus, they’re packed with vitamins, minerals, and antioxidants, making them a super healthy addition to your diet.
Why Grow Pea Shoots Indoors?
Growing pea shoots indoors offers several advantages:
* Year-Round Harvest: You can enjoy fresh pea shoots regardless of the season or weather conditions.
* Space-Saving: You don’t need a large garden or outdoor space. A small tray or container is all you need.
* Fast Growth: Pea shoots grow quickly, typically ready for harvest in just 1-3 weeks.
* Easy and Fun: It’s a simple and enjoyable project, even for beginners.
* Nutritious and Delicious: You get a constant supply of fresh, healthy, and flavorful greens.
What You’ll Need: The Essentials
Before we dive into the step-by-step instructions, let’s gather the necessary supplies. Don’t worry, you probably already have most of these items at home!
* Pea Seeds: You’ll need pea seeds specifically for sprouting or growing shoots. Look for varieties like ‘Dwarf Grey Sugar’, ‘Snow Pea’, or ‘Green Arrow’. Avoid using treated seeds, as they may contain chemicals that are harmful to consume. I usually get mine from a local garden center, but you can easily find them online too.
* Growing Tray or Container: Choose a shallow tray or container with drainage holes. A plastic seedling tray, a repurposed food container, or even a baking dish will work perfectly. I personally prefer using a tray that’s at least 2 inches deep.
* Growing Medium: You can use a variety of growing mediums, such as potting soil, coconut coir, or even a soilless mix. I’ve had great success with a mix of potting soil and coconut coir, as it provides good drainage and moisture retention.
* Watering Can or Spray Bottle: You’ll need a way to water your pea shoots regularly. A watering can with a gentle rose or a spray bottle is ideal.
* Light Source: Pea shoots need light to grow. A sunny windowsill is a good option, but if you don’t have enough natural light, you can use a grow light. I use a simple LED grow light that I got online, and it works wonders.
* Scissors or Kitchen Shears: You’ll need these to harvest your pea shoots.
* Optional: A weight (like a book or brick) to help with germination.
Step-by-Step Guide: Growing Pea Shoots Indoors
Alright, let’s get our hands dirty and start growing some pea shoots!
Phase 1: Soaking the Seeds
This is a crucial step to kickstart the germination process.
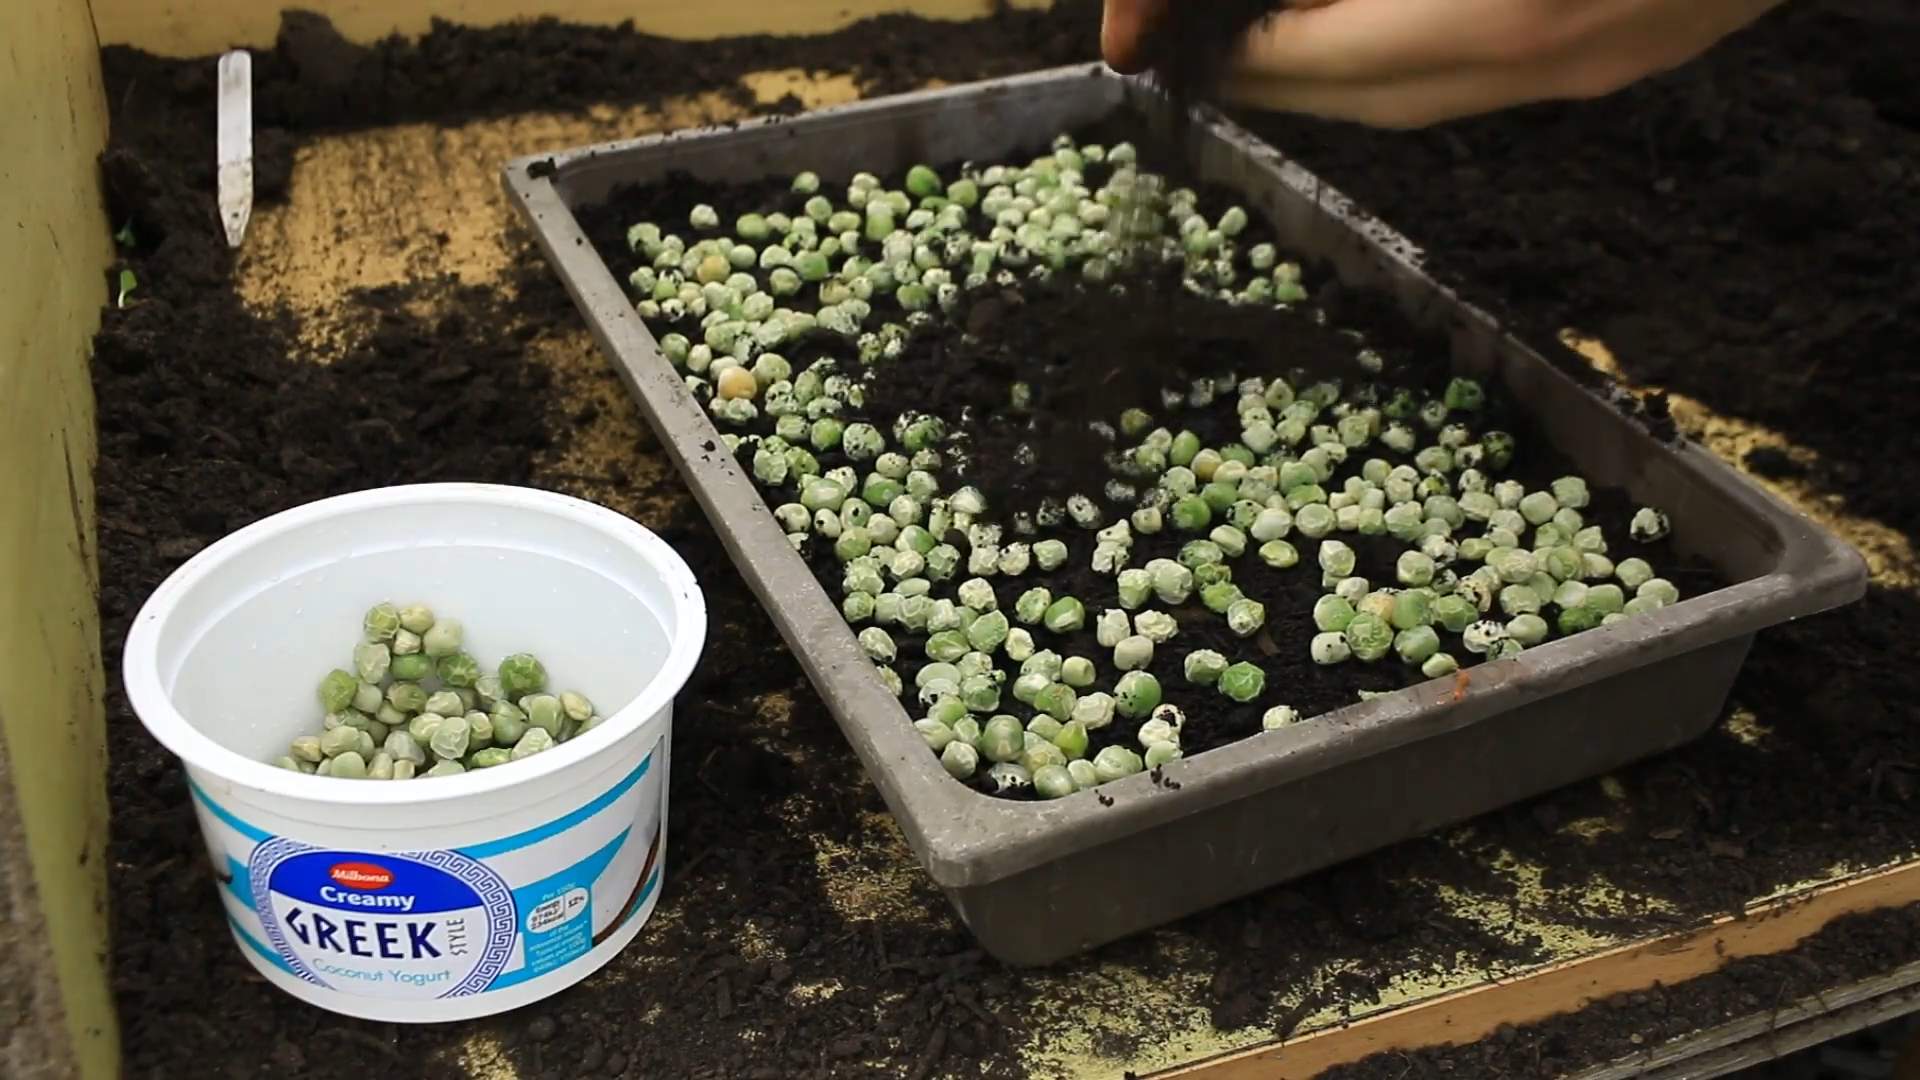
1. Rinse the Pea Seeds: Place your pea seeds in a bowl and rinse them thoroughly with cool water. This will remove any debris or dust.
2. Soak the Seeds: Fill the bowl with fresh, cool water, ensuring that the seeds are completely submerged.
3. Soak for 8-12 Hours: Let the seeds soak for 8-12 hours. This will soften the seed coat and help them germinate faster. I usually soak mine overnight. You’ll notice that the seeds will swell up as they absorb water.
Phase 2: Planting the Seeds
Now it’s time to plant those plump, soaked seeds!
1. Prepare the Growing Tray: Fill your growing tray or container with your chosen growing medium, leaving about an inch of space at the top. Gently pat down the soil to create a level surface.
2. Distribute the Seeds: Sprinkle the soaked pea seeds evenly over the surface of the soil. You can pack them in fairly densely, but make sure they’re not overlapping too much.
3. Cover the Seeds: Lightly cover the seeds with a thin layer of the growing medium, about ¼ inch thick.
4. Water Gently: Use a watering can or spray bottle to gently water the soil, making sure it’s evenly moist but not waterlogged.
Phase 3: Germination and Sprouting
This is where the magic happens!
1. Weighting (Optional but Recommended): Place a weight (like a book or brick wrapped in plastic) on top of the tray. This will help the seeds make good contact with the soil and encourage even germination.
2. Darkness is Key: Place the tray in a dark, cool place for 2-3 days. This will mimic the conditions underground and encourage the seeds to sprout.
3. Check for Moisture: Check the soil moisture daily and mist with water if needed to keep it consistently moist.
4. Remove the Weight: After 2-3 days, remove the weight and you should see the seeds starting to sprout.
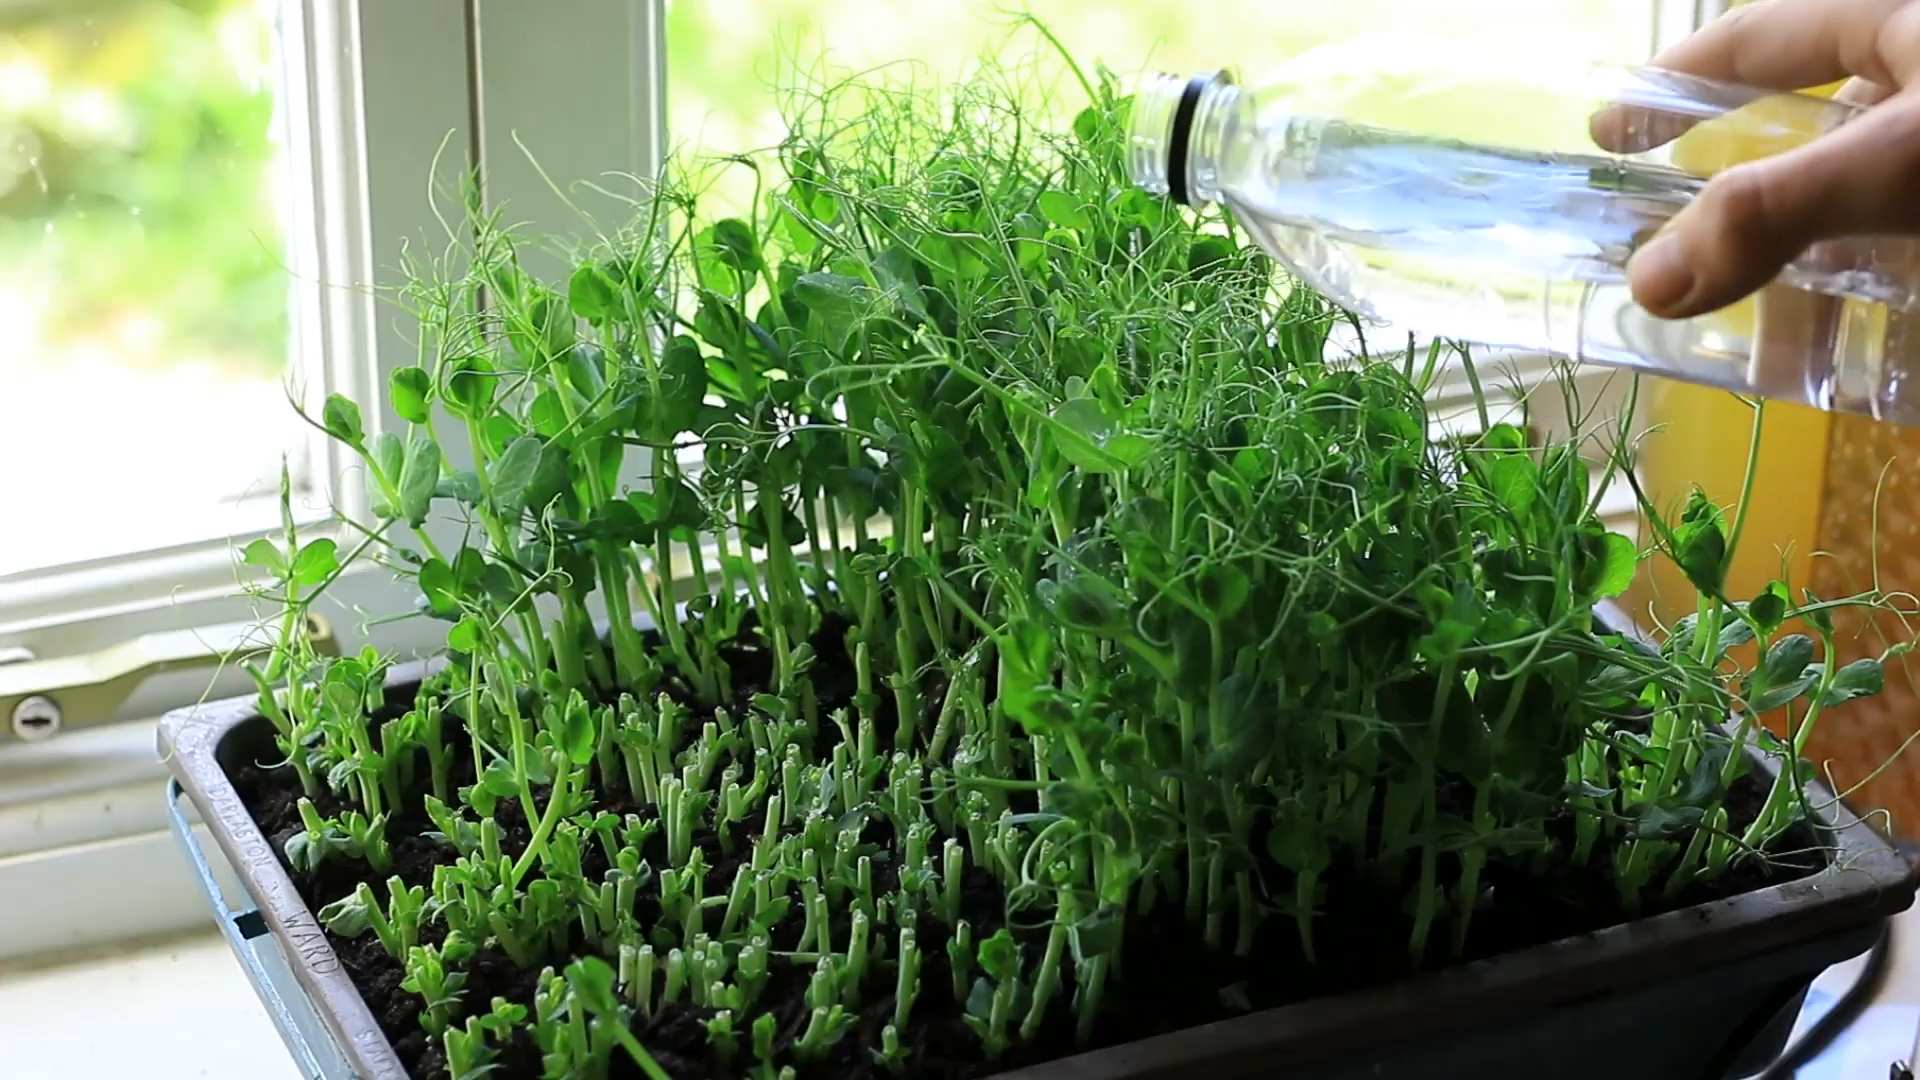
Phase 4: Growing and Caring for Your Pea Shoots
Now that your pea shoots have sprouted, it’s time to give them the light and care they need to thrive.
1. Provide Light: Move the tray to a sunny windowsill or under a grow light. Pea shoots need at least 4-6 hours of light per day. If you’re using a grow light, position it a few inches above the plants.
2. Water Regularly: Water your pea shoots regularly, keeping the soil consistently moist but not waterlogged. I usually water them every day or every other day, depending on the humidity and temperature.
3. Rotate the Tray: If you’re growing your pea shoots on a windowsill, rotate the tray regularly to ensure that they receive even light on all sides. This will prevent them from leaning towards the light source.
4. Watch Them Grow: Watch your pea shoots grow! You’ll be amazed at how quickly they develop.
Phase 5: Harvesting Your Pea Shoots
The best part! Time to enjoy the fruits (or rather, shoots) of your labor.
1. Harvest Time: Your pea shoots will be ready to harvest in 1-3 weeks, depending on the variety and growing conditions. They should be about 4-6 inches tall and have several leaves.
2. Cut the Shoots: Use scissors or kitchen shears to cut the pea shoots just above the lowest set of leaves. This will allow the plants to regrow and produce another harvest.
3. Wash and Enjoy: Wash the harvested pea shoots thoroughly with cool water and enjoy them in your favorite dishes.
Tips for Success: Making Your Pea Shoots Thrive
Here are a few extra tips to help you grow the best pea shoots possible:
* Choose the Right Seeds: As I mentioned earlier, make sure you’re using pea seeds specifically for sprouting or growing shoots. Avoid using treated seeds.
* Don’t Overwater: Overwatering can lead to fungal diseases and rot. Make sure the soil is moist but not waterlogged.
* Provide Adequate Light: Pea shoots need plenty of light to grow strong and healthy. If you don’t have enough natural light, use a grow light.
* Harvest Regularly: Harvesting your pea shoots regularly will encourage them to produce more growth.
* Successive Planting: To ensure a continuous supply of pea shoots, plant a new batch of seeds every week or two.
* Experiment with Varieties: Try growing different varieties of pea seeds to find your favorite flavor and texture.
* Pest Control: Pea shoots are generally pest-resistant, but if you notice any aphids or other pests, you can spray them with a mild solution of soapy water.
Troubleshooting: Common Issues and Solutions
Even with the best intentions, sometimes things don’t go exactly as planned. Here are a few common issues you might encounter and how to fix them:
* Poor Germination: If your pea seeds aren’t germinating well, make sure they’re fresh and that you’re soaking them for the correct amount of time. Also, ensure that the soil is consistently moist.
* Leggy Growth: If your pea shoots are tall and spindly, they’re probably not getting enough light. Move them to a sunnier location or use a grow light.
* Mold or Fungus: If you
Conclusion
So, there you have it! Growing your own pea shoots indoors is not just a fun project; it’s a gateway to fresh, flavorful greens right at your fingertips, regardless of the season. We’ve walked you through the simple steps, from sourcing your seeds to harvesting your vibrant, nutrient-packed bounty. Why settle for store-bought when you can cultivate your own little indoor garden, bursting with the sweet, delicate taste of homegrown pea shoots?
This DIY trick is a must-try for several compelling reasons. First and foremost, it’s incredibly easy and requires minimal space or specialized equipment. Whether you live in a sprawling suburban home or a cozy city apartment, you can easily carve out a small corner for your pea shoot operation. Secondly, it’s a cost-effective way to enjoy fresh greens. A bag of pea shoots at the grocery store can be surprisingly expensive, but a single package of pea seeds can yield multiple harvests, saving you money in the long run. Thirdly, and perhaps most importantly, growing your own pea shoots gives you complete control over the growing process. You know exactly what’s going into your food – no pesticides, no herbicides, just pure, unadulterated goodness.
But the beauty of this DIY project lies in its versatility. Feel free to experiment with different varieties of pea seeds to discover your favorite flavor profile. Snow pea seeds tend to produce sweeter shoots, while sugar snap pea seeds offer a slightly more robust taste. You can also play around with different growing mediums. While we recommend soil, you can also try using hydroponic methods for a faster, cleaner harvest. Consider adding a diluted liquid fertilizer after the first week to boost growth and yield.
Another fun variation is to incorporate your pea shoots into different culinary creations. Beyond salads, they make a fantastic addition to stir-fries, sandwiches, soups, and even smoothies. Their delicate flavor pairs well with a wide range of ingredients, adding a touch of freshness and visual appeal to any dish. Think of them as a microgreen powerhouse, ready to elevate your meals to the next level.
Don’t be intimidated by the idea of growing your own food. This is a beginner-friendly project that yields impressive results with minimal effort. The satisfaction of harvesting your own homegrown pea shoots and incorporating them into your meals is truly rewarding. It’s a small step towards a more sustainable and self-sufficient lifestyle.
We wholeheartedly encourage you to give this DIY trick a try. It’s a simple, rewarding, and delicious way to bring a little bit of nature into your home. And once you’ve experienced the joy of growing your own pea shoots, we’d love to hear about your experience! Share your photos, tips, and recipes with us in the comments below. Let’s create a community of indoor gardeners, sharing our knowledge and inspiring others to embrace the joys of homegrown goodness. Let us know what you think of this method to grow pea shoots indoors.
Frequently Asked Questions (FAQ)
What kind of pea seeds should I use?
You can use any variety of pea seeds specifically intended for sprouting or growing pea shoots. Look for seeds labeled as “pea shoots,” “sprouting peas,” or “garden peas.” Avoid using seeds that have been treated with fungicides or other chemicals, as these are not safe for consumption. Popular choices include snow pea seeds, sugar snap pea seeds, and dwarf grey sugar pea seeds. Experiment with different varieties to find your favorite flavor.
How long does it take to grow pea shoots?
Typically, it takes about 7-14 days to grow pea shoots from seed to harvest. The exact time will depend on factors such as temperature, light, and humidity. You’ll know they’re ready to harvest when they are about 2-4 inches tall and have developed several leaves.
How often should I water my pea shoots?
Keep the soil consistently moist, but not waterlogged. Water gently every day or every other day, depending on the humidity and temperature. The goal is to keep the soil damp to the touch without allowing it to become soggy. Overwatering can lead to mold or mildew growth.
What kind of light do pea shoots need?
Pea shoots need adequate light to grow properly. While they can tolerate some shade, they will thrive in a bright, sunny location. If you don’t have a sunny windowsill, you can use a grow light to supplement their light exposure. Aim for at least 6-8 hours of light per day.
Can I reuse the soil after harvesting pea shoots?
It’s generally not recommended to reuse the soil after harvesting pea shoots. The soil will have been depleted of nutrients and may contain residual roots or debris. It’s best to start with fresh soil for each new batch of pea shoots.
How do I harvest pea shoots?
Harvest pea shoots by snipping them off with scissors or sharp shears just above the lowest set of leaves. This will encourage the plant to regrow, allowing you to harvest multiple times from the same planting.
How many times can I harvest from one planting?
You can typically harvest pea shoots 2-3 times from a single planting. After each harvest, the plants will regrow, producing new shoots. However, the yield will decrease with each subsequent harvest.
How should I store harvested pea shoots?
Store harvested pea shoots in the refrigerator in a sealed container or plastic bag. They will stay fresh for about 3-5 days. To prolong their freshness, you can wrap them in a damp paper towel before storing them.
What if my pea shoots start to mold?
Mold growth is usually a sign of overwatering or poor ventilation. If you notice mold, remove the affected shoots immediately and improve air circulation around the plants. Reduce watering frequency and ensure that the growing container has adequate drainage.
Are pea shoots nutritious?
Yes, pea shoots are highly nutritious. They are a good source of vitamins A, C, and K, as well as folate, fiber, and antioxidants. They are also low in calories and fat.
Can I grow pea shoots hydroponically?
Yes, you can grow pea shoots hydroponically. This method involves growing the plants in water without soil, using a nutrient solution to provide them with the necessary nutrients. Hydroponic pea shoot cultivation can result in faster growth and cleaner harvests.
What are some common problems when growing pea shoots indoors?
Some common problems include mold growth, leggy growth (due to insufficient light), and slow growth (due to inadequate watering or nutrients). Addressing these issues promptly will help ensure a successful harvest.
Can I eat the whole pea shoot, including the tendrils?
Yes, you can eat the entire pea shoot, including the tendrils, leaves, and stems. They are all edible and have a delicate, sweet flavor.
Are there any pests that commonly affect indoor pea shoots?
Indoor pea shoots are generally less susceptible to pests than outdoor plants. However, they can occasionally be affected by aphids or spider mites. If you notice any pests, you can try washing them off with water or using an insecticidal soap.
What is the best temperature for growing pea shoots indoors?
Pea shoots prefer a cool to moderate temperature range of 60-70°F (15-21°C). Avoid exposing them to extreme temperatures, as this can stunt their growth.
Leave a Comment