

Grow Queen Cabbage at Home and unlock the secrets to cultivating this regal vegetable right in your own backyard! Have you ever dreamt of harvesting cabbages so magnificent, they’d be the envy of every gardener in the neighborhood? Well, dream no more! This DIY guide is your passport to cabbage royalty.
Cabbage, in its various forms, has been a staple in diets across the globe for centuries. From the humble sauerkraut of Eastern Europe to the vibrant kimchi of Korea, cabbage boasts a rich culinary history. But growing your own, especially a variety as impressive as Queen Cabbage, takes the experience to a whole new level. It’s about connecting with the earth, nurturing life, and reaping the rewards of your labor.
Why should you embark on this DIY adventure? Because store-bought cabbages simply can’t compare to the flavor and freshness of homegrown. Plus, knowing exactly where your food comes from and how it was grown offers unparalleled peace of mind. And let’s be honest, there’s a certain satisfaction that comes from saying, “I grew that!” So, let’s dive in and discover the simple yet effective tricks to grow Queen Cabbage at Home, transforming your garden into a cabbage kingdom!
Growing Queen Cabbage at Home: A DIY Guide
Okay, so you want to grow your own Queen Cabbage? Awesome! It’s totally doable, even if you don’t have a huge garden. I’m going to walk you through everything you need to know, from starting seeds to harvesting your very own regal cabbage. Get ready to get your hands dirty!
Choosing Your Queen Cabbage Variety
First things first, let’s talk about varieties. “Queen Cabbage” isn’t a specific variety, but rather a term often used to describe large, impressive cabbages. So, we need to pick a variety that fits that description. Here are a few good options:
* ‘Brunswick’: This is a classic, reliable variety that produces large, dense heads. It’s known for its good flavor and storage ability.
* ‘Danish Ballhead’: Another excellent choice for large heads, ‘Danish Ballhead’ is also known for its resistance to splitting.
* ‘Storage No. 4’: As the name suggests, this variety is specifically bred for long-term storage. It produces large, firm heads that will keep well into the winter.
* ‘Mammoth Red Rock’: If you want a bit of color in your garden, ‘Mammoth Red Rock’ is a stunning red cabbage that can grow to impressive sizes.
I recommend doing a little research on each variety to see which one best suits your climate and preferences. Consider factors like disease resistance, days to maturity, and storage potential.
Starting Your Cabbage Seeds
Cabbage is a cool-season crop, so you’ll want to start your seeds indoors about 6-8 weeks before the last expected frost. This gives them a head start before transplanting them into the garden.
Here’s what you’ll need:
* Seed starting trays or small pots
* Seed starting mix (a light, well-draining mix is essential)
* Cabbage seeds (of course!)
* A spray bottle filled with water
* A heat mat (optional, but helpful for germination)
* A grow light (also optional, but provides consistent light)
Now, let’s get planting!
1. Prepare your seed starting trays: Fill each cell or pot with seed starting mix, leaving about half an inch of space at the top. Gently tap the trays to settle the mix.
2. Sow the seeds: Place 2-3 cabbage seeds in the center of each cell or pot. Cover the seeds with a thin layer of seed starting mix (about 1/4 inch).
3. Water gently: Use a spray bottle to mist the soil thoroughly. You want the soil to be moist, but not soggy.
4. Provide warmth: Place the seed starting trays on a heat mat, if you’re using one. This will help to speed up germination. The ideal soil temperature for cabbage seed germination is between 65-75°F (18-24°C).
5. Provide light: If you’re using a grow light, position it a few inches above the seed starting trays. If not, place the trays in a sunny window.
6. Keep the soil moist: Check the soil moisture daily and mist with water as needed to keep it consistently moist.
7. Wait for germination: Cabbage seeds typically germinate in 5-10 days. Once the seedlings emerge, remove the heat mat and adjust the grow light as needed to prevent the seedlings from becoming leggy.
Transplanting Your Cabbage Seedlings
Once your cabbage seedlings have developed a few sets of true leaves (usually about 4-6 weeks after germination), they’re ready to be transplanted into the garden.
Before you transplant, you’ll need to harden off the seedlings. This process gradually acclimates them to outdoor conditions, preventing transplant shock.
Here’s how to harden off your cabbage seedlings:
1. Start slowly: Begin by placing the seedlings outdoors in a sheltered location for just a few hours each day.
2. Increase exposure: Gradually increase the amount of time the seedlings spend outdoors each day, over the course of a week or two.
3. Protect from harsh conditions: Protect the seedlings from strong winds, direct sunlight, and frost.
4. Water regularly: Water the seedlings regularly during the hardening off process.
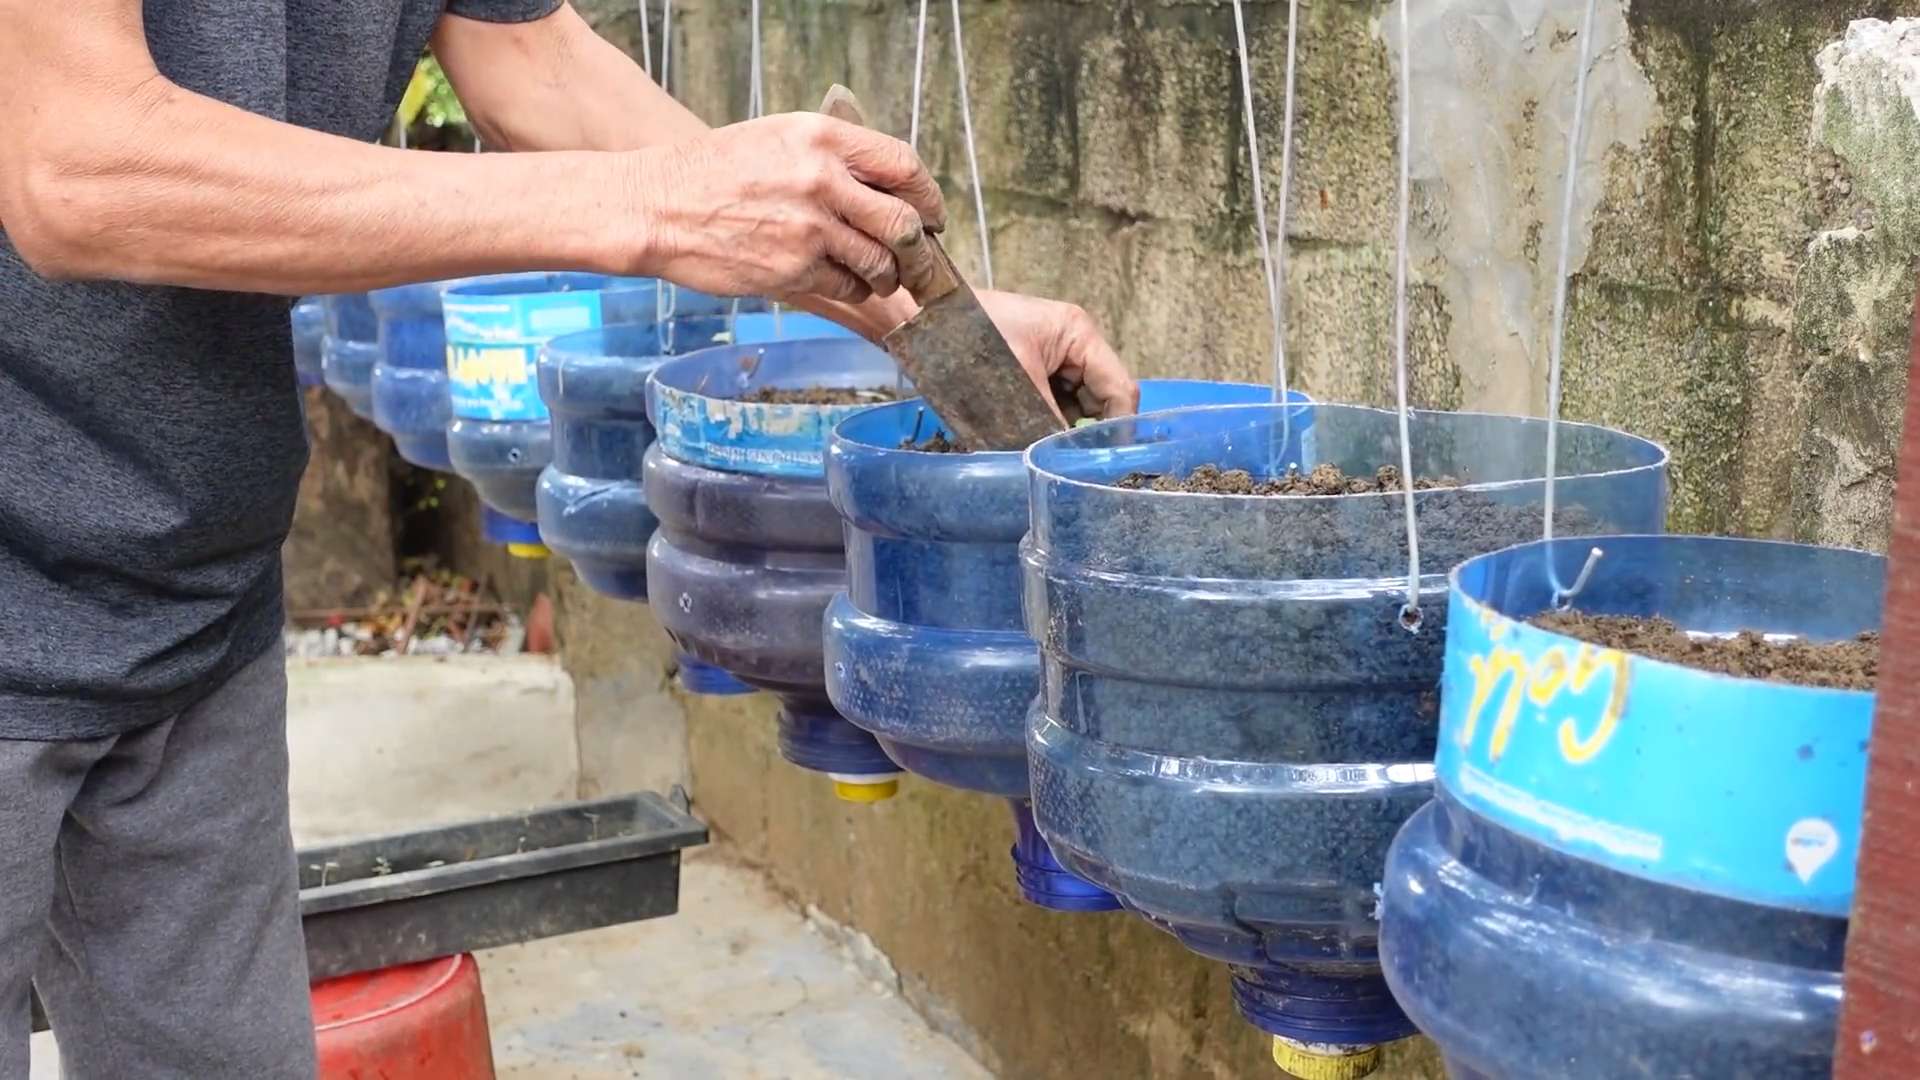
While your seedlings are hardening off, prepare your garden bed. Cabbage needs well-drained, fertile soil with a pH of 6.0-7.5.
Here’s how to prepare your garden bed:
1. Choose a sunny location: Cabbage needs at least 6 hours of sunlight per day.
2. Amend the soil: Incorporate plenty of compost or well-rotted manure into the soil to improve drainage and fertility.
3. Test the soil pH: Use a soil testing kit to check the pH of your soil. If the pH is too low (acidic), add lime to raise it. If the pH is too high (alkaline), add sulfur to lower it.
4. Create raised beds (optional): Raised beds can improve drainage and warm up the soil more quickly in the spring.
Now, let’s transplant those seedlings!
1. Choose a cloudy day: Transplanting on a cloudy day will help to reduce transplant shock.
2. Dig holes: Dig holes that are slightly larger than the root balls of the seedlings. Space the holes about 18-24 inches apart.
3. Remove the seedlings from their containers: Gently remove the seedlings from their seed starting trays or pots. Be careful not to damage the roots.
4. Place the seedlings in the holes: Place each seedling in a hole, making sure that the top of the root ball is level with the soil surface.
5. Fill in the holes: Fill in the holes with soil and gently firm the soil around the seedlings.
6. Water thoroughly: Water the seedlings thoroughly after transplanting.
7. Mulch (optional): Apply a layer of mulch around the seedlings to help retain moisture and suppress weeds.
Caring for Your Growing Cabbage
Once your cabbage seedlings are transplanted, it’s important to provide them with proper care to ensure a healthy and productive harvest.
Here are some tips for caring for your growing cabbage:
* Water regularly: Cabbage needs consistent moisture, especially during hot, dry weather. Water deeply whenever the top inch of soil feels dry.
* Fertilize: Fertilize your cabbage plants every 2-3 weeks with a balanced fertilizer. Follow the instructions on the fertilizer package.
* Weed regularly: Keep the garden bed free of weeds, which can compete with the cabbage plants for nutrients and water.
* Protect from pests: Cabbage is susceptible to a variety of pests, including cabbage worms, aphids, and flea beetles. Inspect your plants regularly for signs of pests and take appropriate action. I personally like using insecticidal soap for most pests.
* Protect from diseases: Cabbage is also susceptible to a variety of diseases, including black rot and clubroot. Choose disease-resistant varieties and practice good sanitation to prevent disease problems.
Harvesting Your Queen Cabbage
The moment you’ve been waiting for! Harvesting your own Queen Cabbage is incredibly rewarding.
Cabbage is typically ready to harvest 80-120 days after transplanting, depending on the variety.
Here’s how to tell when your cabbage is ready to harvest:
* Check the head: The head should be firm and dense.
* Check the size: The head should be the size specified for the variety.
* Check the color: The color should be uniform and consistent with the variety.
To harvest your cabbage, use a sharp knife to cut the head from the stem, leaving a few outer leaves attached.
After harvesting, you can store your cabbage in the refrigerator for several weeks. For longer-term storage, you can store it in a root cellar or other cool, dark place.
Troubleshooting Common Cabbage Problems
Even with the best care, you might encounter some problems while growing your Queen Cabbage. Here are a few common issues and how to address them:
* Cabbage worms: These green caterpillars can quickly devour cabbage leaves. Handpick them off the plants or use Bacillus thuringiensis (Bt), a biological insecticide.
* Aphids: These tiny insects suck sap from cabbage leaves, causing them to become distorted and yellow. Spray the plants with insecticidal soap or neem oil.
* Flea beetles: These small, jumping beetles can create small holes in cabbage leaves. Cover the plants with row covers or use insecticidal soap.
* Black rot: This bacterial disease causes yellowing and blackening of cabbage leaves. Choose disease-resistant varieties and practice good sanitation.
* Clubroot: This fungal disease causes swollen, distorted roots. Improve soil drainage and add lime to raise the soil pH.
Enjoying Your Homegrown Cabbage
Congratulations! You’
Conclusion
So, there you have it! Growing your own Queen Cabbage at home isn’t just a gardening project; it’s an investment in fresh, flavorful, and nutritious food right at your fingertips. We’ve walked you through the process, from selecting the right seeds to nurturing your cabbage to its full, glorious potential. But why is this DIY trick a must-try?
Firstly, consider the unparalleled freshness. Store-bought cabbage, even the freshest looking ones, have traveled miles and spent days in transit. Homegrown Queen Cabbage, on the other hand, goes straight from your garden to your table, bursting with vibrant flavor and retaining all its vital nutrients. You’ll immediately notice the difference in taste and texture.
Secondly, you have complete control over the growing process. No need to worry about harmful pesticides or herbicides. You can choose organic methods, ensuring that your Queen Cabbage is as healthy and wholesome as possible. This peace of mind is invaluable, especially if you’re feeding your family.
Thirdly, it’s incredibly rewarding! There’s something deeply satisfying about nurturing a plant from a tiny seed to a mature, edible vegetable. It connects you to nature and provides a sense of accomplishment that’s hard to replicate. Plus, it’s a fantastic way to get some exercise and fresh air.
But the benefits don’t stop there. Growing your own Queen Cabbage is also a cost-effective way to supplement your grocery bill. Cabbage is a versatile vegetable that can be used in countless dishes, from salads and slaws to soups and stir-fries. By growing your own, you can save money and reduce your reliance on store-bought produce.
Ready to take your Queen Cabbage growing to the next level? Consider these variations:
* Companion Planting: Plant your Queen Cabbage alongside herbs like rosemary, thyme, or sage to deter pests and enhance flavor. Marigolds are also excellent companion plants for their pest-repelling properties.
* Succession Planting: Plant new seeds every few weeks to ensure a continuous harvest throughout the growing season. This way, you’ll always have fresh Queen Cabbage on hand.
* Different Varieties: Experiment with different varieties of cabbage to find your favorite. Red cabbage, Savoy cabbage, and Napa cabbage all offer unique flavors and textures.
* Fermenting: Once you have a bountiful harvest, consider fermenting some of your Queen Cabbage into sauerkraut or kimchi. These fermented foods are packed with probiotics and offer a delicious and healthy way to preserve your harvest.
We’ve provided you with all the tools and knowledge you need to succeed. Now, it’s your turn to get your hands dirty and experience the joy of growing your own Queen Cabbage. Don’t be afraid to experiment, learn from your mistakes, and most importantly, have fun!
We’re confident that you’ll be amazed by the results. So, grab your seeds, prepare your soil, and get ready to enjoy the freshest, most flavorful cabbage you’ve ever tasted.
We encourage you to try this DIY trick and share your experience with us! Post photos of your Queen Cabbage on social media using #HomegrownQueenCabbage and tag us so we can see your amazing results. We can’t wait to see what you create! Let us know if you have any questions or tips to share in the comments below. Happy gardening!
Frequently Asked Questions (FAQ)
What is the best time of year to plant Queen Cabbage?
The best time to plant Queen Cabbage depends on your climate. In general, it’s a cool-season crop, so you’ll want to plant it in early spring or late summer for a fall harvest. For spring planting, start seeds indoors 6-8 weeks before the last expected frost. For fall planting, sow seeds directly into the garden in late summer, about 6-8 weeks before the first expected frost. Consider your local climate and growing zone for the most accurate timing.
How much sunlight does Queen Cabbage need?
Queen Cabbage requires at least 6 hours of direct sunlight per day to thrive. Choose a planting location that receives plenty of sunlight throughout the day. If you live in a particularly hot climate, some afternoon shade can be beneficial to prevent the leaves from scorching.
What kind of soil is best for growing Queen Cabbage?
Queen Cabbage prefers well-drained, fertile soil that is rich in organic matter. The ideal soil pH is between 6.0 and 7.0. Before planting, amend the soil with compost or well-rotted manure to improve drainage and fertility. You can also add a slow-release fertilizer to provide essential nutrients throughout the growing season.
How often should I water my Queen Cabbage plants?
Water your Queen Cabbage plants regularly, especially during dry periods. Aim to keep the soil consistently moist but not waterlogged. Water deeply at the base of the plants, avoiding wetting the leaves, which can promote fungal diseases. Mulching around the plants can help retain moisture and suppress weeds.
What are some common pests and diseases that affect Queen Cabbage?
Queen Cabbage can be susceptible to several pests and diseases, including cabbage worms, aphids, flea beetles, and clubroot. To prevent pest problems, consider using row covers to protect your plants. Inspect your plants regularly for signs of infestation and take action promptly. Organic pest control methods, such as insecticidal soap or neem oil, can be effective. To prevent diseases, ensure good air circulation, avoid overwatering, and practice crop rotation.
How do I know when my Queen Cabbage is ready to harvest?
Queen Cabbage is ready to harvest when the head is firm and compact. The size of the head will vary depending on the variety, but generally, it should be about the size of a softball or larger. To harvest, use a sharp knife to cut the head from the stem, leaving a few outer leaves intact.
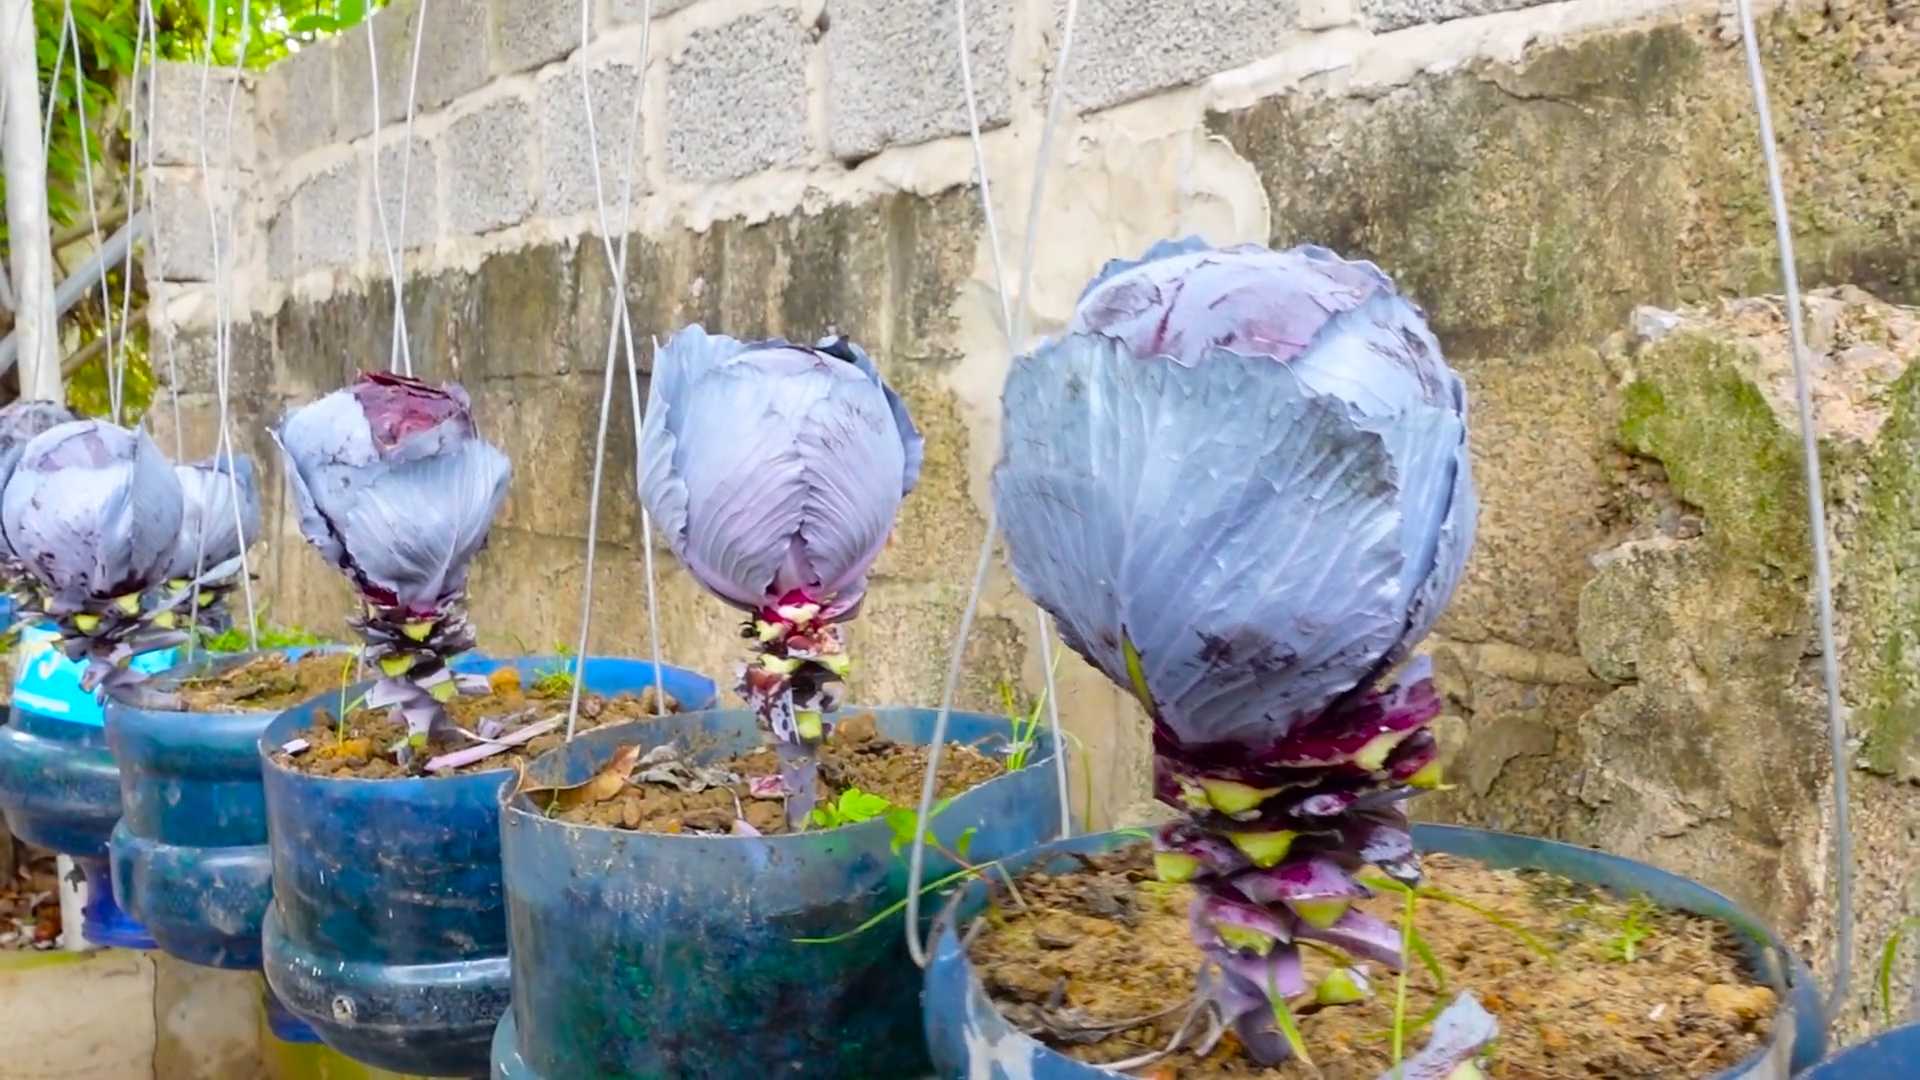
Can I grow Queen Cabbage in containers?
Yes, you can grow Queen Cabbage in containers, but you’ll need to choose a large container that is at least 12 inches in diameter and depth. Use a well-draining potting mix and provide regular watering and fertilization. Container-grown cabbage may require more frequent watering than those grown in the ground.
How can I prevent my Queen Cabbage from splitting?
Cabbage heads can sometimes split open if they receive too much water after a dry spell. To prevent splitting, water your plants consistently and avoid letting the soil dry out completely. You can also harvest the cabbage as soon as it’s mature to prevent it from becoming overripe and splitting.
Is Queen Cabbage a good source of nutrients?
Yes, Queen Cabbage is a highly nutritious vegetable. It’s an excellent source of vitamins C and K, as well as fiber, folate, and antioxidants. It’s also low in calories and fat, making it a healthy addition to any diet.
What are some ways to use Queen Cabbage in cooking?
Queen Cabbage is a versatile vegetable that can be used in a variety of dishes. It can be eaten raw in salads and slaws, or cooked in soups, stews, stir-fries, and casseroles. It’s also a popular ingredient in fermented foods like sauerkraut and kimchi. Get creative and experiment with different recipes to find your favorite ways to enjoy Queen Cabbage.

Leave a Comment