

Growing Bird’s Eye Chili can seem intimidating, but trust me, with a few simple tricks, you can cultivate these fiery little peppers right in your own backyard! Imagine the satisfaction of adding a pinch of your homegrown heat to your favorite dishes. For centuries, chili peppers, including the Bird’s Eye variety, have been a staple in cuisines across the globe, adding not just flavor but also a vibrant cultural element to meals. From the bustling markets of Southeast Asia to the sun-drenched fields of South America, these peppers have been cherished for their unique kick.
But why should *you* bother with growing your own? Well, store-bought chilies can sometimes lack that fresh, intense flavor that truly elevates a dish. Plus, knowing exactly where your food comes from and how it’s grown is incredibly rewarding. This DIY guide is packed with easy-to-follow tips and hacks that will help you successfully growing Bird’s Eye Chili, even if you’re a complete beginner. I’ll share my secrets for optimal soil conditions, watering techniques, and pest control, ensuring you have a bountiful harvest of these delicious, fiery gems. Get ready to spice up your life – literally!
Growing Bird’s Eye Chili: From Seed to Spicy Harvest!
Okay, chili lovers, let’s talk about growing Bird’s Eye Chili! These tiny peppers pack a serious punch, and there’s nothing quite like the satisfaction of harvesting your own fiery little gems. I’m going to walk you through everything you need to know, from starting seeds to enjoying your bountiful harvest. Get ready to add some serious heat to your dishes!
What You’ll Need:
Before we dive in, let’s gather our supplies. Here’s a list of everything you’ll need to successfully grow Bird’s Eye Chili:
* Bird’s Eye Chili Seeds: Obviously! Make sure you get them from a reputable source to ensure good germination rates.
* Seed Starting Tray or Small Pots: These will be your nurseries for the baby chili plants.
* Seed Starting Mix: This is a light, sterile soil mix that’s perfect for delicate seedlings.
* Larger Pots (at least 5 gallons): Once your seedlings are big enough, they’ll need bigger homes.
* Well-Draining Potting Mix: This is different from seed starting mix; it’s richer and designed for mature plants.
* Watering Can or Hose: For keeping your plants hydrated.
* Fertilizer: A balanced fertilizer, or one specifically formulated for peppers, will help your plants thrive.
* Grow Lights (Optional): If you’re starting seeds indoors, grow lights can provide the necessary light.
* Gloves: Trust me, you’ll want these when handling the peppers later on!
* Gardening Tools: A small trowel, pruners, and maybe some plant labels.
* Patience: Growing anything takes time and care!
Starting Your Seeds: The First Steps to Fiery Goodness
This is where the magic begins! Starting your seeds indoors gives you a head start, especially if you live in a cooler climate.
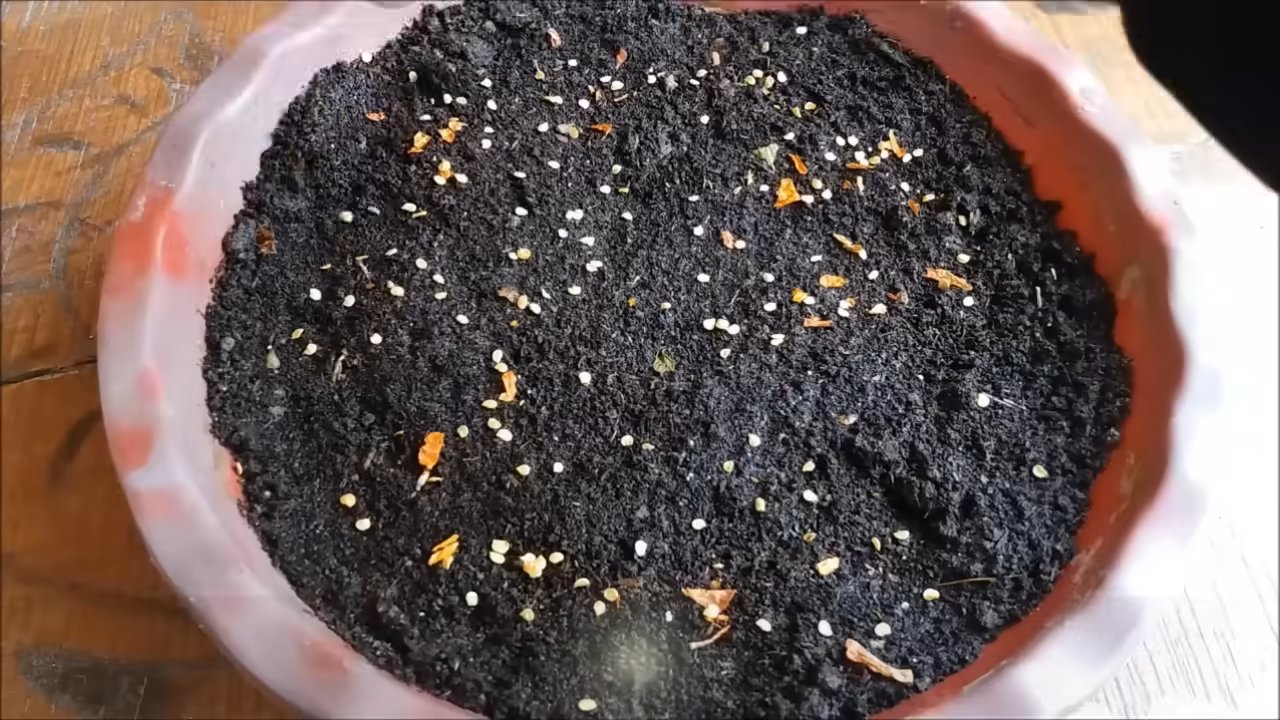
1. Prepare Your Seed Starting Tray: Fill your seed starting tray or small pots with seed starting mix. Gently pat it down to remove any air pockets.
2. Sow the Seeds: Make a small indentation (about ¼ inch deep) in the soil. Place one or two seeds in each indentation.
3. Cover the Seeds: Gently cover the seeds with more seed starting mix.
4. Water Gently: Use a spray bottle or watering can with a gentle nozzle to moisten the soil. You don’t want to wash the seeds away!
5. Provide Warmth and Light: Bird’s Eye Chili seeds need warmth to germinate. Aim for a temperature between 75-85°F (24-29°C). You can use a heat mat or place the tray in a warm location. If you’re using grow lights, position them a few inches above the tray.
6. Keep the Soil Moist: The soil should be consistently moist, but not soggy. Check it daily and water as needed.
7. Wait Patiently: Germination can take anywhere from 7 to 21 days, so be patient!
Transplanting Your Seedlings: Moving to Bigger and Better Things
Once your seedlings have developed a few sets of true leaves (the leaves that look like miniature versions of the adult plant’s leaves), it’s time to transplant them into larger pots.
1. Prepare Your Larger Pots: Fill your larger pots (at least 5 gallons) with well-draining potting mix.
2. Gently Remove the Seedlings: Carefully remove the seedlings from the seed starting tray or small pots. Be gentle to avoid damaging the roots. I like to use a small spoon or trowel to help lift them out.
3. Plant the Seedlings: Make a hole in the potting mix large enough to accommodate the seedling’s root ball. Place the seedling in the hole and gently backfill with potting mix.
4. Water Thoroughly: Water the newly transplanted seedlings thoroughly.
5. Provide Support (Optional): If your seedlings are a bit leggy (tall and spindly), you can use a small stake to provide support.
Caring for Your Chili Plants: Sunshine, Water, and Nutrients
Now that your chili plants are in their larger pots, it’s time to provide them with the care they need to thrive.
1. Sunlight: Bird’s Eye Chili plants need at least 6-8 hours of sunlight per day. Choose a sunny location in your garden or on your patio. If you’re growing them indoors, make sure they’re under strong grow lights.
2. Watering: Water your chili plants regularly, especially during hot weather. The soil should be consistently moist, but not waterlogged. Check the soil moisture by sticking your finger into the soil. If the top inch feels dry, it’s time to water.
3. Fertilizing: Feed your chili plants with a balanced fertilizer every 2-3 weeks. You can also use a fertilizer specifically formulated for peppers. Follow the instructions on the fertilizer package.
4. Pruning (Optional): Pruning can help encourage bushier growth and more peppers. You can pinch off the tips of the branches to encourage side growth.
5. Pest Control: Keep an eye out for pests like aphids, spider mites, and whiteflies. If you spot any pests, you can treat them with insecticidal soap or neem oil.
6. Temperature: Bird’s Eye Chili plants prefer warm temperatures. They can tolerate temperatures down to about 50°F (10°C), but they’ll grow best in temperatures between 70-85°F (21-29°C).
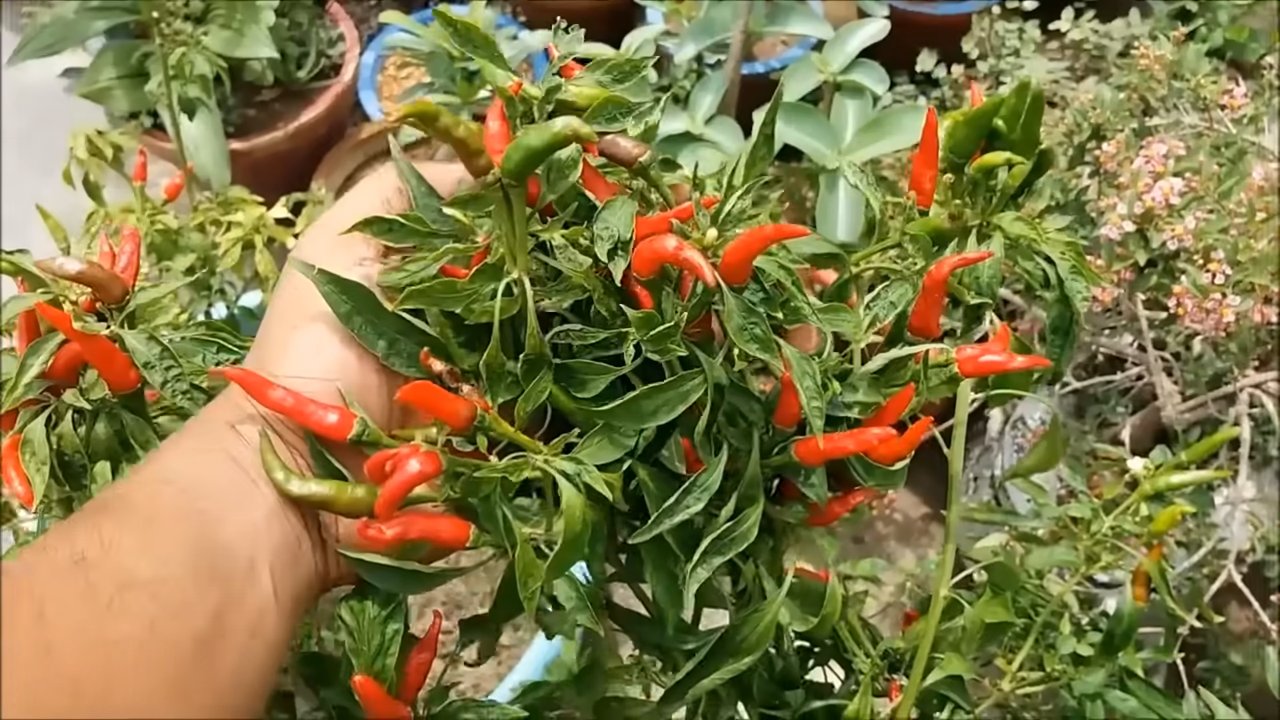
Harvesting Your Chili Peppers: The Spicy Reward!
This is the moment you’ve been waiting for! Harvesting your own Bird’s Eye Chili peppers is incredibly rewarding.
1. When to Harvest: Bird’s Eye Chili peppers are typically ready to harvest when they turn red. They can also be harvested when they’re green, but they’ll be less spicy.
2. How to Harvest: Use pruners or scissors to cut the peppers from the plant. Be careful not to damage the plant.
3. Wear Gloves: I can’t stress this enough! Bird’s Eye Chili peppers are very spicy, and the oils can irritate your skin. Wear gloves when handling them.
4. Storage: You can store your chili peppers in the refrigerator for a few weeks. You can also dry them or freeze them for longer storage.
Troubleshooting: Common Problems and Solutions
Even with the best care, you might encounter some problems along the way. Here are some common issues and how to address them:
* Yellowing Leaves: This can be caused by overwatering, underwatering, nutrient deficiencies, or pests. Check the soil moisture and adjust your watering accordingly. Fertilize your plants with a balanced fertilizer. Inspect the leaves for pests.
* Blossom End Rot: This is a calcium deficiency that causes the bottom of the peppers to rot. Make sure your soil is well-draining and add calcium to the soil. You can also use a calcium-rich fertilizer.
* Lack of Peppers: This can be caused by lack of sunlight, poor pollination, or nutrient deficiencies. Make sure your plants are getting enough sunlight. You can hand-pollinate the flowers by gently shaking the plant or using a small brush to transfer pollen from one flower to another. Fertilize your plants with a fertilizer that’s high in phosphorus.
* Pests: As mentioned earlier, keep an eye out for pests like aphids, spider mites, and whiteflies. Treat them with insecticidal soap or neem oil.
Enjoying Your Harvest: Spice Up Your Life!
Now that you’ve harvested your Bird’s Eye Chili peppers, it’s time to enjoy them! These peppers are incredibly versatile and can be used in a variety of dishes.
* Add them to curries, stir-fries, and soups.
* Make your own chili oil or chili paste.
* Dry them and grind them into chili powder.
* Pickle them for a spicy snack.
Remember to start small! Bird’s Eye Chili peppers are very spicy, so use them sparingly at first. You can always add more, but you can’t take it away!
Growing Bird’s Eye Chili can be a fun and rewarding experience. With a little patience and care, you can enjoy a bountiful harvest of these fiery little peppers. Happy growing!
Conclusion
So, there you have it! Growing your own Bird’s Eye Chili is not only achievable, but it’s also incredibly rewarding. Imagine the satisfaction of plucking fiery peppers straight from your own plant, knowing exactly where they came from and how they were grown. Forget those bland, store-bought chilies that lack the true punch – with this DIY guide, you’re on your way to cultivating a constant supply of intense, flavorful heat.
This isn’t just about saving money (though that’s certainly a perk!). It’s about connecting with your food, understanding the growing process, and adding a vibrant touch of green to your home. Plus, think of the bragging rights! You’ll be the go-to person for anyone seeking a genuine chili kick.
But the best part? The possibilities are endless! Once you’ve mastered the basics, you can experiment with different growing techniques. Try hydroponics for faster growth, or explore different soil compositions to influence the pepper’s flavor profile. Consider companion planting with herbs like basil or rosemary, which are said to deter pests and enhance the chili’s aroma.
And don’t be afraid to get creative with your harvest! Beyond adding them to your favorite dishes, Bird’s Eye Chilies can be used to make homemade chili oil, infused vinegar, or even dried and ground into a potent chili powder. The only limit is your imagination.
We’ve covered everything from seed selection to pest control, providing you with a comprehensive guide to success. Now, it’s your turn to put these tips into action. Don’t be intimidated by the process – even if you’re a beginner gardener, you can absolutely grow your own Bird’s Eye Chili.
We strongly encourage you to embark on this exciting journey. Start small, be patient, and don’t be afraid to learn from your mistakes. The reward of fresh, fiery chilies is well worth the effort.
And most importantly, we want to hear about your experience! Share your photos, tips, and challenges in the comments below. Let’s create a community of Bird’s Eye Chili enthusiasts, sharing our knowledge and inspiring each other to grow the best chilies possible. What are you waiting for? Get planting and unleash the heat! Let us know how your **Bird’s Eye Chili** growing journey goes!
Frequently Asked Questions (FAQ)
What is the best time of year to start growing Bird’s Eye Chili?
The ideal time to start growing Bird’s Eye Chili depends on your climate. In warmer regions with mild winters, you can start seeds indoors in late winter or early spring for transplanting outdoors after the last frost. In colder regions, start seeds indoors 6-8 weeks before the last expected frost. This gives the seedlings enough time to develop before being exposed to outdoor conditions. You can also extend the growing season by using a greenhouse or cold frame. Remember that Bird’s Eye Chilies thrive in warm temperatures, so ensure the soil temperature is consistently above 65°F (18°C) for optimal germination and growth.
How much sunlight do Bird’s Eye Chili plants need?
Bird’s Eye Chili plants require at least 6-8 hours of direct sunlight per day to thrive. Insufficient sunlight can lead to leggy growth, reduced flowering, and smaller, less flavorful chilies. If you’re growing your plants indoors, consider using grow lights to supplement natural sunlight, especially during the winter months. Position the grow lights about 6-12 inches above the plants and adjust as they grow. When transplanting outdoors, choose a location that receives full sun throughout the day.
What type of soil is best for growing Bird’s Eye Chili?
Bird’s Eye Chili plants prefer well-draining, fertile soil with a slightly acidic to neutral pH (around 6.0-7.0). A good soil mix should retain moisture but also allow excess water to drain away to prevent root rot. You can create your own soil mix by combining equal parts of potting soil, compost, and perlite or vermiculite. Compost provides essential nutrients, while perlite or vermiculite improves drainage and aeration. Avoid using heavy clay soils, as they can become waterlogged and hinder root development. Before planting, amend the soil with organic matter, such as compost or well-rotted manure, to improve its fertility and structure.
How often should I water my Bird’s Eye Chili plants?
Water your Bird’s Eye Chili plants regularly, especially during hot and dry weather. The frequency of watering will depend on factors such as the weather, soil type, and size of the plant. Generally, water deeply when the top inch of soil feels dry to the touch. Avoid overwatering, as this can lead to root rot. Ensure the pot or container has adequate drainage holes to prevent water from accumulating at the bottom. During the flowering and fruiting stages, increase watering slightly to support the plant’s increased water demands. Mulching around the base of the plant can help retain moisture and reduce the need for frequent watering.
What are some common pests and diseases that affect Bird’s Eye Chili plants?
Bird’s Eye Chili plants can be susceptible to various pests and diseases, including aphids, spider mites, whiteflies, and fungal diseases like powdery mildew and root rot. Regularly inspect your plants for signs of infestation or disease. Aphids, spider mites, and whiteflies can be controlled with insecticidal soap or neem oil. Powdery mildew can be treated with a fungicide or by improving air circulation around the plants. Root rot is often caused by overwatering, so ensure proper drainage and avoid waterlogged soil. You can also use companion planting to deter pests. For example, planting basil near your chili plants can help repel aphids and whiteflies.
How do I harvest Bird’s Eye Chilies?
Bird’s Eye Chilies are typically ready to harvest when they turn from green to red and are firm to the touch. Use scissors or pruning shears to cut the chilies from the plant, leaving a small stem attached. Avoid pulling the chilies off, as this can damage the plant. Harvest regularly to encourage the plant to produce more chilies. You can use the chilies fresh, or you can dry them for later use. To dry chilies, string them together and hang them in a well-ventilated area, or use a dehydrator.
Can I grow Bird’s Eye Chili indoors?
Yes, you can successfully grow Bird’s Eye Chili indoors, provided you meet their basic requirements. Ensure they receive at least 6-8 hours of direct sunlight per day, or supplement with grow lights. Use a well-draining potting mix and water regularly, allowing the top inch of soil to dry out between waterings. Maintain a warm temperature (around 70-80°F or 21-27°C) and provide adequate ventilation. You may also need to hand-pollinate the flowers to ensure fruit set, especially if there are no pollinators indoors.
How hot are Bird’s Eye Chilies?
Bird’s Eye Chilies are known for their intense heat. They typically range from 50,000 to 100,000 Scoville Heat Units (SHU) on the Scoville scale, which measures the pungency of chili peppers. This makes them significantly hotter than jalapeños, which typically range from 2,500 to 8,000 SHU. When handling Bird’s Eye Chilies, it’s advisable to wear gloves to avoid skin irritation. Be cautious when using them in cooking, as a little goes a long way!
How can I encourage more fruit production on my Bird’s Eye Chili plant?
To encourage more fruit production, ensure your plant receives adequate sunlight, water, and nutrients. Fertilize regularly with a balanced fertilizer or a fertilizer specifically formulated for chili peppers. Prune the plant to encourage branching and remove any dead or yellowing leaves. Pinch off the tips of the branches to promote bushier growth and more flowering. Hand-pollinate the flowers if necessary, especially if growing indoors. Avoid overwatering or underwatering, as both can stress the plant and reduce fruit production.
What are some creative ways to use my homegrown Bird’s Eye Chilies?
Beyond adding them to your favorite dishes, there are many creative ways to use your homegrown Bird’s Eye Chilies. You can make homemade chili oil by infusing oil with the chilies. Create a spicy chili paste by blending the chilies with garlic, ginger, and other spices. Dry the chilies and grind them into a potent chili powder. Infuse vinegar with the chilies to make a spicy condiment. Add them to pickles or relishes for a fiery kick. You can even use them to make homemade hot sauce. The possibilities are endless!


Leave a Comment