

Growing gourds can seem intimidating, but trust me, it’s a surprisingly rewarding experience! Have you ever admired those intricately carved gourds at a fall festival and thought, “I wish I could do that”? Well, you absolutely can! For centuries, gourds have been more than just decorative items; they’ve been essential tools, musical instruments, and even food sources in various cultures around the world. From the ancient Egyptians using them as water containers to Native American tribes crafting them into ceremonial rattles, the humble gourd boasts a rich and fascinating history.
But why should you consider growing gourds in your own backyard? In today’s world, where sustainability and DIY projects are gaining popularity, cultivating your own gourds offers a unique opportunity to connect with nature, unleash your creativity, and even save money! Imagine crafting your own birdhouses, bowls, or unique decorations – all from something you grew yourself. This beginner’s guide will provide you with all the essential tips and tricks to successfully grow gourds, even if you’ve never gardened before. Let’s get started and transform your garden into a gourd-growing paradise!
Growing Gourds: From Seed to Stunning Decor!
Hey there, fellow DIY enthusiasts! I’m so excited to share my passion for growing gourds with you. It’s a rewarding experience that culminates in beautiful, unique decorations for your home. Trust me, there’s nothing quite like displaying something you’ve nurtured from a tiny seed! This guide will walk you through every step, from choosing the right gourd variety to curing them for long-lasting beauty. Let’s get our hands dirty!
Choosing Your Gourd Variety
Before we even think about planting, we need to decide what kind of gourds we want to grow. There are two main categories: ornamental gourds and hard-shelled gourds.
* **Ornamental Gourds:** These are the colorful, often warty, gourds you see in fall displays. They come in a huge variety of shapes, sizes, and colors. They’re great for quick gratification because they mature relatively quickly.
* **Hard-Shelled Gourds (Lagenaria):** These are the gourds that can be dried and used for crafting, like birdhouses, bowls, and musical instruments. They take longer to mature and require a longer growing season.
Here are a few popular varieties to consider:
* **Bottle Gourds:** Perfect for birdhouses and dippers.
* **Apple Gourds:** Round and apple-shaped, great for painting and decorating.
* **Swan Gourds:** Shaped like a swan, very elegant!
* **Miniature Gourds:** A mix of small, colorful gourds, perfect for centerpieces.
* **Loofah Gourds:** Yes, you can grow your own sponges! (Technically, these are a type of gourd.)
Once you’ve chosen your variety, source your seeds from a reputable supplier. I’ve had good luck with online seed companies and local nurseries.
Starting Your Gourd Seeds
Gourds need a long growing season, so starting them indoors is often necessary, especially if you live in a cooler climate.
* **Timing is Key:** Start your seeds indoors about 4-6 weeks before the last expected frost.
* **Soaking the Seeds:** Soak the seeds in warm water for 24 hours before planting. This helps soften the hard outer shell and encourages germination.
* **Planting the Seeds:** Use peat pots or biodegradable pots filled with seed-starting mix. Plant 2-3 seeds per pot, about 1 inch deep.
* **Warmth and Light:** Keep the soil consistently moist and provide warmth. A heat mat can be very helpful. Once the seedlings emerge, provide plenty of light. A grow light is ideal, but a sunny windowsill will also work.
* **Thinning:** Once the seedlings have a few true leaves, thin them to one strong seedling per pot.
Preparing Your Garden Bed
Gourds are heavy feeders, so preparing your garden bed is crucial for success.
* **Sunlight:** Choose a location that receives at least 6-8 hours of direct sunlight per day.
* **Soil:** Gourds prefer well-drained soil that is rich in organic matter. Amend your soil with compost or well-rotted manure before planting.
* **Spacing:** Gourds need plenty of space to sprawl. Allow at least 4-6 feet between plants, depending on the variety.
* **Trellising (Optional):** Some gourd varieties, like bottle gourds, can be trellised to save space and improve air circulation. A sturdy trellis is essential.
Transplanting Your Seedlings
Once the danger of frost has passed and the soil has warmed up, it’s time to transplant your seedlings into the garden.
1. **Harden Off:** Before transplanting, gradually acclimate your seedlings to outdoor conditions by hardening them off. This involves exposing them to increasing amounts of sunlight and wind over a period of 7-10 days.
2. **Planting:** Dig a hole that is slightly larger than the pot. Gently remove the seedling from the pot and place it in the hole. Backfill with soil and water thoroughly.
3. **Mulching:** Apply a layer of mulch around the plants to help retain moisture and suppress weeds.
Caring for Your Gourd Plants
Now that your gourds are in the ground, it’s time to provide them with the care they need to thrive.
* **Watering:** Water deeply and regularly, especially during dry periods. Gourds need consistent moisture to develop properly.
* **Fertilizing:** Fertilize your gourd plants every 2-3 weeks with a balanced fertilizer.
* **Weeding:** Keep the area around your gourd plants free of weeds.
* **Pest Control:** Monitor your plants for pests, such as squash bugs and vine borers. Use organic pest control methods whenever possible.
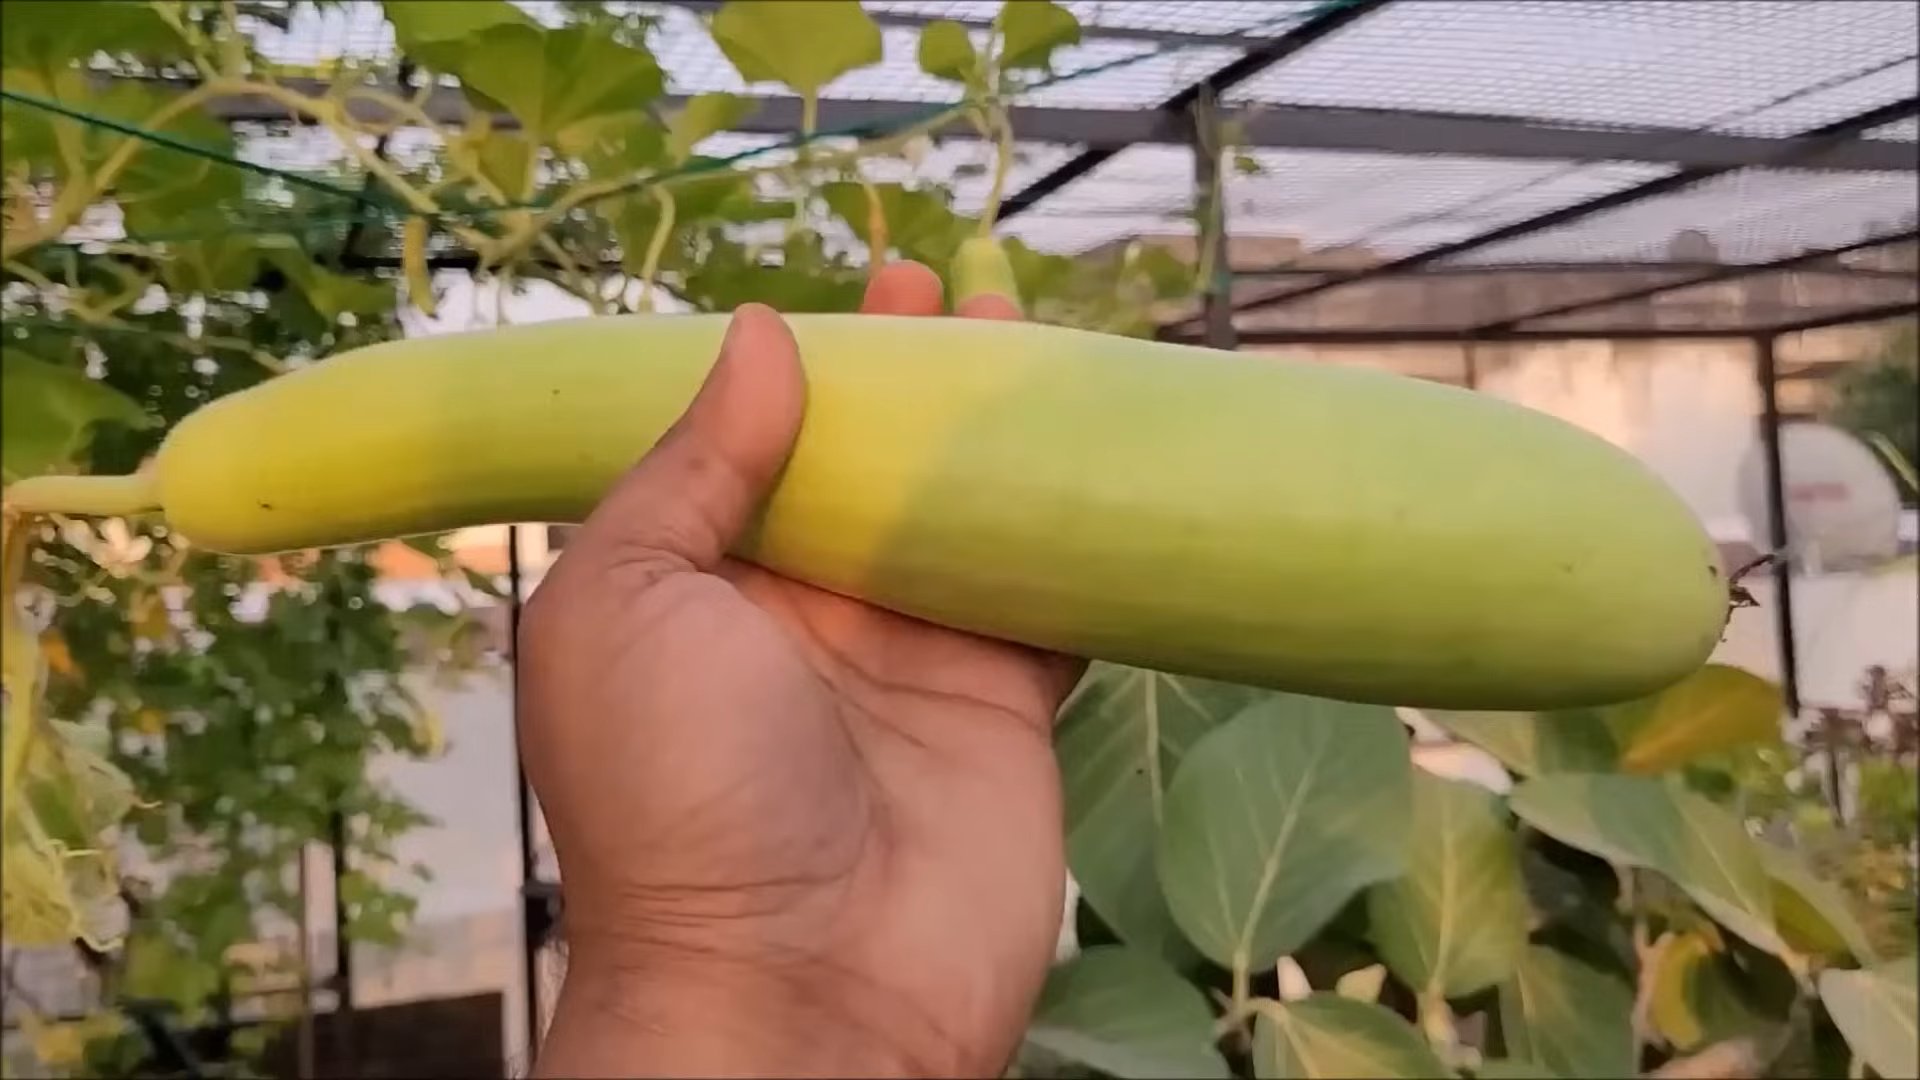
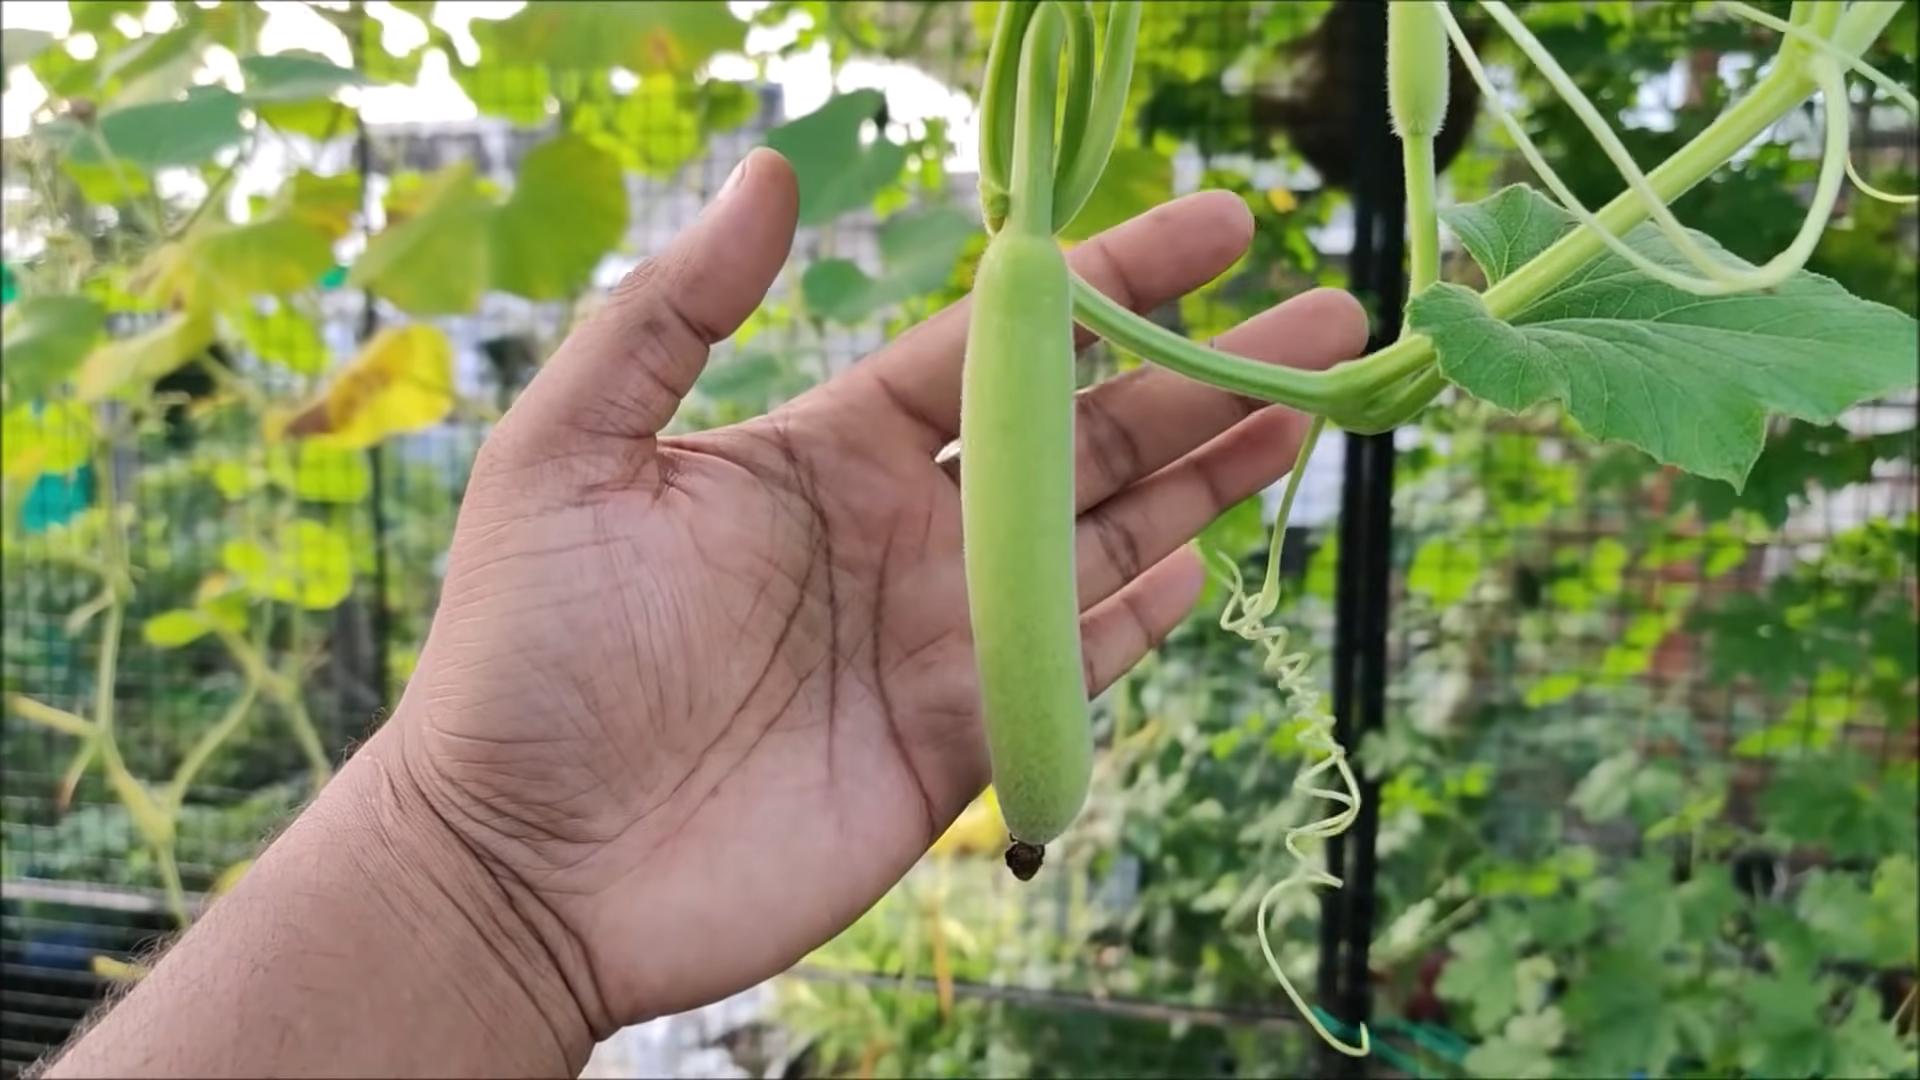
* **Pollination:** Gourds have separate male and female flowers. If you’re not seeing any gourds developing, you may need to hand-pollinate the flowers. To do this, use a small paintbrush to transfer pollen from the male flower to the female flower. The female flower has a small gourd-like structure at the base.
Harvesting Your Gourds
Knowing when to harvest your gourds is crucial for successful drying and crafting.
* **Ornamental Gourds:** Harvest ornamental gourds when they are fully mature and the stems have begun to dry and turn brown.
* **Hard-Shelled Gourds:** Harvest hard-shelled gourds when the stems are completely dry and brown, and the gourd itself feels lightweight. A good test is to shake the gourd – if you hear the seeds rattling inside, it’s ready to harvest.
* **Handle with Care:** When harvesting, use pruning shears or a sharp knife to cut the gourd from the vine, leaving a few inches of stem attached. Handle the gourds carefully to avoid bruising or damaging the skin.
Curing Your Gourds: The Key to Longevity
Curing is the process of drying the gourds, which is essential for preventing rot and ensuring they last for years. This is probably the most important step!
1. **Cleaning:** Gently wash the gourds with soapy water to remove any dirt or debris.
2. **Drying Location:** Choose a well-ventilated, dry, and dark location for curing. A shed, garage, or attic works well. Avoid direct sunlight, as it can cause the gourds to crack.
3. **Elevated Drying:** Place the gourds on a wire rack or pallets to allow air to circulate around them. Do not let them touch each other.
4. **Patience is a Virtue:** The curing process can take several weeks or even months, depending on the size and thickness of the gourd. Check the gourds regularly for signs of rot or mold. If you see any, wipe them down with a solution of bleach and water (1 part bleach to 10 parts water).
5. **Signs of Completion:** The gourds are fully cured when they are lightweight, hard, and the seeds rattle inside. The outer skin will be hard and dry.
Cleaning Cured Gourds
Once the gourds are cured, they may have some mold or discoloration on the surface. Don’t worry, this is normal!
1. **Scrubbing:** Use a scrub brush and soapy water to remove any mold or dirt.
2. **Bleach Solution (Optional):** For stubborn mold, you can use a bleach solution (1 part bleach to 10 parts water).
3. **Rinsing:** Rinse the gourds thoroughly with clean water.
4. **Drying:** Allow the gourds to dry completely before painting or decorating.
Decorating Your Gourds: Unleash Your Creativity!
Now for the fun part! There are endless ways to decorate your gourds.
* **Painting:** Acrylic paints work well on gourds. You can paint intricate designs, landscapes, or abstract patterns.
* **Wood Burning:** Use a wood-burning tool to create designs on the gourd’s surface.
* **Carving:** Carve intricate designs into the gourd using a carving tool.
* **Decoupage:** Glue paper cutouts or fabric onto the gourd’s surface.
* **Adding Embellishments:** Glue on beads, sequins, or other embellishments to add sparkle and texture.
* **Sealing:** Once you’ve finished decorating your gourd, seal it with a clear coat of varnish or polyurethane to protect the finish.
Specific Project Ideas
Here are a few ideas to get your creative juices flowing:
* **Birdhouses:** Bottle gourds make excellent birdhouses. Simply cut a hole in the side, clean out the inside, and add a perch.
* **Bowls:** Cut a gourd in half and clean out the inside to create a unique bowl.
* **Lamps:** Drill a hole in the bottom of a gourd and insert a lamp kit to create a one-of-a-kind lamp.
* **Musical Instruments:** Gourds can be used to make a variety of musical instruments, such as rattles and drums.
* **Fall Centerpieces:** Arrange a collection of ornamental gourds in a bowl or basket for a festive fall centerpiece
Conclusion
So, there you have it! Growing gourds might seem intimidating at first, but with a little patience, the right techniques, and this comprehensive guide, you’ll be well on your way to harvesting a beautiful and bountiful crop. We’ve covered everything from selecting the perfect gourd variety for your needs and climate, to preparing your soil, nurturing your seedlings, and even troubleshooting common problems.
But why is this DIY approach to growing gourds a must-try? Simply put, it’s about connection. It’s about connecting with nature, understanding the life cycle of a plant, and experiencing the immense satisfaction of creating something beautiful and useful with your own two hands. Store-bought gourds, while convenient, lack the unique character and personal touch that comes from nurturing your own. Plus, you’ll have a wider selection of varieties available to you than you’d ever find in a store.
Beyond the basic techniques, there’s a whole world of gourd-growing variations to explore. Consider experimenting with different training methods to shape your gourds into unique forms. Try growing them on trellises for a vertical garden effect, or let them sprawl across the ground for a more natural look. You can also explore different curing and drying techniques to achieve different finishes and textures. For example, some growers use a bleach solution to lighten the gourd’s skin, while others prefer a more natural, sun-dried look.
Don’t be afraid to get creative with your gourd projects! Once your gourds are dried and cured, the possibilities are endless. From birdhouses and bowls to musical instruments and decorative art, gourds can be transformed into a wide range of functional and artistic creations. Consider painting them with vibrant colors, carving intricate designs, or even adding embellishments like beads and feathers.
Growing gourds is more than just a hobby; it’s an experience. It’s a journey of learning, discovery, and creativity. So, what are you waiting for? Grab some seeds, prepare your soil, and get ready to embark on your own gourd-growing adventure.
We’re confident that with the knowledge you’ve gained from this guide, you’ll be successful in growing your own beautiful and unique gourds. But remember, every garden is different, and every growing season presents its own unique challenges. Don’t be discouraged if you encounter setbacks along the way. Learn from your mistakes, adapt your techniques, and keep experimenting.
Most importantly, have fun! Growing gourds should be a rewarding and enjoyable experience. So, relax, connect with nature, and let the magic of the garden unfold.
We’d love to hear about your gourd-growing experiences! Share your photos, tips, and stories with us in the comments below. Let’s create a community of gourd enthusiasts who can learn from each other and inspire others to try this rewarding hobby. Happy growing!
Frequently Asked Questions (FAQ)
What is the best time of year to plant gourd seeds?
The ideal time to plant gourd seeds is after the last frost in your area, when the soil has warmed to at least 65 degrees Fahrenheit. Gourds require a long growing season, typically 90-120 days, so starting them indoors 4-6 weeks before the last frost can give them a head start. Check your local frost dates and the specific requirements of the gourd variety you’re growing for the most accurate timing.
How much space do gourds need to grow?
Gourds are vigorous vines that require a significant amount of space. Depending on the variety, they can spread 10-20 feet or more. Provide ample room for them to sprawl, either on the ground or on a sturdy trellis. If growing on the ground, space plants at least 4-6 feet apart. If using a trellis, ensure it’s strong enough to support the weight of the mature gourds.
What kind of soil is best for growing gourds?
Gourds thrive in well-drained, fertile soil that is rich in organic matter. Amend your soil with compost or well-rotted manure before planting to improve drainage and nutrient content. A slightly acidic to neutral soil pH (6.0-7.0) is ideal. Conduct a soil test to determine your soil’s pH and nutrient levels, and amend accordingly.
How often should I water my gourd plants?
Gourds need consistent moisture, especially during hot, dry weather. Water deeply and regularly, aiming to keep the soil consistently moist but not waterlogged. Avoid overhead watering, as this can promote fungal diseases. Drip irrigation or soaker hoses are excellent options for delivering water directly to the roots. Mulching around the plants can also help retain moisture and suppress weeds.
What are some common pests and diseases that affect gourds?
Common pests that can affect gourds include squash bugs, squash vine borers, cucumber beetles, and aphids. Regularly inspect your plants for signs of infestation and take appropriate action, such as hand-picking pests, using insecticidal soap, or applying neem oil. Common diseases include powdery mildew, downy mildew, and fungal rots. Ensure good air circulation around your plants, avoid overhead watering, and apply fungicides if necessary.
How do I know when my gourds are ready to harvest?
Gourds are typically ready to harvest in the fall, after the vines have died back and the gourds have fully matured. The skin of the gourd should be hard and dry to the touch, and the stem should be brown and dry. Gently tap the gourd; it should sound hollow. Leave the gourds on the vine as long as possible to allow them to fully mature and dry.
What is the best way to cure and dry gourds?
Curing and drying gourds is essential for preserving them and preventing rot. After harvesting, wash the gourds with a mild soap and water solution and dry them thoroughly. Place them in a well-ventilated area, such as a shed or garage, away from direct sunlight and moisture. Elevate the gourds on racks or pallets to allow air to circulate around them. Turn the gourds regularly to ensure even drying. The drying process can take several weeks or even months, depending on the size and thickness of the gourd.
How can I prevent my gourds from rotting during the drying process?
Preventing rot is crucial for successful gourd drying. Ensure good air circulation around the gourds, avoid overcrowding them, and remove any damaged or diseased gourds promptly. You can also wipe the gourds with a diluted bleach solution (1 part bleach to 10 parts water) to help prevent fungal growth. Regularly inspect the gourds for signs of rot, such as soft spots or discoloration, and discard any affected gourds.
Can I paint or decorate my gourds after they are dried?
Yes, absolutely! Once your gourds are fully dried and cured, you can paint, carve, or decorate them in any way you like. Use acrylic paints, wood stains, or other craft materials to create unique and personalized designs. Seal the finished gourds with a clear coat of varnish or polyurethane to protect them from moisture and damage.
What are some creative uses for dried gourds?
The possibilities are endless! Dried gourds can be used to create a wide range of functional and decorative items, including birdhouses, bowls, dippers, musical instruments, masks, ornaments, and decorative art. Let your imagination run wild and experiment with different techniques and materials to create your own unique gourd creations.

Leave a Comment