

Growing Kale in Plastic Bottles: Sounds unconventional, right? But trust me, it’s a game-changer for anyone looking to maximize their gardening space and enjoy fresh, homegrown kale, even without a sprawling backyard! I’m so excited to share this incredibly simple and effective DIY trick with you.
For centuries, humans have cultivated kale, a nutritional powerhouse, in various ways. From ancient Roman gardens to modern-day organic farms, this leafy green has been a staple in diets worldwide. But let’s face it, not everyone has the luxury of acres of land to dedicate to gardening. That’s where this clever hack comes in!
Imagine harvesting vibrant, healthy kale right from your balcony, patio, or even a sunny windowsill. No more trips to the grocery store for wilted greens! This method of growing kale in plastic bottles is not only eco-friendly (repurposing those bottles!), but it’s also incredibly space-efficient and cost-effective. Plus, it’s a fantastic way to introduce kids to the joys of gardening and teach them about sustainability. Ready to ditch the traditional garden bed and embrace this innovative approach? Let’s get started!

DIY Vertical Kale Garden: Upcycling Plastic Bottles
Hey there, fellow gardening enthusiasts! I’m super excited to share a fun and eco-friendly project with you: growing kale in upcycled plastic bottles. This is a fantastic way to maximize space, especially if you have a small balcony, patio, or even just a sunny windowsill. Plus, it’s a great way to reduce plastic waste! Let’s dive in!
Materials You’ll Need:
Before we get started, let’s gather all the necessary materials. Trust me, having everything ready beforehand will make the process much smoother.
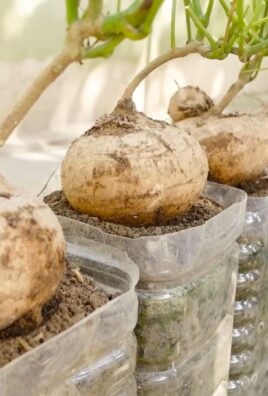
* Plastic Bottles: You’ll need several plastic bottles. I recommend using 2-liter bottles, but any size will work. Just make sure they’re clean and have their labels removed. The number of bottles depends on how big you want your vertical garden to be.
* Kale Seeds or Seedlings: Choose your favorite kale variety! I personally love curly kale and dinosaur kale, but feel free to experiment. You can start from seeds or buy small seedlings from your local garden center.
* Potting Soil: Use a good quality potting mix that’s well-draining. This is crucial for healthy kale growth.
* Scissors or Utility Knife: For cutting the plastic bottles. Be careful!
* Drill or Nail and Hammer: To create drainage holes.
* Rope or Twine: To hang the bottles. I prefer using sturdy rope for extra support.
* Measuring Tape or Ruler: To ensure even spacing.
* Marker: For marking cutting lines.
* Watering Can: For watering your kale.
* Gloves (Optional): To keep your hands clean.
Preparing the Plastic Bottles:
This is where we transform those ordinary plastic bottles into mini kale planters!
1. Clean the Bottles: Thoroughly wash the plastic bottles with soap and water to remove any residue. Rinse them well and let them dry completely. This is important to prevent any contamination that could harm your kale.
2. Remove Labels: Peel off the labels from the bottles. If they’re stubborn, try soaking the bottles in warm, soapy water for a while. You can also use a scraper or adhesive remover.
3. Cut the Bottles: This is where the scissors or utility knife comes in. There are a couple of ways to cut the bottles, depending on how you want to arrange your vertical garden.
* Option 1: Horizontal Cut: Cut the bottle horizontally, about two-thirds of the way up from the bottom. This creates a larger planting area. You’ll discard the top portion of the bottle.
* Option 2: Vertical Cut (for stacking): Cut a rectangular opening on one side of the bottle, leaving the top and bottom intact. This allows you to stack the bottles on top of each other, creating a tower-like structure.
I personally prefer the horizontal cut because it provides more space for the kale to grow. But the vertical cut is great if you’re short on space and want a taller garden.
4. Create Drainage Holes: Drainage is essential to prevent waterlogging and root rot. Use a drill or a nail and hammer to create several drainage holes in the bottom of each bottle. I usually make about 4-5 holes, evenly spaced.
5. Prepare Hanging Holes (if needed): If you plan to hang your bottles, you’ll need to create holes for the rope or twine. Use the drill or nail and hammer to make two holes on either side of the bottle, near the top. Make sure the holes are large enough to accommodate your rope or twine.
Planting the Kale:
Now for the fun part – planting the kale!
1. Fill with Potting Soil: Fill each prepared bottle with potting soil, leaving about an inch of space at the top. Gently pat down the soil to remove any air pockets.
2. Plant the Seeds or Seedlings:
* From Seeds: Sprinkle the kale seeds evenly over the surface of the soil. Cover them with a thin layer of soil (about ¼ inch). Gently water the soil.
* From Seedlings: Carefully remove the kale seedlings from their containers. Gently loosen the roots and plant them in the center of the bottle. Fill in around the seedlings with potting soil and gently pat it down.
3. Water Thoroughly: Water the soil thoroughly until water drains out of the drainage holes. This helps to settle the soil and ensures that the roots are well-hydrated.
Creating Your Vertical Garden:
This is where you get to be creative and design your vertical kale garden!
1. Hanging the Bottles: If you’ve chosen to hang your bottles, thread the rope or twine through the holes you created earlier. Tie a secure knot at each end to prevent the bottles from slipping. Hang the bottles from a sturdy support, such as a fence, balcony railing, or even a clothesline. Make sure the bottles are spaced evenly to allow for adequate sunlight and airflow.
2. Stacking the Bottles: If you’ve chosen to stack your bottles, simply place one bottle on top of the other, ensuring that they are securely nested. You can use zip ties or wire to further secure the bottles together.
3. Arranging the Bottles: Whether you’re hanging or stacking, arrange the bottles in a way that maximizes sunlight exposure. Kale needs at least 6 hours of sunlight per day to thrive.
Caring for Your Kale:
Now that your vertical kale garden is set up, it’s important to provide proper care to ensure healthy growth.
1. Watering: Water your kale regularly, especially during hot and dry weather. Check the soil moisture by sticking your finger into the soil. If the top inch feels dry, it’s time to water. Avoid overwatering, as this can lead to root rot.
2. Fertilizing: Kale is a heavy feeder, so it benefits from regular fertilization. Use a balanced liquid fertilizer every 2-3 weeks. Follow the instructions on the fertilizer label. You can also add compost to the soil to provide additional nutrients.
3. Sunlight: Make sure your kale receives at least 6 hours of sunlight per day. If you’re growing your kale indoors, you may need to supplement with artificial light.
4. Pest Control: Keep an eye out for pests, such as aphids, cabbage worms, and slugs. You can control these pests by handpicking them off the plants, using insecticidal soap, or applying diatomaceous earth.
5. Harvesting: You can start harvesting kale leaves when they are about 4-6 inches long. Simply cut off the outer leaves, leaving the inner leaves to continue growing. This will encourage continuous production.
Troubleshooting:
Even with the best care, you might encounter some problems. Here are a few common issues and how to address them:
* Yellowing Leaves: This could be a sign of overwatering, underwatering, or nutrient deficiency. Check the soil moisture and adjust your watering schedule accordingly. Fertilize with a balanced fertilizer.
* Leggy Growth: This usually indicates insufficient sunlight. Move your kale to a sunnier location or supplement with artificial light.
* Pest Infestation: As mentioned earlier, keep an eye out for pests and take action promptly.
* Slow Growth: This could be due to poor soil quality, insufficient sunlight, or lack of nutrients. Amend the soil with compost, move your kale to a sunnier location, and fertilize regularly.
Enjoying Your Harvest:
The best part of growing your own kale is enjoying the delicious and nutritious harvest! Kale is incredibly versatile and can be used in a variety of dishes.
* Salads: Add chopped kale to your favorite salads for a boost of nutrients.
* Smoothies: Blend kale into your smoothies for a healthy and refreshing drink.
* Soups and Stews: Add kale to soups and stews for added flavor and nutrition.
* Chips: Bake kale leaves with olive oil and salt for a crispy and healthy snack.
* Sautéed: Sauté kale with garlic and olive oil for a simple and delicious side dish.
I hope you found this guide helpful! Growing kale in plastic bottles is a rewarding and sustainable way to enjoy fresh, homegrown produce. Happy gardening!

Conclusion
So, there you have it! Growing kale in plastic bottles isn’t just a quirky gardening experiment; it’s a sustainable, space-saving, and surprisingly effective way to cultivate your own fresh, nutritious greens. We’ve walked you through the entire process, from preparing your bottles to harvesting your bountiful kale. But why is this DIY trick a must-try?
Firstly, it’s incredibly accessible. You’re likely already generating plastic bottle waste, and this method transforms that waste into a valuable resource. Secondly, it’s perfect for urban dwellers or anyone with limited garden space. Vertical gardening with plastic bottles allows you to maximize your yield without sacrificing precious square footage. Thirdly, it’s a fantastic way to introduce children to the joys of gardening and teach them about sustainability. They can actively participate in the process, from planting the seeds to watering the growing kale.
But the benefits don’t stop there. Growing kale in plastic bottles offers excellent drainage, preventing waterlogging and root rot, common problems in traditional gardening. The bottles also provide some insulation, protecting your kale from extreme temperature fluctuations. And let’s not forget the aesthetic appeal! A wall of vibrant green kale growing in repurposed plastic bottles is a unique and eye-catching addition to any balcony, patio, or even indoor space.
Now, let’s talk about variations. Feel free to experiment with different types of kale. Curly kale, Lacinato kale (also known as dinosaur kale), and Red Russian kale all thrive in this environment. You can also try companion planting. Consider adding herbs like basil or thyme to your plastic bottle garden. These herbs not only add flavor to your meals but also help deter pests. Another variation is to paint the plastic bottles to add a splash of color and personality to your vertical garden. Use non-toxic paint to ensure the safety of your kale.
We encourage you to embrace this DIY project and experience the satisfaction of growing your own fresh, organic kale. It’s a rewarding and sustainable way to connect with nature, even in the heart of the city. Don’t be afraid to get creative and personalize your plastic bottle garden.
Most importantly, we want to hear about your experiences! Share your photos, tips, and challenges in the comments section below. Let’s build a community of plastic bottle kale growers and inspire others to adopt this innovative and eco-friendly gardening technique. Your insights could help someone else discover the joy of growing their own food and reducing their environmental impact. So, grab those plastic bottles, get your hands dirty, and start growing your own delicious and nutritious kale today! Remember, even small steps can make a big difference in creating a more sustainable future. This method of growing kale is a fantastic way to contribute to that future.
Frequently Asked Questions (FAQ)
1. What kind of plastic bottles are best for growing kale?
Ideally, you should use food-grade plastic bottles, such as those that previously contained water, juice, or soda. Avoid bottles that held chemicals or cleaning products, as these may leach harmful substances into the soil and affect your kale. The size of the bottle depends on the variety of kale you’re growing, but generally, 1-2 liter bottles work well. Make sure the bottles are clean and free of any residue before you start.
2. What type of soil should I use for growing kale in plastic bottles?
A well-draining potting mix is essential for growing kale in plastic bottles. Avoid using garden soil, as it can become compacted and hinder drainage. A good potting mix will retain moisture while allowing excess water to escape, preventing root rot. You can also amend your potting mix with compost or other organic matter to provide additional nutrients for your kale.
3. How often should I water my kale plants in plastic bottles?
The frequency of watering depends on several factors, including the weather, the size of the bottle, and the type of potting mix you’re using. Generally, you should water your kale plants when the top inch of soil feels dry to the touch. Avoid overwatering, as this can lead to root rot. During hot weather, you may need to water more frequently. Check the moisture level of the soil regularly and adjust your watering schedule accordingly.
4. How much sunlight does kale need when grown in plastic bottles?
Kale thrives in full sun, which means at least 6 hours of direct sunlight per day. If you’re growing your kale indoors, you may need to supplement with artificial lighting. Place your plastic bottle garden in a sunny location, such as a south-facing window. If you don’t have enough natural light, consider using grow lights to ensure your kale receives adequate illumination.
5. How do I fertilize kale growing in plastic bottles?
Kale is a heavy feeder, so it’s important to fertilize regularly to ensure healthy growth. You can use a balanced liquid fertilizer, such as a 10-10-10 or 20-20-20 formula, diluted according to the manufacturer’s instructions. Fertilize every 2-3 weeks during the growing season. You can also use organic fertilizers, such as compost tea or fish emulsion.
6. How do I protect my kale plants from pests and diseases?
Growing kale in plastic bottles can help reduce the risk of pests and diseases, but it’s still important to take precautions. Regularly inspect your plants for signs of infestation or disease. Common kale pests include aphids, cabbage worms, and flea beetles. You can control these pests with insecticidal soap, neem oil, or by handpicking them off the plants. To prevent diseases, ensure good air circulation and avoid overwatering.
7. When can I harvest my kale from plastic bottles?
You can start harvesting kale leaves when they are about 4-6 inches long. Harvest the outer leaves first, leaving the inner leaves to continue growing. This will encourage the plant to produce more leaves. You can harvest kale throughout the growing season, as long as the plant is healthy and producing new growth.
8. Can I grow other vegetables in plastic bottles besides kale?
Yes, you can grow a variety of other vegetables in plastic bottles, including lettuce, spinach, herbs, and even strawberries. The key is to choose plants that are well-suited to container gardening and that have similar growing requirements. Research the specific needs of each plant before you start.
9. How do I deal with drainage issues in plastic bottle gardens?
Proper drainage is crucial for the health of your kale plants. Ensure that you have adequate drainage holes in the bottom of your plastic bottles. You can also add a layer of gravel or pebbles to the bottom of the bottles to improve drainage. If you notice that the soil is consistently waterlogged, you may need to repot your plants into larger bottles with better drainage.
10. What do I do with the plastic bottles after the growing season is over?
After the growing season is over, you can reuse the plastic bottles for other gardening projects or recycle them. Clean the bottles thoroughly and store them in a dry place until you’re ready to use them again. You can also cut them up and use them as plant markers or for other DIY projects. If the bottles are no longer usable, recycle them properly to minimize their environmental impact.

Leave a Comment