

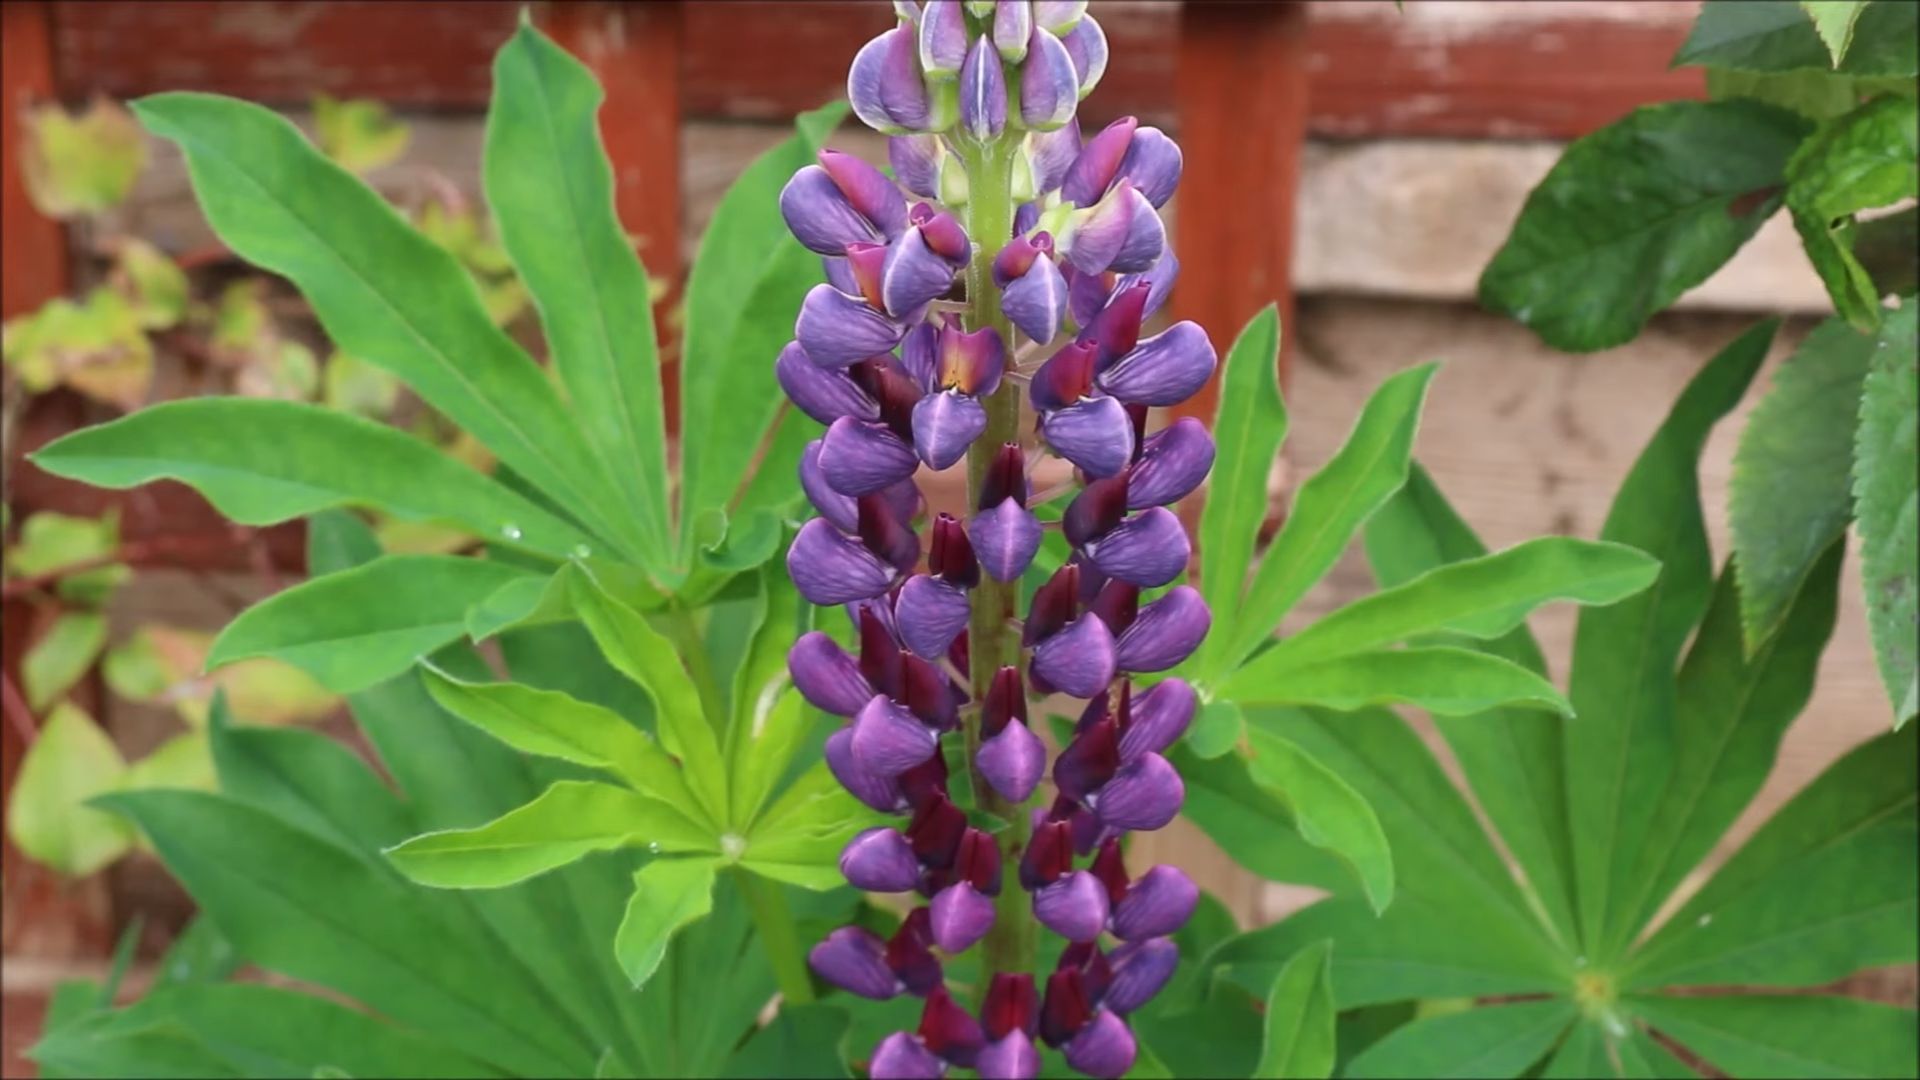
Growing Lupins from Seed might seem daunting, but trust me, it’s a rewarding journey that will fill your garden with vibrant spires of color! I remember my grandmother, a true cottage garden enthusiast, always had lupins towering in her flowerbeds. They were like beacons, attracting bees and butterflies from miles around. Lupins have a rich history, too, dating back to ancient times when they were cultivated as a food source. While we primarily admire them for their beauty now, their resilience and adaptability remain unchanged.
But why should you bother growing lupins from seed yourself? Well, for starters, it’s incredibly cost-effective compared to buying established plants. Plus, you get to choose from a wider variety of colors and cultivars. More importantly, though, mastering the art of growing lupins from seed gives you a deeper connection to your garden. You’re not just a consumer; you’re an active participant in the life cycle of these stunning flowers. This DIY guide will equip you with all the knowledge and simple hacks you need to successfully germinate, nurture, and transplant your lupin seedlings, ensuring a breathtaking display that will be the envy of your neighborhood. Let’s get started and transform your garden into a lupin paradise!
Growing Lupins from Seed: A Comprehensive DIY Guide
Hey there, fellow gardening enthusiasts! I’m so excited to share my tried-and-true method for growing lupins from seed. These beauties are a fantastic addition to any garden, adding vibrant color and attracting pollinators like crazy. Plus, starting them from seed is surprisingly easy and rewarding. Let’s dive in!
Choosing Your Lupin Seeds
Before we get our hands dirty, let’s talk about seeds. You have a few options here:
* Single Colors vs. Mixes: Do you have a specific color palette in mind for your garden? If so, opt for single-color seed packets. If you’re like me and love a riot of color, go for a mixed variety. You’ll get a surprise assortment of blooms!
* Dwarf vs. Tall Varieties: Consider the size of your garden and where you plan to plant your lupins. Dwarf varieties are perfect for containers or smaller spaces, while taller varieties make a stunning statement in borders.
* Reputable Seed Source: Always buy your seeds from a reputable source. This ensures you’re getting viable seeds that are true to type. I’ve had great success with online seed companies and local nurseries.
Preparing Your Lupin Seeds for Success
Lupin seeds have a tough outer coating, which can sometimes make it difficult for them to germinate. To give them a head start, we’re going to scarify and soak them. Don’t worry, it’s not as scary as it sounds!
Scarification: Giving Seeds a Helping Hand
Scarification involves gently damaging the seed coat to allow water to penetrate more easily. Here’s how I do it:
1. Gather Your Supplies: You’ll need your lupin seeds, a small piece of sandpaper (fine-grit works best), and a small container.
2. Gently Sand: Take each seed individually and lightly rub it against the sandpaper. You’re not trying to remove the entire seed coat, just create a small scratch or nick. I usually do this for about 5-10 seconds per seed.
3. Inspect Your Work: Check each seed to make sure you’ve created a small abrasion. You should see a slightly lighter area where you’ve sanded.
Soaking: Hydrating for Germination
After scarifying, we’ll soak the seeds to further soften the seed coat and kickstart the germination process.
1. Place Seeds in Water: Put your scarified lupin seeds in a small container and cover them with lukewarm water.
2. Soak Overnight: Let the seeds soak for 12-24 hours. You’ll notice that some of the seeds will swell up as they absorb water.
3. Drain and Prepare to Plant: After soaking, drain the water and your seeds are ready to be planted!
Sowing Lupin Seeds: Two Methods
You can sow lupin seeds directly into the ground or start them indoors. I prefer starting them indoors because it gives me more control over the growing conditions and protects the seedlings from pests. However, direct sowing is also a viable option, especially if you live in a mild climate.
Method 1: Starting Seeds Indoors
This method is great if you want to get a head start on the growing season or if you live in an area with a short growing season.
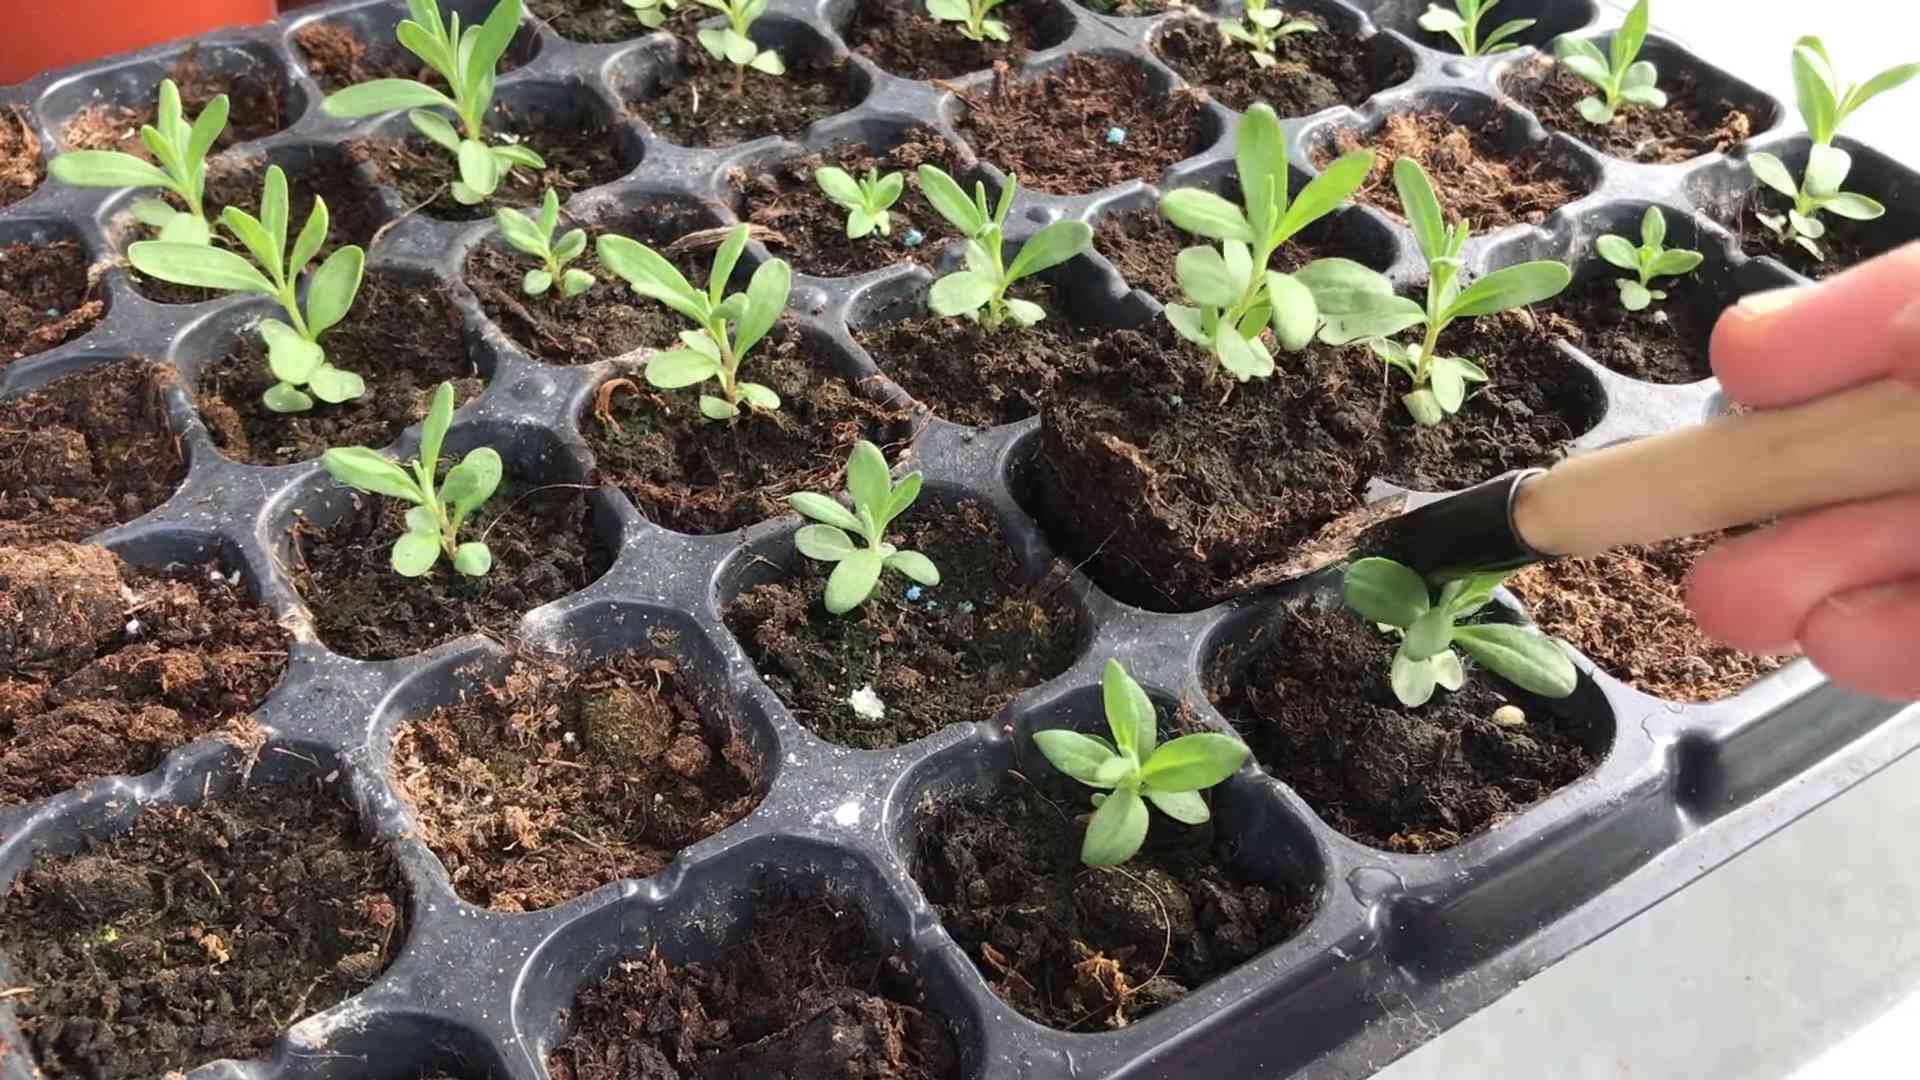
1. Choose Your Containers: I recommend using individual pots or seed trays with cells. This prevents root disturbance when you transplant the seedlings later. Peat pots or biodegradable pots are also a good option.
2. Use a Good Seed Starting Mix: Fill your containers with a high-quality seed starting mix. This mix is typically lighter and more sterile than regular potting soil, which helps prevent damping-off disease.
3. Sow the Seeds: Make a small hole in the center of each pot or cell, about 1/2 inch deep. Place one or two lupin seeds in each hole and gently cover them with the seed starting mix.
4. Water Gently: Water the soil gently using a spray bottle or watering can with a fine rose. You want to moisten the soil without disturbing the seeds.
5. Provide Warmth and Light: Place the containers in a warm location, such as a sunny windowsill or under grow lights. Lupin seeds germinate best at temperatures between 60-70°F (15-21°C). If you’re using grow lights, keep them about 2-4 inches above the soil surface.
6. Keep the Soil Moist: Check the soil moisture regularly and water as needed to keep it consistently moist but not soggy.
7. Thin Seedlings (If Necessary): If you planted two seeds per pot and both germinate, thin out the weaker seedling by snipping it off at the soil line. This will give the remaining seedling more room to grow.
8. Harden Off Seedlings: Before transplanting your seedlings outdoors, you’ll need to harden them off. This process gradually acclimates them to outdoor conditions. Start by placing the seedlings outdoors in a sheltered location for a few hours each day, gradually increasing the amount of time they spend outside over the course of a week or two.
Method 2: Direct Sowing Seeds Outdoors
This method is simpler but requires more patience and a bit of luck.
1. Prepare the Soil: Choose a sunny location with well-drained soil. Amend the soil with compost or other organic matter to improve its fertility and drainage.
2. Sow the Seeds: Sow the seeds directly into the ground, about 1/2 inch deep and 6-12 inches apart.
3. Water Gently: Water the soil gently using a watering can with a fine rose.
4. Keep the Soil Moist: Keep the soil consistently moist until the seeds germinate.
5. Protect from Pests: Keep an eye out for slugs and snails, which can damage young seedlings. Use slug bait or other pest control methods as needed.
6. Thin Seedlings (If Necessary): Once the seedlings emerge, thin them out to 6-12 inches apart.
Transplanting Lupin Seedlings
Once your seedlings have developed a few sets of true leaves and the danger of frost has passed, it’s time to transplant them into their permanent location in the garden.
1. Choose a Sunny Location: Lupins thrive in full sun, so choose a location that receives at least 6 hours of sunlight per day.
2. Prepare the Soil: Amend the soil with compost or other organic matter to improve its fertility and drainage.
3. Dig Planting Holes: Dig planting holes that are slightly larger than the root balls of your seedlings. Space the holes 12-18 inches apart, depending on the variety of lupin you’re growing.
4. Gently Remove Seedlings: Carefully remove the seedlings from their containers, being careful not to damage the roots. If you’re using peat pots, you can plant the entire pot directly into the ground.
5. Plant the Seedlings: Place the seedlings in the planting holes and gently backfill with soil. Make sure the top of the root ball is level with the surrounding soil.
6. Water Thoroughly: Water the seedlings thoroughly after planting.
7. Mulch Around Plants: Apply a layer of mulch around the plants to help retain moisture, suppress weeds, and regulate soil temperature.
Caring for Your Lupins
Once your lupins are established, they’re relatively low-maintenance. Here are a few tips to keep them happy and healthy:
* Watering: Water regularly, especially during dry spells. Lupins prefer consistently moist soil, but avoid overwatering, which can lead to root rot.
* Fertilizing: Lupins are not heavy feeders, but you can fertilize them lightly in the spring with a balanced fertilizer.
* Deadheading: Deadhead spent flowers to encourage more blooms. Simply snip off the flower stalks just below the lowest flower.
* Staking: Taller varieties of lupins may need staking to prevent them from flopping over, especially in windy areas.
* Pest and Disease Control: Keep an eye out for pests such as aphids and slugs. Treat infestations promptly with insecticidal soap or other appropriate methods. Lupins can also be susceptible to fungal diseases, such as powdery mildew. Improve air circulation around the plants and avoid overhead watering to prevent these diseases.
* Dividing: Lupins can be divided every few years to rejuvenate the plants and prevent them from becoming overcrowded. Divide the plants in the spring or fall, separating the clumps into smaller sections and replanting them in new locations.
Troubleshooting Lupin Growing
Even with the best care, you might encounter a few challenges when growing lupins. Here are some common problems and how to address them:
* Poor Germination: If your lupin seeds aren’t germinating, make sure you’ve scarified and soaked them properly. Also, ensure that the soil is warm enough and that you’re
Conclusion
So, there you have it! Growing lupins from seed isn’t just a cost-effective way to fill your garden with these stunning spires of color; it’s a deeply rewarding experience. From the initial anticipation of germination to the triumphant display of blooms, each stage offers a connection to nature that you simply can’t replicate by buying pre-grown plants.
Why is this DIY trick a must-try? Because it empowers you to cultivate a wider variety of lupins than you might find at your local nursery. You can select specific colors, heights, and even cultivars known for their exceptional fragrance. Plus, you’ll gain a deeper understanding of the lupin’s life cycle, making you a more knowledgeable and confident gardener.
But the benefits don’t stop there. Growing from seed allows you to control the growing environment from the very beginning, ensuring your lupins are strong, healthy, and acclimatized to your specific climate. This translates to more robust plants that are better equipped to withstand pests, diseases, and the vagaries of the weather.
Consider these variations to personalize your lupin-growing journey:
* Experiment with different stratification methods: While the fridge method is reliable, you could also try soaking the seeds in water for 24 hours or gently scarifying them with sandpaper.
* Create a lupin meadow: Sow a mix of lupin seeds in a designated area of your garden for a breathtaking display of color and texture.
* Succession sow for extended blooms: Sow seeds every few weeks to enjoy a continuous succession of lupin flowers throughout the growing season.
* Try growing dwarf varieties in containers: If you have limited space, dwarf lupins are perfect for pots and planters.
Ultimately, growing lupins from seed is about more than just saving money or expanding your plant selection. It’s about embracing the joy of gardening, connecting with nature, and creating a beautiful and vibrant space that you can be proud of.
We wholeheartedly encourage you to give this DIY trick a try. Don’t be intimidated if you’re a beginner; lupins are surprisingly easy to grow from seed with a little patience and care. And once you’ve experienced the satisfaction of nurturing these magnificent flowers from tiny seeds, you’ll be hooked!
We’d love to hear about your experiences! Share your photos, tips, and challenges in the comments below. Let’s create a community of lupin enthusiasts and inspire others to embark on this rewarding gardening adventure. What are you waiting for? Get those seeds sown and prepare to be amazed by the beauty of homegrown lupins! Remember, the key to success is proper seed preparation and consistent care. Happy gardening!
Frequently Asked Questions (FAQ)
What is the best time of year to sow lupin seeds?
The best time to sow lupin seeds depends on your climate. In cooler regions, you can sow seeds indoors in early spring (February-March) for transplanting outdoors after the last frost. Alternatively, you can sow seeds directly outdoors in late spring (April-May) once the soil has warmed up. In warmer regions, you can sow seeds in the fall (September-October) for blooms the following spring. Avoid sowing during the hottest months of summer.
Do I need to soak or scarify lupin seeds before sowing?
Yes, lupin seeds have a hard outer coating that can inhibit germination. Soaking the seeds in water for 24 hours or gently scarifying them with sandpaper can help to break down this coating and improve germination rates. Be careful not to damage the inner seed when scarifying.
What type of soil is best for growing lupins from seed?
Lupins prefer well-drained soil that is slightly acidic to neutral (pH 6.0-7.0). Avoid heavy clay soils, as they can become waterlogged and cause root rot. Amend the soil with compost or other organic matter to improve drainage and fertility.
How deep should I sow lupin seeds?
Sow lupin seeds about 1/2 inch (1.25 cm) deep. Cover the seeds with soil and gently water them in.
How long does it take for lupin seeds to germinate?
Lupin seeds typically germinate within 7-21 days, depending on the temperature and moisture levels. Keep the soil consistently moist but not waterlogged during this time.
How much sunlight do lupins need?
Lupins thrive in full sun, which means they need at least 6 hours of direct sunlight per day. In hotter climates, they may benefit from some afternoon shade.
How often should I water lupins?
Water lupins regularly, especially during dry periods. Avoid overwatering, as this can lead to root rot. Allow the soil to dry out slightly between waterings.
Do lupins need fertilizer?
Lupins are relatively low-maintenance plants and do not require heavy fertilization. However, you can apply a balanced fertilizer in early spring to promote healthy growth and flowering. Avoid fertilizers that are high in nitrogen, as this can encourage leafy growth at the expense of blooms.
Are lupins susceptible to any pests or diseases?
Lupins can be susceptible to aphids, slugs, and snails. Check your plants regularly for signs of infestation and take appropriate action. They can also be affected by powdery mildew and root rot. Ensure good air circulation and avoid overwatering to prevent these diseases.
How do I deadhead lupins?
Deadheading lupins involves removing the spent flower spikes to encourage further blooming. Cut the flower spike back to the next set of leaves. This will also prevent the plant from self-seeding, which can lead to unwanted lupins in your garden.
Can I save seeds from my lupins?
Yes, you can save seeds from your lupins. Allow the seed pods to dry on the plant, then harvest them and extract the seeds. Store the seeds in a cool, dry place until you are ready to sow them. Be aware that seeds saved from hybrid lupins may not produce plants that are true to type.
Are lupins poisonous?
Yes, all parts of the lupin plant are poisonous if ingested. Keep lupins away from children and pets.
My lupins are not flowering. What could be the problem?
There are several reasons why your lupins may not be flowering. They may not be getting enough sunlight, the soil may be too poor, or they may be over-fertilized with nitrogen. Ensure they are in a sunny location, amend the soil with compost, and avoid high-nitrogen fertilizers. Also, ensure the plants are not too crowded.
Can I grow lupins in containers?
Yes, you can grow dwarf varieties of lupins in containers. Choose a pot that is at least 12 inches (30 cm) in diameter and use a well-draining potting mix. Water regularly and fertilize occasionally.
How do I prevent lupins from self-seeding too much?
To prevent lupins from self-seeding excessively, deadhead the spent flower spikes before they form seed pods. This will also encourage further blooming.

Leave a Comment