

Growing Pumpkins at Home might seem like a daunting task reserved for sprawling farms, but I’m here to tell you it’s absolutely achievable, even in a small backyard or container garden! Imagine the satisfaction of carving a jack-o’-lantern from a pumpkin you nurtured from a tiny seed. Forget those grocery store pumpkins – this year, you can have a truly homegrown Halloween!
Pumpkins have a rich history, deeply intertwined with autumn celebrations and harvest festivals for centuries. Native American cultures revered pumpkins not only as a food source but also for their medicinal properties and seeds. Today, they symbolize the bounty of the season and the joy of sharing.
But why should you bother with the effort of growing pumpkins at home? Well, beyond the sheer fun of it, you’ll have access to varieties you simply won’t find in stores – think unique colors, shapes, and flavors! Plus, you’ll know exactly where your food comes from and avoid any unwanted pesticides. In this article, I’m going to share some simple DIY tricks and hacks that will help you cultivate a thriving pumpkin patch, no matter your space or experience level. Get ready to impress your neighbors and enjoy the fruits (or rather, vegetables!) of your labor!

Growing Pumpkins: From Seed to Spooky (or Delicious!) Pie
Okay, so you want to grow pumpkins? Awesome! It’s a surprisingly rewarding experience, and nothing beats carving a pumpkin you nurtured from a tiny seed. I’ve grown pumpkins for years, and I’m going to walk you through everything you need to know to have a successful harvest. Let’s get started!
Choosing Your Pumpkin Variety
Before you even think about planting, you need to decide what kind of pumpkin you want. There are tons of options, from giant carving pumpkins to smaller pie pumpkins, and even decorative gourds. Here’s a quick rundown:
* **Giant Pumpkins (e.g., Atlantic Giant):** These are the behemoths you see at pumpkin weigh-offs. They require a lot of space, fertilizer, and dedication. If you’re a beginner, maybe start with something smaller.
* **Carving Pumpkins (e.g., Howden, Connecticut Field):** These are your classic jack-o’-lantern pumpkins. They’re a good size for carving and generally easy to grow.
* **Pie Pumpkins (e.g., Sugar Pie, Baby Pam):** These are smaller, denser pumpkins with sweeter flesh, perfect for baking into pies, soups, and other delicious treats.
* **Miniature Pumpkins (e.g., Jack Be Little, Baby Boo):** These are adorable little pumpkins that are great for decorating. They don’t have much flesh, so they’re not ideal for cooking.
* **Ornamental Gourds:** While technically not pumpkins, these add a lot of visual interest to your fall display.
Once you’ve chosen your variety, make sure you get your seeds from a reputable source.
Preparing Your Pumpkin Patch
Pumpkins are hungry plants, so soil preparation is key. They need plenty of sunlight and well-drained soil that’s rich in organic matter.
* **Sunlight:** Pumpkins need at least 6 hours of direct sunlight per day. The more, the better!
* **Soil:** The ideal soil is loamy, well-drained, and has a pH between 6.0 and 7.0. If your soil is heavy clay or sandy, you’ll need to amend it.
* **Compost:** Add plenty of compost to your soil. This will improve drainage, add nutrients, and help retain moisture. I usually add several inches of compost to my pumpkin patch.
* **Fertilizer:** Pumpkins are heavy feeders, so you’ll need to fertilize them regularly. A balanced fertilizer (e.g., 10-10-10) is a good starting point. You can also use organic fertilizers like bone meal and blood meal.
Planting Your Pumpkin Seeds
You have two options for planting: direct sowing or starting seeds indoors. Direct sowing is easier, but starting seeds indoors gives you a head start.
* **Direct Sowing:** Wait until the soil has warmed up to at least 60°F (15°C). This is usually a few weeks after the last frost. Plant seeds about 1 inch deep and 2-3 feet apart.
* **Starting Seeds Indoors:** Start seeds indoors about 3-4 weeks before the last frost. Use peat pots or biodegradable pots, as pumpkins don’t like to have their roots disturbed. Plant seeds about 1 inch deep. Keep the soil moist and warm. Once the seedlings have a few true leaves, you can transplant them outdoors after hardening them off.
Hardening off is the process of gradually acclimating your seedlings to outdoor conditions. Start by placing them outside for a few hours each day, gradually increasing the amount of time they spend outdoors. This will help them adjust to the sun, wind, and temperature changes.
Caring for Your Pumpkin Plants
Once your pumpkin plants are established, you’ll need to provide them with regular care.
* **Watering:** Pumpkins need plenty of water, especially during hot, dry weather. Water deeply and regularly, aiming for about 1 inch of water per week. Avoid watering the leaves, as this can lead to fungal diseases.
* **Weeding:** Keep your pumpkin patch free of weeds. Weeds compete with pumpkins for water and nutrients.
* **Fertilizing:** Fertilize your pumpkin plants every few weeks with a balanced fertilizer. You can also use a foliar fertilizer (a fertilizer that’s sprayed directly onto the leaves).
* **Pest Control:** Pumpkins are susceptible to a variety of pests, including squash bugs, squash vine borers, and cucumber beetles. Inspect your plants regularly for pests and take action if you see any. I usually use organic pest control methods, such as insecticidal soap or neem oil.
* **Pollination:** Pumpkins have separate male and female flowers. The female flowers need to be pollinated in order to produce pumpkins. If you’re not seeing any pumpkins forming, you may need to hand-pollinate the flowers. To hand-pollinate, use a small paintbrush to transfer pollen from the male flower to the female flower.
Training Your Pumpkin Vines
Pumpkin vines can grow quite long, so you may need to train them to keep them from taking over your garden.
* **Pruning:** You can prune your pumpkin vines to encourage the plant to focus its energy on producing fewer, larger pumpkins. To prune, simply cut off any side shoots that are growing from the main vine.
* **Directing Vines:** You can also direct the vines to grow in a specific direction. This can be helpful if you have limited space.
Protecting Your Pumpkins
As your pumpkins grow, you’ll need to protect them from pests, diseases, and the elements.
* **Pest Control:** Continue to monitor your pumpkins for pests and take action if you see any.
* **Disease Control:** Pumpkins are susceptible to a variety of fungal diseases, such as powdery mildew and downy mildew. To prevent these diseases, make sure your plants have good air circulation and avoid watering the leaves. If you see signs of disease, treat your plants with a fungicide.
* **Sun Protection:** In hot climates, pumpkins can get sunburned. To protect them from the sun, you can cover them with a cloth or cardboard.
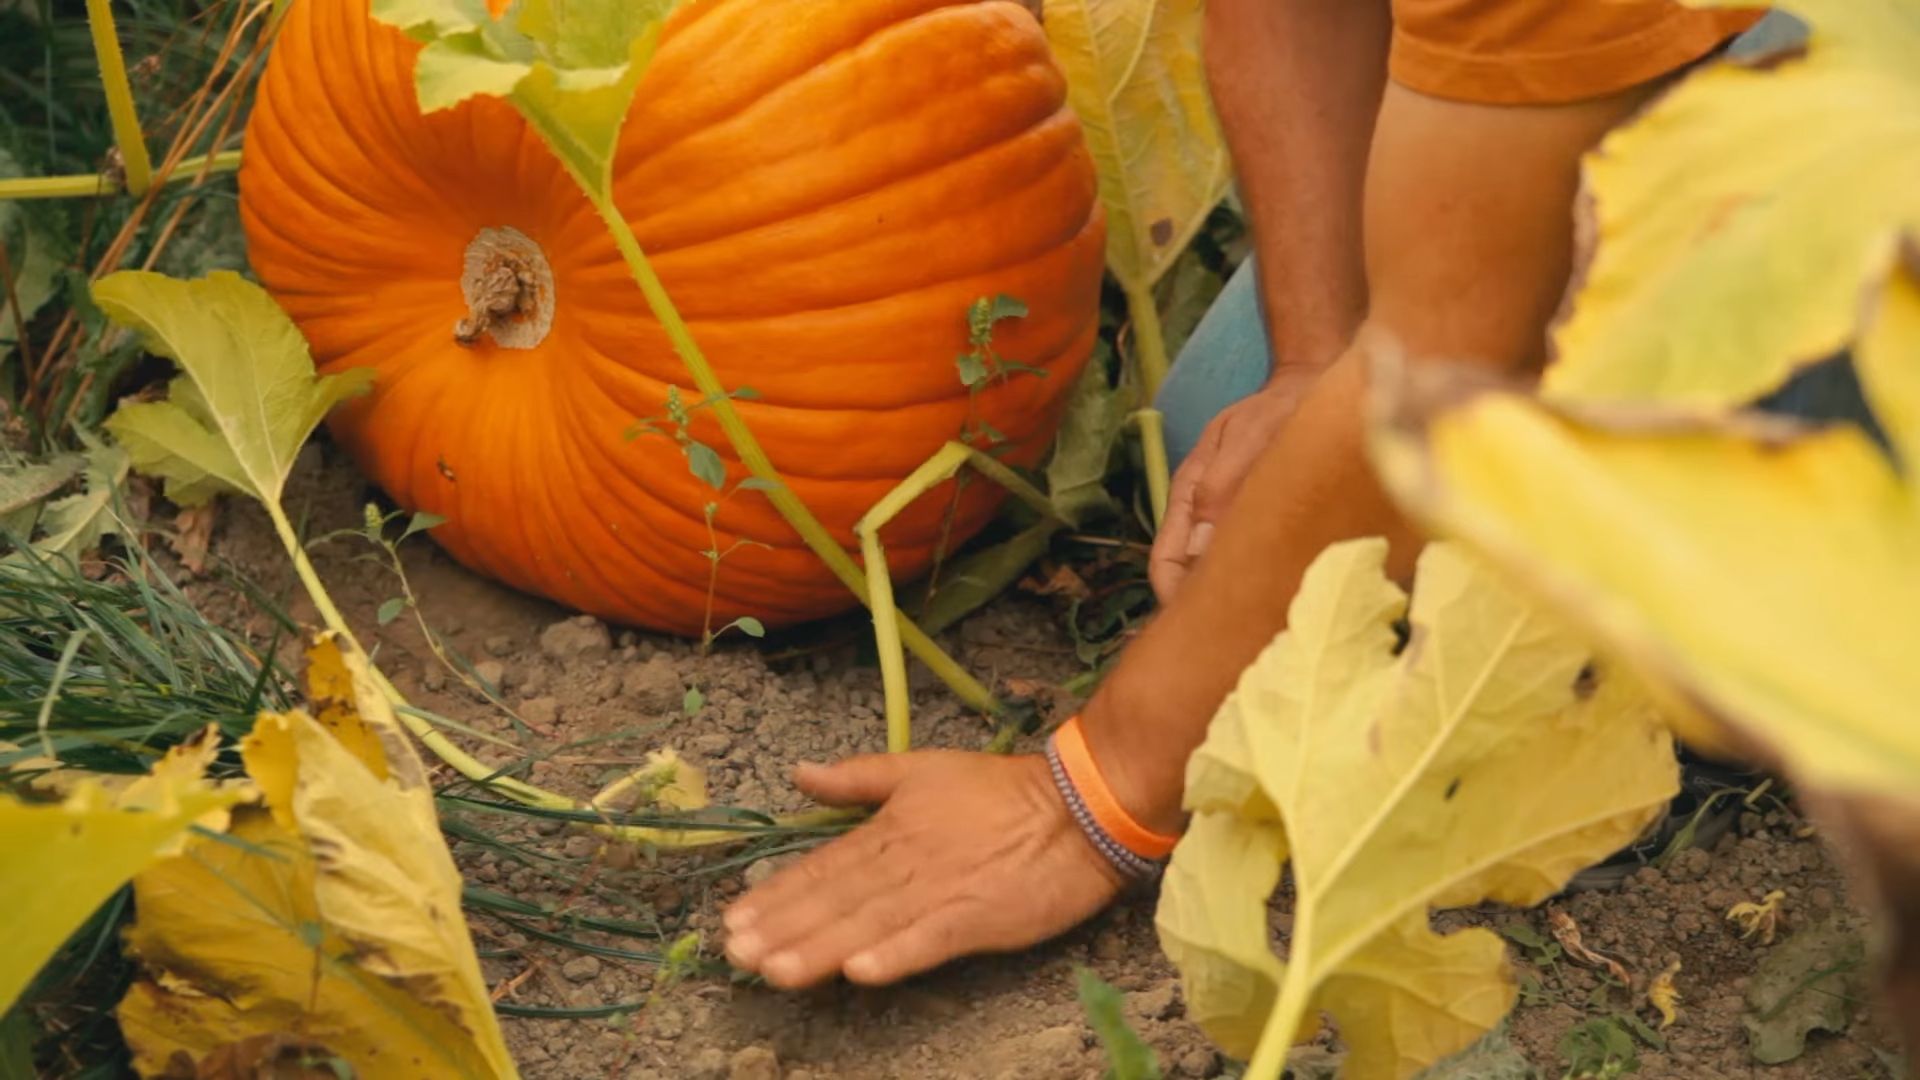
* **Ground Protection:** As your pumpkins get larger, they can rot if they’re sitting directly on the ground. To prevent this, place a piece of cardboard or wood under each pumpkin.
Harvesting Your Pumpkins
The moment you’ve been waiting for! Knowing when to harvest is crucial.
* **Color:** The pumpkin should be a deep, solid color.
* **Stem:** The stem should be dry and hard.
* **Rind:** The rind should be hard and resistant to scratching.
* **Sound:** When you tap the pumpkin, it should sound hollow.
To harvest your pumpkin, use a sharp knife to cut the stem about 2-3 inches from the pumpkin. Be careful not to damage the pumpkin.
Curing Your Pumpkins
Curing your pumpkins will help them last longer.
* **Clean:** Wipe off any dirt or debris from the pumpkin.
* **Dry:** Place the pumpkin in a warm, dry place with good air circulation for about 1-2 weeks. This will help the rind harden and prevent rot.
Storing Your Pumpkins
Store your cured pumpkins in a cool, dry place. They should last for several months.
Step-by-Step Instructions: Growing Pumpkins
Okay, let’s break down the whole process into easy-to-follow steps:
1. **Choose Your Variety:** Decide what kind of pumpkin you want to grow. Consider size, use (carving, pie, decoration), and your available space.
2. **Prepare Your Soil:** Find a sunny spot with well-drained soil. Amend the soil with plenty of compost. Add fertilizer if needed.
3. **Plant Your Seeds:** Direct sow seeds after the last frost, or start seeds indoors 3-4 weeks before the last frost.
4. **Water Regularly:** Water deeply and regularly, especially during hot, dry weather.
5. **Weed Regularly:** Keep your pumpkin patch free of weeds.
6. **Fertilize Regularly:** Fertilize your pumpkin plants every few weeks.
7. **Control Pests and Diseases:** Inspect your plants regularly for pests and diseases and take action if you see any.
8. **Train Your Vines (Optional):** Prune or direct your pumpkin vines to control their growth.
9. **Protect Your Pumpkins:** Protect your pumpkins from pests, diseases, sun, and ground rot.
10. **Harvest Your Pumpkins:** Harvest your pumpkins when they are ripe.
11. **Cure Your Pumpkins:** Cure your pumpkins in a warm, dry place for 1-2 weeks.
12. **Store Your Pumpkins:** Store your cured pumpkins in a cool, dry place.
Troubleshooting Common Pumpkin Problems
Even with the best care, you might encounter some problems. Here are a few common issues and how to deal with them:
* **Powdery Mildew:** This fungal disease appears as a white, powdery coating on the leaves. Treat with a fungicide or
Conclusion
So, there you have it! Growing pumpkins at home, while it might seem daunting at first, is an incredibly rewarding experience. From the tiny seed to the magnificent gourd, witnessing the entire life cycle unfold in your own backyard is something truly special. This DIY project isn’t just about getting a pumpkin; it’s about connecting with nature, learning new skills, and creating lasting memories.
Why is this a must-try? Because it’s more than just a fall decoration. It’s a tangible representation of your hard work and dedication. Imagine the pride you’ll feel carving a jack-o’-lantern from a pumpkin you nurtured from a seed! Think of the delicious pumpkin pies, soups, and roasted seeds you can enjoy, all sourced directly from your garden. And let’s not forget the sheer joy of watching children’s faces light up as they witness the magic of a pumpkin patch, right in their own backyard.
But the benefits extend beyond the immediate harvest. Gardening, in general, is a fantastic stress reliever. The act of tending to plants, feeling the soil between your fingers, and observing the growth process can be incredibly therapeutic. Plus, you’ll be contributing to a healthier environment by reducing your reliance on commercially grown produce, which often involves pesticides and long-distance transportation.
Now, let’s talk about variations. Feel free to experiment with different pumpkin varieties! From the classic orange carving pumpkins to the smaller, sweeter pie pumpkins, and even the unique and colorful heirloom varieties, the possibilities are endless. Consider companion planting to enhance growth and deter pests. Marigolds, nasturtiums, and basil are excellent choices to plant alongside your pumpkins. You can also try different training methods to control the vine’s spread, such as vertical gardening or pruning.
Don’t be afraid to get creative with your pumpkin patch! Add decorative elements like scarecrows, hay bales, or even a small fence to create a charming and festive atmosphere. Involve your family and friends in the process, making it a collaborative and enjoyable experience for everyone.
Ultimately, **growing pumpkins at home** is an adventure. It’s a journey filled with challenges and triumphs, but the rewards are well worth the effort. So, grab your seeds, prepare your soil, and get ready to embark on this exciting gardening endeavor.
We encourage you to try this DIY trick and share your experience with us! Post photos of your pumpkin patch, share your tips and tricks, and let us know what you learned along the way. We’re eager to hear your stories and see your amazing pumpkins! Let’s create a community of pumpkin-growing enthusiasts and inspire others to embrace the joy of gardening. Happy growing!
Frequently Asked Questions (FAQ)
1. What is the best time to plant pumpkin seeds?
The ideal time to plant pumpkin seeds is late spring to early summer, typically from late May to early June in most regions. You want to ensure that the soil has warmed up to at least 65 degrees Fahrenheit (18 degrees Celsius) and that there is no longer any risk of frost. Pumpkins require a long growing season, typically 90 to 120 days, so planting them too late may result in smaller pumpkins or no pumpkins at all. Check your local frost dates to determine the best planting time for your specific area.
2. How much space do pumpkins need to grow?
Pumpkins are sprawling plants that require a significant amount of space. Each pumpkin plant needs at least 6 to 8 feet of space in all directions. If you’re planting multiple plants, space them 6 to 10 feet apart in rows that are 10 to 12 feet apart. This allows for adequate air circulation and sunlight penetration, which are crucial for healthy growth and fruit development. If space is limited, consider growing smaller pumpkin varieties or using vertical gardening techniques to train the vines upwards.
3. What kind of soil is best for growing pumpkins?
Pumpkins thrive in well-drained, fertile soil that is rich in organic matter. The ideal soil pH is between 6.0 and 7.0. Before planting, amend the soil with compost, aged manure, or other organic materials to improve its fertility and drainage. Avoid heavy clay soils, as they can become waterlogged and hinder root growth. If you have clay soil, consider adding sand or perlite to improve drainage. A soil test can help you determine the specific nutrient needs of your soil and guide your amendment choices.
4. How often should I water my pumpkin plants?
Pumpkins require consistent watering, especially during hot, dry weather. Water deeply and regularly, aiming to keep the soil consistently moist but not waterlogged. Water at the base of the plants to avoid wetting the foliage, which can increase the risk of fungal diseases. A good rule of thumb is to water deeply once or twice a week, providing about 1 to 2 inches of water each time. Monitor the soil moisture regularly and adjust your watering schedule as needed based on weather conditions and soil type.
5. What are some common pests and diseases that affect pumpkins, and how can I control them?
Pumpkins are susceptible to several pests and diseases, including squash bugs, squash vine borers, powdery mildew, and downy mildew. Squash bugs can be controlled by handpicking them off the plants or using insecticidal soap. Squash vine borers can be prevented by wrapping the base of the stems with aluminum foil or row covers. Powdery mildew and downy mildew can be managed by ensuring good air circulation, avoiding overhead watering, and applying fungicides if necessary. Regularly inspect your plants for signs of pests or diseases and take action promptly to prevent them from spreading.
6. How do I know when my pumpkins are ripe and ready to harvest?
Pumpkins are typically ready to harvest when they have reached their mature color, the rind is hard and resistant to scratching, and the stem is dry and brown. The stem should also be firmly attached to the pumpkin. To test the rind, try pressing your fingernail into it. If it’s difficult to puncture, the pumpkin is likely ripe. Use pruning shears or a sharp knife to cut the pumpkin from the vine, leaving several inches of stem attached. Avoid lifting the pumpkin by the stem, as this can cause it to break off and shorten the pumpkin’s storage life.
7. Can I grow pumpkins in containers?
Yes, you can grow pumpkins in containers, but you’ll need to choose a large container (at least 20 gallons) and select a smaller pumpkin variety, such as ‘Jack Be Little’ or ‘Baby Boo.’ Use a high-quality potting mix and ensure that the container has good drainage. Water regularly and fertilize every two weeks with a balanced fertilizer. Container-grown pumpkins may require more frequent watering and fertilization than those grown in the ground.
8. How can I get bigger pumpkins?
To grow larger pumpkins, choose a variety known for producing large fruits, such as ‘Atlantic Giant.’ Provide your plants with plenty of sunlight, water, and nutrients. Prune the vines to encourage the plant to focus its energy on developing a single pumpkin. Remove any female flowers that appear after the first few pumpkins have set. Regularly fertilize with a high-phosphorus fertilizer to promote fruit development. You can also try burying sections of the vine to encourage additional root growth, which can help the plant absorb more nutrients.
9. What can I do with my pumpkin seeds?
Pumpkin seeds are a nutritious and delicious snack. To roast them, rinse the seeds to remove any pulp, then pat them dry. Toss them with olive oil, salt, and any other desired seasonings, such as garlic powder, paprika, or chili powder. Spread the seeds in a single layer on a baking sheet and roast at 300 degrees Fahrenheit (150 degrees Celsius) for 15 to 20 minutes, or until they are golden brown and crispy. Let them cool completely before storing them in an airtight container.
10. How long can I store my harvested pumpkins?
Properly cured and stored pumpkins can last for several months. To cure your pumpkins, place them in a warm, dry, and well-ventilated area for about two weeks. This allows the skin to harden and the stem to dry out, which helps prevent rot. Store your cured pumpkins in a cool, dry, and dark place, such as a basement or garage, with a temperature between 50 and 60 degrees Fahrenheit (10 to 15 degrees Celsius). Avoid storing pumpkins in areas that are too humid or too cold, as this can shorten their storage life. Check your pumpkins regularly for signs of rot or spoilage and discard any that are damaged.
Leave a Comment