

Growing tomatoes first time can feel a little daunting, I know! You’re probably picturing sun-ripened, juicy tomatoes bursting with flavor, but maybe also envisioning a garden plagued by pests and diseases. Don’t worry, you’re not alone! For centuries, cultivating tomatoes has been a rewarding experience for gardeners worldwide. Originating in South America, tomatoes gradually made their way across the globe, becoming a staple in countless cuisines and a symbol of summer abundance.
But let’s be honest, getting those perfect tomatoes isn’t always easy. That’s why I’ve put together this guide packed with simple DIY tricks and hacks to help you succeed, even if you’re growing tomatoes first time. We’ll cover everything from choosing the right varieties for your climate to creating your own natural pest control solutions. Imagine the satisfaction of harvesting your own delicious tomatoes, knowing you nurtured them from tiny seedlings to thriving plants. This isn’t just about growing food; it’s about connecting with nature, saving money, and enjoying the unparalleled taste of homegrown goodness. So, grab your gardening gloves, and let’s get started!
Growing Tomatoes: A Beginner’s Guide to Delicious Homegrown Goodness
Okay, so you’re thinking about growing tomatoes for the first time? Awesome! Let me tell you, there’s nothing quite like biting into a sun-warmed, juicy tomato that you grew yourself. It’s a rewarding experience, and honestly, it’s not as hard as you might think. I’m going to walk you through everything you need to know to get started, from choosing the right variety to harvesting your bounty.
Choosing Your Tomato Varieties
First things first, let’s talk tomatoes! There are literally hundreds of varieties to choose from, and it can be a little overwhelming. But don’t worry, I’ll break it down.
* Determinate vs. Indeterminate: This is a big one. Determinate tomatoes grow to a certain size and then produce all their fruit at once, making them great for canning. Indeterminate tomatoes, on the other hand, keep growing and producing fruit throughout the season. I usually go with a mix of both so I have tomatoes coming in waves.
* Size and Shape: Do you want big beefsteak tomatoes for sandwiches, smaller cherry tomatoes for salads, or something in between? Think about how you plan to use your tomatoes.
* Disease Resistance: Look for varieties that are resistant to common tomato diseases like Verticillium wilt (V), Fusarium wilt (F), and nematodes (N). The seed packet or plant label will usually indicate this with letters like “VFNT.”
* Days to Maturity: This tells you how long it will take from planting to harvest. Choose varieties with different maturity dates to extend your harvest season.
Some of my personal favorites for beginners include:
* ‘Early Girl’: A reliable, early-producing indeterminate variety.
* ‘Roma’: A determinate variety perfect for sauces and canning.
* ‘Sungold’: An incredibly sweet and flavorful cherry tomato (indeterminate).
* ‘Celebrity’: A disease-resistant hybrid that produces medium-sized fruits (determinate).
Starting Your Tomato Plants
You have two main options here: starting from seed or buying seedlings. Starting from seed gives you more variety choices and can be cheaper, but it requires more time and effort. Buying seedlings is quicker and easier, but you’ll have fewer variety options.
Starting from Seed (Indoor)
I usually start my tomato seeds indoors about 6-8 weeks before the last expected frost in my area. This gives them a head start on the growing season.
1. Gather Your Supplies: You’ll need seed starting trays or small pots, seed starting mix (not regular potting soil!), tomato seeds, a spray bottle, and a grow light (optional, but highly recommended).
2. Sow the Seeds: Moisten the seed starting mix and fill your trays or pots. Sow the seeds about 1/4 inch deep and gently cover them with soil. I usually plant 2-3 seeds per cell or pot, just in case some don’t germinate.
3. Water Gently: Use a spray bottle to gently water the soil. You don’t want to wash the seeds away.
4. Provide Warmth and Light: Place the trays or pots in a warm location (around 70-75°F) and provide plenty of light. A grow light is ideal, but a sunny windowsill can work too, just make sure to rotate the trays regularly to prevent the seedlings from leaning towards the light.
5. Keep the Soil Moist: Check the soil daily and water as needed to keep it consistently moist, but not soggy.
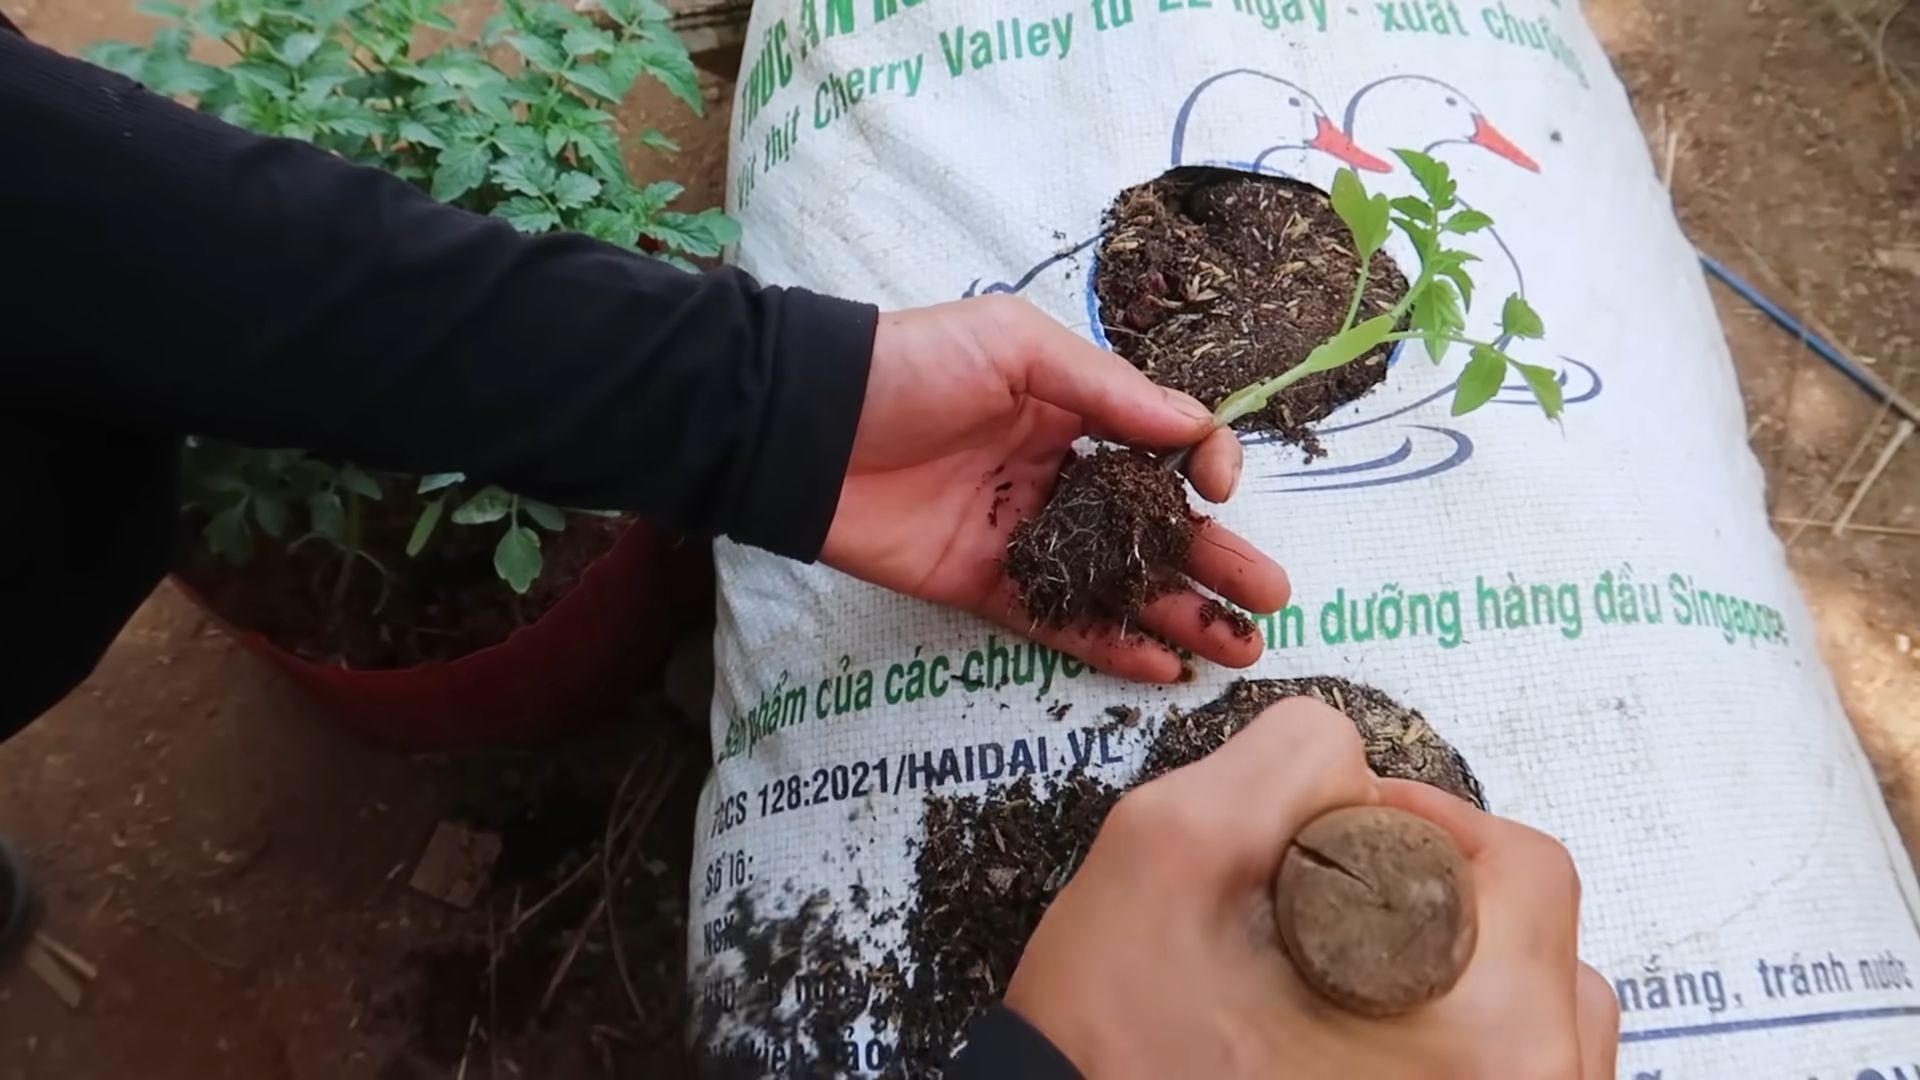
6. Thin the Seedlings: Once the seedlings have their first true leaves (the second set of leaves after the initial seed leaves), thin them to one seedling per cell or pot. Snip off the weaker seedlings at the soil line with scissors. Don’t try to pull them out, as you might damage the roots of the remaining seedling.
7. Harden Off the Seedlings: About a week before you plan to transplant the seedlings outdoors, you need to “harden them off.” This means gradually exposing them to outdoor conditions to acclimate them to the sun, wind, and temperature changes. Start by placing them outdoors in a sheltered location for an hour or two each day, gradually increasing the amount of time they spend outside over the course of a week.
Buying Seedlings
If you’re buying seedlings, make sure to choose healthy-looking plants with sturdy stems and no signs of disease or pests. Avoid plants that are root-bound (roots circling around the bottom of the pot) or that have flowers or fruit already forming, as these plants may be stressed and less likely to thrive.
Preparing Your Garden Bed
Tomatoes need at least 6-8 hours of sunlight per day and well-drained soil. Choose a location in your garden that meets these requirements.
1. Clear the Area: Remove any weeds, grass, rocks, or debris from the planting area.
2. Amend the Soil: Tomatoes are heavy feeders, so it’s important to amend the soil with plenty of organic matter, such as compost or well-rotted manure. Dig in a generous amount of compost to improve drainage and fertility.
3. Check the Soil pH: Tomatoes prefer a soil pH of 6.0-6.8. You can test your soil pH with a soil testing kit or by sending a sample to your local extension office. If your soil is too acidic (pH below 6.0), you can add lime to raise the pH. If it’s too alkaline (pH above 6.8), you can add sulfur to lower the pH.
Transplanting Your Tomato Plants
Once the danger of frost has passed and the soil has warmed up, it’s time to transplant your tomato plants into the garden.
1. Dig the Holes: Dig holes that are slightly larger than the root balls of your tomato plants. Space the holes about 2-3 feet apart for determinate varieties and 3-4 feet apart for indeterminate varieties.
2. Plant Deep: This is a crucial step! Tomatoes can grow roots along their stems, so planting them deep will encourage a stronger root system. Remove the lower leaves from the stem and plant the tomato plant so that the lowest remaining leaves are just above the soil surface.
3. Add Support: Install stakes, cages, or trellises at the time of planting to provide support for the tomato plants as they grow. This will help prevent the plants from falling over and keep the fruit off the ground. I prefer using tomato cages because they’re easy to install and provide good support.
4. Water Thoroughly: Water the tomato plants thoroughly after planting to help them settle in.
5. Mulch: Apply a layer of mulch around the tomato plants to help retain moisture, suppress weeds, and regulate soil temperature. I like to use straw or shredded leaves.
Caring for Your Tomato Plants
Now that your tomato plants are in the ground, it’s time to give them the care they need to thrive.
* Watering: Water your tomato plants deeply and regularly, especially during hot, dry weather. Aim to water at the base of the plants to avoid wetting the foliage, which can lead to disease.
* Fertilizing: Fertilize your tomato plants every 2-3 weeks with a balanced fertilizer or a tomato-specific fertilizer. Follow the instructions on the fertilizer label.
* Pruning: Pruning is important for indeterminate tomato varieties. Remove the “suckers” that grow between the main stem and the branches. These suckers will steal energy from the plant and reduce fruit production. Determinate varieties generally don’t need much pruning.
* Pest and Disease Control: Keep an eye out for pests and diseases. Common tomato pests include aphids, tomato hornworms, and whiteflies. Common tomato diseases include early blight, late blight, and blossom end rot. Treat any problems promptly with appropriate organic or chemical controls. I always try organic methods first!
* Blossom End Rot Prevention: Blossom end rot is caused by a calcium deficiency and results in a dark, leathery spot on the bottom of the tomato. To prevent blossom end rot, make sure your soil has adequate calcium and water your plants consistently. You can also add calcium to the soil by mixing in crushed eggshells or bone meal.
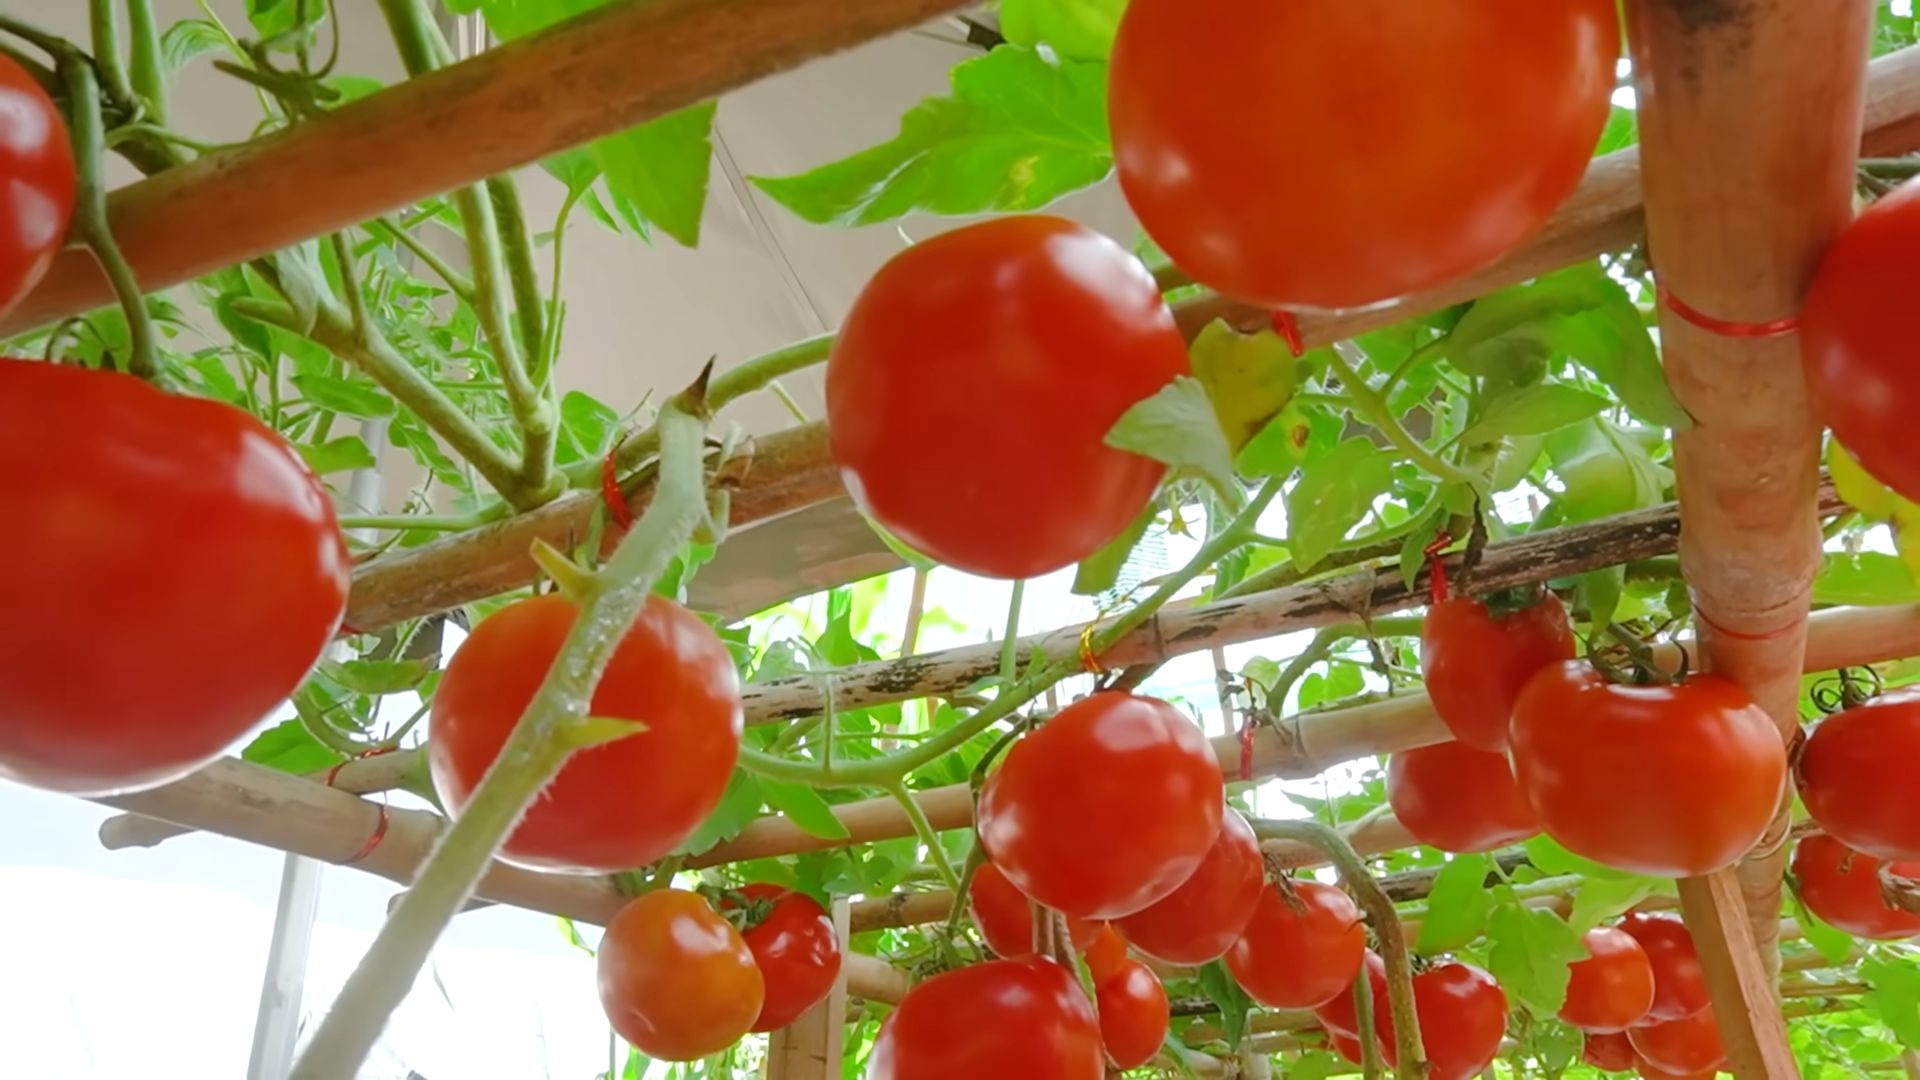
Harvesting Your Tomatoes
The moment you’ve been waiting for! Tomatoes are ready to harvest when they are fully colored and slightly soft to the touch. Gently twist the tomato off the vine, leaving the stem attached.
* Color is Key: The color of the tomato will depend on the variety, but it should be a deep, rich color.
* Slightly Soft: The tomato should be slightly soft to the touch, but not mushy.
* Easy to Twist: The tomato should twist easily off the vine. If you have to pull hard, it’s probably not quite ripe yet.
Store your harvested tomatoes at room temperature, away from direct sunlight. Refrigerating tomatoes can affect their flavor and texture.
Troubleshooting Common Tomato Problems
Even with the best care
Conclusion
So, you’re embarking on the exciting journey of growing tomatoes for the first time! Hopefully, this guide has demystified the process and equipped you with the knowledge and confidence to nurture your own thriving tomato plants. Remember, gardening is a learning experience, and even seasoned gardeners face challenges. Don’t be discouraged by initial setbacks; view them as opportunities to learn and refine your approach.
This DIY approach to starting your tomato plants offers several compelling advantages. Firstly, it’s incredibly cost-effective. Starting from seed allows you to grow a wider variety of tomatoes than you might find readily available at your local nursery, and at a fraction of the price. Secondly, it gives you complete control over the growing environment, ensuring your seedlings get the best possible start in life. You can choose organic soil, control the amount of light and water they receive, and protect them from pests and diseases. Finally, there’s a unique satisfaction that comes from nurturing a plant from seed to harvest. Watching your tiny seedlings grow into robust tomato plants laden with delicious fruit is an incredibly rewarding experience.
But the benefits don’t stop there. Consider these variations to further enhance your tomato-growing adventure:
* Experiment with different tomato varieties: Don’t limit yourself to just one type of tomato. Try growing a mix of heirloom varieties, cherry tomatoes, and beefsteak tomatoes to discover your favorites. Each variety offers a unique flavor profile and texture, adding diversity to your homegrown harvest.
* Companion planting: Enhance your tomato plants’ growth and deter pests by planting companion plants like basil, marigolds, and carrots nearby. Basil is known to improve the flavor of tomatoes, while marigolds repel nematodes and other harmful insects.
* Vertical gardening: If you’re short on space, consider growing your tomatoes vertically using cages, stakes, or trellises. Vertical gardening maximizes space and improves air circulation, reducing the risk of disease.
* DIY fertilizer: Create your own organic fertilizer using compost, eggshells, and coffee grounds. These natural ingredients provide essential nutrients for healthy tomato growth.
* Seed saving: Once you’ve grown your tomatoes, save the seeds from your favorite varieties to plant next year. This allows you to preserve unique heirloom varieties and adapt them to your local growing conditions.
Growing tomatoes for the first time can seem daunting, but with a little preparation and care, you can enjoy a bountiful harvest of delicious, homegrown tomatoes. We encourage you to embrace this DIY approach and experience the joy of growing your own food.
Don’t be afraid to get your hands dirty and experiment. Gardening is all about learning and adapting. And most importantly, don’t forget to share your experiences with us! We’d love to hear about your successes, challenges, and favorite tomato varieties. Share your photos and tips on social media using #DIYTomatoGrowing and inspire others to embark on their own tomato-growing journey. Happy gardening!
Frequently Asked Questions (FAQ)
Q: What are the best tomato varieties for beginners?
A: For first-time tomato growers, it’s best to start with varieties that are known for their ease of growth and disease resistance. Some excellent choices include:
* ‘Early Girl’: This variety is a reliable producer of medium-sized tomatoes and matures relatively quickly, making it ideal for shorter growing seasons.
* ‘Roma’: A popular choice for making sauces and pastes, ‘Roma’ tomatoes are determinate, meaning they grow to a certain size and then stop, making them easier to manage.
* ‘Cherry Tomatoes’: These small, sweet tomatoes are prolific producers and are relatively easy to grow in containers or in the ground. ‘Sungold’ and ‘Sweet Million’ are two popular cherry tomato varieties.
* ‘Celebrity’: This hybrid variety is known for its disease resistance and produces large, flavorful tomatoes.
Q: When should I start my tomato seeds indoors?
A: The timing for starting tomato seeds indoors depends on your local climate and the length of your growing season. As a general rule, you should start your seeds 6-8 weeks before the last expected frost date in your area. You can find the average last frost date for your location by consulting your local weather service or agricultural extension office.
Q: What kind of soil should I use for starting tomato seeds?
A: Use a seed-starting mix that is specifically formulated for starting seeds. These mixes are typically lightweight and well-draining, which is essential for healthy seedling development. Avoid using garden soil, as it can be too heavy and may contain pathogens that can harm your seedlings.
Q: How much light do tomato seedlings need?
A: Tomato seedlings need plenty of light to grow strong and healthy. Ideally, they should receive 14-16 hours of light per day. If you don’t have a sunny windowsill, you can use grow lights to provide supplemental lighting. Place the grow lights a few inches above the seedlings and adjust the height as they grow.
Q: How often should I water my tomato seedlings?
A: Water your tomato seedlings regularly, keeping the soil consistently moist but not waterlogged. Allow the top inch of soil to dry out slightly between waterings. Overwatering can lead to root rot, while underwatering can stunt growth.
Q: When can I transplant my tomato seedlings outdoors?
A: Transplant your tomato seedlings outdoors after the last expected frost date and when the soil has warmed up to at least 60°F (15°C). Before transplanting, harden off your seedlings by gradually exposing them to outdoor conditions for a week or two. This will help them acclimate to the sun, wind, and temperature changes.
Q: How do I harden off my tomato seedlings?
A: To harden off your tomato seedlings, start by placing them outdoors in a sheltered location for a few hours each day. Gradually increase the amount of time they spend outdoors each day, exposing them to more sunlight and wind. After a week or two, they should be ready to be transplanted into your garden.
Q: What are some common tomato pests and diseases?
A: Some common tomato pests include aphids, tomato hornworms, and whiteflies. Common tomato diseases include early blight, late blight, and blossom end rot. You can prevent many of these problems by providing your tomato plants with proper care, including adequate sunlight, water, and nutrients.
Q: How do I prevent blossom end rot?
A: Blossom end rot is a condition caused by calcium deficiency in the developing fruit. To prevent blossom end rot, ensure your tomato plants receive consistent watering and fertilize them with a calcium-rich fertilizer. You can also add crushed eggshells to the soil to provide a natural source of calcium.
Q: How often should I fertilize my tomato plants?
A: Fertilize your tomato plants every 2-3 weeks with a balanced fertilizer that is specifically formulated for tomatoes. Follow the instructions on the fertilizer package for application rates. You can also use organic fertilizers like compost tea or fish emulsion.
Q: How do I prune my tomato plants?
A: Pruning tomato plants can improve air circulation, reduce the risk of disease, and encourage fruit production. Remove suckers (the small shoots that grow between the main stem and the branches) from indeterminate tomato varieties. Determinate tomato varieties generally do not need to be pruned.
Q: How long does it take for tomatoes to ripen?
A: The time it takes for tomatoes to ripen depends on the variety and the growing conditions. Generally, it takes 60-85 days from transplanting to harvest. You’ll know your tomatoes are ripe when they are fully colored and slightly soft to the touch.
Q: Can I grow tomatoes in containers?
A: Yes, you can grow tomatoes in containers. Choose a large container (at least 20 gallons) with drainage holes. Use a high-quality potting mix and provide your tomato plants with plenty of sunlight, water, and fertilizer. Determinate tomato varieties are generally better suited for container growing than indeterminate varieties.


Leave a Comment