

Mushroom Growing at Home might sound like something reserved for seasoned horticulturalists, but trust me, it’s more accessible than you think! Forget trekking to the grocery store for those gourmet fungi; imagine harvesting your own delicious, earthy mushrooms right from your kitchen. For centuries, mushrooms have held a special place in various cultures, from ancient medicinal practices in the East to culinary delicacies in Europe. They’re not just food; they’re a symbol of nature’s hidden bounty.
But why should you consider mushroom growing at home? Well, beyond the sheer satisfaction of nurturing life, it’s a fantastic way to reduce your carbon footprint, control the quality of your food, and impress your friends with your newfound skills. Plus, let’s be honest, store-bought mushrooms can be pricey! This DIY guide will demystify the process, offering simple, step-by-step instructions and clever hacks to ensure your mushroom-growing journey is a success. I’m excited to show you how easy and rewarding it can be to cultivate these fascinating organisms in the comfort of your own home. Get ready to unlock the secrets of mushroom growing at home and enjoy a fresh, flavorful harvest!
Growing Gourmet Mushrooms at Home: A Beginner’s Guide
Okay, so you want to grow your own mushrooms? Awesome! It’s surprisingly easier than you might think, and the reward of fresh, delicious, homegrown mushrooms is totally worth it. This guide will walk you through a simple method for growing oyster mushrooms, which are a great choice for beginners because they’re relatively fast-growing and forgiving.
What You’ll Need
Before we dive in, let’s gather our supplies. You can find most of these at your local hardware store, garden center, or online.
* Oyster Mushroom Spawn: This is the “seed” of your mushrooms. You can buy it online or from a specialty mushroom supplier. Make sure it’s a reputable source to ensure good quality spawn.
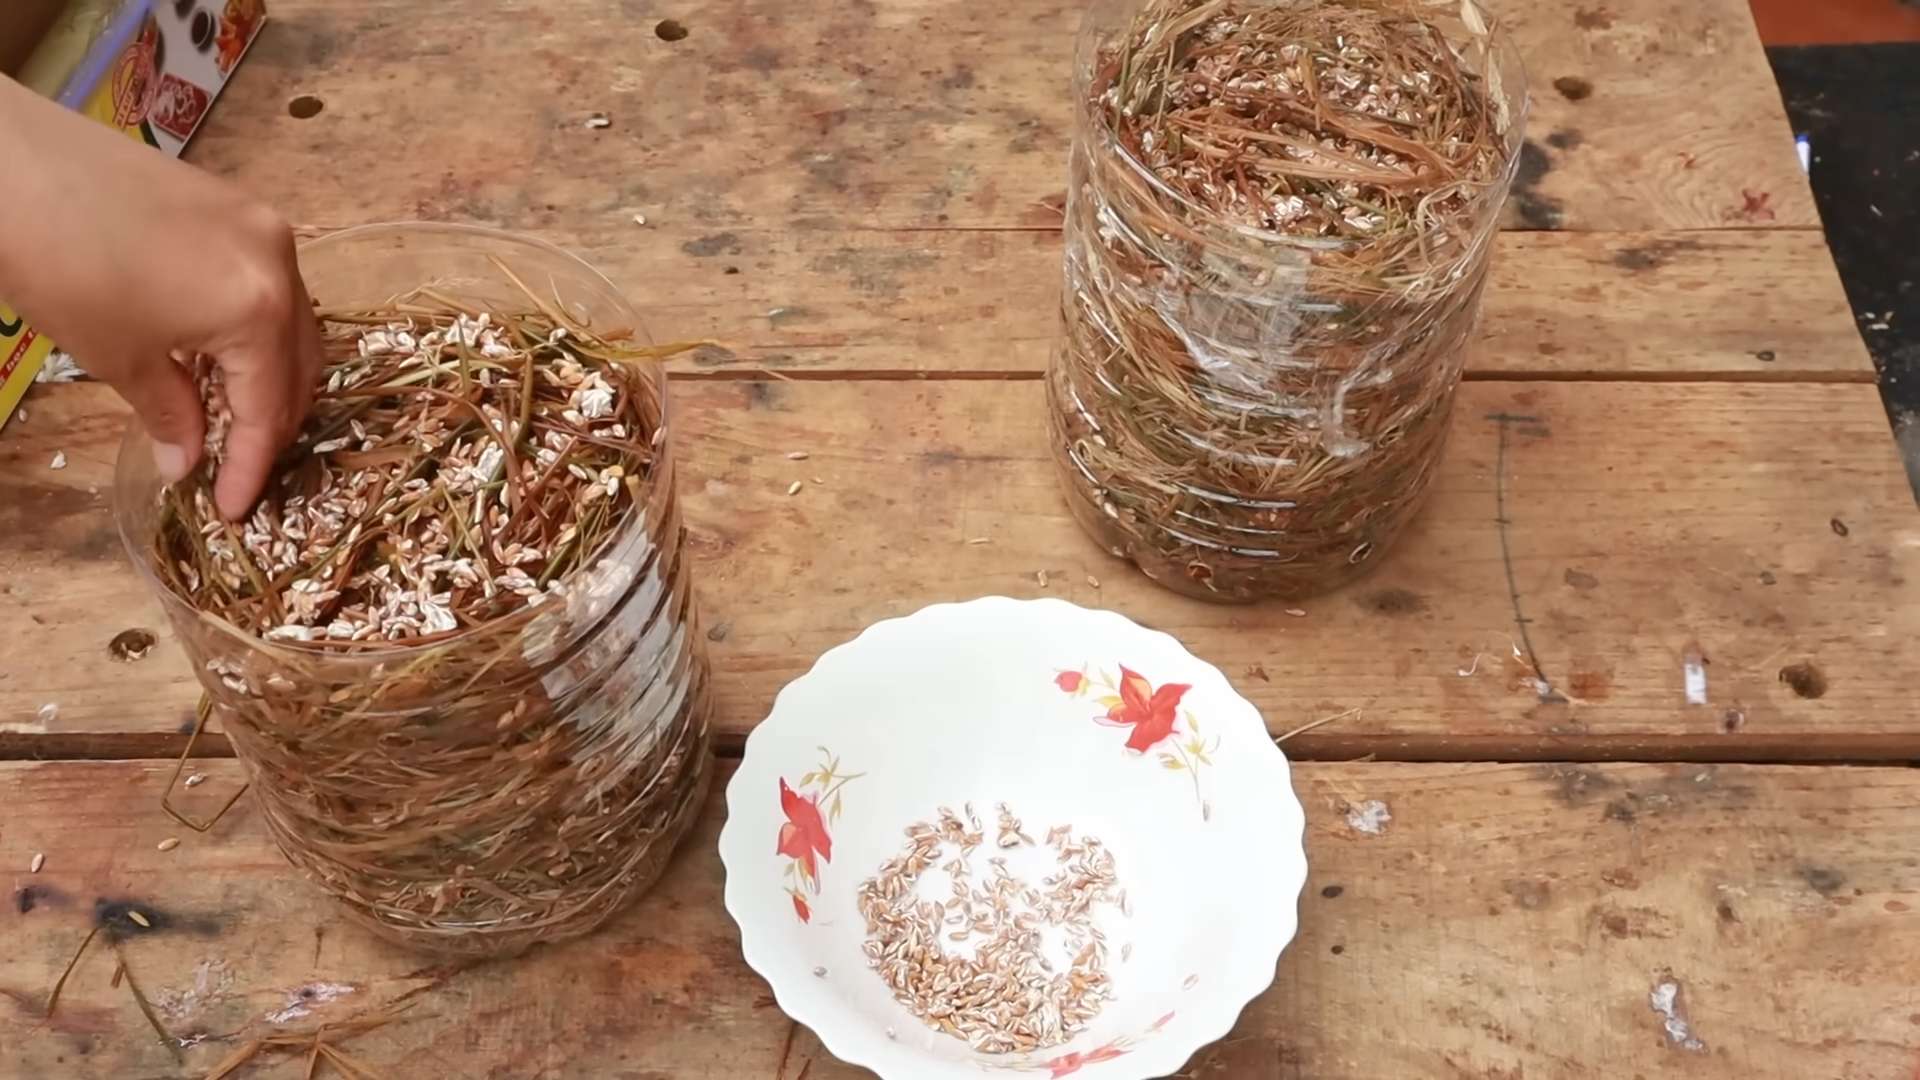
* Straw: This will be our growing substrate. Wheat straw is ideal, but other types of straw can work too. Avoid hay, as it contains seeds that can contaminate your grow.
* Large Plastic Bag: A heavy-duty garbage bag works perfectly. Make sure it’s clean and free of any holes.
* Lime (Hydrated Lime or Garden Lime): This will help pasteurize the straw and prevent unwanted mold growth.
* Large Container or Tub: For pasteurizing the straw. A large plastic storage tub or even a clean trash can will do.
* Drill or Knife: To create ventilation holes in the bag.
* Spray Bottle: Filled with clean water, for misting.
* Gloves: To keep things sanitary.
* Thermometer: To monitor the temperature of the pasteurization process.
* Measuring Cup and Spoon: For measuring lime.
Phase 1: Pasteurizing the Straw
This is a crucial step to kill off any competing organisms in the straw, giving your mushroom spawn a head start.
1. Chop the Straw: Using scissors or garden shears, chop the straw into smaller pieces, about 2-4 inches long. This will make it easier to pack into the bag and for the mushroom mycelium to colonize.
2. Prepare the Lime Water: In your large container or tub, mix the lime with water. The ratio is typically 1 tablespoon of lime per gallon of water. The amount of water you need will depend on how much straw you’re using, but you want enough to completely submerge the straw. Stir well to dissolve the lime. Be careful when handling lime, as it can be irritating to the skin and eyes. Wear gloves and eye protection.
3. Soak the Straw: Pack the chopped straw into the lime water, making sure it’s completely submerged. You might need to weigh it down with a brick or a heavy object to keep it from floating.
4. Pasteurize: Let the straw soak in the lime water for 12-24 hours. This will raise the pH of the straw, killing off most of the unwanted microorganisms. Monitor the temperature of the water if possible. Ideally, you want to keep it between 140-160°F (60-71°C) for an hour or two, but soaking for a longer period at room temperature will also work.
5. Drain the Straw: After soaking, drain the straw thoroughly. You can do this by scooping it out of the tub and placing it in a colander or on a screen to let the excess water drip off. You want the straw to be damp, but not soaking wet. It should feel like a wrung-out sponge.
Phase 2: Inoculating the Straw
Now comes the fun part – introducing the mushroom spawn to the straw!
1. Clean Your Work Area: Before you start, wipe down your work surface with a disinfectant to minimize the risk of contamination.
2. Layer the Bag: Place a layer of pasteurized straw in the bottom of your plastic bag, about 4-6 inches thick.
3. Add Spawn: Sprinkle a generous amount of oyster mushroom spawn over the straw layer. Aim for about 5-10% spawn by weight of the straw. So, if you have 10 pounds of straw, use about 0.5-1 pound of spawn.
4. Repeat Layers: Continue layering straw and spawn, alternating between the two, until you’ve used up all the straw and spawn. The top layer should be straw.
5. Pack the Bag: Gently pack the straw and spawn mixture down in the bag. This will help to create good contact between the spawn and the straw.
6. Seal the Bag: Close the top of the bag securely with tape or a zip tie.
7. Create Ventilation Holes: Using a drill or knife, create several small holes (about 1/4 inch in diameter) in the bag. These holes will allow for air exchange, which is essential for mushroom growth. Space the holes evenly around the bag, about 4-6 inches apart.
Phase 3: Incubation
This is where the magic happens! The mushroom mycelium will start to colonize the straw, turning it into a solid white mass.
1. Find a Suitable Location: Place the bag in a dark, humid, and well-ventilated location. A basement, closet, or spare room works well. The ideal temperature for oyster mushroom incubation is between 65-75°F (18-24°C).
2. Monitor Colonization: Check the bag regularly for signs of colonization. You should start to see white, fuzzy mycelium spreading throughout the straw within a week or two.
3. Maintain Humidity: If the air in your incubation area is dry, you may need to mist the bag lightly with water every few days to maintain humidity. Be careful not to overwater, as this can lead to mold growth.
4. Patience is Key: It can take 2-4 weeks for the mycelium to fully colonize the straw. The bag should feel firm and solid when it’s fully colonized.
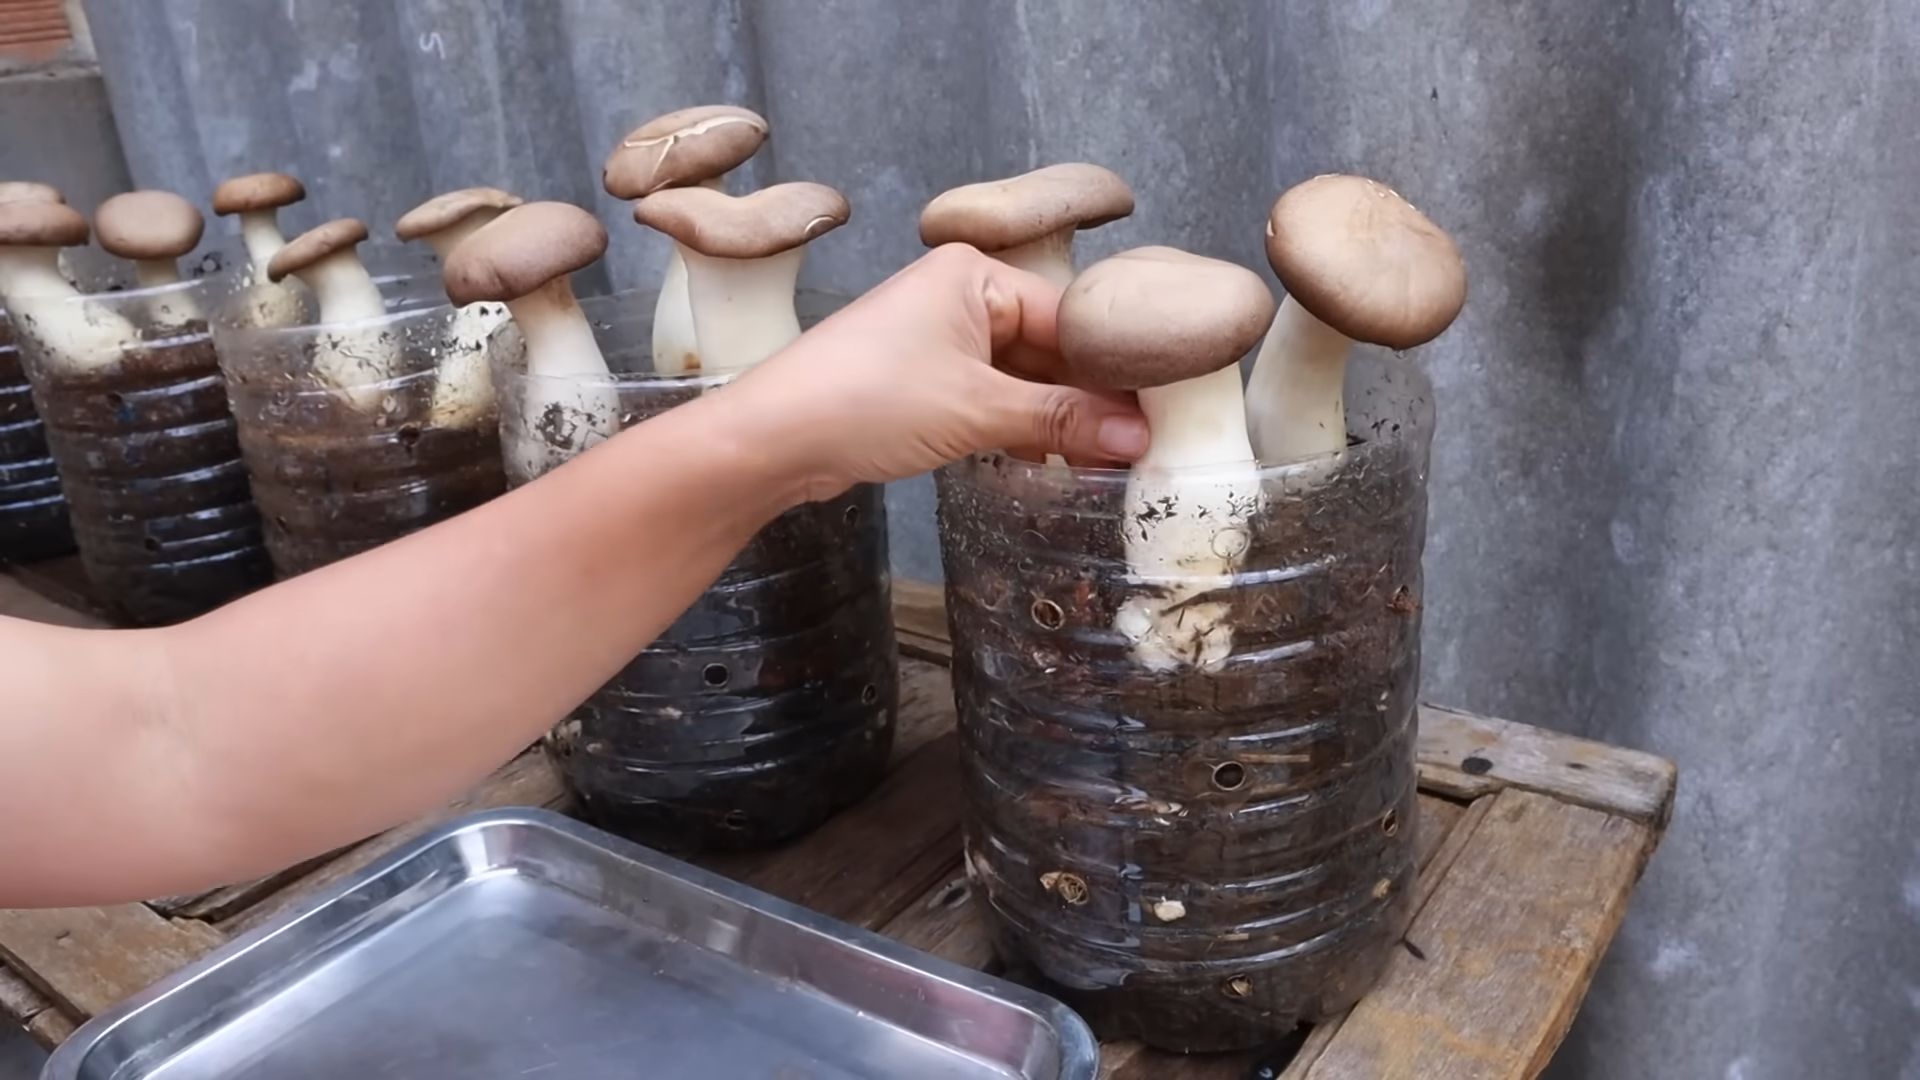
Phase 4: Fruiting
Once the straw is fully colonized, it’s time to trigger fruiting, which is when the mushrooms start to grow.
1. Increase Light: Move the bag to a location with more light. Indirect sunlight is ideal. Avoid direct sunlight, as it can dry out the mushrooms.
2. Increase Ventilation: Open the top of the bag or cut larger holes in the sides to increase ventilation. This will encourage the mushrooms to fruit.
3. Maintain Humidity: Mist the bag regularly with water to maintain high humidity. You can also place a humidity tent over the bag to help retain moisture. A clear plastic bag with holes poked in it works well for this.
4. Wait for Pins: Within a few days to a week, you should start to see small mushroom “pins” forming on the surface of the straw. These are the baby mushrooms!
5. Watch Them Grow: The mushrooms will grow rapidly over the next few days. Keep the humidity high and the ventilation good.
Phase 5: Harvesting
Harvesting your own mushrooms is incredibly satisfying!
1. Harvest at the Right Time: Harvest the mushrooms when the caps are fully formed but before they start to drop spores. The edges of the caps will start to curl upwards slightly when they’re ready to harvest.
2. Harvest Carefully: To harvest, gently twist and pull the mushrooms away from the straw. Avoid cutting them, as this can leave behind a stump that can rot and contaminate the grow.
3. Enjoy Your Harvest: Your freshly harvested oyster mushrooms are now ready to be cooked and enjoyed! They’re delicious sautéed, grilled, or added to soups and stews.
Subsequent Flushes
After you harvest your first flush of mushrooms, you can often get several more flushes from the same bag.
1. Soak the Bag: After harvesting, soak the bag in water for 12-24 hours to rehydrate the straw.
2. Drain and Repeat: Drain the bag and return it to the fruiting location. Repeat the fruiting process as described above.
3. Expect Diminishing Returns: Each subsequent flush will typically produce fewer mushrooms than the previous one. After 2-3 flushes, the bag will likely be exhausted and you’ll need to start a new one.
Troubleshooting
Sometimes things don’t go exactly as planned. Here are a few common problems and how to fix them:
* Mold Growth: If you see mold growing on the straw, it’s usually a sign that the pasteurization wasn’t effective enough or that the humidity is too high. Remove the moldy areas and try to improve ventilation. If the mold is widespread, it’s best to discard the bag and start over.
* Slow Colonization: Slow colonization can be caused by low temperatures, poor quality spawn, or contamination. Make sure the temperature is within the ideal range and that you’re using fresh, high-quality spawn.
*
Conclusion
So, there you have it! Cultivating your own mushrooms at home is not only achievable but also incredibly rewarding. Forget the expensive grocery store prices and the often-questionable freshness of store-bought fungi. With this simple DIY trick, you can unlock a world of flavor and sustainability right in your own kitchen.
Why is this a must-try? Because it’s more than just growing food; it’s about connecting with nature, understanding the life cycle of these fascinating organisms, and enjoying the unparalleled taste of freshly harvested mushrooms. Imagine the satisfaction of adding your own homegrown shiitakes to a stir-fry, or the delight of sharing a creamy mushroom soup made with oyster mushrooms you nurtured from start to finish. The possibilities are endless!
But the benefits extend beyond the culinary. Growing mushrooms at home is an environmentally friendly practice. You’re reducing your carbon footprint by eliminating transportation costs and packaging waste. Plus, you’re creating a closed-loop system by utilizing organic waste materials like coffee grounds or straw as substrate. It’s a win-win for your taste buds and the planet.
Ready to take your mushroom cultivation to the next level? Consider experimenting with different mushroom varieties. Oyster mushrooms are a great starting point due to their ease of growth and adaptability, but don’t be afraid to branch out to shiitakes, lion’s mane, or even wine caps once you’ve gained some experience. Each variety offers a unique flavor profile and texture, adding exciting diversity to your culinary repertoire.
Another variation to explore is the type of substrate you use. While coffee grounds are a popular choice, you can also use straw, sawdust, cardboard, or even agricultural waste products. Research which substrate is best suited for the specific mushroom variety you’re growing. Remember to always pasteurize or sterilize your substrate to eliminate competing organisms and ensure a successful mushroom harvest.
Don’t be discouraged if your first attempt isn’t perfect. Mushroom growing requires patience and observation. Pay close attention to the humidity levels, temperature, and light conditions in your growing environment. Adjust your techniques as needed based on your observations. Every mistake is a learning opportunity that will bring you closer to mastering the art of mushroom cultivation.
We are confident that you’ll find this DIY mushroom growing trick to be a game-changer. It’s a fun, educational, and delicious way to bring a touch of nature into your home. So, grab your supplies, get your hands dirty, and embark on this exciting journey of cultivating your own mushrooms.
We can’t wait to hear about your experiences! Share your successes, challenges, and tips in the comments below. Let’s create a community of mushroom enthusiasts and learn from each other. Happy growing!
Frequently Asked Questions (FAQ)
What are the easiest types of mushrooms to grow at home for beginners?
Oyster mushrooms are generally considered the easiest for beginners due to their rapid growth, tolerance of a wide range of conditions, and ability to thrive on various substrates like coffee grounds, straw, or even cardboard. They are also relatively resistant to contamination, making them a forgiving choice for novice growers. Shiitake mushrooms are another popular option, but they require a bit more patience as they have a longer incubation period.
What kind of space do I need to grow mushrooms at home?
You don’t need a lot of space! A small closet, a spare room, or even a corner of your basement can be sufficient. The key is to provide a dark, humid environment with good ventilation. A humidity tent or a simple plastic bag can help maintain the necessary moisture levels. The specific space requirements will depend on the scale of your operation and the type of mushrooms you’re growing.
How long does it take to grow mushrooms at home?
The time it takes to grow mushrooms varies depending on the species and the growing conditions. Oyster mushrooms can typically be harvested within a few weeks of inoculation, while shiitakes may take several months. Factors like temperature, humidity, and substrate quality can also influence the growth rate. Be patient and monitor your mushrooms regularly to ensure they are thriving.
What kind of substrate should I use for growing mushrooms?
The best substrate depends on the type of mushroom you’re growing. Oyster mushrooms are versatile and can grow on coffee grounds, straw, sawdust, or cardboard. Shiitakes prefer hardwood sawdust or logs. It’s crucial to research the specific substrate requirements for your chosen mushroom variety. Always pasteurize or sterilize your substrate to eliminate competing organisms and prevent contamination.
How do I prevent contamination when growing mushrooms?
Contamination is a common challenge in mushroom cultivation, but there are several steps you can take to minimize the risk. First, always sterilize or pasteurize your substrate to kill any existing microorganisms. Second, maintain a clean and sanitary growing environment. Wear gloves and a mask when handling your substrate and mushrooms. Third, ensure proper ventilation to prevent the buildup of moisture, which can promote mold growth. Finally, monitor your mushrooms regularly for signs of contamination, such as unusual colors or odors.
How do I know when my mushrooms are ready to harvest?
The signs of maturity vary depending on the mushroom species. Oyster mushrooms are typically ready to harvest when the caps have fully expanded and the edges are still slightly curled downward. Shiitakes are ready when the caps have flattened out and the gills are visible. It’s best to harvest mushrooms before they release their spores, as this can reduce their quality and flavor.
Can I reuse the substrate after harvesting mushrooms?
Yes, you can often get multiple flushes (harvests) from a single substrate block. After harvesting your first flush, soak the substrate in water for a few hours to rehydrate it. Then, return it to its growing environment and wait for the next flush to appear. The number of flushes you can get will depend on the quality of the substrate and the growing conditions. Eventually, the substrate will become depleted of nutrients and will no longer produce mushrooms. At that point, you can compost it and use it to enrich your garden soil.
Are there any health benefits to eating homegrown mushrooms?
Absolutely! Homegrown mushrooms are a nutritious and delicious addition to your diet. They are a good source of protein, fiber, vitamins, and minerals. They also contain antioxidants and other beneficial compounds that may support immune function and overall health. Plus, growing your own mushrooms ensures that they are fresh, organic, and free from harmful pesticides or chemicals.
What if my mushrooms don’t grow?
Don’t give up! Mushroom growing can be challenging, but with patience and persistence, you can succeed. If your mushrooms aren’t growing, consider the following factors: Are the temperature and humidity levels correct? Is the substrate properly prepared? Is there enough ventilation? Are there any signs of contamination? Adjust your techniques as needed and try again. Remember, every mistake is a learning opportunity.
Where can I find mushroom spawn or cultures?
Mushroom spawn and cultures can be purchased from a variety of online retailers and specialty suppliers. Look for reputable sources that offer high-quality spawn and cultures. You can also find local mushroom growing clubs or organizations that may offer spawn or cultures to their members. Be sure to choose a spawn or culture that is appropriate for your growing environment and the type of substrate you’re using. Successfully **mushroom growing at home** requires good quality spawn.

Leave a Comment