

Plant Pointed Cabbage: Ever dreamt of strolling through your backyard, basket in hand, and harvesting perfectly formed, delicious pointed cabbages? I know I have! It’s a rewarding experience that’s more achievable than you might think, even if you’re a beginner gardener. This DIY guide is packed with simple tricks and hacks to help you cultivate a thriving pointed cabbage patch right at home.
Cabbage, in general, has a rich history, dating back thousands of years. From ancient Rome, where it was considered a medicinal plant, to medieval Europe, where it was a staple food, cabbage has nourished civilizations. Pointed cabbage, with its unique conical shape, offers a slightly sweeter and more tender flavor than its rounder cousins. It’s a delightful variation worth exploring in your garden.
Why should you try these DIY tricks? Well, growing your own pointed cabbage means you control the quality, ensuring it’s free from harmful pesticides and bursting with freshness. Plus, let’s be honest, there’s something incredibly satisfying about nurturing a plant from seed to harvest. These hacks will save you time, money, and frustration, guiding you through common challenges like pest control and soil preparation. So, grab your gardening gloves, and let’s get started on your journey to successfully plant pointed cabbage and enjoy the fruits (or rather, vegetables!) of your labor!
Growing Pointed Cabbage: A Gardener’s Guide
Okay, so you want to grow pointed cabbage? Awesome! It’s a fantastic vegetable – delicious, versatile, and surprisingly easy to cultivate once you know the ropes. I’ve grown pointed cabbage for years, and I’m happy to share my tips and tricks to help you get a bountiful harvest. Let’s dive in!
Choosing the Right Variety
First things first, let’s talk about varieties. Pointed cabbage isn’t just one thing; there are different types, each with its own characteristics. Here are a few popular choices:
* ‘Hispi’: This is probably the most common and reliable variety. It’s known for its sweet flavor and relatively quick maturity. It’s a great choice for beginners.
* ‘Caraflex’: Another excellent option, ‘Caraflex’ is known for its uniform, tightly packed heads and excellent storage potential.
* ‘Sweet Point’: As the name suggests, this variety is exceptionally sweet and tender. It’s a good choice if you prefer a milder cabbage flavor.
Consider your local climate and growing season when selecting a variety. Check seed packets for information on maturity dates and suitability for your region.
Getting Started: Seeds or Transplants?
You have two main options for starting your pointed cabbage: seeds or transplants.
* Seeds: Starting from seed gives you more control over the entire process and can be more economical. However, it requires more time and attention.
* Transplants: Buying transplants from a nursery is a quicker and easier option, especially if you’re short on time or space.
I personally prefer starting from seed, as I find it more rewarding. But either method can work well.
Starting from Seed: A Step-by-Step Guide
If you’re going the seed route, here’s how I do it:
1. Timing is Key: Pointed cabbage is a cool-season crop, so you’ll want to start your seeds indoors about 4-6 weeks before the last expected frost in your area. Check your local frost dates to determine the best time to start.
2. Prepare Your Seed Starting Mix: Use a good quality seed starting mix. This is important because it’s sterile and provides the right nutrients for young seedlings. Avoid using garden soil, as it can contain diseases and pests.
3. Sow the Seeds: Fill your seed trays or pots with the seed starting mix. Make small indentations (about 1/4 inch deep) in the soil and sow 2-3 seeds per cell or pot. Cover the seeds lightly with soil and gently water them.
4. Provide Warmth and Light: Place the seed trays in a warm location (around 70-75°F) and provide plenty of light. A sunny windowsill can work, but a grow light is even better. Keep the soil consistently moist, but not soggy.
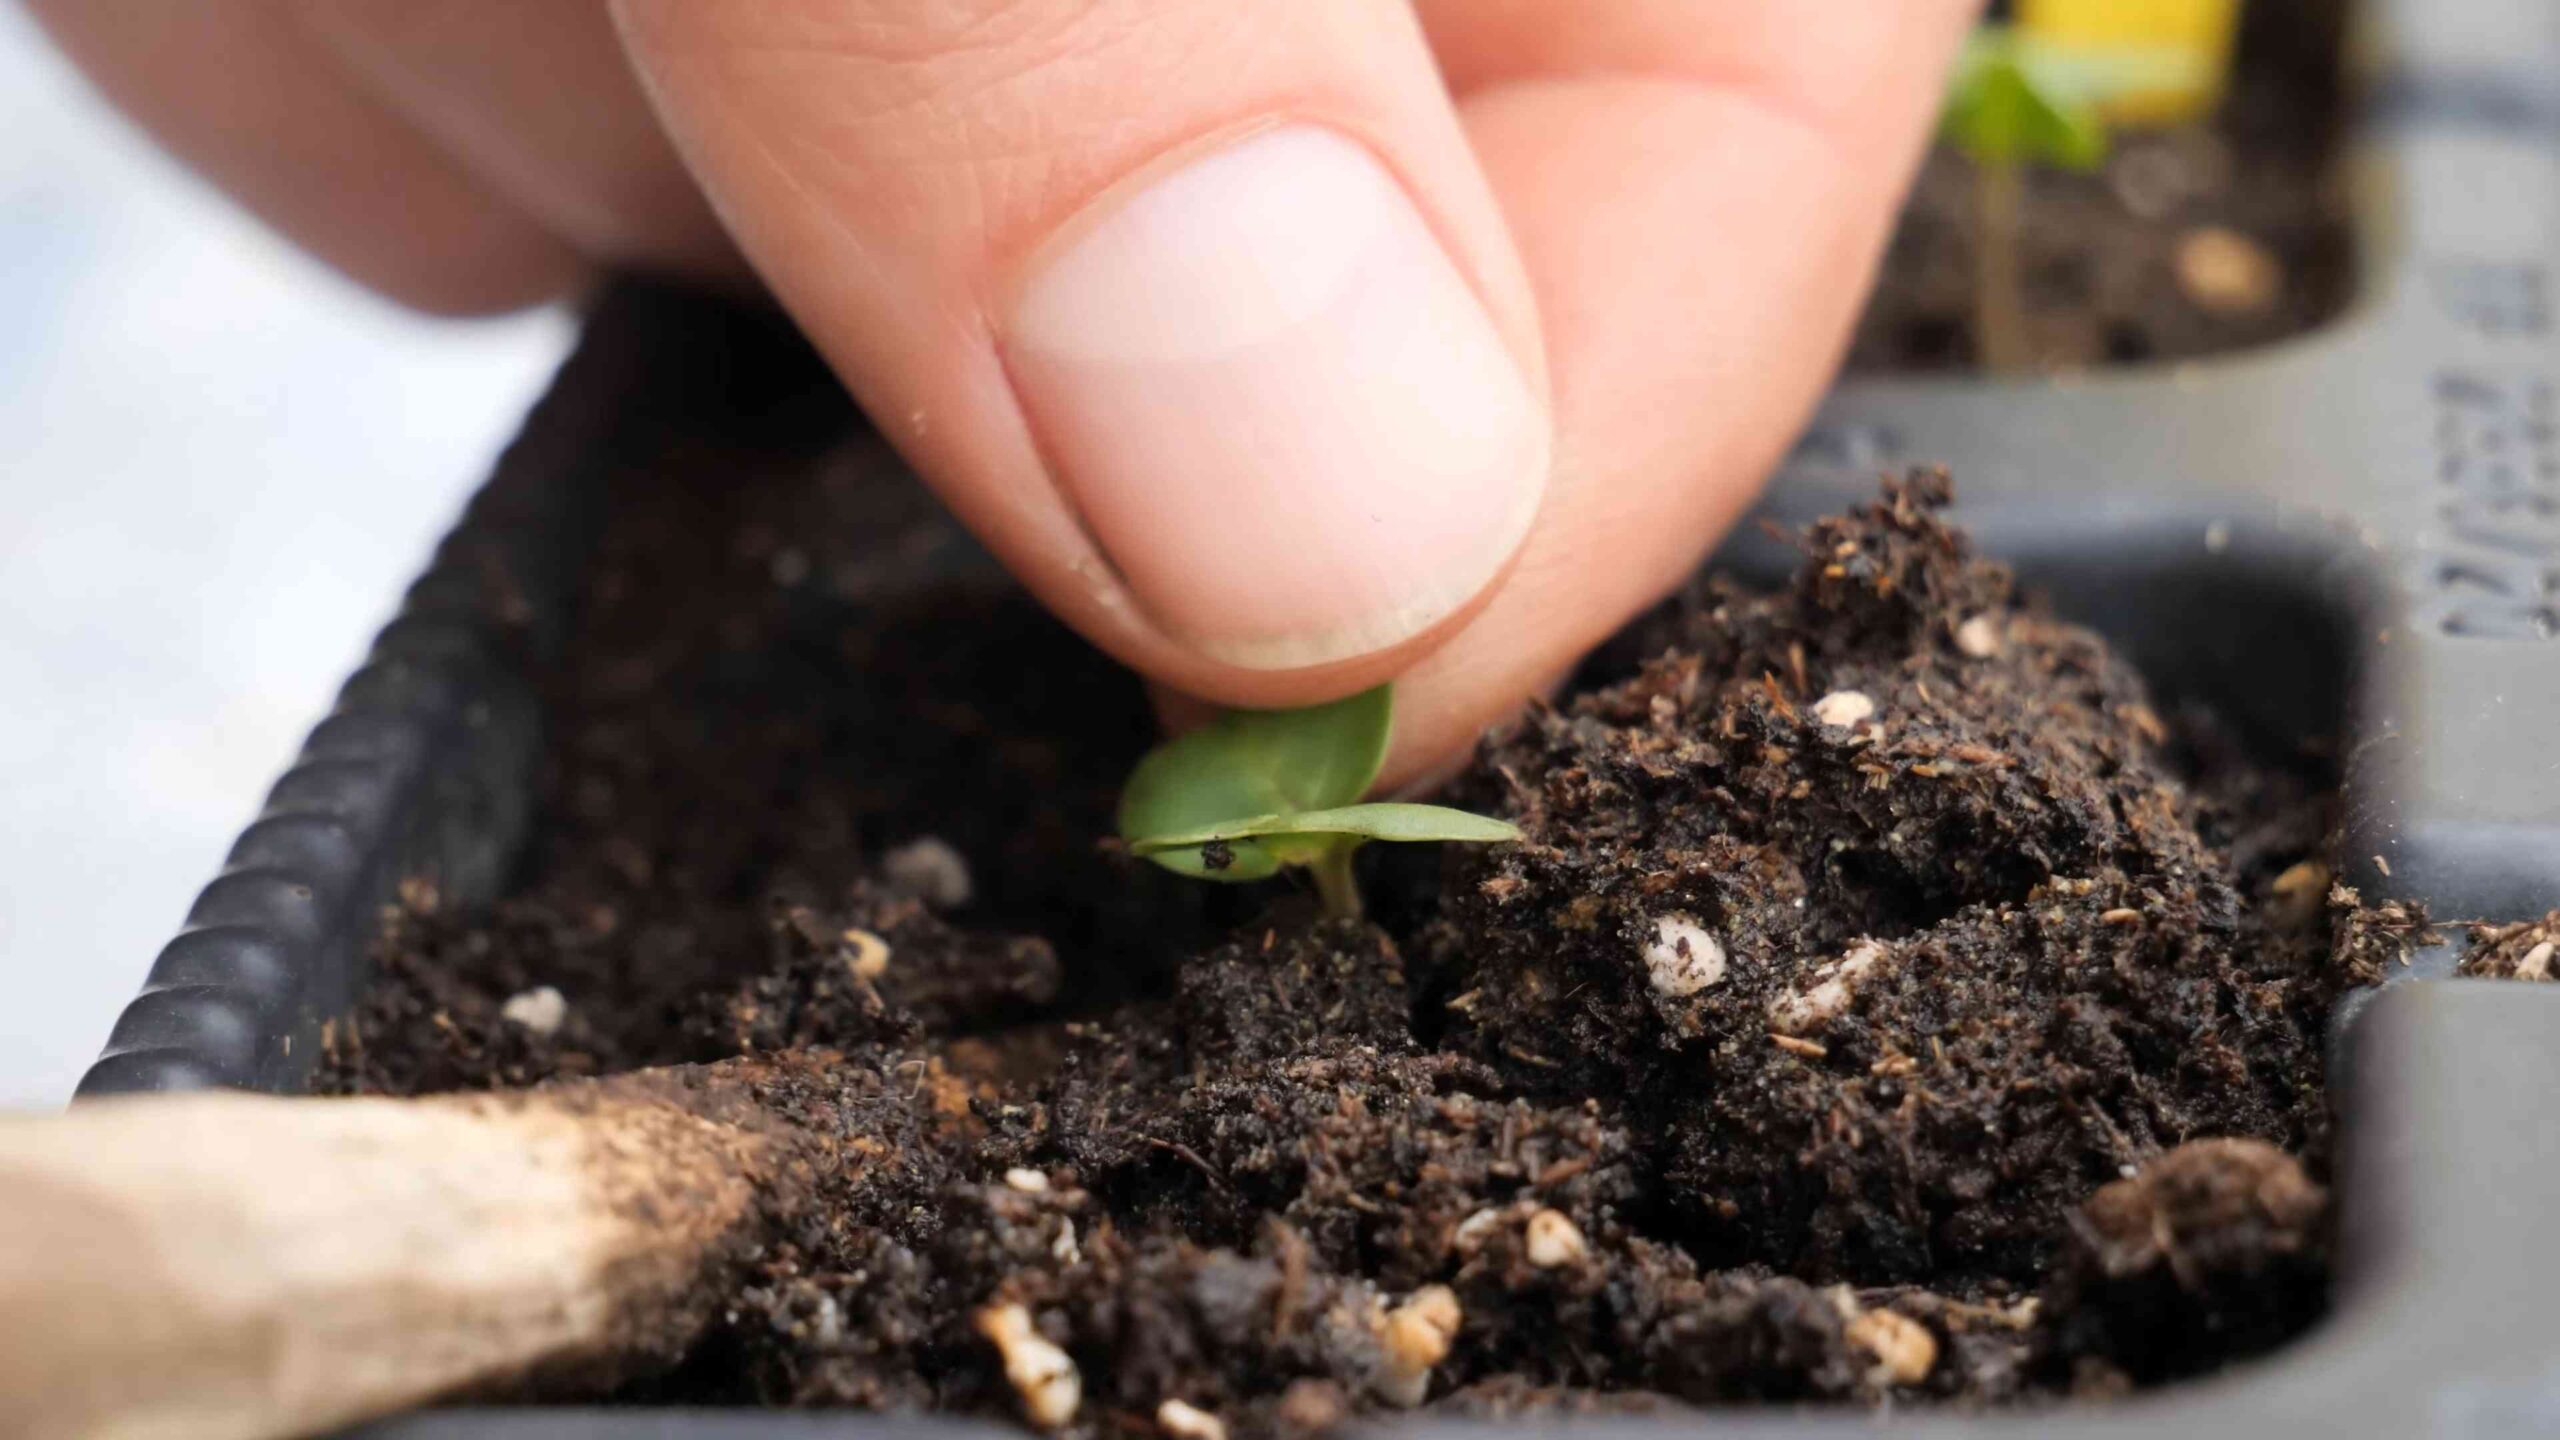
5. Thin the Seedlings: Once the seedlings emerge (usually within a week or two), thin them to one seedling per cell or pot. Choose the strongest and healthiest-looking seedling and snip off the others at the soil line.
6. Harden Off the Seedlings: Before transplanting the seedlings outdoors, you’ll need to harden them off. This means gradually exposing them to outdoor conditions over a period of about a week. Start by placing them in a sheltered location for a few hours each day, gradually increasing the amount of time they spend outdoors.
Preparing the Garden Bed
Whether you’re using seeds or transplants, proper soil preparation is crucial for success.
1. Choose a Sunny Location: Pointed cabbage needs at least 6 hours of sunlight per day. Choose a location in your garden that receives plenty of sun.
2. Improve the Soil: Pointed cabbage prefers well-drained, fertile soil with a pH of 6.0-7.5. Amend the soil with compost or other organic matter to improve its drainage and fertility. I usually add a generous amount of well-rotted manure as well.
3. Remove Weeds: Clear the garden bed of any weeds. Weeds can compete with your cabbage plants for nutrients and water.
4. Work the Soil: Loosen the soil to a depth of at least 12 inches. This will allow the roots of the cabbage plants to penetrate easily.
Transplanting Your Cabbage
Once your seedlings are hardened off or you’ve purchased transplants, it’s time to get them in the ground.
1. Timing is Important: Transplant your cabbage seedlings outdoors after the last expected frost. The soil temperature should be at least 50°F.
2. Space the Plants Properly: Space the plants about 12-18 inches apart in rows that are 24-36 inches apart. This will give them enough room to grow and mature.
3. Dig the Holes: Dig holes that are slightly larger than the root balls of the seedlings.
4. Plant the Seedlings: Gently remove the seedlings from their containers and place them in the holes. Make sure the top of the root ball is level with the soil surface.
5. Fill the Holes: Fill the holes with soil and gently firm the soil around the base of the plants.
6. Water Thoroughly: Water the plants thoroughly after transplanting. This will help them settle in and establish their roots.
Caring for Your Pointed Cabbage
Once your cabbage plants are in the ground, it’s important to provide them with proper care.
1. Watering: Pointed cabbage needs consistent moisture, especially during hot, dry weather. Water deeply and regularly, aiming for about 1 inch of water per week. Avoid overhead watering, as this can promote fungal diseases. Drip irrigation is a great option.
2. Fertilizing: Fertilize your cabbage plants every 2-3 weeks with a balanced fertilizer. Follow the instructions on the fertilizer package. I like to use a liquid fertilizer diluted in water.
3. Weeding: Keep the garden bed free of weeds. Weeds can compete with your cabbage plants for nutrients and water. Mulching can help suppress weeds and retain moisture.
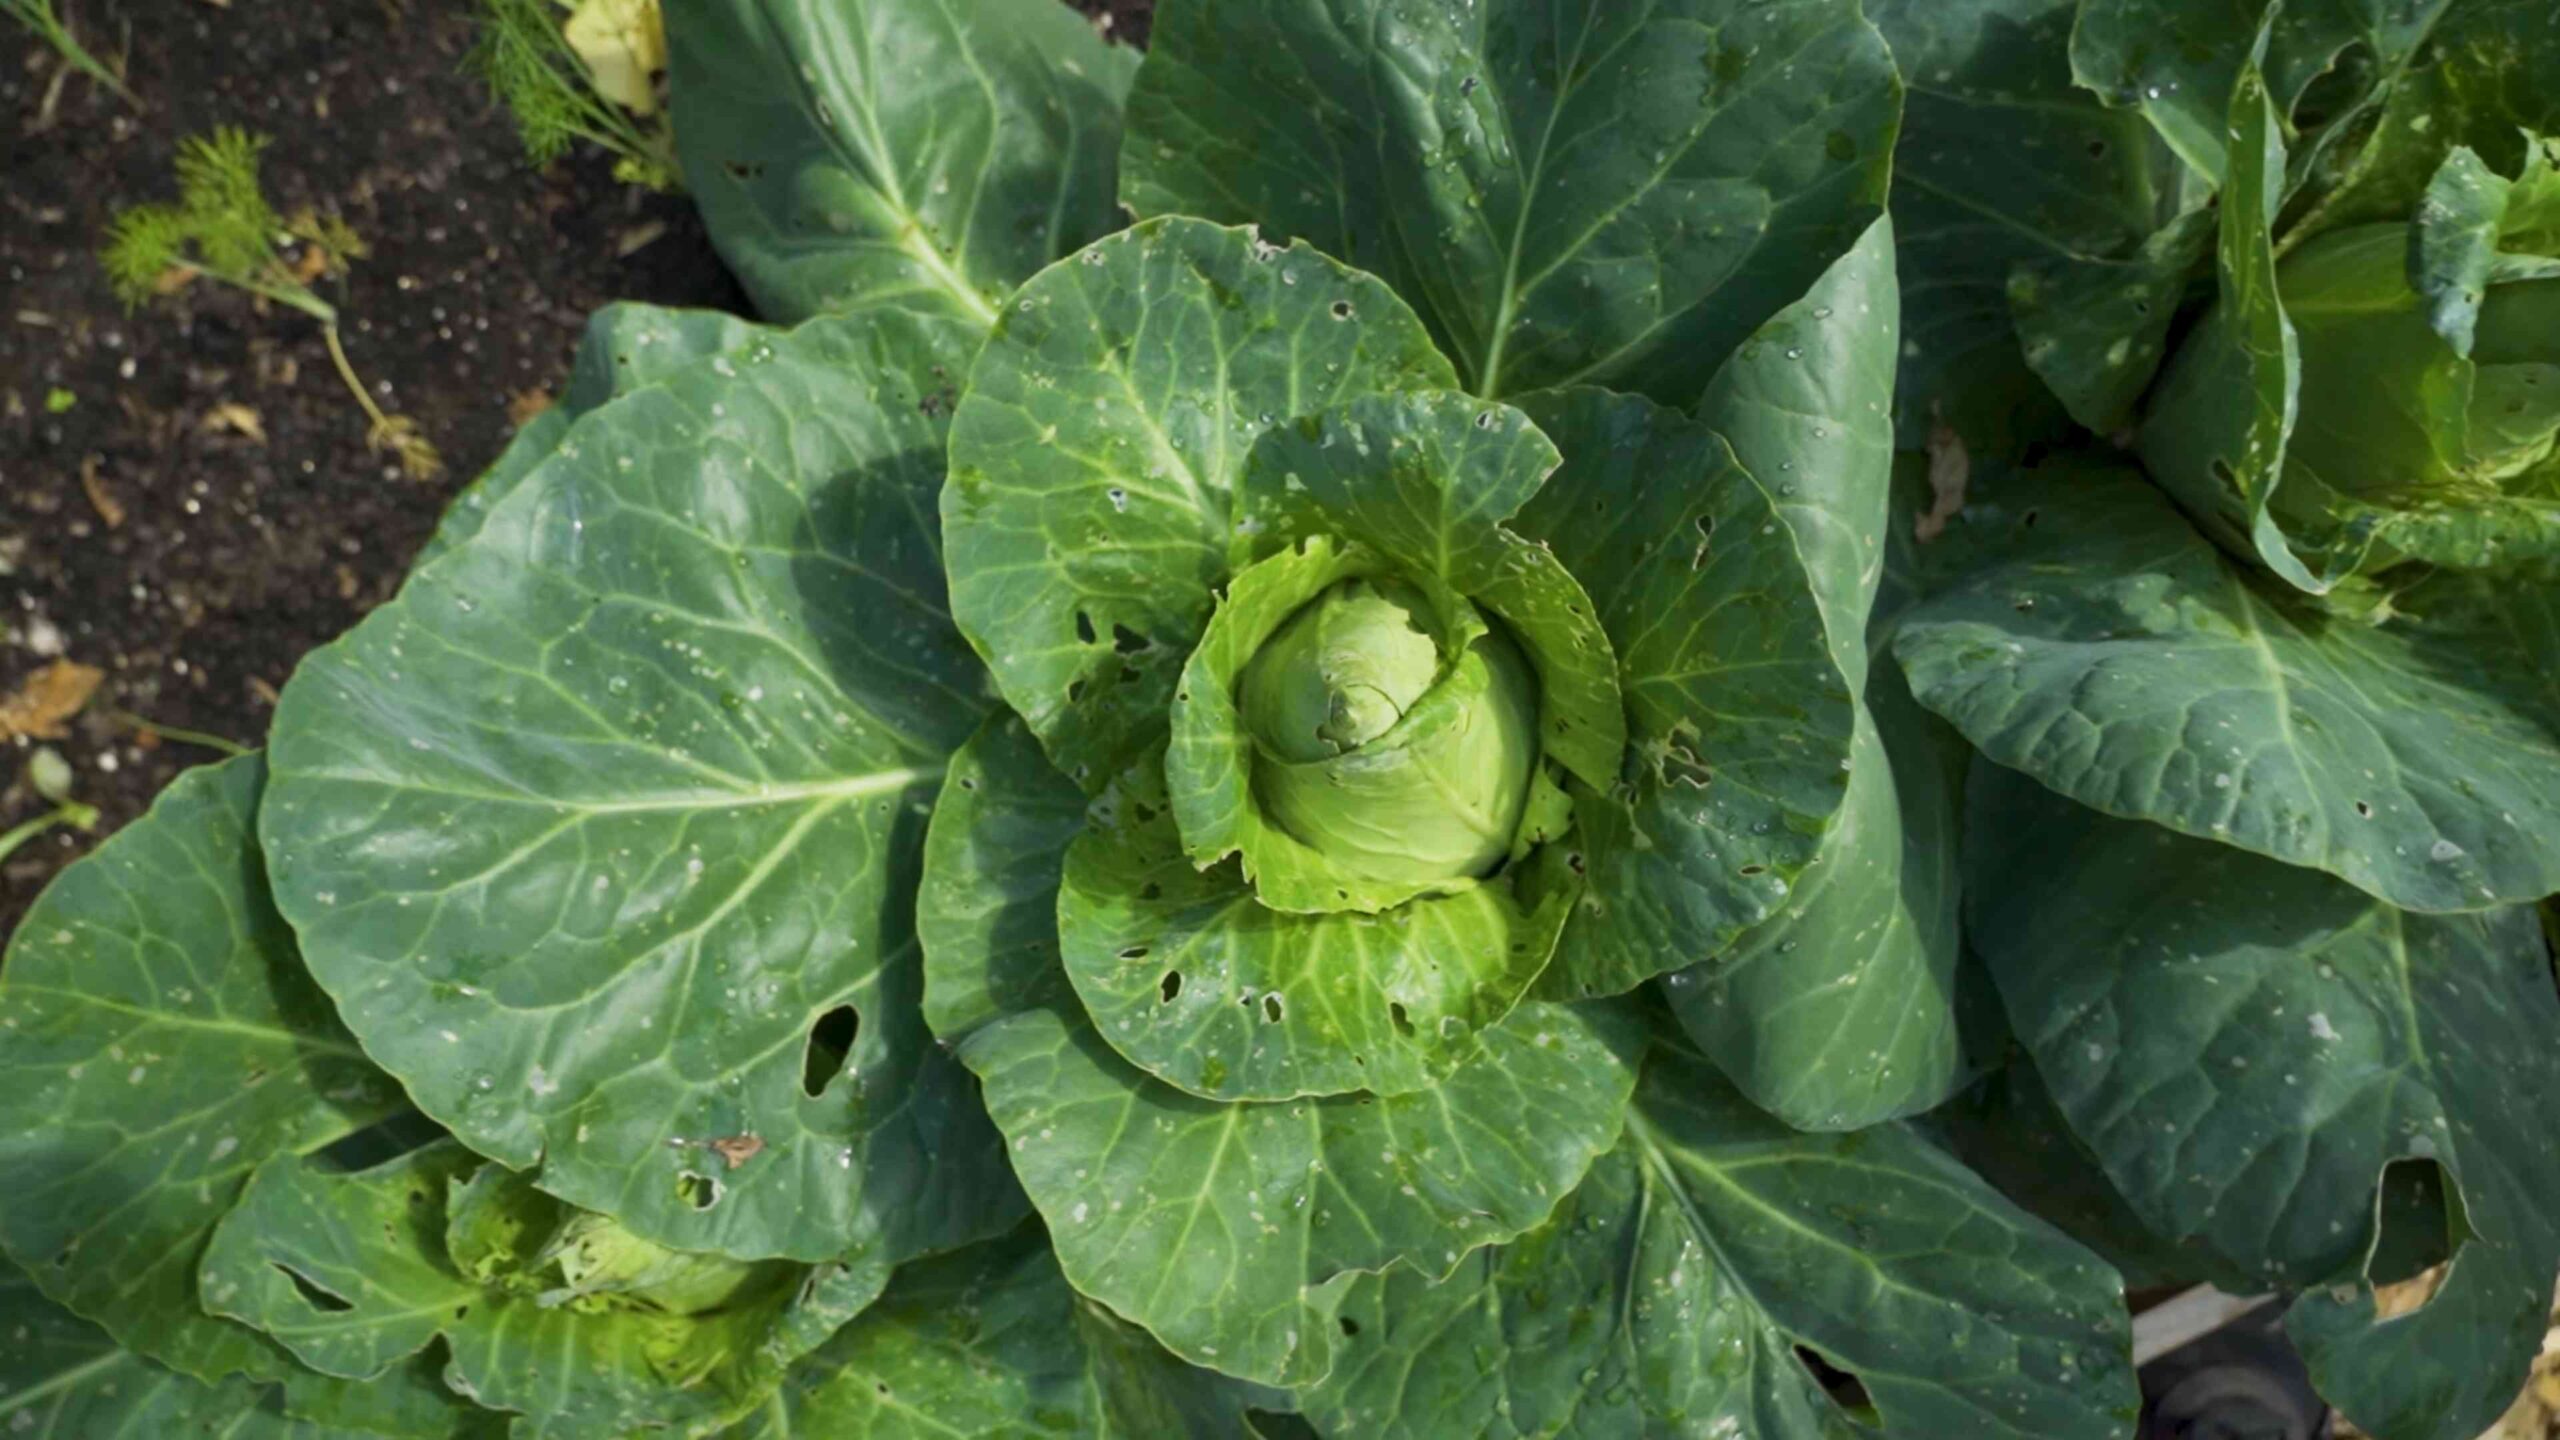
4. Pest Control: Cabbage plants are susceptible to several pests, including cabbage worms, aphids, and flea beetles. Inspect your plants regularly for signs of pests and take action promptly.
* Cabbage Worms: These green caterpillars can quickly devour cabbage leaves. Handpicking them off the plants is an effective method for small infestations. For larger infestations, you can use Bacillus thuringiensis (Bt), a biological insecticide that is safe for humans and pets.
* Aphids: These small, sap-sucking insects can weaken cabbage plants. Spraying the plants with a strong stream of water can dislodge aphids. You can also use insecticidal soap or neem oil.
* Flea Beetles: These tiny beetles can create small holes in cabbage leaves. Covering the plants with row covers can prevent flea beetles from reaching them. You can also use insecticidal soap or diatomaceous earth.
5. Disease Control: Cabbage plants can also be affected by several diseases, including black rot and clubroot.
* Black Rot: This bacterial disease can cause yellowing and wilting of the leaves. To prevent black rot, use disease-free seeds and practice crop rotation.
* Clubroot: This fungal disease can cause swollen and distorted roots. To prevent clubroot, amend the soil with lime to raise the pH to 7.0-7.5 and practice crop rotation.
Harvesting Your Pointed Cabbage
The moment you’ve been waiting for! Harvesting your pointed cabbage is the most rewarding part of the process.
1. Timing is Key: Pointed cabbage is typically ready to harvest about 60-80 days after transplanting, depending on the variety. The heads should be firm and tightly packed.
2. Check for Firmness: Gently squeeze the cabbage head. If it feels firm and solid, it’s ready to harvest.
3. Cut the Head: Use a sharp knife to cut the cabbage head from the stem. Leave a few outer leaves on the stem, as these can sometimes produce smaller side shoots.
4. Store Properly: Store your harvested cabbage in the refrigerator. It should keep for several weeks.
Troubleshooting
Even with the best care, you might encounter some problems along the way. Here are a few common issues and how to address them:
* Heads Not Forming: If your cabbage plants are not forming heads, it could be due to several factors, including lack of sunlight, poor soil fertility, or insufficient watering. Make sure your plants are getting enough sunlight, fertilize them regularly, and water them deeply.
* Splitting Heads: If your cabbage heads are splitting, it’s usually due to inconsistent watering. Try to maintain consistent moisture levels in the soil.
* Pest Infestations: As mentioned earlier, cabbage plants are susceptible to several pests. Inspect your
Conclusion
So, there you have it! Mastering the art of planting pointed cabbage isn’t just about gardening; it’s about embracing a sustainable lifestyle, enjoying the freshest possible produce, and connecting with the earth in a deeply rewarding way. We’ve walked you through the process, from selecting the perfect seeds to nurturing your young plants, and now it’s time to put that knowledge into action.
Why is this DIY trick a must-try? Because store-bought cabbage simply can’t compare to the vibrant flavor and satisfying crunch of a pointed cabbage you’ve grown yourself. You control the growing conditions, ensuring it’s free from unwanted pesticides and brimming with nutrients. Plus, there’s an undeniable sense of accomplishment that comes with harvesting your own food. It’s a tangible connection to the natural world, a reminder of the simple joys of life.
But don’t stop there! Experiment with different varieties of pointed cabbage. Try growing ‘Hispi’ for its early maturity and sweet flavor, or ‘Caraflex’ for its conical shape and excellent storage capabilities. Consider companion planting with herbs like rosemary or thyme to deter pests and enhance the flavor of your cabbage. You can also explore different planting times to extend your harvest season. For example, a late summer planting can provide you with a delicious crop well into the fall.
We encourage you to embrace the challenge and embark on your own pointed cabbage growing adventure. Don’t be afraid to get your hands dirty, to learn from your mistakes, and to celebrate your successes. Remember, every garden is unique, and every gardener has their own style. The most important thing is to enjoy the process and to appreciate the bounty that nature provides.
And most importantly, share your experience! We want to hear about your successes, your challenges, and your tips for growing the perfect pointed cabbage. Post photos of your garden, share your favorite recipes, and connect with other gardeners in our community. Together, we can learn from each other and inspire others to embrace the joys of gardening. So, grab your seeds, prepare your soil, and get ready to experience the satisfaction of growing your own delicious and nutritious pointed cabbage. Happy gardening!
Frequently Asked Questions (FAQ)
What is the best time of year to plant pointed cabbage?
The ideal time to plant pointed cabbage depends on your climate and the specific variety you’re growing. Generally, you can plant pointed cabbage in early spring for a summer harvest or in late summer for a fall or winter harvest. For spring planting, start seeds indoors 6-8 weeks before the last expected frost. For fall planting, sow seeds directly into the garden in late summer, about 6-8 weeks before the first expected frost. Check the specific seed packet for recommended planting times for your chosen variety.
How much sunlight does pointed cabbage need?
Pointed cabbage thrives in full sun, which means it needs at least 6 hours of direct sunlight per day. If you live in a particularly hot climate, some afternoon shade can be beneficial to prevent the leaves from scorching. Insufficient sunlight can result in leggy plants with poor head formation.
What kind of soil is best for growing pointed cabbage?
Pointed cabbage prefers well-drained, fertile soil that is rich in organic matter. The ideal soil pH is between 6.0 and 7.5. Before planting, amend the soil with compost or well-rotted manure to improve drainage and fertility. You can also add a slow-release fertilizer to provide essential nutrients throughout the growing season.
How often should I water my pointed cabbage plants?
Pointed cabbage needs consistent moisture to thrive. Water deeply and regularly, especially during dry periods. Aim to keep the soil consistently moist but not waterlogged. A good rule of thumb is to water when the top inch of soil feels dry to the touch. Mulching around the plants can help retain moisture and suppress weeds.
What are some common pests and diseases that affect pointed cabbage?
Pointed cabbage is susceptible to several pests and diseases, including cabbage worms, aphids, flea beetles, clubroot, and black rot. To prevent pest problems, consider using row covers to protect your plants. Regularly inspect your plants for signs of infestation and take action promptly. Organic pest control methods, such as insecticidal soap or neem oil, can be effective against many common pests. To prevent diseases, practice crop rotation, ensure good drainage, and avoid overhead watering.
How do I harvest pointed cabbage?
Pointed cabbage is ready to harvest when the head is firm and compact. The exact time will depend on the variety and growing conditions, but generally, it takes about 60-80 days from transplanting. To harvest, use a sharp knife to cut the head from the stem, leaving a few outer leaves intact. You can also harvest the outer leaves as needed for salads or cooking.
Can I grow pointed cabbage in containers?
Yes, pointed cabbage can be grown in containers, but you’ll need to choose a large container that is at least 12 inches in diameter and depth. Use a well-draining potting mix and provide regular watering and fertilization. Container-grown cabbage may require more frequent watering than plants grown in the ground.
What are some good companion plants for pointed cabbage?
Companion planting can help deter pests, improve soil health, and enhance the flavor of your pointed cabbage. Some good companion plants include:
* **Herbs:** Rosemary, thyme, sage, dill, and mint can help repel cabbage moths and other pests.
* **Flowers:** Marigolds and nasturtiums can also deter pests and attract beneficial insects.
* **Vegetables:** Onions, garlic, and leeks can help repel cabbage root flies.
Avoid planting pointed cabbage near other members of the brassica family, such as broccoli, cauliflower, and kale, as they can attract the same pests and diseases.
How do I store pointed cabbage after harvesting?
Pointed cabbage can be stored in the refrigerator for several weeks. To store, wrap the head in plastic wrap or place it in a plastic bag. You can also store pointed cabbage in a cool, dark place, such as a root cellar, for several months.
What are some delicious ways to use pointed cabbage?
Pointed cabbage is a versatile vegetable that can be used in a variety of dishes. It can be eaten raw in salads, coleslaw, or slaws. It can also be cooked in stir-fries, soups, stews, and braised dishes. Some popular recipes include:
* **Coleslaw:** Shredded pointed cabbage mixed with mayonnaise, vinegar, and other seasonings.
* **Stir-fries:** Pointed cabbage stir-fried with other vegetables, meat, or tofu.
* **Cabbage rolls:** Pointed cabbage leaves stuffed with a mixture of meat, rice, and vegetables.
* **Braised cabbage:** Pointed cabbage braised with bacon, onions, and other vegetables.
Don’t be afraid to experiment and try new recipes with your homegrown pointed cabbage! The possibilities are endless.

Leave a Comment