

Plant Yardlong Beans Backyard: Imagine stepping into your backyard and being greeted by a lush, vibrant tapestry of climbing vines, laden with incredibly long, delicious beans. That’s the magic of yardlong beans, and I’m here to show you how to cultivate this unique and rewarding crop right in your own backyard!
Yardlong beans, also known as asparagus beans or Chinese long beans, have a rich history, particularly in Southeast Asian cuisine. For centuries, they’ve been a staple ingredient, adding a delightful crunch and subtle sweetness to stir-fries, curries, and salads. But you don’t need to travel to Asia to enjoy these culinary delights; you can grow them yourself!
Why should you consider adding yardlong beans to your backyard garden? Well, besides their incredible flavor and versatility, they’re also relatively easy to grow, especially with a few clever DIY tricks and hacks. In this article, I’m going to share my favorite tips and techniques for successfully plant yardlong beans backyard, even if you’re a beginner gardener. From choosing the right location and preparing the soil to building a sturdy trellis and combating common pests, I’ll guide you through every step of the process.
Let’s unlock the secrets to a bountiful harvest of these fascinating and delicious beans, transforming your backyard into a thriving edible oasis. Get ready to roll up your sleeves and discover the joy of growing your own food!
Growing Yardlong Beans in Your Backyard: A DIY Guide
Hey there, fellow gardening enthusiasts! I’m so excited to share my experience growing yardlong beans (also known as asparagus beans or Chinese long beans) right in my backyard. These beans are not only delicious but also incredibly rewarding to grow. Get ready to impress your friends and family with these impressively long veggies!
Choosing the Right Variety and Location
Before we dive into the nitty-gritty, let’s talk about choosing the right variety and location. This is crucial for a successful harvest.
* Variety Selection: There are several yardlong bean varieties available. I personally prefer the ‘Red Noodle’ variety for its vibrant color and excellent flavor, but ‘Chinese Red Noodle’ and ‘Orient Wonder’ are also popular choices. Do some research and pick one that suits your taste and climate.
* Sunlight: Yardlong beans need at least 6-8 hours of direct sunlight per day. Choose a spot in your backyard that gets plenty of sunshine.
* Soil: These beans thrive in well-drained soil that’s rich in organic matter. Amend your soil with compost or well-rotted manure before planting.
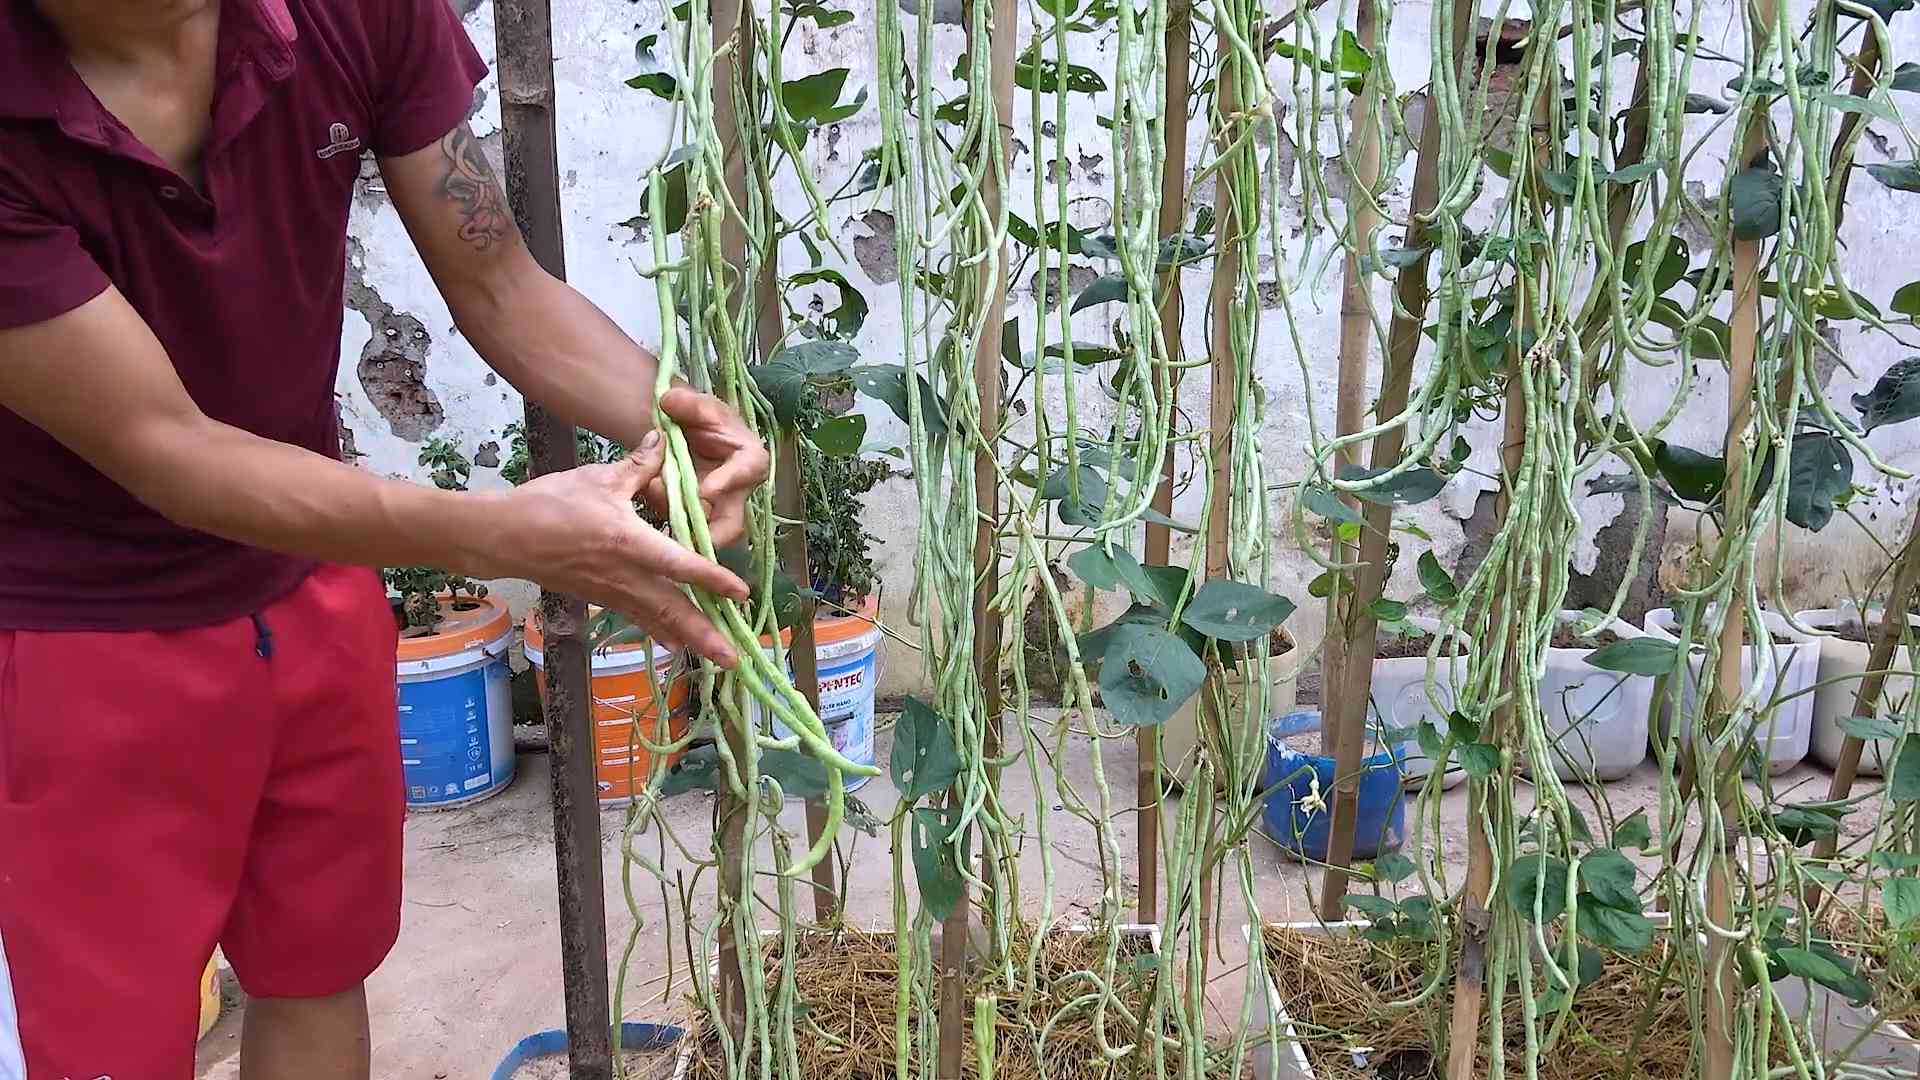
* Support Structure: Yardlong beans are climbers, so you’ll need to provide them with a trellis, fence, or other support structure. They can grow quite tall, so make sure your support is sturdy enough. I’ve found that a trellis made of sturdy bamboo poles works wonders.
Preparing the Soil and Planting
Now that we’ve covered the basics, let’s get our hands dirty!
1. Soil Preparation: Start by clearing the area where you plan to plant your beans. Remove any weeds, rocks, or debris. Then, dig in plenty of compost or well-rotted manure to enrich the soil. I usually add about 2-3 inches of compost and mix it thoroughly with the existing soil.
2. Building the Support Structure: Before planting, set up your trellis or support structure. This will prevent you from disturbing the young plants later. Make sure the structure is firmly in place and can withstand the weight of the growing vines.
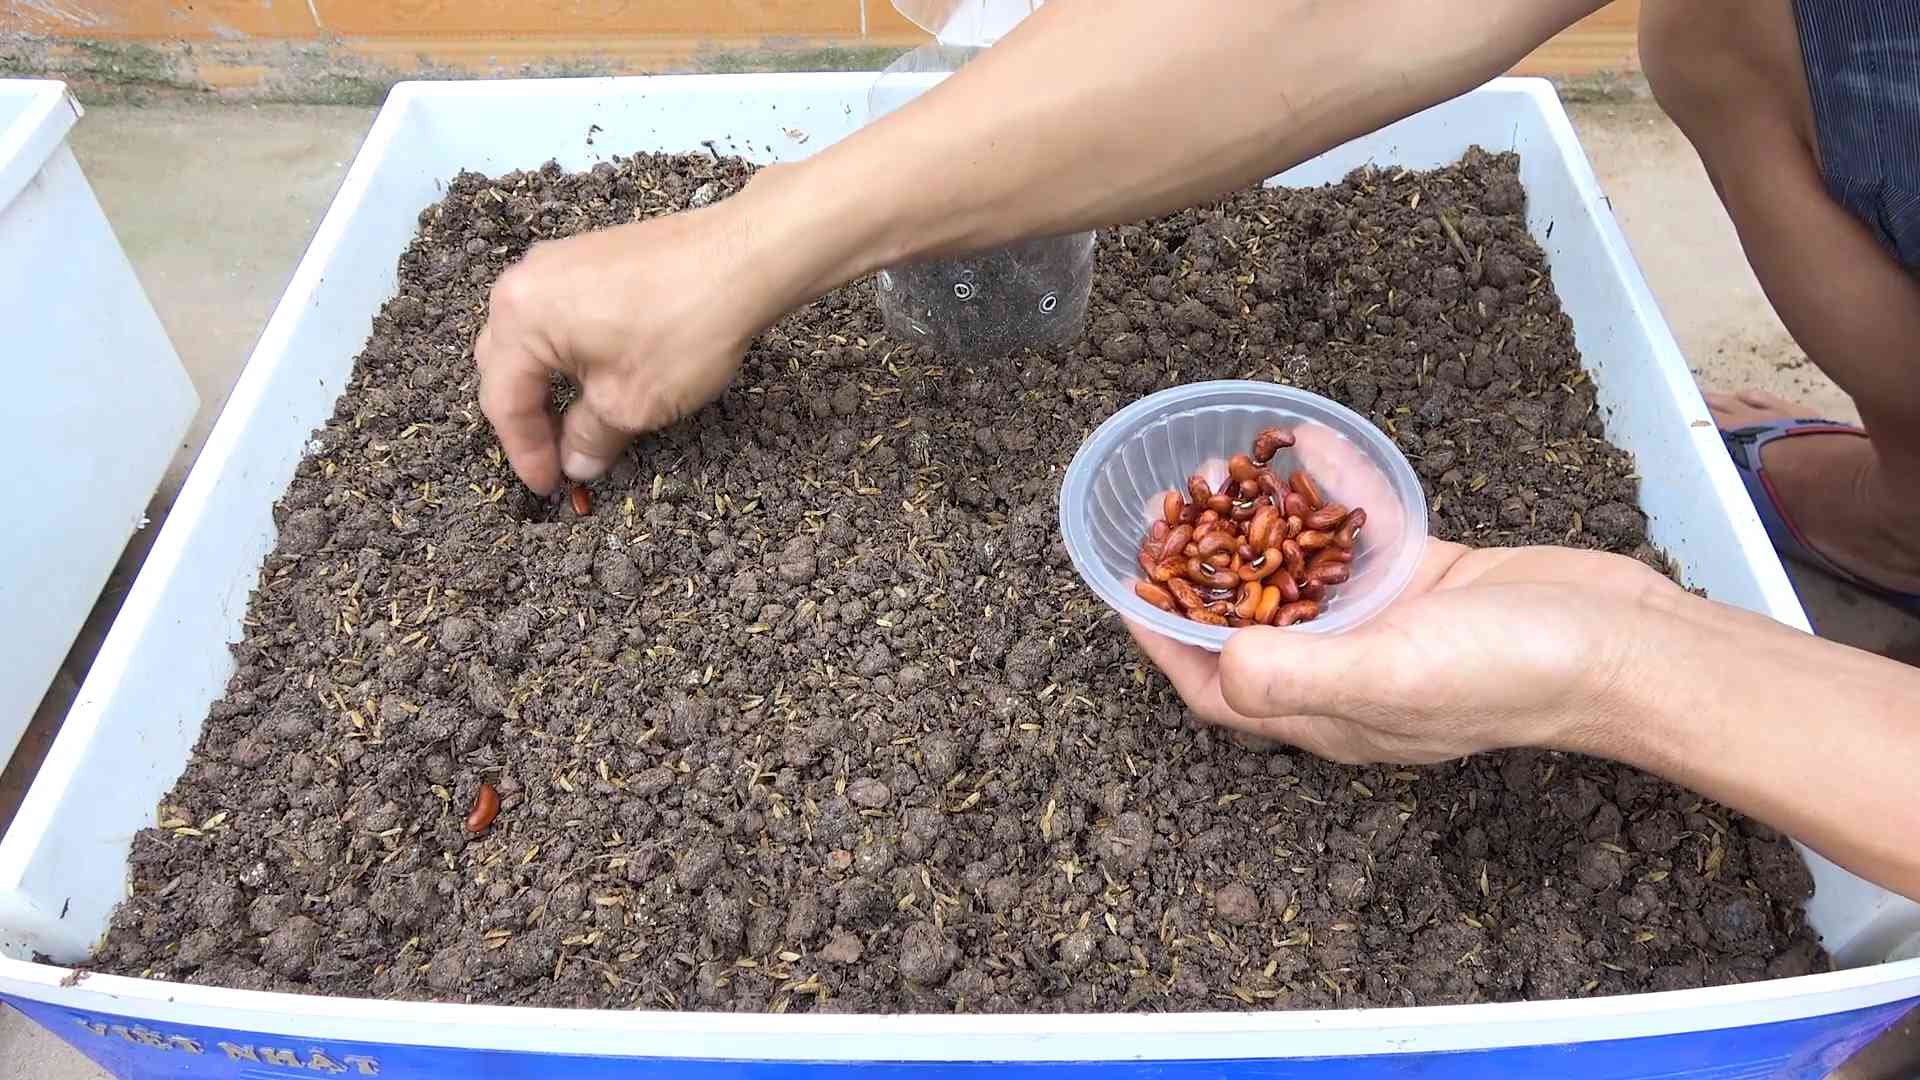
3. Sowing the Seeds: Yardlong beans are best sown directly into the ground after the last frost. The soil temperature should be at least 65°F (18°C). Sow the seeds about 1 inch deep and 2-3 inches apart. I usually plant two seeds per hole to increase the chances of germination.
4. Watering: After planting, water the seeds gently but thoroughly. Keep the soil consistently moist until the seedlings emerge.
5. Thinning: Once the seedlings are a few inches tall, thin them out to one plant per hole. Choose the strongest and healthiest-looking seedling to keep.
Caring for Your Yardlong Beans
Once your yardlong beans are established, it’s time to provide them with the care they need to thrive.
1. Watering: Yardlong beans need consistent moisture, especially during hot and dry weather. Water deeply and regularly, aiming to keep the soil consistently moist but not waterlogged. I usually water them every 2-3 days, depending on the weather.
2. Fertilizing: Feed your yardlong beans with a balanced fertilizer every 2-3 weeks. Look for a fertilizer that’s specifically formulated for vegetables. I like to use a liquid fertilizer diluted according to the package instructions.
3. Weeding: Keep the area around your yardlong beans free of weeds. Weeds can compete with your beans for nutrients and water. Hand-pull weeds regularly or use a hoe to cultivate the soil.
4. Training the Vines: As the vines grow, gently guide them onto the trellis or support structure. This will help them climb properly and prevent them from sprawling on the ground. I use soft twine to tie the vines to the trellis if needed.
5. Pest and Disease Control: Keep an eye out for pests and diseases. Common pests that affect yardlong beans include aphids, bean beetles, and spider mites. You can control these pests with insecticidal soap or neem oil. Diseases like powdery mildew can also be a problem. Improve air circulation and avoid overhead watering to prevent fungal diseases. If necessary, use a fungicide.
Harvesting Your Yardlong Beans
The most exciting part of growing yardlong beans is, of course, harvesting them!
1. Harvest Time: Yardlong beans are typically ready to harvest about 60-80 days after planting. The beans should be long and slender, but still tender. They’re usually about 12-18 inches long, but some varieties can grow even longer.
2. Harvesting Technique: Use scissors or pruning shears to cut the beans from the vine. Be careful not to damage the plant. Harvest the beans regularly to encourage continued production.
3. Storage: Freshly harvested yardlong beans are best used immediately. However, you can store them in the refrigerator for a few days. Place them in a plastic bag or container to prevent them from drying out.
Troubleshooting Common Problems
Even with the best care, you might encounter some problems while growing yardlong beans. Here are some common issues and how to address them:
* Poor Germination: If your seeds aren’t germinating, make sure the soil temperature is warm enough. You can also try soaking the seeds in water for 24 hours before planting to improve germination rates.
* Yellowing Leaves: Yellowing leaves can be a sign of nutrient deficiency. Fertilize your plants with a balanced fertilizer to provide them with the nutrients they need.
* Lack of Flowers: If your plants aren’t flowering, it could be due to a lack of sunlight or excessive nitrogen in the soil. Make sure your plants are getting enough sunlight and avoid over-fertilizing with nitrogen-rich fertilizers.
* Pest Infestations: Regularly inspect your plants for pests. Treat infestations promptly with insecticidal soap or neem oil.
* Disease Problems: Prevent fungal diseases by improving air circulation and avoiding overhead watering. If necessary, use a fungicide.
Enjoying Your Harvest
Now that you’ve harvested your yardlong beans, it’s time to enjoy the fruits (or rather, vegetables) of your labor! Yardlong beans are incredibly versatile and can be used in a variety of dishes.
* Stir-fries: Yardlong beans are a staple in Asian stir-fries. They add a delicious crunch and flavor to any stir-fry recipe.
* Salads: You can also add yardlong beans to salads. Blanch them briefly to soften them slightly before adding them to your salad.
* Soups and Stews: Yardlong beans can also be added to soups and stews. They add a hearty and nutritious element to these dishes.
* Grilled: Grilling yardlong beans is another delicious way to enjoy them. Toss them with olive oil, salt, and pepper before grilling.
Saving Seeds for Next Year
If you want to grow yardlong beans again next year, you can save seeds from your current harvest.
1. Select Healthy Pods: Choose several healthy and mature pods from your best-performing plants.
2. Allow Pods to Dry: Allow the pods to dry completely on the vine. They should turn brown and brittle.
3. Harvest the Seeds: Once the pods are dry, shell them and collect the seeds.
4. Dry the Seeds: Spread the seeds out on a tray and allow them to dry completely for a few days.
5. Store the Seeds: Store the dried seeds in an airtight container in a cool, dark, and dry place. They should be viable for several years.
Final Thoughts
Growing yardlong beans in your backyard is a fun and rewarding experience. With a little bit of care and attention, you can enjoy a bountiful harvest of these delicious and versatile vegetables. So, get out there and start planting! Happy gardening!
Conclusion
So, there you have it! Planting yardlong beans in your backyard doesn’t have to be an intimidating endeavor. With a little preparation, the right techniques, and a dash of patience, you can cultivate a thriving crop of these delicious and versatile legumes right outside your door. This DIY approach not only saves you money compared to buying them at the store, but it also gives you the satisfaction of knowing exactly where your food comes from and how it was grown.
Why is this DIY trick a must-try? Because it empowers you to control the quality of your food, reduces your carbon footprint by minimizing transportation, and provides a rewarding connection to nature. Imagine stepping into your backyard and harvesting fresh, crisp yardlong beans for your stir-fries, salads, or even a simple side dish. The taste difference between homegrown and store-bought is undeniable!
But the benefits don’t stop there. Growing your own yardlong beans can also be a fun and educational activity for the whole family. It’s a great way to teach children about the life cycle of plants, the importance of healthy eating, and the joys of gardening. Plus, the vibrant green vines and dangling beans add a touch of beauty to your backyard landscape.
Looking for variations? Consider interplanting your yardlong beans with other vegetables like corn or sunflowers. The tall stalks of these plants can provide natural support for the bean vines, creating a symbiotic relationship that benefits both crops. You can also experiment with different varieties of yardlong beans, each with its own unique flavor and texture. Some popular choices include the Chinese Red Noodle Bean, the Asparagus Bean, and the Thai Purple Podded Bean.
Another variation is to try growing your yardlong beans in containers. This is a great option if you have limited space or if you want to move your plants around to follow the sun. Just make sure to choose a large container with good drainage and provide a sturdy trellis or support structure for the vines to climb.
Ready to embark on your yardlong bean growing adventure? Don’t hesitate to give this DIY trick a try. We’re confident that you’ll be amazed by the results. And once you’ve harvested your first crop, we encourage you to share your experience with us and other gardening enthusiasts. Post photos of your yardlong bean plants, share your favorite recipes, and let us know what tips and tricks worked best for you. Together, we can create a community of backyard gardeners who are passionate about growing their own food and sharing their knowledge with others. So grab your seeds, get your hands dirty, and get ready to enjoy the delicious rewards of planting yardlong beans in your backyard!
Frequently Asked Questions (FAQ)
What is the best time to plant yardlong beans?
The ideal time to plant yardlong beans is after the last frost in spring, when the soil has warmed up to at least 65°F (18°C). Yardlong beans are warm-season crops and are sensitive to cold temperatures. Planting too early can result in poor germination or stunted growth. In warmer climates, you can also plant a second crop in late summer for a fall harvest. Check your local frost dates to determine the best planting time for your region.
How much sunlight do yardlong beans need?
Yardlong beans require at least 6-8 hours of direct sunlight per day to thrive. Choose a planting location that receives plenty of sunlight throughout the day. If you’re growing them in containers, you can move them around to ensure they get adequate sunlight. Insufficient sunlight can lead to weak, leggy plants and reduced yields.
What type of soil is best for yardlong beans?
Yardlong beans prefer well-drained, fertile soil with a pH between 6.0 and 7.0. Amend your soil with compost or other organic matter to improve its drainage and fertility. Avoid planting in heavy clay soil, as this can lead to root rot. If your soil is compacted, till it before planting to loosen it up and improve drainage.
How often should I water yardlong beans?
Water your yardlong beans regularly, especially during hot, dry weather. Keep the soil consistently moist, but avoid overwatering, which can lead to root rot. Water deeply and less frequently, rather than shallowly and more often. A good rule of thumb is to water when the top inch of soil feels dry to the touch. Mulching around the plants can help retain moisture and suppress weeds.
Do yardlong beans need a trellis or support?
Yes, yardlong beans are climbing plants and require a trellis or other support structure to grow properly. Without support, the vines will sprawl on the ground, making them more susceptible to pests and diseases. A trellis, fence, or even a sturdy stake can provide adequate support for the vines. Train the vines to climb the support structure as they grow.
How long does it take for yardlong beans to mature?
Yardlong beans typically take 60-80 days to mature after planting. You can start harvesting the beans when they are about 12-18 inches long and still tender. Harvest regularly to encourage continued production. Overripe beans will become tough and less flavorful.
What are some common pests and diseases that affect yardlong beans?
Some common pests that can affect yardlong beans include aphids, bean beetles, and spider mites. Diseases that can affect them include powdery mildew, bean rust, and anthracnose. Inspect your plants regularly for signs of pests or diseases and take appropriate action to control them. Organic pest control methods, such as insecticidal soap or neem oil, can be effective for controlling many pests. Ensure good air circulation around the plants to prevent fungal diseases.
Can I save seeds from my yardlong beans?
Yes, you can save seeds from your yardlong beans for planting next year. Allow some of the beans to mature fully on the vine until they are dry and brown. Remove the seeds from the pods and store them in a cool, dry place. Make sure the seeds are completely dry before storing them to prevent mold growth.
Are yardlong beans nutritious?
Yes, yardlong beans are a good source of vitamins, minerals, and fiber. They are low in calories and fat and are a good source of protein. They are also a good source of vitamin C, vitamin A, and folate.
What are some ways to cook yardlong beans?
Yardlong beans can be cooked in a variety of ways. They can be stir-fried, steamed, boiled, or grilled. They are often used in Asian cuisine, such as stir-fries and curries. They can also be added to salads or served as a side dish. Their unique texture and mild flavor make them a versatile ingredient in many dishes.

Leave a Comment