

Polish faucet with toothpaste? Yes, you read that right! Forget those expensive, harsh chemical cleaners. I’m about to let you in on a little secret that’s been passed down through generations – a simple, everyday item hiding in your bathroom can restore your faucets to their former glory.
The concept of using readily available household items for cleaning isn’t new. Think back to your grandmother’s cleaning rituals – vinegar, baking soda, and lemon juice were her go-to solutions. This resourceful approach stems from a time when commercial cleaners weren’t as accessible or affordable. It’s a testament to the ingenuity and practicality of past generations. And honestly, it’s a much more eco-friendly way to keep your home sparkling!
Let’s face it, grimy, water-stained faucets can really detract from the overall look of your kitchen or bathroom. They can even make the whole space feel a little…unclean. Nobody wants that! But constantly scrubbing with harsh chemicals can be tough on your faucets (and your hands!). That’s where this amazing DIY trick comes in. Using toothpaste to polish faucet with toothpaste is a gentle, effective, and surprisingly simple way to remove those stubborn water spots and restore the shine. I’m excited to share this easy hack with you, so you can enjoy sparkling faucets without breaking the bank or harming the environment. Let’s get started!
DIY Faucet Sparkle: Toothpaste Polishing Power!
Hey everyone! Are your faucets looking a little dull and grimy? Don’t rush out to buy expensive cleaners just yet! I’m going to show you a super simple and surprisingly effective way to bring back their shine using something you probably already have in your bathroom: toothpaste! Yes, you read that right. Toothpaste isn’t just for your teeth; it’s a fantastic, gentle abrasive that can work wonders on chrome and other faucet finishes.
This method is perfect for removing water spots, soap scum, and general dullness. It’s also a great way to avoid harsh chemicals, especially if you have kids or pets. Let’s get started!
What You’ll Need:
Before we dive in, gather these few simple supplies:
* Toothpaste: Plain white toothpaste works best. Avoid gel toothpastes or those with added whitening agents or abrasive particles, as these could potentially scratch delicate finishes. Think classic, old-school toothpaste.
* Soft Cloths: You’ll need a couple of soft cloths. Microfiber cloths are ideal because they’re gentle and absorbent.
* Old Toothbrush (Optional): An old toothbrush is great for getting into those hard-to-reach areas around the base of the faucet and handles.
* Water: For rinsing, of course!
* Optional: White Vinegar: For stubborn hard water stains, white vinegar can be a helpful pre-treatment.
* Optional: Baking Soda: For extra scrubbing power, baking soda can be mixed with the toothpaste.
Step-by-Step Instructions:
Okay, let’s get those faucets sparkling! Follow these steps carefully for the best results.
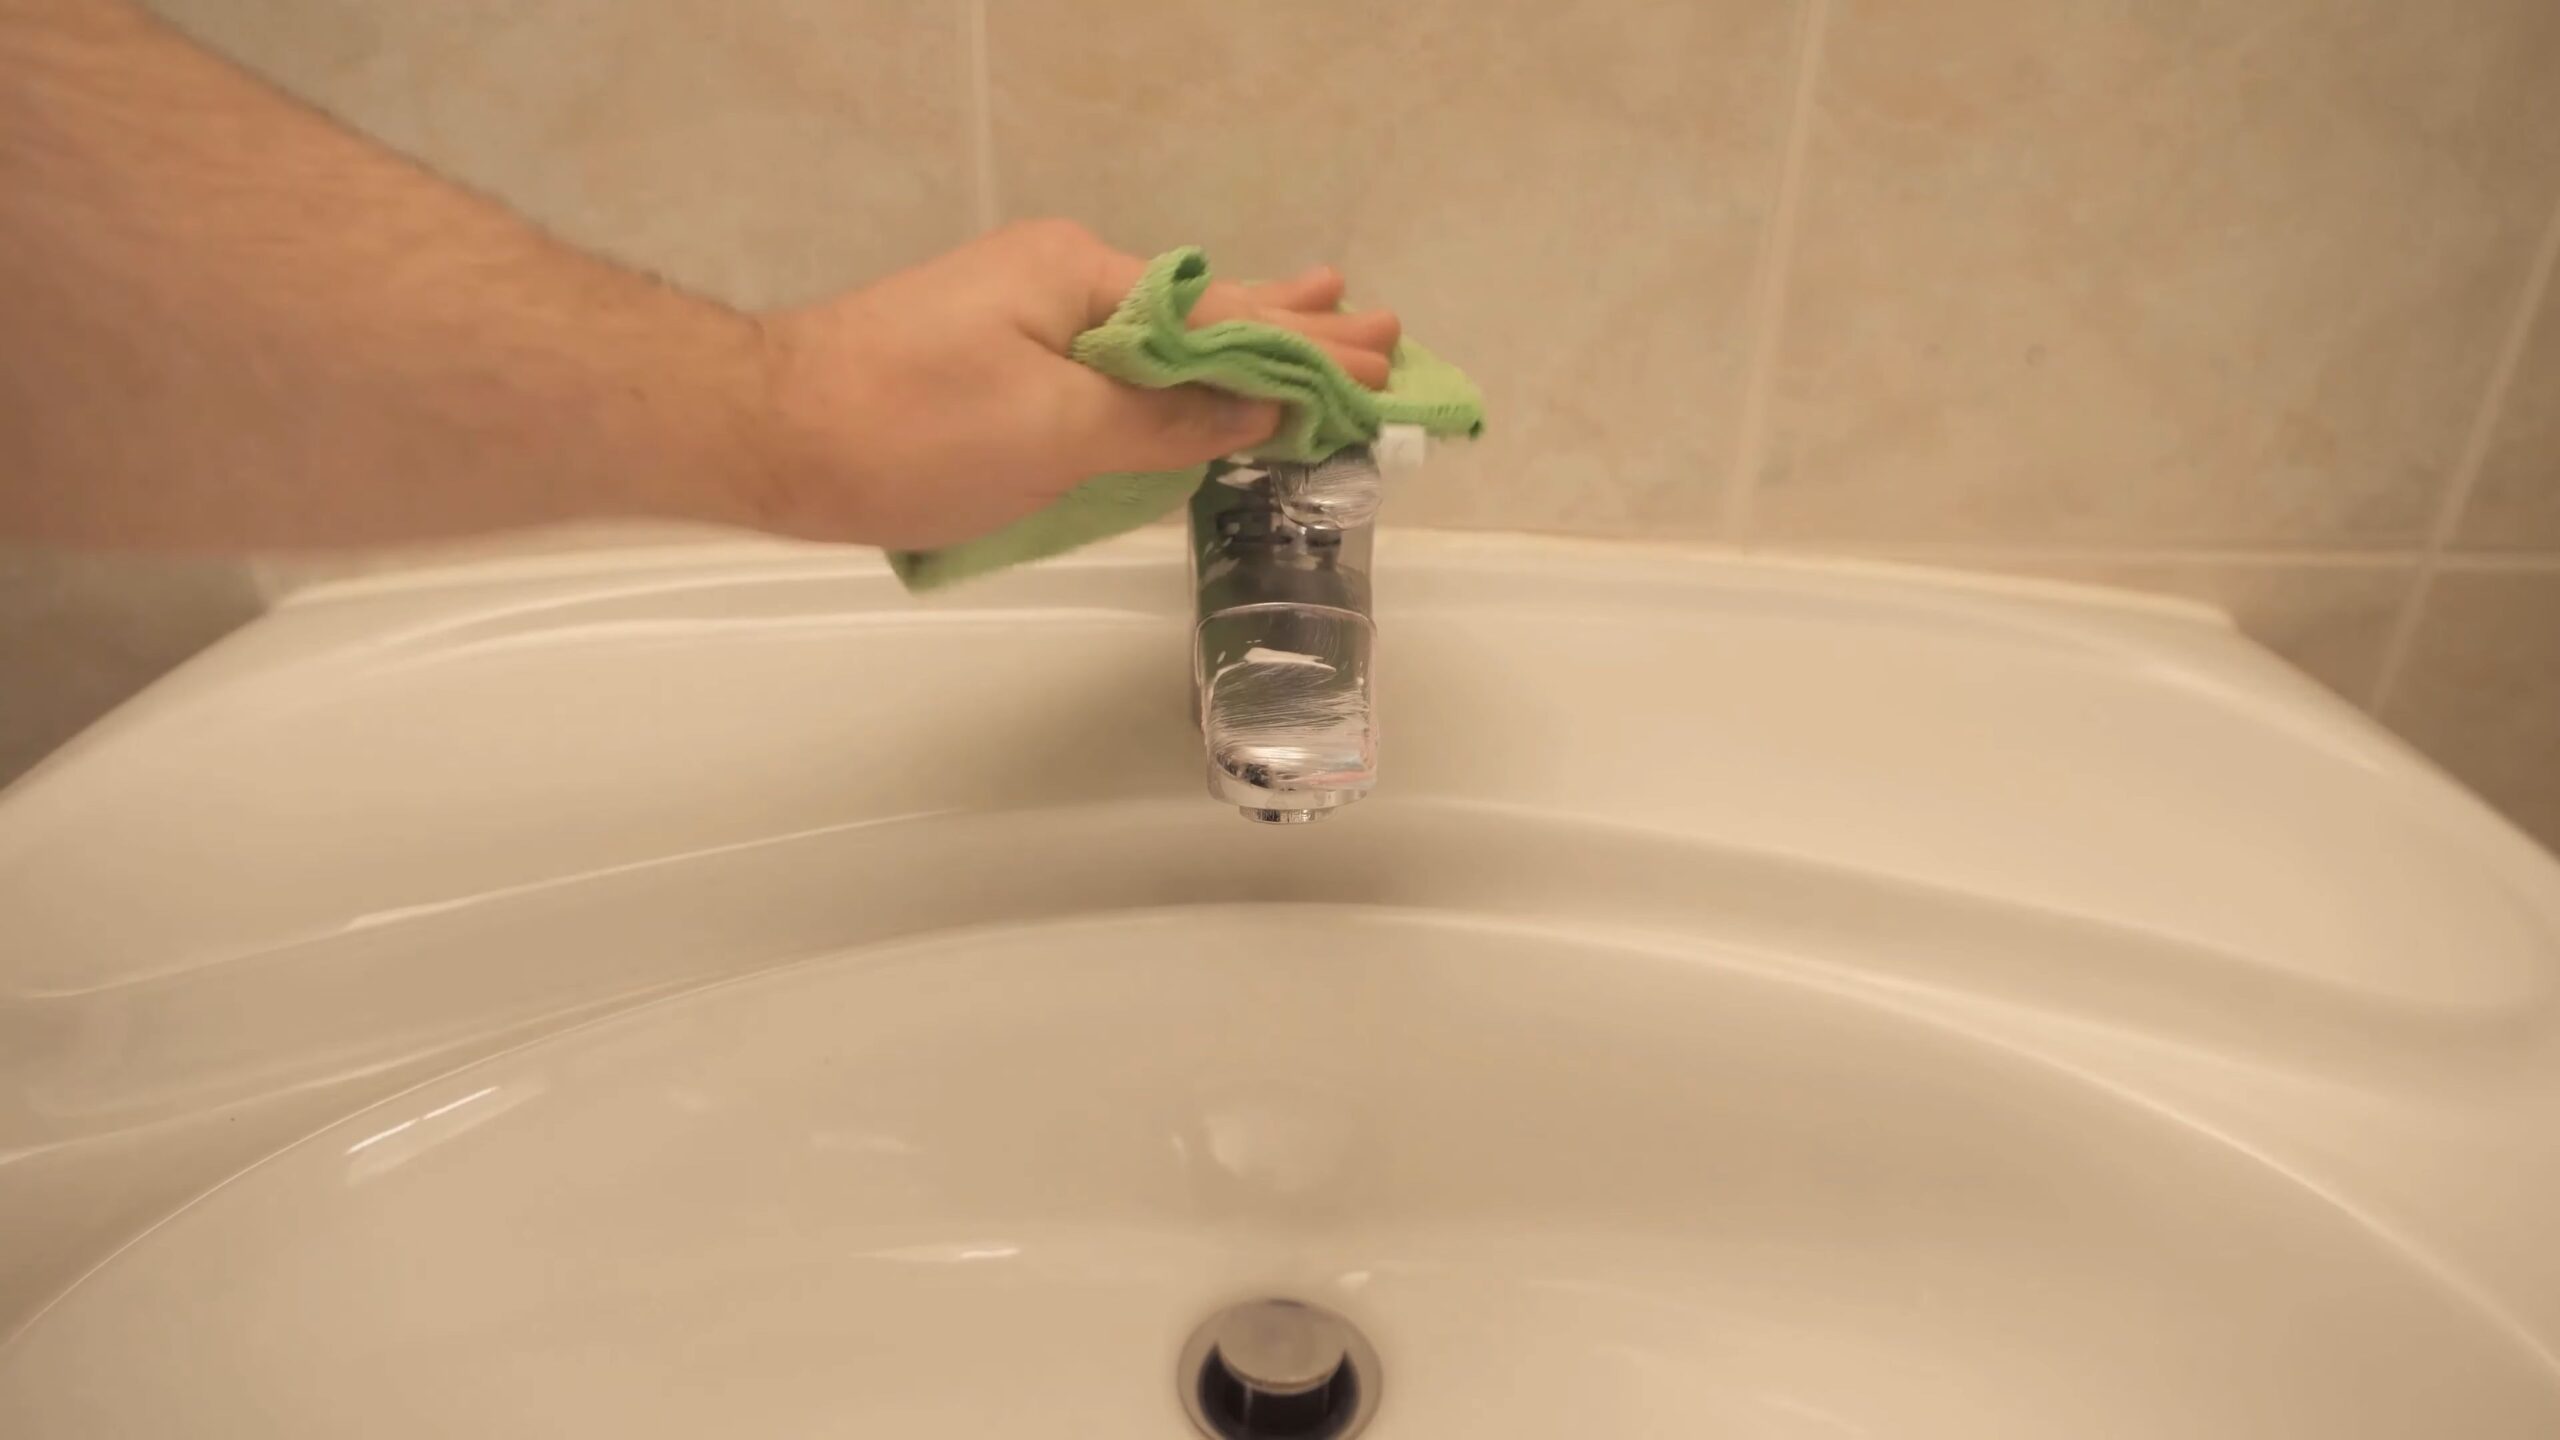
1. Prepare the Faucet: Before you start polishing, give your faucet a quick rinse with water to remove any loose dirt or debris. This will prevent you from grinding dirt into the finish while you’re polishing.
2. Apply the Toothpaste: Squeeze a small amount of toothpaste (about the size of a pea) onto a soft cloth. You don’t need a ton! Less is more to start.
3. Polish the Faucet: Gently rub the toothpaste onto the faucet surface in a circular motion. Apply even pressure, and focus on areas with water spots, soap scum, or dullness. If you’re using an old toothbrush, apply a small amount of toothpaste directly to the bristles and use it to scrub around the base of the faucet, handles, and other tight spots.
4. Let it Sit (Optional): For tougher stains, you can let the toothpaste sit on the faucet for a few minutes (5-10 minutes should be plenty). This allows the mild abrasives in the toothpaste to break down the grime. Don’t let it dry completely, though!
5. Rinse Thoroughly: After polishing (and letting it sit, if you chose to), rinse the faucet thoroughly with water. Make sure to remove all traces of toothpaste. Use your fingers or a clean cloth to help dislodge any toothpaste that’s stuck in crevices.
6. Dry and Buff: Use a clean, dry microfiber cloth to dry the faucet completely. As you dry, buff the surface to bring out the shine. This step is crucial for removing any remaining residue and achieving that sparkling finish.
7. Inspect and Repeat (If Necessary): Take a good look at your faucet. Are there any areas that still need attention? If so, repeat steps 2-6 until you’re satisfied with the results. Sometimes, stubborn stains require a second or even third application.
Dealing with Stubborn Stains:
Sometimes, toothpaste alone isn’t enough to tackle really tough stains, especially hard water deposits. Here are a couple of tricks you can try:
Pre-Treat with White Vinegar:
Hard water stains are alkaline, and vinegar is acidic, making it a great natural cleaner.
1. Soak a Cloth: Soak a clean cloth in white vinegar.
2. Apply to Stains: Wrap the vinegar-soaked cloth around the affected area of the faucet.
3. Let it Sit: Let it sit for 15-20 minutes to allow the vinegar to dissolve the mineral deposits.
4. Rinse and Proceed: Rinse the faucet thoroughly with water and then proceed with the toothpaste polishing method as described above.
Boost with Baking Soda:
Baking soda is a mild abrasive that can add extra scrubbing power to your toothpaste.
1. Make a Paste: Mix a small amount of baking soda with the toothpaste on your cloth. Start with a 1:1 ratio.
2. Apply and Scrub: Apply the paste to the faucet and scrub gently. Be careful not to apply too much pressure, as baking soda can be slightly more abrasive than toothpaste alone.
3. Rinse Thoroughly: Rinse the faucet thoroughly with water to remove all traces of toothpaste and baking soda.
4. Dry and Buff: Dry and buff the faucet with a clean microfiber cloth.
Important Considerations:
* Test in an Inconspicuous Area: Before applying toothpaste to the entire faucet, test it in a small, inconspicuous area to make sure it doesn’t damage the finish. This is especially important for antique or specialty finishes.
* Avoid Abrasive Toothpastes: As mentioned earlier, avoid using gel toothpastes or those with added whitening agents or abrasive particles. These can scratch the faucet’s surface.
* Gentle Pressure is Key: When polishing, use gentle pressure. Excessive force can damage the finish.
* Regular Cleaning: To prevent buildup and keep your faucets sparkling, make this toothpaste polishing method part of your regular cleaning routine. A quick polish once a week can make a big difference.
* Not for All Finishes: While this method works well on chrome and many other common faucet finishes, it may not be suitable for all types. Avoid using it on brushed nickel, oil-rubbed bronze, or other delicate finishes without testing first. For these finishes, a mild soap and water solution is often the best option.
* Be Patient: Some stains may require multiple applications and a little elbow grease. Don’t get discouraged if you don’t see results immediately.
* Protect Your Sink: Consider placing a towel or cloth in the sink to protect it from scratches while you’re working.
Troubleshooting:
* Streaks: If you’re seeing streaks after polishing, it’s likely due to toothpaste residue. Make sure you’re rinsing the faucet thoroughly and buffing it with a clean, dry cloth.
* Scratches: If you notice any scratches, stop using the toothpaste immediately. You may be using a toothpaste that’s too abrasive or applying too much pressure.
* Dullness: If the faucet still looks dull after polishing, try pre-treating it with white vinegar or adding baking soda to the toothpaste for extra scrubbing power.
Beyond Faucets: Other Uses for Toothpaste Polishing
The magic of toothpaste polishing doesn’t stop at faucets! You can use this same technique to clean and shine other chrome or metal fixtures in your bathroom and kitchen, such as:
* Showerheads: Remove mineral deposits and soap scum from your showerhead.
* Sink Drains: Polish the drain flange to remove stains and grime.
* Towel Racks: Bring back the shine to your towel racks.
* Kitchen Sinks (Stainless Steel): While not a replacement for dedicated stainless steel cleaners, toothpaste can help remove minor stains and water spots.
* Chrome Trim on Appliances: Give your appliances a little extra sparkle by polishing the chrome trim.
Remember to always test in an inconspicuous area first, especially on delicate or antique items.
So, there you have it! A simple, affordable, and effective way to get your faucets sparkling clean using toothpaste. Give it a try, and let me know how it works for you! Happy polishing!
Conclusion
So, there you have it! Transforming your dull, water-stained faucets into gleaming fixtures doesn’t require harsh chemicals or expensive cleaning solutions. This simple, yet incredibly effective, DIY trick using toothpaste is a game-changer for anyone looking to revitalize their bathroom or kitchen without breaking the bank. The gentle abrasives in toothpaste work wonders on removing hard water stains, soap scum, and general grime, leaving behind a sparkling clean surface that will instantly brighten up your space.
Why is this a must-try? Because it’s accessible, affordable, and surprisingly powerful. You likely already have toothpaste in your bathroom, making it a readily available solution. It’s also a much gentler alternative to many commercial cleaners, reducing the risk of damaging your faucet’s finish, especially if you have brushed nickel or other delicate materials. Plus, the fresh, minty scent is a welcome bonus compared to the chemical odors of some cleaning products.
But the magic doesn’t stop there! Feel free to experiment with variations to suit your specific needs and preferences. For particularly stubborn stains, try letting the toothpaste sit on the affected area for a few minutes before scrubbing. You can also use an old toothbrush to get into those hard-to-reach crevices around the base of the faucet and handles. For an extra boost of shine, consider finishing with a microfiber cloth to buff the surface after rinsing.
If you’re looking for a more natural approach, consider using a toothpaste that is fluoride-free and contains natural ingredients. While most standard toothpastes work perfectly well, some individuals prefer to minimize their exposure to certain chemicals.
Beyond the bathroom and kitchen, this DIY trick can also be used to polish other chrome or stainless steel fixtures around your home, such as showerheads, towel racks, and even some kitchen appliances. Just be sure to test a small, inconspicuous area first to ensure compatibility.
We are confident that this simple toothpaste hack will become your new go-to solution for keeping your faucets looking their best. It’s a quick, easy, and effective way to maintain a sparkling clean home without the need for harsh chemicals or expensive cleaning products.
Now, it’s your turn! We wholeheartedly encourage you to give this DIY trick a try and witness the transformative power of toothpaste for yourself. Don’t just take our word for it – experience the difference firsthand. Once you’ve tried it, we’d love to hear about your results. Share your before-and-after photos, tips, and variations in the comments below. Let’s create a community of sparkling clean faucets and happy homeowners! We are eager to hear how this method of faucet polishing with toothpaste worked for you. Your insights and experiences will not only help others but also contribute to refining this already effective technique. Let’s make those faucets shine!
Frequently Asked Questions (FAQ)
Q: What kind of toothpaste works best for polishing faucets?
A: Generally, any standard white toothpaste will work effectively for polishing faucets. The key ingredient is the mild abrasive that helps to remove stains and grime. However, gel toothpastes are typically less effective as they lack the necessary abrasive properties. For best results, opt for a non-gel, white toothpaste. Some users have reported success with whitening toothpastes, as they often contain slightly more abrasive ingredients, but be cautious as excessive abrasion could potentially damage delicate finishes over time. If you’re concerned about potential damage, test the toothpaste on an inconspicuous area of the faucet first.
Q: Can I use this toothpaste method on all types of faucet finishes?
A: While this method is generally safe for most common faucet finishes like chrome, stainless steel, and brushed nickel, it’s always best to exercise caution, especially with more delicate or specialized finishes. Avoid using abrasive toothpastes or excessive pressure on finishes like oil-rubbed bronze, gold-plated, or painted faucets, as these can be easily scratched or damaged. For these types of finishes, a gentler cleaning solution, such as mild soap and water, is usually recommended. If you’re unsure about your faucet’s finish, consult the manufacturer’s instructions or test the toothpaste on a small, hidden area before applying it to the entire faucet.
Q: How often should I polish my faucets with toothpaste?
A: The frequency of polishing your faucets with toothpaste depends on several factors, including the hardness of your water, the amount of use the faucet gets, and your personal preference. In areas with hard water, mineral deposits can build up more quickly, requiring more frequent cleaning. As a general guideline, polishing your faucets with toothpaste every one to two weeks should help to maintain their shine and prevent the buildup of stubborn stains. However, if you notice stains or grime accumulating more quickly, you may need to polish them more often. Conversely, if your faucets remain relatively clean, you can extend the time between polishing sessions.
Q: What if the toothpaste doesn’t remove all the stains?
A: If the toothpaste alone isn’t enough to remove stubborn stains, there are a few things you can try. First, allow the toothpaste to sit on the affected area for a longer period of time, perhaps 10-15 minutes, before scrubbing. This will give the abrasive ingredients more time to break down the stains. You can also try using a slightly more abrasive scrubbing tool, such as a non-scratch scouring pad, but be careful not to apply too much pressure, as this could damage the faucet’s finish. Alternatively, you can try using a mixture of baking soda and water to create a paste, which is a slightly more abrasive cleaning solution than toothpaste. If all else fails, you may need to consider using a commercial cleaning product specifically designed for removing hard water stains, but be sure to choose one that is safe for your faucet’s finish.
Q: Is there a way to prevent hard water stains from forming on my faucets in the first place?
A: Yes, there are several ways to prevent hard water stains from forming on your faucets. One of the most effective methods is to simply wipe down your faucets with a dry cloth after each use. This will help to remove any water droplets before they have a chance to evaporate and leave behind mineral deposits. You can also consider installing a water softener in your home, which will reduce the mineral content of your water and prevent hard water stains from forming on all of your fixtures. Another option is to use a water filter on your faucets, which will remove some of the minerals from the water before it comes out of the tap. Finally, you can apply a sealant or protectant to your faucets, which will create a barrier that prevents mineral deposits from adhering to the surface.
Q: Can I use this method to clean other bathroom fixtures besides faucets?
A: Absolutely! The toothpaste method can be used to clean a variety of other bathroom fixtures, including showerheads, towel racks, and even some parts of the toilet. The gentle abrasive properties of toothpaste make it effective at removing soap scum, water stains, and other types of grime from these surfaces. However, as with faucets, it’s important to exercise caution when cleaning delicate or specialized finishes. Avoid using abrasive toothpastes or excessive pressure on finishes like oil-rubbed bronze or gold-plated fixtures. Always test the toothpaste on a small, inconspicuous area first to ensure compatibility. For larger surfaces, you may find it more efficient to use a larger amount of toothpaste or to apply it with a damp cloth or sponge.
Q: What are some other natural alternatives to toothpaste for polishing faucets?
A: If you prefer to use natural cleaning solutions, there are several alternatives to toothpaste that can be effective for polishing faucets. A mixture of equal parts white vinegar and water is a popular choice, as the acidity of the vinegar helps to dissolve mineral deposits. You can also try using a paste made from baking soda and water, which is a gentle abrasive that can help to remove stains and grime. Lemon juice is another natural option, as its acidity can also help to dissolve mineral deposits. Simply apply the lemon juice to the faucet, let it sit for a few minutes, and then rinse with water. For a more gentle cleaning solution, you can try using mild soap and water. Regardless of which natural cleaning solution you choose, be sure to test it on a small, inconspicuous area first to ensure compatibility with your faucet’s finish.


Leave a Comment