

Shine Sterling Silver Baking Soda: Is your cherished sterling silver losing its luster? Don’t despair! I know the feeling – those beautiful heirlooms and everyday pieces deserve to gleam. Before you rush off to buy expensive cleaners, let me let you in on a little secret: you can restore that brilliant shine with something you probably already have in your pantry: baking soda!
Silver has been prized for centuries, not just for its beauty but also for its antibacterial properties. From ancient Roman coins to elegant Victorian tea sets, silver has always held a special place in our homes and hearts. But, alas, silver tarnishes. This natural process, caused by a reaction with sulfur in the air, can leave your silver looking dull and lifeless.
But here’s the good news: you don’t need to be a professional silversmith to bring back that sparkle. This DIY trick using baking soda is not only incredibly effective, but it’s also gentle on your silver and your wallet. I’m going to show you a simple, step-by-step method to shine sterling silver baking soda, saving you time, money, and the potential damage from harsh chemicals. Get ready to transform your tarnished treasures back to their former glory!
DIY Sterling Silver Shine: The Baking Soda Method
Hey there, fellow silver enthusiasts! Is your beautiful sterling silver looking a little dull? Don’t despair! Before you rush out to buy expensive silver cleaners, I want to share a super simple, effective, and budget-friendly method using something you probably already have in your pantry: baking soda! This method is fantastic for removing tarnish and restoring the shine to your silver pieces. Let’s get started!
What You’ll Need
Before we dive in, let’s gather our supplies. This is a pretty straightforward process, so the list is short and sweet:
* Baking Soda: The star of the show!
* Aluminum Foil: This is crucial for the chemical reaction that removes the tarnish.
* Boiling Water: Hot water speeds up the cleaning process.
* A Glass or Plastic Container: Make sure it’s large enough to hold your silver pieces and the water. Avoid using metal containers other than the aluminum foil.
* Tongs or a Fork: To safely handle the hot silver.
* Soft Cloth: For polishing your silver after cleaning.
* Optional: Dish Soap: For pre-cleaning heavily soiled items.
Understanding the Science (A Little Bit!)
Okay, I promise I won’t bore you with a full-blown chemistry lesson, but it’s helpful to understand *why* this works. Tarnish on silver is actually silver sulfide, which forms when silver reacts with sulfur compounds in the air. The baking soda and aluminum foil create an electrolytic reaction. The aluminum is more reactive than the silver, so it attracts the sulfur, effectively reversing the tarnishing process. Pretty neat, huh?
Step-by-Step Instructions: Bringing Back the Shine
Alright, let’s get down to business! Here’s how to use the baking soda method to clean your sterling silver:
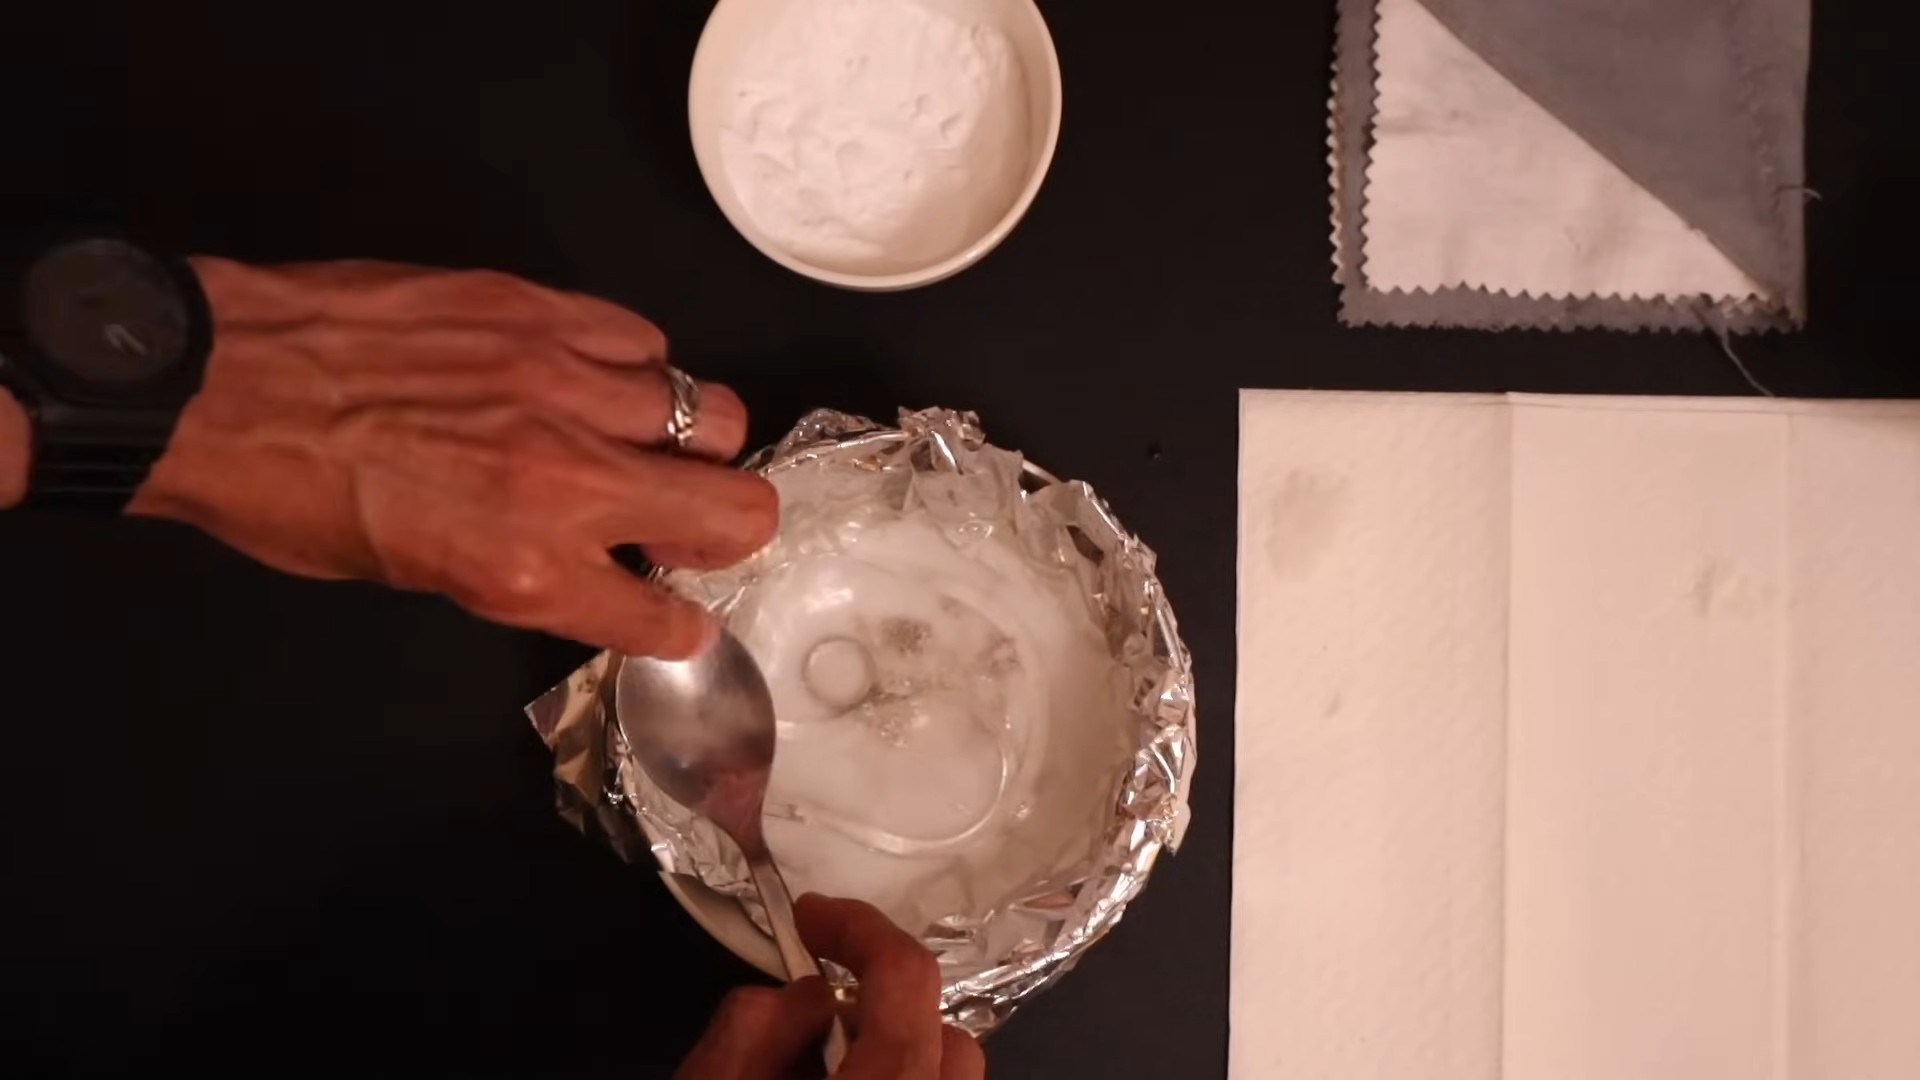
1. Prepare Your Cleaning Bath: Line your glass or plastic container with aluminum foil, shiny side up. Make sure the foil covers the entire bottom and sides of the container. This is where the magic happens!
2. Add Baking Soda: Pour about 1-2 tablespoons of baking soda into the container. The amount you need will depend on the size of your container and the amount of silver you’re cleaning. A good rule of thumb is to use enough to create a noticeable concentration in the water.
3. Pour in the Boiling Water: Carefully pour boiling water into the container. Be cautious, as the water will be very hot! Fill the container enough to completely submerge your silver pieces.
4. Observe the Fizzing: As soon as the boiling water hits the baking soda and aluminum foil, you’ll notice some fizzing. This is the electrolytic reaction at work!
5. Submerge Your Silver: Gently place your tarnished silver items into the container, making sure they are touching the aluminum foil. This contact is essential for the reaction to occur. If you have a lot of items, you might need to do this in batches to ensure good contact.
6. Wait and Watch: Now comes the waiting game. The amount of time it takes to remove the tarnish will vary depending on how tarnished your silver is. Start by checking after a few minutes. You should see the tarnish starting to disappear. For heavily tarnished items, you might need to leave them in for 10-15 minutes, or even longer. I usually check every few minutes to monitor the progress.
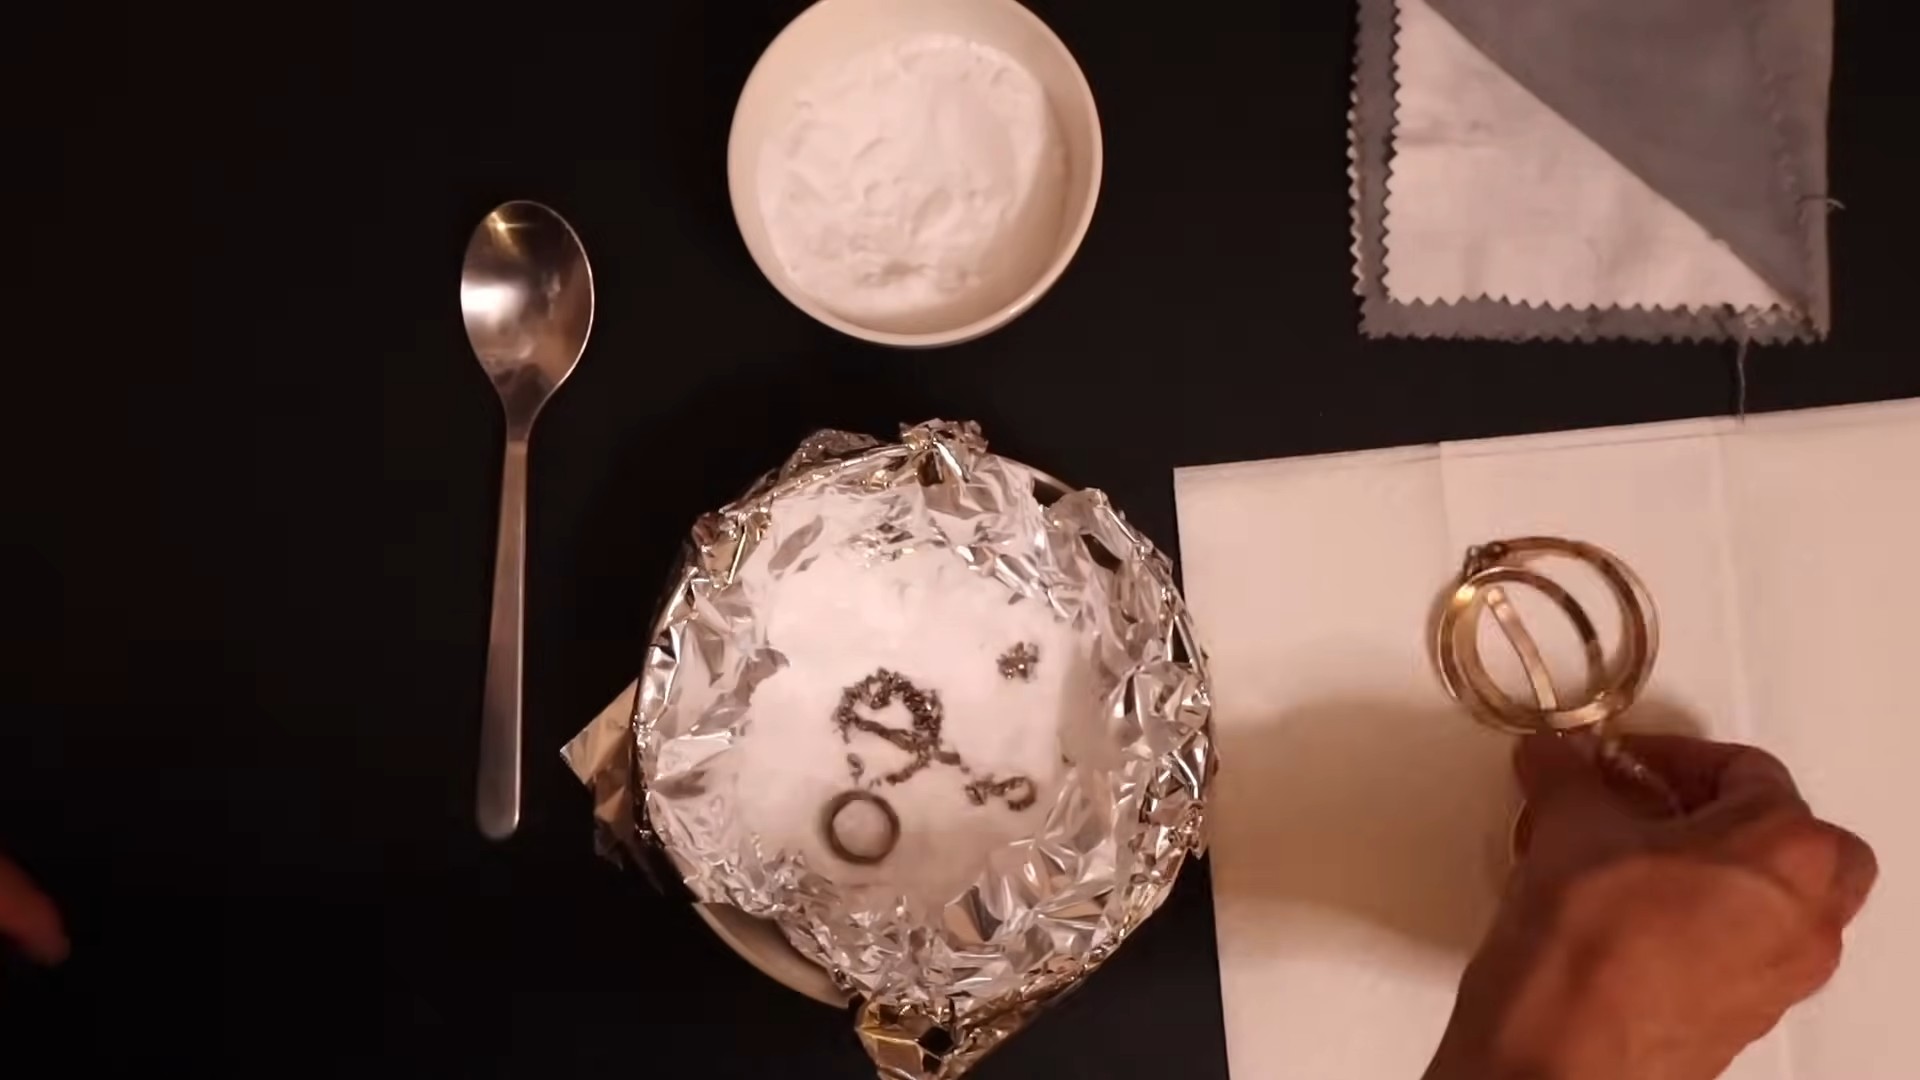
7. Remove and Rinse: Once the tarnish is gone (or significantly reduced), carefully remove the silver items from the container using tongs or a fork. Be careful, as they will be hot! Rinse them thoroughly under cool running water to remove any baking soda residue.
8. Dry and Polish: Use a soft, clean cloth to dry your silver pieces. As you dry them, you’ll notice the shine returning! For an extra touch of sparkle, you can use a silver polishing cloth to buff them to a brilliant finish.
Dealing with Stubborn Tarnish
Sometimes, the tarnish is particularly stubborn and doesn’t completely disappear with the first treatment. Don’t worry! Here are a few tips for tackling those tough spots:
* Repeat the Process: If the tarnish is only partially removed, simply repeat the process with fresh baking soda, aluminum foil, and boiling water.
* Increase the Baking Soda Concentration: For heavily tarnished items, try using a higher concentration of baking soda in the water.
* Direct Contact: Make sure the tarnished areas are in direct contact with the aluminum foil. You might need to reposition the items in the container to ensure good contact.
* Gentle Scrubbing: For very stubborn tarnish, you can try gently scrubbing the affected areas with a soft toothbrush and a paste made from baking soda and water *after* the initial soak. Be very gentle to avoid scratching the silver.
Cleaning Silver with Intricate Details
If you’re cleaning silver with intricate details or hard-to-reach areas, here’s a little trick:
* Use a Soft Brush: After soaking the silver in the baking soda solution, use a soft-bristled brush (like an old toothbrush) to gently scrub the crevices and details. This will help to remove any tarnish that’s trapped in those areas.
Pre-Cleaning Heavily Soiled Silver
If your silver is not only tarnished but also heavily soiled with dirt or grease, it’s a good idea to pre-clean it before using the baking soda method.
1. Wash with Dish Soap: Wash the silver items with warm water and a mild dish soap. Use a soft sponge or cloth to gently remove any dirt or grease.
2. Rinse Thoroughly: Rinse the silver thoroughly under cool running water to remove all traces of soap.
3. Dry Partially: You don’t need to completely dry the silver before using the baking soda method. Just remove any excess water.
Important Considerations and Precautions
While the baking soda method is generally safe for sterling silver, there are a few things to keep in mind:
* Not for All Metals: This method is best suited for sterling silver. Avoid using it on plated silver, as it can damage the plating. Also, be cautious when cleaning items with gemstones or other delicate materials.
* Avoid Abrasive Cleaners: Never use abrasive cleaners or scouring pads on sterling silver, as they can scratch the surface.
* Test in an Inconspicuous Area: If you’re unsure about using this method on a particular item, test it in a small, inconspicuous area first.
* Handle Hot Water with Care: Always use caution when handling boiling water to avoid burns.
* Ventilation: While the fumes from this process are generally harmless, it’s always a good idea to work in a well-ventilated area.
Preventing Tarnish in the Future
Once you’ve restored the shine to your silver, you’ll want to keep it looking its best. Here are a few tips for preventing tarnish:
* Store Properly: Store your silver in airtight containers or tarnish-resistant bags. You can also add a piece of chalk or activated charcoal to the container to absorb moisture and sulfur compounds.
* Avoid Contact with Sulfur: Keep your silver away from sulfur-containing materials, such as rubber bands, wool, and certain types of paper.
* Regular Cleaning: Wipe your silver with a soft cloth after each use to remove any oils or fingerprints.
* Use Silver Polish: Periodically polish your silver with a good quality silver polish to help prevent tarnish from forming.
Troubleshooting
* Why isn’t the tarnish coming off? Make sure the silver is in direct contact with the aluminum foil. Also, ensure the water is hot enough and that you’re using enough baking soda.
* My silver has a white residue after cleaning. This is likely baking soda residue. Simply rinse the silver thoroughly under cool running water and dry it with a soft cloth.
* Can I use this method on silver-plated items? It’s generally not recommended, as it can damage the plating.
Final Thoughts
I hope this guide has been helpful! The baking soda method is a fantastic way to clean your sterling silver without harsh chemicals or expensive cleaners. It’s a simple, effective, and environmentally friendly option that will keep your silver looking its best for years to come. Happy cleaning!
Conclusion
So, there you have it! Forget those harsh chemicals and expensive silver polishes. This simple, yet incredibly effective, baking soda method is a game-changer for anyone looking to restore the luster to their sterling silver. We’ve shown you how to shine sterling silver using ingredients you likely already have in your pantry. It’s quick, it’s easy, and it’s surprisingly satisfying to watch the tarnish disappear before your eyes.
But why is this DIY trick a must-try? Beyond the cost savings and avoidance of harsh chemicals, it’s about the gentle care you’re giving your precious silver pieces. This method is less abrasive than many commercial polishes, meaning you’re less likely to scratch or damage delicate items. Plus, it’s a fantastic way to involve kids in household chores – under supervision, of course! They’ll be amazed by the science in action.
Looking to personalize the process? Consider these variations:
* **For Heavily Tarnished Items:** If your silver is severely tarnished, you might need to repeat the process a few times or let the silver soak in the baking soda solution for a longer period, up to an hour. Keep a close eye on it, though, and check for any adverse reactions.
* **Adding a Touch of Vinegar:** For an extra boost, you can add a tablespoon of white vinegar to the baking soda and water mixture. The vinegar’s acidity helps to further break down the tarnish. However, use this with caution, especially on delicate or antique pieces. Always test a small, inconspicuous area first.
* **Essential Oil Infusion:** While not directly related to cleaning, you can add a drop or two of your favorite essential oil (like lemon or lavender) to the water after cleaning to leave a subtle, pleasant scent on your silver.
We’re confident that this baking soda method will become your go-to solution for keeping your sterling silver sparkling. It’s a simple, effective, and eco-friendly way to maintain the beauty of your treasured possessions.
Now, it’s your turn! We encourage you to try this DIY trick and see the amazing results for yourself. Don’t be afraid to experiment with the variations we’ve suggested, but always prioritize the safety of your silver.
Most importantly, we want to hear about your experience! Share your before-and-after photos, tips, and any modifications you made in the comments below. Let’s build a community of silver-shining enthusiasts! Your insights could help others discover the magic of baking soda for cleaning sterling silver. We can’t wait to see your sparkling results!
Frequently Asked Questions (FAQ)
Q: What exactly causes sterling silver to tarnish?
A: Tarnish is a chemical reaction that occurs when silver is exposed to sulfur-containing compounds in the air. These compounds, often found in pollutants, food, and even some fabrics, react with the silver to form silver sulfide, a black or brownish coating that dulls the metal’s shine. The rate of tarnishing depends on factors like humidity, air quality, and the silver’s composition.
Q: Is this baking soda method safe for all types of sterling silver?
A: Generally, yes, this method is safe for most sterling silver items. However, it’s always a good idea to exercise caution, especially with antique or delicate pieces. Items with gemstones, pearls, or other embellishments should be treated with extra care, as the baking soda solution could potentially damage these materials. It’s recommended to test the method on a small, inconspicuous area first to ensure there are no adverse reactions. If you’re unsure, consult a professional jeweler.
Q: How often should I clean my sterling silver using this method?
A: The frequency of cleaning depends on how often you use and expose your silver to tarnishing agents. For items that are frequently used and exposed to air, you might need to clean them every few weeks. For items that are stored away, you might only need to clean them every few months. Regular cleaning helps prevent heavy tarnish buildup, making the cleaning process easier.
Q: Can I use aluminum foil instead of a baking dish?
A: Yes, you can absolutely use aluminum foil instead of a baking dish. In fact, using aluminum foil is a crucial part of the process. The aluminum foil acts as a reducing agent, attracting the sulfur from the silver sulfide and reversing the tarnishing process. Make sure the silver is in direct contact with the aluminum foil for the method to work effectively.
Q: What if I don’t have baking soda? Are there any alternatives?
A: While baking soda is the most effective and readily available option, you could try using washing soda (sodium carbonate) as an alternative. However, washing soda is more alkaline than baking soda, so use it with extra caution and dilute it more thoroughly. We strongly recommend sticking with baking soda for the best and safest results when you want to shine sterling silver.
Q: The tarnish isn’t coming off completely. What should I do?
A: If the tarnish is stubborn, try these tips:
* **Increase the Baking Soda Concentration:** Add a bit more baking soda to the water.
* **Increase the Soaking Time:** Let the silver soak in the solution for a longer period, up to an hour, checking it periodically.
* **Use Hotter Water:** Hotter water can help accelerate the chemical reaction. Be careful not to burn yourself.
* **Repeat the Process:** Sometimes, a second round of cleaning is necessary for heavily tarnished items.
* **Gentle Scrubbing:** After soaking, gently scrub the silver with a soft cloth or a very soft toothbrush to remove any remaining tarnish. Be careful not to scratch the silver.
Q: How can I prevent my sterling silver from tarnishing in the future?
A: Prevention is key! Here are some tips to minimize tarnishing:
* **Store Silver Properly:** Store your silver in airtight containers or tarnish-resistant bags. You can also add anti-tarnish strips or cloths to the storage container.
* **Avoid Exposure to Sulfur:** Keep your silver away from sulfur-containing substances like rubber bands, wool, and certain cleaning products.
* **Regular Use:** Surprisingly, regular use can help prevent tarnishing. The friction from handling the silver can help remove early signs of tarnish.
* **Clean After Use:** Wipe your silver with a soft cloth after each use to remove any oils or residues that could contribute to tarnishing.
* **Avoid Humid Environments:** Store your silver in a cool, dry place. Humidity accelerates the tarnishing process.
Q: Can this method be used on silver-plated items?
A: While this method can sometimes work on silver-plated items, it’s crucial to proceed with extreme caution. The silver plating is often very thin, and the baking soda method can potentially remove or damage the plating if not done carefully. Test a small, inconspicuous area first, and use a very diluted baking soda solution. If you’re unsure, it’s best to consult a professional jeweler for advice on cleaning silver-plated items.
Q: Is it normal for the aluminum foil to turn black during the cleaning process?
A: Yes, it’s perfectly normal for the aluminum foil to turn black. This is a sign that the process is working! The black residue is silver sulfide, which has been transferred from the silver to the aluminum foil. The more tarnished the silver, the blacker the aluminum foil will become.

Leave a Comment